
Security Best Practices for Vultr Instances
Introduction
Security is crucial when protecting applications and data stored on your Vultr Cloud instance from potential security attacks. By setting up multiple lines of defense, your production instances are safe from the most common security threats that rely on IP access to launch planned attacks. It is important to ensure that only authorized users and permitted IP Addresses can access specific server resources to safeguard your data is essential.
This article explains the best security practices for Vultr Instances that safeguard your server access and login interface. You are to explore the difference between SSH keys and Password authentication mechanisms. Rotate the mechanisms regularly, then configure advanced security layers to safeguard your authentication layer using firewall policies and automated Vultr DDoS Protection.
SSH Keys vs Passwords
SSH supports SSH Keys and Passwords as login methods to access your Vultr Instance. However, both methods offer different capabilities when accessing your server. An SSH key matches your local machine's fingerprint and cryptographic information to launch a new server SSH session without needing a password. A password is an autogenerated or preset value granting you access to the server without checking your host information.
When enabled, password authentication requires you to enter the correct user account and respective password to access the server SSH console successfully. Using password authentication may present a security threat if the password leaks to unauthorized users. In any case, SSH keys are a more secure way to protect SSH server access, as only the host computer with a permitted SSH key gains authorized access to the server SSH console.
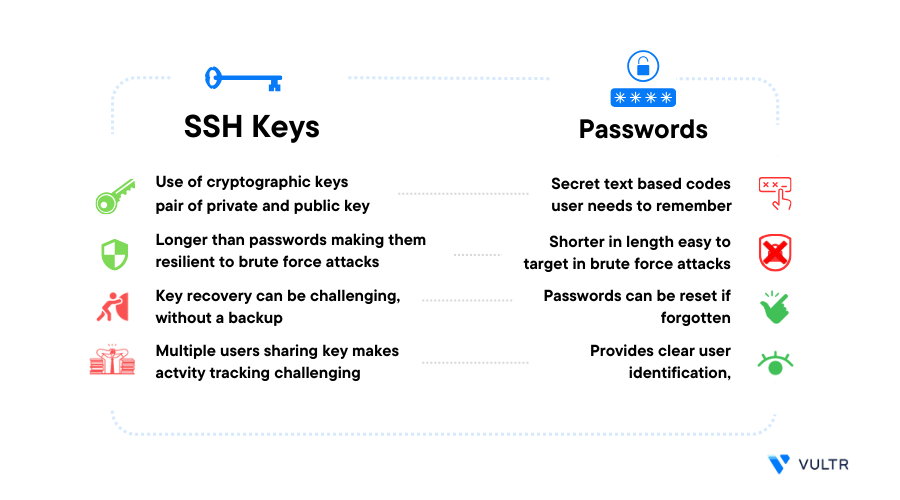
By comparison, you can create SSH keys upon deploying your Vultr Server Instance to access your server SSH session. In the case of passwords, change your root user autogenerated password upon accessing your server SSH console. SSH Keys and Passwords offer secure, centralized access to your server over SSH. Still, cryptographic SSH keys guarantee extra security with added tools for improved management of every system user.
To enable SSH keys on your server, generate the SSH keys on your local machine, then visit the how to add and delete SSH keys guide.
Enforce Password Rotation
System users often apply the same password across multiple servers and internet accounts. This practice becomes a security threat as an attacker may get access to the password and use it across all valid platforms, including your production server, to gain access.
To enforce password rotations, you can set a specific timeframe when every system user must change their password to the required strength to continue accessing the server.
Using a text editor like
nano, edit the/etc/login.defsfile$ sudo nano /etc/login.defsFind the following section
 PASS_MAX_DAYS   99999
 PASS_MIN_DAYS   0
 PASS_WARN_AGE   7
Change the maximum password validity
PASS_MAX_DAYSvalue from99999to60PASS_MAX_DAYS 60Change the
PASS_WARN_AGEvalue from7to14daysPASS_WARN_AGE 14Save and close the file.
The above value
14sets the number of days a user receives password change warnings before expiry. This grants users enough time to generate new passwords and set them using the following command.$ passwdOutput:
 Changing password for example_user.
 Current password:
To enforce the minimum password strength requirements for new passwords, edit the
/etc/security/pwquality.conffile$ nano etc/security/pwquality.confAdd the following directives at the end of the file
 minlen = 8
 minclass = 4
 maxrepeat = 0
The above configuration sets the following values:
minlen: Sets the minimum required password length to 8 charactersminclass: Enables4different character classes for a valid password. These may include lowercase,uppercase, symbols and digits to create a strong passwordmaxrepeat: The value0enforces no repeat of any characters to create hard to guess strong passwords
Configure Firewall Rules
Protect your server against common attacks by configuring firewall rules using ufw, firewalld, iptables and so on. Firewall rules help you to restrict the traffic and only allow connections to the ports that you wish to expose. You may also restrict incoming connections to certain ports from a specific source IP for added security.
- Configure firewall rules using Uncomplicated Firewall (UFW)
- Configure firewall rules using
iptables - Configure firewall rules using
firewalld
You may also set up Vultr Firewall to enable packet filtering before the traffic reaches the protected server for an extra layer of security.
Enable Vultr DDoS Protection
Vultr's native DDoS mitigation system adds an extra layer of protection to keep your hosting infrastructure online and operating even when they are the target of attacks. You can secure your website from DDoS attacks in minutes with our automatic DDoS mitigation service, which is available in all our worldwide locations. Our system monitors network traffic and routes malicious activity to our attack mitigation farm after a DDoS event is detected, generally within 60 seconds.
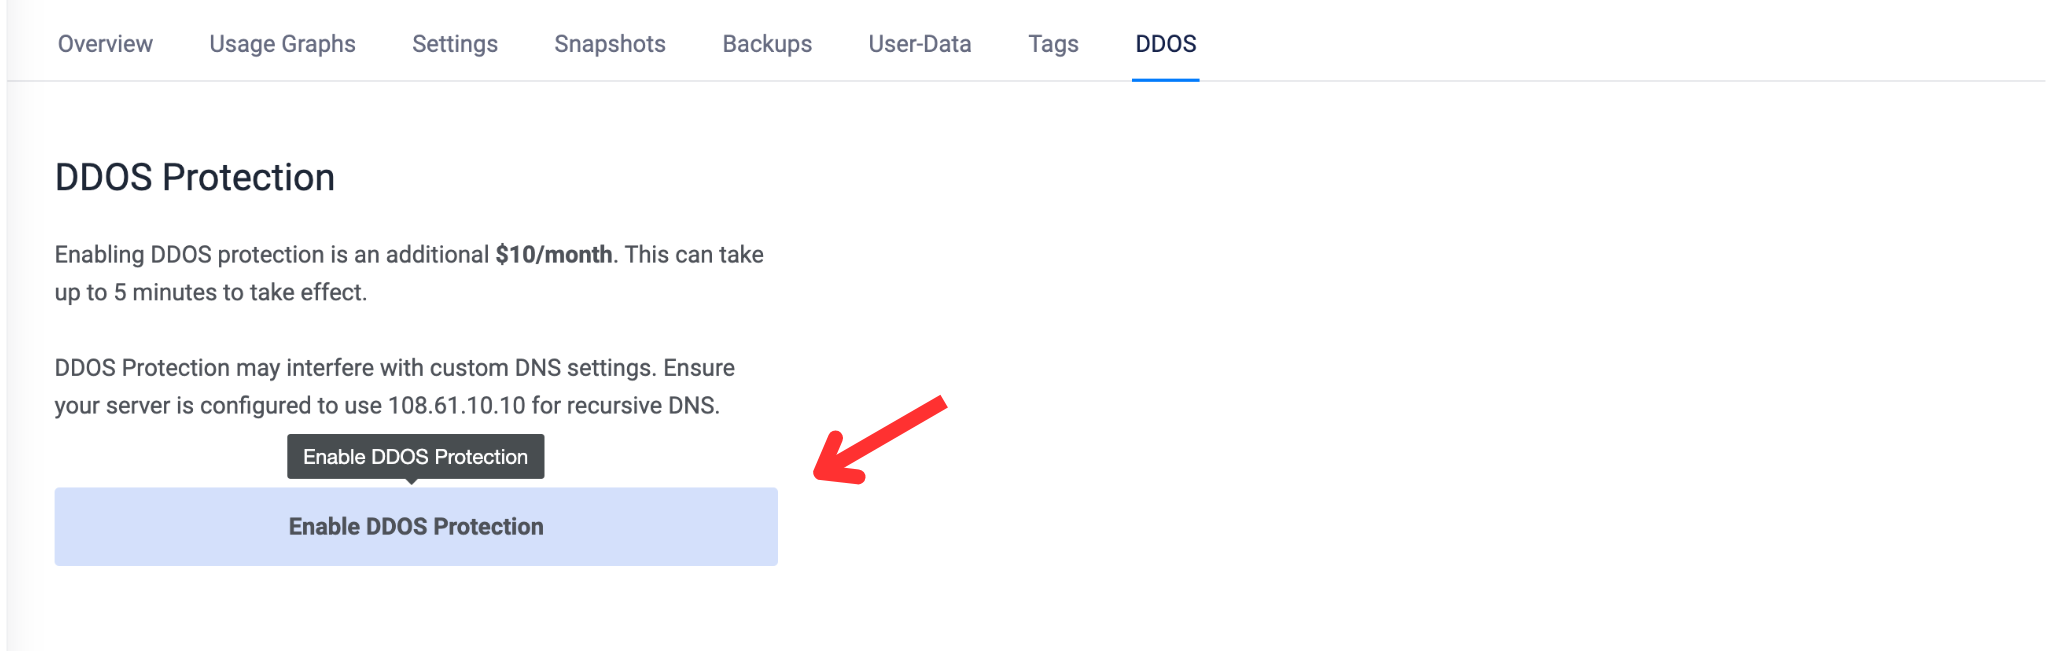
Log in to the Vultr Vultr Console
Navigate to the target Instance page, select DDOS and click the Enable DDOS Protection button
Configure Fail2Ban to Protect SSH
Fail2ban is an open-source security tool. It scans log files for suspicious activity, like repeated login failures, and dynamically blocks IP addresses to prevent unauthorized access. It helps protect against automated attacks by temporarily banning malicious IPs. It works out-of-the-box with any firewall installed on your instance such as ufw, firewalld and so on.
This section demonstrates the steps to install Fail2ban and configure it to protect the server against SSH bruteforcing.
Install Fail2ban:
On Ubuntu/Debian-based systems
$ sudo apt install fail2banOn RHEL-based operating systems
$ sudo dnf install fail2banEnable the Fail2ban service to start at boot time
$ sudo systemctl enable fail2banStart Fail2ban
$ sudo systemctl start fail2banVerify the Fail2ban status
$ sudo fail2ban-client statusOutput:
 Status
 |- Number of jail:      1
 `- Jail list:   sshd
By default, Fail2ban starts with 1 jail rule for SSH access. A Fail2ban jail is a combination of filters and actions that determine the action taken on user policies.
View the default Fail2ban configuration
$ sudo cat /etc/fail2ban/jail.confOutput:
 [sshd]
 port    = ssh
 logpath = %(sshd_log)s
 backend = %(sshd_backend)s

 ...
The main configuration file consists of multiple preconfigured filters for various different services including SSH. To enable individual service rules, create new configuration files in the
/etc/fail2ban/jail.ddirectory.Delete the default configurations in the
jail.ddirectory$ sudo rm /etc/fail2ban/jail.d/*Create a new SSH jail configuration
$ sudo nano /etc/fail2ban/jail.d/sshd.confAdd the following contents to the file
 [sshd]
 enabled = true
 port = 22
 findtime = 5m
 bantime = 2h
 maxretry = 3
 ignoreip = 127.0.0.1/8 ::1
Save and close the file
The above configuration creates a new SSH jail configuration with the following values:
port: Listens for SSH connections on the default port22. When using a custom SSH port, apply it to correctly filter user traffic.findtime: Crawls the SSH logs every 5 minutes to search for new entriesbantime: Bans users that exceed themaxentryvaluemaxretry: Sets the maximum number of log in attempts a user must make every 2 hoursignoreip: Ignores the listed IP Addresses.127.0.0.1only whitelists the local address. This means, all public IP Addresses are scanned and banned incase of violations. Commonly, include your public IP Address to avoid being locked out of the system
Restart the Fail2ban service to apply changes
$ sudo systemctl reload fail2banVerify the Fail2ban SSH configuration status
$ sudo fail2ban-client status sshdOutput:
 Status for the jail: sshd
 |- Filter
 |  |- Currently failed: 0
 |  |- Total failed:     0
 |  `- File list:        /var/log/auth.log
 `- Actions
 |- Currently banned: 0
 |- Total banned:     0
 `- Banned IP list:
To configure additional Fail2ban rules and secure your server, Configure Fail2ban to Reduce Brute-force Attacks
Conclusion
In this article, you indetified the security differences when using SSH keys and passwords on your Vultr Cloud Server. You applied password rotations at regular intervals to enforce tight user authentication policies. In addition, you configured Fail2Ban and firewall policies to block any SSH brute force attacks from unknown IP Addresses.
Depending on your server environment, it's safe to implement Vultr DDoS protection to block any continuous requests such as ping floods that aim at exhausting your server resources. For more informaton, visit the Vultr DDOS Protection documentation.
Next Steps
To further secure your Vultr Cloud Server, please visit the following resources:
- How to Harden Server SSH Access Using Advanced OpenSSH Features
- Best Practices for SSH on a Production Cloud Server
- How to Use Two-Factor Authentication with Sudo and SSH on Linux with Google Authenticator
- Use Cloudflare and Vultr Firewall to Protect a Vultr Cloud Server
- Use SSHFP Records to Verify SSH Host Keys