Write your Kubernetes Infrastructure in Go with cdk8s

Introduction
Cloud Development Kit for Kubernetes (cdk8s) is an open-source development framework for defining Kubernetes applications using familiar programming languages, including Go, Typescript, Python, and Java. cdk8s applications synthesize into standard Kubernetes manifests, which you can apply to any Kubernetes cluster. cdk8s lets you import objects from any Kubernetes API version and also custom resource definitions for use.
cdk8s allows you to define abstract components called Constructs that compose Kubernetes resources or other Constructs into higher-level abstractions.
This guide covers how to write Kubernetes Infrastructure in Go using cdk8s.
More about Kubernetes
Kubernetes (K8s) is an open-source orchestration system for containerized applications across multiple hosts, with support for deployment automation, scaling, and managing these applications. Kubernetes also provides zero downtime with automated rolling updates and rollbacks. Additional features include:
- Self-healing - Kubernetes performs restarts on failed containers, with container replacement if configured. It also terminates containers that fail to respond to user-defined health checks and doesn't advertise them to clients until they are ready to serve.
- Service discovery - Kubernetes can expose containers by IP address or DNS name.
- Load balancing - Kubernetes distributes network traffic, so deployments remain stable.
- Configuration management - Kubernetes allows storing and managing sensitive information such as passwords, SSH keys, and OAuth tokens. This lets users deploy and update secrets and application configuration without rebuilding container images or exposing secrets within stack configuration.
Prerequisites
You should have:
- Working knowledge of Go and Kubernetes
- An installed Go toolchain, version 1.18 or greater
- Kubectl installed, version 1.25 or greater.
- Docker installed
- Access to a Kubernetes cluster, like Vultr Kubernetes Engine (VKE).
Setting Up
cdk8s has three main components:
- cdk8s - the core framework used to create and structure apps with one or multiple stacks. Stacks are logical units of infrastructure containing multiple resources.
- cdk8s-cli - the command-line interface that interacts with the core framework to initialize the project's structure, generate final manifests, and inspect differences between deployments.
- cdk8s-plus - high-level constructs library for Kubernetes core. It includes essential components for creating manifests for specific objects such as a Pod, Service, and so on. This library lets you create API abstractions using strongly typed data types and interact with methods and properties.
To get started, install the cdk8s-cli using one of the following methods:
NPM
$ npm i -g cdk8s-cliYarn
$ yarn global add cdk8s-cliHomebrew
$ brew install cdk8sAfter installing cdk8s-cli:
Create the project directory within your
GOPATH.$ mkdir kuber-infraSwitch to the project directory.
$ cd kuber-infraInitialize a cdk8s application within the project directory.
$ cdk8s init go-appThis will initialize a project from the go-app template.
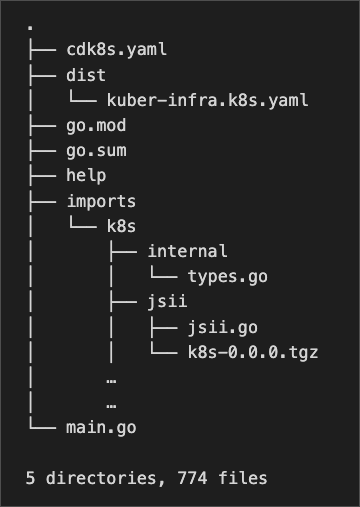
After running the above commands, the project directory should look like this:
.
├── cdk8s.yaml
├── dist
│   └── kuber-infra.k8s.yaml
├── go.mod
├── go.sum
├── help
├── imports
│   └── k8s
│       ├── internal
│       │   └── types.go
│       ├── jsii
│       │   ├── jsii.go
│       │   └── k8s-0.0.0.tgz
│       …
│       …
└── main.go

5 directories, 774 files
This guide uses minikube as the local Kubernetes cluster engine. For installation instructions, check the official page.
Building a Custom WebService Construct
Constructs serve as the elementary building blocks of cdk8s, with cdk8s programs structured as a tree of constructs. As mentioned earlier, constructs compose Kubernetes resources such as API objects or other constructs into higher-level abstractions through normal object-oriented classes. This offers several benefits, including:
- Lets you express great interactions with properties and methods.
- Test them using familiar testing techniques and tools.
- Express each abstraction's API using strongly-typed data types.
This guide implements a custom WebService construct that you can customize through an API.
To implement the WebService construct, create a webservice.go file within the project directory:
$ touch webservice.goImport Libraries
To import the required libraries, add the following lines to the webservice.go file:
package main

import (
 "example.com/kuber-infra/imports/k8s"
 "github.com/aws/constructs-go/constructs/v10"
 "github.com/aws/jsii-runtime-go"
)
The first import statement imports the k8s package from the imports directory within the project directory. This contains the abstraction functions for defining or creating Services or Deployments. The second import statement brings the constructs package into scope, which contains a function for creating new constructs to use within the program. The final import brings the jsii-runtime-go package into scope for using specially defined data types.
Defining the WebService Struct
To build a WebService construct that can be easily customized, define a struct to hold the properties of the construct to create:
type WebServiceProps struct {
 Image *string
 Replicas *float64
 Port *float64
 ContainerPort *float64
}
This struct will hold the name of the docker image to deploy, the number of replicas of the image, the port, and the container port numbers.
Building the Construct Creation Function
To build the construct creation function, add the following line:
func NewWebService(scope constructs.Construct, id *string, props *WebServiceProps) constructs.Construct {This function creates a new WebService construct and takes three arguments. The first argument is a construct representing the scope of the construct to create. As mentioned earlier, cdk8s structures programs like a tree of constructs with a root construct. All constructs except the root construct are within the scope of another construct when created; this forms a hierarchical tree of constructs with a single root.
The second argument is a string representing the id of the new construct, and the third argument is a WebServiceProps struct representing the specifics of the construct to create.
Create a new construct:
construct := constructs.NewConstruct(scope, id)The NewConstruct function takes two arguments, the scope of the construct and a string identifying the construct. This returns a new construct node.
Next, fetch the fields from the passed WebServiceProps struct:
 replicas := props.Replicas
 if replicas == nil {
   replicas = jsii.Number(1)
 }

 port := props.Port
 if port == nil {
   port = jsii.Number(80)
 }

 containerPort := props.ContainerPort
 if containerPort == nil {
   containerPort = jsii.Number(8080)
 }
If the fields are nil, assign other numbers to them - using the jsii.Number function.
 label := map[string]*string {
   "app": constructs.Node_Of(construct).Id(),
 }
The above lines create a map representing a label of the created construct.
Next, create a new Kubernetes Service API object:
 k8s.NewKubeService(construct, jsii.String("service"), &k8s.KubeServiceProps {
   Spec: &k8s.ServiceSpec{
     Type: jsii.String("LoadBalancer"),
     Ports: &[]*k8s.ServicePort{{
       Port: port,
       TargetPort: k8s.IntOrString_FromNumber(containerPort),
     }},
     Selector: &label,
   },
 })
A service is an abstract way to expose an application running on a set of Pods as a network service. The above lines of code set up a Load Balancer service.
The NewKubeService function takes three arguments, the construct scope, a string id representing the name of the KubeService, and a KubeServiceProps. KubeServiceProps is a struct that takes two optional fields - Metadata of type ObjectMeta and Spec of type ServiceSpec. For this use case, only the Spec is vital. Setting the Type, Ports, and Selector defines the service specifications. In this case, the code sets up a Load Balancer service.
The NewKubeService function returns a KubeService object.
Create the deployment:
 k8s.NewKubeDeployment(construct, jsii.String("deployment"), &k8s.KubeDeploymentProps{
   Spec: &k8s.DeploymentSpec{
     Replicas: replicas,
     Selector: &k8s.LabelSelector{ MatchLabels: &label },
     Template: &k8s.PodTemplateSpec{
       Metadata: &k8s.ObjectMeta{ Labels: &label },
       Spec: &k8s.PodSpec {
         Containers: &[]*k8s.Container{{
           Name: jsii.String("web"),
           Image: props.Image,
           Ports: &[]*k8s.ContainerPort{{ ContainerPort: containerPort }},
         }},
       },
     },
   },
 })
The above lines of code set up the Kubernetes deployment by declaring a new state of the Pod, with the image to pull and deploy.
Return the new construct:
 return construct
}
Full Code
The final webservice.go code:
package main

import (
 "example.com/kuber-infra/imports/k8s"
 "github.com/aws/constructs-go/constructs/v10"
 "github.com/aws/jsii-runtime-go"
)

type WebServiceProps struct {
 Image *string
 Replicas *float64
 Port *float64
 ContainerPort *float64
}

func NewWebService(scope constructs.Construct, id *string, props *WebServiceProps) constructs.Construct {
 construct := constructs.NewConstruct(scope, id)

 replicas := props.Replicas
 if replicas == nil {
   replicas = jsii.Number(1)
 }

 port := props.Port
 if port == nil {
   port = jsii.Number(80)
 }

 containerPort := props.ContainerPort
 if containerPort == nil {
   containerPort = jsii.Number(8080)
 }

 label := map[string]*string {
   "app": constructs.Node_Of(construct).Id(),
 }

 k8s.NewKubeService(construct, jsii.String("service"), &k8s.KubeServiceProps {
   Spec: &k8s.ServiceSpec{
     Type: jsii.String("LoadBalancer"),
     Ports: &[]*k8s.ServicePort{{
       Port: port,
       TargetPort: k8s.IntOrString_FromNumber(containerPort),
     }},
     Selector: &label,
   },
 })

 k8s.NewKubeDeployment(construct, jsii.String("deployment"), &k8s.KubeDeploymentProps{
   Spec: &k8s.DeploymentSpec{
     Replicas: replicas,
     Selector: &k8s.LabelSelector{ MatchLabels: &label },
     Template: &k8s.PodTemplateSpec{
       Metadata: &k8s.ObjectMeta{ Labels: &label },
       Spec: &k8s.PodSpec {
         Containers: &[]*k8s.Container{{
           Name: jsii.String("web"),
           Image: props.Image,
           Ports: &[]*k8s.ContainerPort{{ ContainerPort: containerPort }},
         }},
       },
     },
   },
 })

 return construct
}
Examining the main.go File
The main.go file was automatically generated by running the cdk8s init go-app command earlier. It represents the entry point to the entire application:
package main

import (
       "github.com/aws/constructs-go/constructs/v10"
       "github.com/aws/jsii-runtime-go"
       "github.com/cdk8s-team/cdk8s-core-go/cdk8s/v2"
)

type MyChartProps struct {
       cdk8s.ChartProps
}

func NewMyChart(scope constructs.Construct, id string, props *MyChartProps) cdk8s.Chart {
       var cprops cdk8s.ChartProps
       if props != nil {
               cprops = props.ChartProps
       }
       chart := cdk8s.NewChart(scope, jsii.String(id), &cprops)

       // define resources here

       return chart
}

func main() {
       app := cdk8s.NewApp(nil)
       NewMyChart(app, "kuber-infra", nil)
       app.Synth()
}
Within the main function, NewApp creates an App. App is also a construct and serves as the root of the construct tree that makes up the program.
The next entry in this construct tree is a cdk8s.Chart. A cdk8s App can contain multiple Chart, and you can convert each chart into a separate Kubernetes manifest file. Charts can define a Deployment, Service, Custom Resource Definition (CRD), or a custom construct. This forms nodes and child nodes within the construct tree.
The NewMyChart function takes three arguments, a construct scope to attach to, the id of the chart to create, and a MyChartProps struct containing the properties of the created chart should have. Then, the created chart returns at the end of the function.
Note: A chart is also a construct, and each construct must attach to another construct except for the root construct (in this case, the created App).
You define components within charts; such components include a Pod, Job, Ingress, Service, and so on. To make use of the custom WebService construct API built earlier, add the following lines within the NewMyChart function:
…
…
       // define resources here

       NewWebService(chart, jsii.String("hello"), &WebServiceProps {
               Image: jsii.String("paulbouwer/hello-kubernetes:1.10.1"),
               Replicas: jsii.Number(2),
       })
Here, the base chart created within the NewMyChart function passes as the scope of the new construct to create, with an id string - hello", and the properties of the new WebService Service. Then pull the docker image paulbouwer/hello-kubernetes:1.10.1 with the number of replicas set to 2.
This custom construct attaches to the chart, forming a child node of the parent Chart node.
Final Code
The main.go file:
package main

import (
       "github.com/aws/constructs-go/constructs/v10"
       "github.com/aws/jsii-runtime-go"
       "github.com/cdk8s-team/cdk8s-core-go/cdk8s/v2"
)

type MyChartProps struct {
       cdk8s.ChartProps
}

func NewMyChart(scope constructs.Construct, id string, props *MyChartProps) cdk8s.Chart {
       var cprops cdk8s.ChartProps
       if props != nil {
               cprops = props.ChartProps
       }
       chart := cdk8s.NewChart(scope, jsii.String(id), &cprops)

       // define resources here
       NewWebService(chart, jsii.String("hello"), &WebServiceProps {
               Image: jsii.String("paulbouwer/hello-kubernetes:1.10.1"),
               Replicas: jsii.Number(2),
       })

       return chart
}

func main() {
       app := cdk8s.NewApp(nil)
       NewMyChart(app, "kuber-infra", nil)
       app.Synth()
}
Deploying the Code
To prepare the code for deployment, enter the following command within the project directory:
$ cdk8s synth

Output:

Synthesizing application
- dist/kuber-infra.k8s.yaml
This generates a synthesized Kubernetes YAML file, defining the resources in the program. The generated manifest file looks like this:
apiVersion: v1
kind: Service
metadata:
 name: kuber-infra-hello-service-c85636b9
spec:
 ports:
   - port: 80
     targetPort: 8080
 selector:
   app: hello
 type: LoadBalancer
---
apiVersion: apps/v1
kind: Deployment
metadata:
 name: kuber-infra-hello-deployment-c8b1aa77
spec:
 replicas: 2
 selector:
   matchLabels:
     app: hello
 template:
   metadata:
     labels:
       app: hello
   spec:
     containers:
       - image: paulbouwer/hello-kubernetes:1.10.1
         name: web
         ports:
           - containerPort: 8080
Start the Cluster
This guide uses minikube as the Kubernetes cluster to deploy to. After installing minikube, enter the following command:
minikube start

Output:

 minikube v1.27.1 on Ubuntu 22.10 (amd64)
✨  Automatically selected the docker driver. Other choices: none, ssh
 If you are running minikube within a VM, consider using --driver=none:
   https://minikube.sigs.k8s.io/docs/reference/drivers/none/
…
…
 Enabled addons: default-storageclass, storage-provisioner
 Done! kubectl is now configured to use "minikube" cluster and "default" namespace by default
This starts a Kubernetes cluster running locally.
Applying the Manifest
To apply the configuration according to the manifest file generated by cdk8s synth:
$ kubectl apply -f dist/kuber-infra.k8s.yaml

Output:

service/kuber-infra-hello-service-c85636b9 created
deployment.apps/kuber-infra-hello-deployment-c8b1aa77 created
This creates the hello service and deployment specified within main.go in the cluster.
Querying Services
By applying the manifest, the Kubernetes cluster state changes with the infrastructure deployed. To check for running Pods and Services:
$ kubectl get pod

Output:

NAME                                                    READY   STATUS    RESTARTS   AGE
kuber-infra-hello-deployment-c8b1aa77-748db4b78-5mk67   1/1     Running   0          83s
kuber-infra-hello-deployment-c8b1aa77-748db4b78-8wk2m   1/1     Running   0          83s
Check for running services:
$ kubectl get svc

Output:

NAME                                 TYPE           CLUSTER-IP      EXTERNAL-IP   PORT(S)        AGE
kuber-infra-hello-service-c85636b9   LoadBalancer   10.103.77.174   <pending>     80:30678/TCP   22s
kubernetes                           ClusterIP      10.96.0.1       <none>        443/TCP        5m33s
To expose services of type LoadBalancer when using Minikube, enter the following command in another terminal:
$ minikube tunnel

Output:

Status:
       machine: minikube
       pid: 4140961
       route: 10.96.0.0/12 -> 192.168.49.2
       minikube: Running
       services: [kuber-infra-hello-service-c85636b9]
   errors:
               minikube: no errors
               router: no errors
               loadbalancer emulator: no errors
…
Check for running services again:
$kubectl get svc

Output:

NAME                                 TYPE           CLUSTER-IP      EXTERNAL-IP     PORT(S)        AGE
kuber-infra-hello-service-c85636b9   LoadBalancer   10.103.77.174   10.103.77.174   80:30678/TCP   4m59s
kubernetes                           ClusterIP      10.96.0.1       <none>          443/TCP        10m
This exposes the Load Balancer service on port 30678.
You can also check running services using Minikube:
$ minikube service list

Output:

|-------------|------------------------------------|--------------|---------------------------|
|  NAMESPACE  |                NAME                | TARGET PORT  |            URL            |
|-------------|------------------------------------|--------------|---------------------------|
| default     | kuber-infra-hello-service-c85636b9 |           80 | http://192.168.49.2:30678 |
| default     | kubernetes                         | No node port |
| kube-system | kube-dns                           | No node port |
|-------------|------------------------------------|--------------|---------------------------|
You've successfully deployed your Kubernetes infrastructure. The deployed docker container (paulbouwer/hello-kubernetes:1.10.1) exposes a server that you can also query using curl:
$ curl http://192.168.49.2:30678

Output:

<!DOCTYPE html>
<html>
<head>
   <title>Hello Kubernetes!</title>
   <link rel="stylesheet" type="text/css" href="/css/main.css">
   <link rel="stylesheet" href="https://fonts.googleapis.com/css?family=Ubuntu:300" >
</head>
<body>

 <div class="main">
   <img src="/images/kubernetes.png"/>
   <div class="content">
     <div id="message">
 Hello world!
</div>
<div id="info">
 <table>
   <tr>
     <th>namespace:</th>
     <td>-</td>
   </tr>
   <tr>
     <th>pod:</th>
     <td>kuber-infra-hello-deployment-c8b1aa77-748db4b78-5mk67</td>
   </tr>
   <tr>
     <th>node:</th>
     <td>- (Linux 5.19.0-23-generic)</td>
   </tr>
 </table>
</div>
<div id="footer">
 paulbouwer/hello-kubernetes:1.10.1 (linux/amd64)
</div>
   </div>
 </div>

</body>
</html>
This yields information about the running Pod and Node versions.
Conclusion
This guide covered how to write Kubernetes infrastructure in Go using cdk8s and how to deploy to a Kubernetes cluster. For more information, check the official website.