Build a Chat Application in Go with Vultr Managed Databases for Caching

Introduction
Redis® is an open-source, in-memory data store that supports many data structures like String, Hash, List, Set, and Sorted Set, along with other capabilities such as Pub/Sub messaging and stream processing. It also supports high availability, scalability, and reliability through a combination of asynchronous replication and Redis® Cluster. Redis® has client libraries for many programming languages. This includes Go, Java, Python, and many others.
This article will walk you through the process of building a chat application with Go client for Redis®, and in the process, you will learn:
- How to create and delete a Vultr Managed Database for Caching.
- How to securely connect to a Vultr Managed Database for Caching using
TLSand use Redis® Pub/Sub feature. - How to use
WebSocketin Go with gorilla library
Prerequisites
To follow the instructions in this article:
- Install a recent version of the Go programming language (version 1.18 or higher)
- Install wscat, a command-line
WebSocketclient.
Application Overview
The application is a simplified version of a chat service built using Redis® Pub/Sub and WebSocket. It allows users to join the chat service, send and receive messages, and exit it.
WebSocket and Redis® Pub/Sub
WebSocket is a protocol defined by RFC 6455 which allows full-duplex communication between a client and server over a single TCP connection. Either the client or server can send messages. These can be exchanged simultaneously. This is an improvement over communication patterns such as long polling that is used by HTTP based solutions and heavily used in building real-time applications.
Here is how Redis® Pub/Sub works with the Go client:
- Producers send data to a Redis® channel using
Publishmethod. - Consumers subscribe to the channel to receive messages using
Subscribemethod and receive messages via a Go channel (withChannel). - And finally, unsubscribe and close the connection.
Redis® Pub/Sub helps this service work in a scaled-out architecture, where the users connected to the chat service might be associated with any application instance via the WebSocket connection. Without Redis® Pub/Sub, only users connected to a specific instance can exchange chat messages. Redis® Pub/Sub solves this problem by providing a way to broadcast the messages to all the connected users irrespective of which application instance they are connected to.
Application Flow
- A user connects to an endpoint provided by the application. If successful, this creates a
WebSocketconnection between the client and application (server). - When the user sends a chat message, it's relayed over the
WebSocketconnection to the application. - The application publishes this message to the Redis® channel.
- Because the application is also subscribed to this channel, it receives this message and sends it to all connected users via the
WebSocketconnection established initially.
Create Vultr Managed Database for Caching
Log into your Vultr account, navigate to Add Managed Database and follow the steps below.
Choose the Redis® database engine.
You can choose from several options in the Server Type. This includes Cloud Compute, Cloud Compute High Performance - AMD or Intel, Optimized Cloud Compute - General Purpose, and Storage or Memory Optimized. You can select zero or more replica nodes as well as the cluster location. A replica node is the same server type and plan as the primary node.
After you add a label for the database cluster, click Deploy Now to create the cluster. The cluster will take a few minutes to be available, and the Status should change to Running.
The Vultr Managed Database for Caching is ready.
Initialize the Project
Create a directory and switch to it:
mkdir go-redis-chat
cd go-redis-chat
Create a new Go module:
go mod init go-redis-chatThis will create a new
go.modfile
Create a new file, main.go:
touch main.goImport Libraries
To import required Go modules, add the following to main.go file:
package main

import (
    "context"
    "fmt"
    "log"
    "net/http"
    "os"
    "os/signal"
    "strings"
    "syscall"
    "time"

    "github.com/go-redis/redis/v8"
    "github.com/gorilla/websocket"
)
Add the init Function and Global Variables
Add the code below to main.go file:
var client *redis.Client
var Users map[string]*websocket.Conn
var sub *redis.PubSub
var upgrader = websocket.Upgrader{}
var redisURL string

const chatChannel = "chats"

func init() {
    redisURL = os.Getenv("REDIS_URL")
    if redisURL == "" {
        log.Fatal("missing environment variable REDIS_URL")
    }
    Users = map[string]*websocket.Conn{}
}- The init function reads the Redis® URL from the
REDIS_URLenvironment variable and fails if it's missing. - It also instantiates a
mapthat stores a mapping of the username to the actualwebsocket.Connobject.
Add the main Function
Add the main function to the main.go file:
func main() {
    opt, err := redis.ParseURL(redisURL)
    if err != nil {
        log.Fatal("invalid redis url", err)
    }

    opt.TLSConfig = &tls.Config{}

    client = redis.NewClient(opt)
    startChatBroadcaster()

    http.HandleFunc("/chat/", chat)
    server := http.Server{Addr: ":8080", Handler: nil}

    go func() {
        fmt.Println("started server")
        err := server.ListenAndServe()
        if err != nil && err != http.ErrServerClosed {
            log.Fatal("failed to start server", err)
        }
    }()

    exit := make(chan os.Signal, 1)
    signal.Notify(exit, syscall.SIGTERM, syscall.SIGINT)
    <-exit

    fmt.Println("exit signalled")

    ctx, cancel := context.WithTimeout(context.Background(), 10*time.Second)
    defer cancel()

    for _, conn := range Users {
        conn.Close()
    }

    sub.Unsubscribe(context.Background(), chatChannel)
    sub.Close()

    server.Shutdown(ctx)

    fmt.Println("application shut down")
}
The main function is responsible for multiple things:
- It starts by creating a new
redis.Clientinstance and verifies the connectivity to Redis® by using thePingmethod. If connectivity fails, the program exists with an error message. - Then, the
startChatBroadcaster()function is invoked. Its details will be explained in the subsequent section of this article.` - Next,
http.HandleFuncis used to map the/chatURL to thechatHTTPhandler function. The details of thisHTTPhandler will be explained in the subsequent section of this article. - The program makes sure it can respond to a termination signal and executes cleanup tasks:
- Close all the individual
websocket.Connobjects for each connected user Unsubscribefrom the Redis® channel subscriptionClosethe Redis® channel subscription
- Close all the individual
Add the chat HTTP Handler Function
Add the chat function to main.go file:
func chat(w http.ResponseWriter, r *http.Request) {
    user := strings.TrimPrefix(r.URL.Path, "/chat/")

    upgrader.CheckOrigin = func(r *http.Request) bool {
        return true
    }
    c, err := upgrader.Upgrade(w, r, nil)
    if err != nil {
        log.Print("upgrade:", err)
        return
    }

    Users[user] = c
    fmt.Println(user, "in chat")

    for {
        _, message, err := c.ReadMessage()
        if err != nil {
            _, ok := err.(*websocket.CloseError)
            if ok {
                fmt.Println("connection closed by", user)
                err := c.Close()
                if err != nil {
                    fmt.Println("error closing ws connection", err)
                }
                delete(Users, user)
                fmt.Println("closed websocket connection and removed user session")
            }
            break
        }
        client.Publish(context.Background(), chatChannel, user+":"+string(message)).Err()
        if err != nil {
            fmt.Println("publish failed", err)
        }
    }
}
The chat function is the HTTP handler that provides the core functionality of the service:
- It starts by establishing the
WebSocketconnection from the HTTP request, usingupgrader.Upgrade - The name of the user that initiated the connection is mapped in this
websocket.Connobject, and this mapping is stored as amap. - It starts a
forloop to handle the following:- Read each message sent from a user over the
WebSocketconnection (usingReadMessage) - Send this to the Redis® channel (using
Publish) - Respond to error or termination of the
WebSocketconnection
- Read each message sent from a user over the
Add the startChatBroadcaster Function
Add the startChatBroadcaster function to the main.go file:
func startChatBroadcaster() {
    go func() {
        fmt.Println("listening to messages")
        sub = client.Subscribe(context.Background(), chatChannel)
        messages := sub.Channel()
        for message := range messages {
            from := strings.Split(message.Payload, ":")[0]
            for user, peer := range Users {
                if from != user {
                    peer.WriteMessage(websocket.TextMessage, []byte(message.Payload))
                }
            }
        }
    }()
}
This function also starts a for loop:
- Acts as a subscriber to the Redis® channel
- Receive each message sent to the Redis® channel and send it to all the connected users over their respective
WebSocketconnections. It does so by iterating themapof the user to thewebsocket.Connobject (as described in previous sections).
Save the main.go file and execute the program to try the chat application.
Run the Program
Fetch the Go module dependencies for the program:
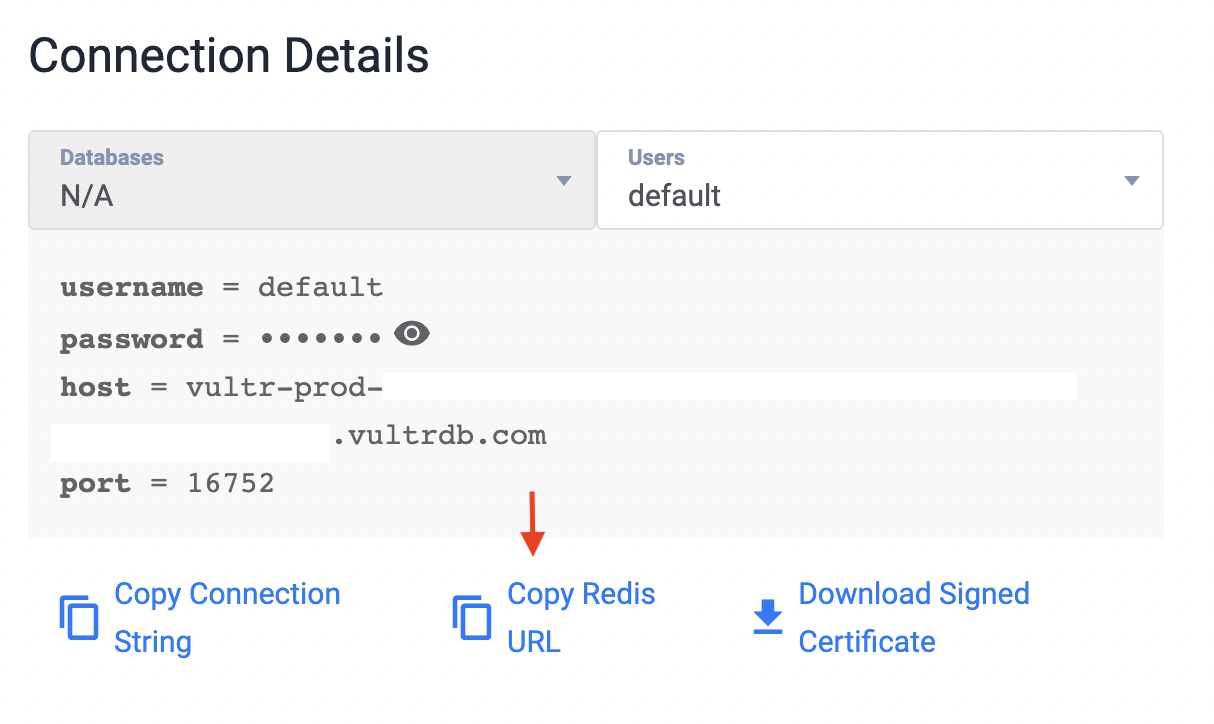
go mod downloadGet the Redis® connection URL of Vultr Managed Database for Caching.
- Click the Manage icon to open the Overview tab.
- From Connection Details section, choose Copy Redis® URL
To run the program, open a terminal and enter the following:
export REDIS_URL=<PASTE THE REDIS URL>
go run main.go
You should see the following output:
listening to messages
started server
Open another terminal, and use wscat to join the chat service as user1:
wscat --connect ws://localhost:8080/chat/user1You should see output along with the prompt (>)
Connected (press CTRL+C to quit)
>
Open another terminal and use wscat again to join the chat service as user2:
wscat --connect ws://localhost:8080/chat/user2You should see output along with the prompt (>)
Connected (press CTRL+C to quit)
>
Go back to the terminal where you started the application. You should see the following additional logs:
user1 in chat
user2 in chat
Currently, two users have joined the service. They can exchange messages.
- To send a message from
user1, switch to the terminal where you joined the chat service asuser1and type in a text message such ashello there!. - Switch to the terminal where you joined the chat service as
user2. You should see the message thatuser1sent. From this terminal, send a message asuser2likehi, how are you. - Switch to the terminal where you joined the chat service as
user1. You should see the message thatuser2sent.
You can continue to use the chat application by adding more users and sending messages to one another.
Users can also exit the application. This can be done by pressing CTRL+C in the respective terminal (wscat) from where they joined the service.
Finally, to stop the application, go back to the terminal where the application is running and press CTRL+C. Once the application exits, the WebSocket sessions connected via wscat will terminate, and you should see the following output in the application logs:
exit signalled
application shut down
After completing this article's tutorial, you can delete the database.
Delete Vultr Managed Database for Caching
To delete the Vultr Redis Managed Database that you had created, log into your Vultr account and follow the below steps for the database you want to delete:
- Click the Manage icon to open the Settings tab.
- Choose Delete Managed Database and click Destroy Database Instance.
- In the Destroy Managed Database? pop-up window, select the checkbox Yes, destroy this Managed Database. and click Destroy Managed Database.
Conclusion
In this article, you learned how to build a chat application using Go and WebSocket with Vultr Managed Database for Caching as the backend data store.
You can also learn more in the following documentation:
- Vultr Managed Databases Quickstart
- Vultr Managed Databases for Caching Reference Guide
- Implement Redis® Transactions and Locks with Golang and MySQL on a Linux Server
- Create a Redis® Leaderboard with Golang
- Implement Rate-limiting with Redis® and Golang on a Linux Server
- How to Securely Connect to Redis® with TLS/SSL in Go, NodeJS, PHP, Python, and redis-cli