Introduction
A lookup table is an array of items for users to select from your application when submitting data to your server. Normally, the lookup table list is used when collecting data with HTML forms and is considered a good design practice when creating applications. For instance, when designing a customer registration form, you might create a list box with MALE and FEMALE values. In that case, end-users are forced to select an item only from the pre-defined items. This is a good method that you can incorporate in your project to enforce data validation rules without too much coding.
Lookup tables are also great when it comes to saving storage in your database. Imagine a scenario where you've millions of subscribers in your database. It would take less space to keep their genders as integers values instead of strings for such a significant number. You don't want a design pattern that bloats your database. When the data stored in your database is small, processing also becomes more manageable. This improves your application's performance, especially when you index referenced columns in the child tables, which are tables referencing columns back to the lookup tables.
Another great advantage is data modification and the ease of maintaining your code. For instance, if you have a lookup table for countries and want to change the value of USA to USA - NORTH AMERICA, you don't need to change the code. You change the lookup table's value, and changes will be propagated in connected forms when users refresh their browsers. Lookup tables are also great when it comes to maintaining additional information related to the option values. Consider a case where you're offering three packages for customers subscribing to your online products. Instead of just displaying the plans' name, you can code your list boxes to display your products alongside the prices to allow customers to make a better decision.
In this tutorial, you'll create a sample test_company database, create some lookup tables and incorporate them later in the guide to collect and submit customers' data from HTML forms with PHP on Ubuntu 20.04.
Prerequisites
Before you begin, ensure that you have the following:
- An Ubuntu 20.04 server.
- A sudo user.
- A LAMP Stack. You can also follow this tutorial on a Vultr One-Click LAMP server.
Create a test_company Database
Begin by connecting to your server and log in to MySQL as a root.
$ sudo mysql -u root -pEnter the root password of your MySQL server and hit Enter to continue. Next, run the command below to create a test_company database.
mysql> CREATE DATABASE test_company;Use the test_company database.
mysql> USE test_company;Next, create a test_user as it is not recommended to use the root user's credentials in the PHP scripts for security purposes. Remember to replace EXAMPLE_PASSWORD with a strong value.
mysql> CREATE USER 'test_user'@'localhost' IDENTIFIED WITH mysql_native_password BY 'EXAMPLE_PASSWORD';
mysql> GRANT ALL PRIVILEGES ON test_company.* TO 'test_user'@'localhost';
mysql> FLUSH PRIVILEGES;
In case you've installed MariaDB instead of MySQL in your server, use the code below to create the test_user account.
MariaDB> GRANT ALL PRIVILEGES on test_company.* TO 'test_user'@'localhost' identified by 'EXAMPLE_PASSWORD';Create plans Lookup Table
In this tutorial, you'll assume that you're offering 3 plans for your products to anyone who subscribes to your online database. However, you might consider adding more plans in the future as you get more customers to cater to their future demands.
Instead of hard-coding these plans to an HTML form, you'll create a flexible MySQL lookup table with all the plans you intend to offer. The good thing about this approach is flexibility. After you've created the table, you can add as many plans as you want, and you can even alter the names in the future without changing your PHP code.
Create the plans table.
mysql> CREATE TABLE plans (
       plan_id INT NOT NULL AUTO_INCREMENT PRIMARY KEY,
       plan_name  VARCHAR(50),
       price  DECIMAL(17,2)
       ) ENGINE = InnoDB;
Next, insert some records into the plans table.
mysql> INSERT INTO plans (plan_name, price) VALUES ('BASIC', '5.00');
mysql> INSERT INTO plans (plan_name, price) VALUES ('DEDICATED', '15.00');
mysql> INSERT INTO plans (plan_name, price) VALUES ('PROFESSIONAL', '50.00');
Query the plans table to ensure that your records are in place.
mysql> SELECT
       plan_id,
       plan_name,
       price
       FROM plans;
You should now see a list of plans as shown below.
+---------+--------------+-------+
| plan_id | plan_name    | price |
+---------+--------------+-------+
|       1 | BASIC        |  5.00 |
|       2 | DEDICATED    | 15.00 |
|       3 | PROFESSIONAL | 50.00 |
+---------+--------------+-------+
3 rows in set (0.00 sec)
Create countries Lookup Table
Next, you'll create a countries table. In your hypothetical company, you might get customers from different countries. However, due to your preferences or laws governing your countries, you might restrict customers' registration only to a few countries. New subscribers who miss their country name from the list won't register for your product. This is one way that you can use lookup tables to enforce validation rules in your application.
Execute the command below to create the countries table.
mysql> CREATE TABLE countries (
       country_id INT NOT NULL AUTO_INCREMENT PRIMARY KEY,
       country_name  VARCHAR(50)
       ) ENGINE = InnoDB;
Next, populate the countries table with some records.
mysql> INSERT INTO countries (country_name) VALUES ('USA');
mysql> INSERT INTO countries (country_name) VALUES ('KENYA');
mysql> INSERT INTO countries (country_name) VALUES ('GERMANY');
Query the countries table to make sure it was populated.
mysql> SELECT
       country_id,
       country_name
       FROM countries;
Ensure you get the list of countries as shown below.
+------------+--------------+
| country_id | country_name |
+------------+--------------+
|          1 | USA          |
|          2 | KENYA        |
|          3 | GERMANY      |
+------------+--------------+
3 rows in set (0.00 sec)
Create genders Lookup Table
The most common genders of subscribers are MALE and FEMALE. But just like in the plans and countries, you don't have to hard-code this in your PHP scripts. This is because you might need to incorporate more gender options in the future. Using a MySQL lookup table, adding new genders will be as simple as inserting a new record into the genders table without touching the base PHP code.
To put this into a better perspective, if there are customers who don't want to disclose their gender during registration, you may later consider adding a new option in the lookup table like, I'd rather not say my gender.
Run the below command to create the genders table.
mysql> CREATE TABLE genders (
       gender_id INT NOT NULL AUTO_INCREMENT PRIMARY KEY,
       gender_name  VARCHAR(50)
       ) ENGINE = InnoDB;
Add the MALE and the FEMALE genders into the table.
mysql> INSERT INTO genders (gender_name) VALUES ('MALE');
mysql> INSERT INTO genders (gender_name) VALUES ('FEMALE');
Query the table to make sure the table is populated.
mysql> SELECT
       gender_id,
       gender_name
       FROM genders;
You should now see 2 genders as shown below.
+-----------+-------------+
| gender_id | gender_name |
+-----------+-------------+
|         1 | MALE        |
|         2 | FEMALE      |
+-----------+-------------+
2 rows in set (0.00 sec)
Create a customers Table
The last object to create in your test_company database is the customers table. This table will store customers' names together with their personal information, including their gender, country, and preferred plans.
In this table, the customers' gender, country, and plan will be represented by indexed INTEGER values related to the base lookup tables.
For instance, if a customer gender is MALE, the gender_id column in the customers table will be represented by 1. Remember if you query the genders table 1 corresponds to MALE.
The same case also applies to the countries. Instead of entering the country's string value in the customers table, the country_id from the countries lookup table is used.
Create the customers table by running the command below.
mysql> CREATE TABLE customers (
       customer_id BIGINT NOT NULL AUTO_INCREMENT PRIMARY KEY,
       first_name  VARCHAR(50),
       last_name  VARCHAR(50),
       gender_id  INT,
       address  VARCHAR(50),
       country_id  INT,
       plan_id  INT,
       INDEX (gender_id),
       FOREIGN KEY (gender_id) REFERENCES genders (gender_id),
       INDEX (country_id),
       FOREIGN KEY (country_id) REFERENCES countries (country_id),
       INDEX (plan_id),
       FOREIGN KEY (plan_id) REFERENCES plans (plan_id)
       ) ENGINE = InnoDB;
In the command above, all columns that refer back to lookup tables have been indexed and defined with the FOREIGN KEY constraints to enforce referential integrity in your data.
Don't enter any record into the customers table. You're going to code an HTML form to enter customers' information to the table.
Exit from the MySQL command-line interface.
mysql> QUIT;Create the HTML Form
Create a /var/www/html/html_form.php file.
$ sudo nano /var/www/html/html_form.phpThen enter the information below into the file.
<html>
  <body>
    <?php
        try {
            define('DB_NAME', 'test_company');
            define('DB_USER', 'test_user');
            define('DB_PASSWORD', 'EXAMPLE_PASSWORD');
            define('DB_HOST', 'localhost');

            $pdo = new PDO("mysql:host=" . DB_HOST . ";dbname=" . DB_NAME, DB_USER , DB_PASSWORD );
            $pdo->setAttribute(PDO::ATTR_ERRMODE, PDO::ERRMODE_EXCEPTION);
            $pdo->setAttribute(PDO::ATTR_EMULATE_PREPARES, false);

            $stmt = $pdo->prepare("SELECT * FROM genders");
            $stmt->execute();
            $genders = $stmt->fetchAll();

            $stmt = $pdo->prepare("SELECT * FROM countries");
            $stmt->execute();
            $countries = $stmt->fetchAll();

            $stmt = $pdo->prepare("SELECT * FROM plans");
            $stmt->execute();
            $plans = $stmt->fetchAll();
            } catch(PDOException $e) {
                echo $e->getMessage();
            }
    ?>

    <h2>Registration Form</h2>
      <form action="register.php" method="post">

        <label for="first_name">First name:</label><br>
        <input type="text" id="first_name" name="first_name"><br><br>

        <label for="last_name">Last name:</label><br>
        <input type="text" id="last_name" name="last_name"><br><br>

        <label for="gender_id">Choose your gender</label><br>
        <select name="gender_id" id="gender_id">
        <?php
            foreach ($genders as $gender) {
                echo '<option value=' . $gender['gender_id'] . '>' . $gender['gender_name'] . '</option>';
            }
        ?>
        </select><br><br>

        <label for="address">Address:</label><br>
        <input type="text" id="address" name="address"><br><br>
        <label for="country_id">Choose your country</label><br>
        <select name="country_id" id="country_id">
        <?php
            foreach ($countries as $country) {
                echo '<option value=' . $country['country_id'] . '>' . $country['country_name'] . '</option>';
            }
        ?>
        </select><br><br>

        <label for="plan_id">Choose your Plan</label><br>
        <select name="plan_id" id="plan_id">
        <?php
            foreach ($plans as $plan) {
                echo '<option value=' . $plan['plan_id'] . '>' . $plan['plan_name'] . '</option>';
            }
        ?>
        </select><br><br>

        <input type="submit" value="Register">
      </form>
  </body>
</html>
Save and close the file.
At the top of the /var/www/html/html_form.php file, you're connecting to the database that you created earlier. Then, you're executing an SQL statement to retrieve values from each lookup table and placing them in an array. For instance, you're using the genders array to store lookup gender names and their corresponding gender ids temporarily.
...
$stmt = $pdo->prepare("SELECT * FROM genders");
$stmt->execute();
$genders = $stmt->fetchAll();
...
Then, you're looping through the array items to display these values as list options.
...
<?php
    foreach ($genders as $gender) {
        echo '<option value=' . $gender['gender_id'] . '>' . $gender['gender_name'] . '</option>';
    }
?>
...
You've repeated this logic for all list boxes to retrieve their corresponding values from the MySQL lookup tables that you created earlier.
When designing the form, you've telling PHP to process it using a file named register.php because you've added this value inside the form opening tags.
<form action="register.php" method="post">Create a Backend Process for the Form
In this step, you'll create the PHP registration script. The code in this file will take the values collected from the HTML form you've designed above and execute an INSERT statement to populate the customers table.
Create the registration file /var/www/html/register.php.
$ sudo nano /var/www/html/register.phpThen, enter the information below into the file.
<?php
    try {
        define('DB_NAME', 'test_company');
        define('DB_USER', 'test_user');
        define('DB_PASSWORD', 'EXAMPLE_PASSWORD');
        define('DB_HOST', 'localhost');

        $pdo = new PDO("mysql:host=" . DB_HOST . ";dbname=" . DB_NAME, DB_USER , DB_PASSWORD );
        $pdo->setAttribute(PDO::ATTR_ERRMODE, PDO::ERRMODE_EXCEPTION);
        $pdo->setAttribute(PDO::ATTR_EMULATE_PREPARES, false);

        $sql = "INSERT INTO customers
               (
               first_name,
               last_name,
               gender_id,
               address,
               country_id,
               plan_id
               )
               VALUES
               (
               :first_name,
               :last_name,
               :gender_id,
               :address,
               :country_id,
               :plan_id
               )";

        $data = [
                'first_name' => $_POST['first_name'],
                'last_name'  => $_POST['last_name'],
                'gender_id'  => $_POST['gender_id'],
                'address'    => $_POST['address'],
                'country_id' => $_POST['country_id'],
                'plan_id'    => $_POST['plan_id']
                ];

        $stmt = $pdo->prepare($sql);
        $stmt->execute($data);

        echo "You have been successfully registered into the database.";

        } catch(PDOException $e) {
            echo $e->getMessage();
        }
?>
Save and close the file. The above code connects to the database, prepares an INSERT statement using named parameters(to prevent SQL injection), and then submits collected data into the customers table.
Please note, this code is for demonstration purposes only. Although it uses parameterized queries for security purposes, you might need to add a step to sanitize the data further against known attack vectors in a production environment. For instance, if you're expecting an integer for a value, make sure this is the supplied value.
Test the Form and the Registration Script
The next step is testing the form to see if everything is working. Visit the URL below on a web browser. Remember to replace your_server_public_ip_address with the public IP address or domain name of your server.
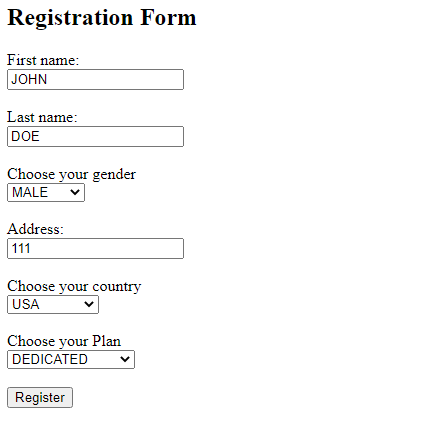
http://your_server_public_ip_address/html_form.phpAfter you get the HTML form, populate it with some data, as shown below.

Then, click the Register button to submit the form. You'll get a success message that your details have been submitted.
You have been successfully registered into the database.To ensure that the details have been saved into the customers table, get back to your MySQL command-line interface.
$ sudo mysql -u root -pUse the test_company database.
mysql> USE `test_company`;Execute the SELECT statement below.
mysql> SELECT
       customer_id,
       first_name,
       last_name,
       gender_id,
       address,
       country_id,
       plan_id
       FROM customers;
You should now see one record in the customers list.
+-------------+------------+-----------+-----------+---------+------------+---------+
| customer_id | first_name | last_name | gender_id | address | country_id | plan_id |
+-------------+------------+-----------+-----------+---------+------------+---------+
|           1 | JOHN       | DOE       |         1 | 111     |          1 |       2 |
+-------------+------------+-----------+-----------+---------+------------+---------+
1 row in set (0.00 sec)
Changing the Values of Lookup Tables
Finally, you'll change some lookup table values and see if the HTML form reflects this change.
First, add a new product to the plans table by running the below query in the MySQL command-line interface.
mysql> INSERT INTO plans (plan_name, price) VALUES ('EXECUTIVE', '75.00');Next, update the countries table to include the names of the continents.
mysql> UPDATE countries SET
       country_name = 'USA - NORTH AMERICA'
       where country_id = 1;

mysql> UPDATE countries SET
       country_name = 'KENYA - AFRICA'
       where country_id = 2;

mysql> UPDATE countries SET
       country_name = 'GERMANY - EUROPE'
       where country_id = 3;
Also, for customers who don't want to disclose their gender information during registration, add a new option for them.
mysql> INSERT INTO genders (gender_name) VALUES ('I WOULD RATHER NOT SAY');Visit the HTML form page html_form.php and see if the changes have been reflected. If the address is still open in your browser window, refresh it.
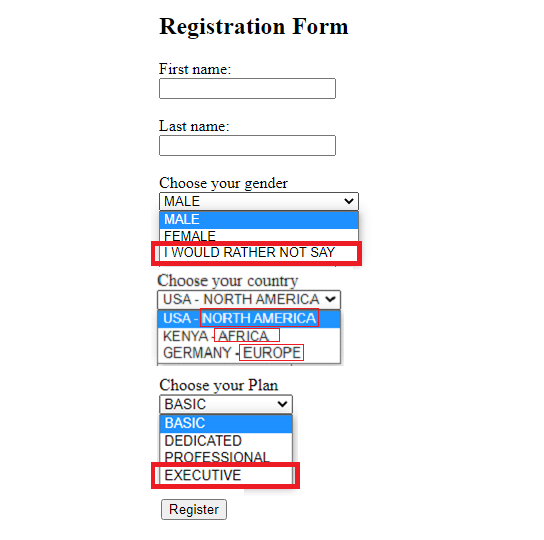
http://your_server_public_ip_address/html_form.phpYou should now see the modified form picking up the new list from the lookup tables as shown below.

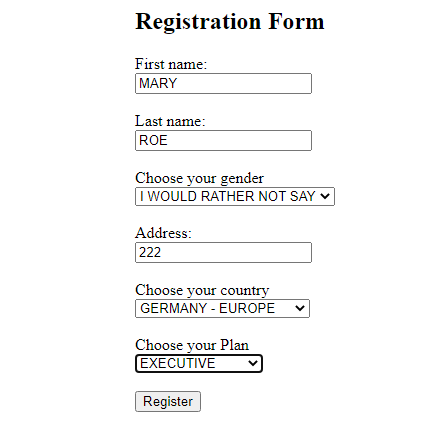
The changes in the screenshot above have been highlighted for better viewing. Choose the values below and submit the form again.

Again, you should get a success message.
You have been successfully registered into the database.Confirm the changes again from the customers table.
mysql> SELECT
       customer_id,
       first_name,
       last_name,
       gender_id,
       address,
       country_id,
       plan_id
       FROM customers;
You should now have a list with two records.
+-------------+------------+-----------+-----------+---------+------------+---------+
| customer_id | first_name | last_name | gender_id | address | country_id | plan_id |
+-------------+------------+-----------+-----------+---------+------------+---------+
|           1 | JOHN       | DOE       |         1 | 111     |          1 |       2 |
|           2 | MARY       | ROE       |         3 | 222     |          3 |       4 |
+-------------+------------+-----------+-----------+---------+------------+---------+
2 rows in set (0.00 sec)
When querying the child table customers, you can only view lookup value ids or magic numbers, which are values that should be given a symbolic name.
To spell out these magic numbers, use a MySQL JOIN statement to retrieve the lookup ids' actual names using the command below.
mysql> SELECT
       customer_id,
       first_name,
       last_name,
       customers.gender_id,
       gender_name,
       address,
       customers.country_id,
       country_name,
       customers.plan_id,
       plan_name
       FROM customers
       LEFT JOIN plans
       ON customers.plan_id = plans.plan_id
       LEFT JOIN countries
       ON customers.country_id = countries.country_id
       LEFT JOIN genders
       ON customers.gender_id = genders.gender_id;
You should get a nice output displaying the customers' list and the actual string values for the magic numbers.
+-------------+------------+-----------+-----------+------------------------+---------+------------    +---------------------+---------+-----------+
| customer_id | first_name | last_name | gender_id | gender_name            | address | country_id | country_name            | plan_id | plan_name |
+-------------+------------+-----------+-----------+------------------------+---------+------------    +---------------------+---------+-----------+
|           1 | JOHN       | DOE       |         1 | MALE                   | 111     |          1 | USA - NORTH AMERICA     |       2 | DEDICATED |
|           2 | MARY       | ROE       |         3 | I WOULD RATHER NOT SAY | 222     |          3 | GERMANY - EUROPE        |       4 | EXECUTIVE |
+-------------+------------+-----------+-----------+------------------------+---------+------------    +---------------------+---------+-----------+
2 rows in set (0.00 sec)
Conclusion
In this tutorial, you've learned how to create MySQL lookup tables and incorporate them when designing applications with PHP on Ubuntu 20.04. Feel free to use and extend the code in this guide to suit your use-case.
No comments yet.