
How to Automatically Back Up MySQL Databases with Object Storage
Introduction
MySQL databases need timely backups to keep recovery data available in case of unplanned database server failures or data corruption events. Available MySQL database backup strategies include SQL statement recreation with tools such as mysqldump and mysqlbackup, replication, and point-in-time recovery methods such as binary logging. Cloud Storage such as object storage decentralizes your MySQL database backups for smooth data recoveries in case the original database or server fails.
This guide explains how to automatically back up MySQL databases with object storage using mysqldump and Cron utilities on a Vultr Linux server. You will schedule weekly database backup operations and ensure the existence of uploaded files to support your database recovery methods.
Prerequisites
Deploy Vultr Block Storage.
Deploy a fresh Vultr Debian Server to use as the automation system.
Access the server using SSH and log in as a non-root user with sudo privileges.
Install the MySQL or MariaDB database server package.
console$ sudo apt install mariadb-server
This guide uses a Vultr Debian server as the automation system for testing purposes. Ensure to use your existing MySQL database server to automate database backup operations with Vultr Object Storage.Note
Set Up Sample MySQL Databases and a Backup MySQL User
MySQL Databases require special access privileges such as SELECT to enable successful backups and recoveries. Follow the steps below to create a dedicated MySQL backup user with all necessary privileges to perform backups on the database server.
Log in to your MySQL database server as an administrator.
console$ sudo mysql
Create a new sample database
exampledb.sqlmysql> CREATE DATABASE exampledb;
Create another sample database
sampledb.sqlmysql> CREATE DATABASE sampledb;
Create a new MySQL user with a strong password to perform backup operations on the server. For example,
exampleuser.sqlmysql> CREATE USER 'exampleuser'@'localhost' IDENTIFIED BY 'secure-password';
Grant the new user full privileges to all databases on the server.
sqlmysql> GRANT ALL PRIVILEGES ON *.* TO 'exampleuser'@'localhost';
To grant the MySQL user specific access to a target database such as
exampledbinstead of global database server permissions, run the following command instead.sqlmysql> GRANT ALL PRIVILEGES ON exampledb.* TO 'exampleuser'@'localhost';
Assigning the MySQL user full privileges to all databases allows the user to perform all types of backup tasks on the server with any supported options such as
LOCK TABLESand--single-transactionthat may not be available with a single class of privileges.Flush the MySQL privileges table to apply the new user changes.
sqlmysql> FLUSH PRIVILEGES;
Exit the MySQL database console.
sqlmysql> EXIT
Set Up Vultr Object Storage
Vultr Object Storage is an S3-compatible cloud storage service that supports data transfer tools such as Cyberduck, S3 Browser, and S3cmd to securely store and share files. Follow the steps below to set up Vultr Object Storage, create a new bucket, and upload test data files from the server using S3cmd.
Open the Vultr Console.
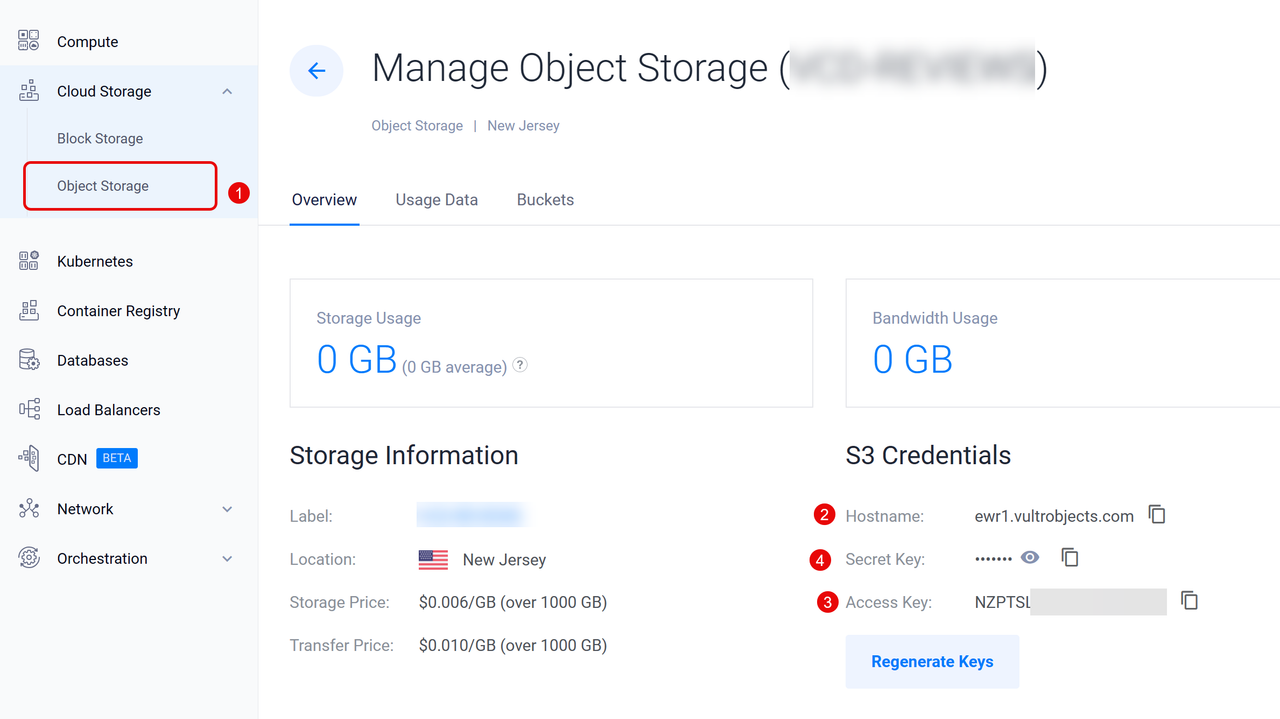
Expand Cloud Storage and click Object Storage from the list of menu options.
Select your Object Storage instance to view the access credentials.
View and copy your Vultr Object Storage Hostname, Secret, and Access keys to use with s3cmd.
Switch to your server SSH session.
Update the server packages.
console$ sudo apt update
Install the s3cmd file transfer application on your server.
console$ sudo apt install s3cmd
Run s3cmd with the
--configureoption to set up Vultr Object Storage as the default provider.console$ s3cmd --configure
Output:
Enter new values or accept defaults in brackets with Enter.
Refer to user manual for detailed description of all options.

Access key and Secret key are your identifiers for Amazon S3. Leave them empty for using the env variables.
Access Key:
Paste your Vultr Object Storage access key and press Enter to save the new access key.
Paste your secret key and press Enter.
Secret Key:Press Enter to use the default S3 region
US.Default Region [US]:Enter your Vultr Object Storage hostname in the S3 Endpoint prompt. For example,
ew1.vultrobjects.com.S3 Endpoint [s3.amazonaws.com]:Enter the bucket DNS-style template to use with Vultr Object Storage. For example
%(bucket)s.ewr1.vultrobjects.com.DNS-style bucket+hostname:port template for accessing a bucket [%(bucket)s.s3.amazonaws.com]:Enter a strong encryption password to protect your Vultr Object Storage connection from unauthorized users on the server.
Encryption password is used to protect your files from reading
by unauthorized persons while in transfer to S3
Encryption password:
Press Enter to accept the default GPG program path
/usr/bin/gpgto encrypt objects during transfer to Vultr Object Storage.Path to GPG program [/usr/bin/gpg]:Press Enter to use the HTTPS protocol with Vultr Object Storage.
Use HTTPS protocol [Yes]:Press Enter to use Vultr Object Storage without an HTTP Proxy connection. If your network requires a proxy, enter the server URL to use with s3cmd.
HTTP Proxy server name:Review your object transfer configuration and enter
Yto test access to your Vultr Object Storage.New settings: Access Key: aaaaaa Secret Key: aaaaaasss Default Region: US S3 Endpoint: ewr1.vultrobjects.com DNS-style bucket+hostname:port template for accessing a bucket: %(bucket)s.ewr1.vultrobjects.com Encryption password: secure-password Path to GPG program: Use HTTPS protocol: True HTTP Proxy server name: HTTP Proxy server port: 0 Test access with supplied credentials? [Y/n]Press Y then Enter to save the s3cmd configuration when the test is successful.
Please wait, attempting to list all buckets...
Success. Your access key and secret key worked fine :-)

Now verifying that encryption works...
Success. Encryption and decryption worked fine :-)

Save settings? [y/N]
View the s3cmd configuration file
.s3cfgin your user home directory to verify your Vultr Object Storage connection settings.console$ cat /home/user/.s3cfg
Create a new Vultr Object Storage bucket to store your MySQL backup files using s3cmd. For example
mysql-backups.console$ s3cmd mb s3://mysql-backups
Output:
Bucket 's3://mysql-backups/' createdFollow the Vultr Object Storage naming requirements when creating new buckets to avoid any errors. Use lowercase, unique and only allowed characters to successfully create a new bucket.
List all available Vultr Object Storage buckets to verify your new storage resource.
console$ s3cmd ls
Create a new sample text file
mysql-test.txtto upload to the Vultr Object Storage bucket.console$ touch mysql-test.txt
Transfer the sample text file to your Vultr Object Storage bucket.
console$ s3cmd put mysql-test.txt s3://mysql-backups/
List all objects in the bucket to verify that s3cmd correctly uploads files to your Vultr Object Storage.
console$ s3cmd ls s3://mysql-backups
Output:
2024-04-07 16:45 0 s3://mysql-backups/mysql-test.txtAccess your Vultr Object Storage instance page, click Buckets and select your new
mysql-backupsbucket. View the bucket contents to verify that the sample text file is available similar to your s3cmd output.
Backup MySQL Databases using mysqldump
The mysqldump database backup utility performs logical MySQL backups by creating a set of SQL statements that reproduce the original database contents when executed. mysqldump supports exports to multiple file types such as .sql, .sh, .csv, .xml, or .txt depending on your desired backup naming scheme. Follow the steps below to back up your MySQL databases using the mysqldump utility.
Create a new directory to store the MySQL backup files on the server. For example,
mysql-backups.console$ mkdir mysql-backups
Switch to the directory.
console$ cd mysql-backups
Back up the sample MySQL database you created earlier
exampledbto a file such asexampledb.sqlusingmysqldump.console$ mysqldump -u exampleuser -p exampledb > exampledb.sql
Enter your MySQL backup user password to log in and start the backup process.
Long list the directory files and verify that a new
exampledb.sqlfile is available with the correct file size.console$ ls -l
Output:
total 4
-rw-r--r-- 1 user user 1294 Apr  7 19:39 exampledb.sql
If your total MySQL database backup file size is zero bytes, verify that your backup user has enough privileges and
mysqldumpruns without any errors to avoid data corruption. The database backup file size depends on the MySQL database content in which a big database results in a big backup file. As a result, a backup file with zero bytes is a result of an incomplete backup or a corrupted database.Back up the second sample database
sampledbwith the--lock-tablesoption to prevent database modifications during the backup process.console$ mysqldump -u exampleuser -p --lock-tables sampledb > sampledb.sql
Back up all available databases on the MySQL database server to create a full backup.
console$ mysqldump -u exampleuser -p --all-databases > fullmysqlbackup.sql
The full MySQL backup creates a single file with all existing databases, unlike the single database backup method that contains only specific databases.
Back up all MySQL database user tables to back up the existing users and associated privileges.
console$ mysqldump -u exampleuser -p mysql --no-data --skip-triggers > db-server-users.sql
List files to verify all the available MySQL backup files in your working directory.
console$ ls -l
Output:
total 2472
-rw-r--r-- 1 user user   34567 Apr  7 19:41 db-server-users.sql
-rw-r--r-- 1 user user    1294 Apr  7 19:39 exampledb.sql
-rw-r--r-- 1 user user 2486007 Apr  7 19:40 fullmysqlbackup.sql
-rw-r--r-- 1 user user    1293 Apr  7 19:40 sampledb.sql
Upload MySQL Database Backups to Vultr Object Storage
Create a new directory to organize and store your database backup files. For example,
test-backups.console$ mkdir test-backups
Move all MySQL backup files
.sqlto the directory for upload to your Vultr Object Storage bucket.console$ mv *.sql test-backups/
Upload all files in the test backup files directory to your object storage bucket.
console$ s3cmd put -r test-backups/ s3://mysql-backups/test-backups/
Output:
upload: 'test-backups/db-server-users.sql' -> 's3://mysql-backups/test-backups/db-server-users.sql'  [1 of 4]
 34567 of 34567   100% in    1s    24.85 KB/s  done
upload: 'test-backups/exampledb.sql' -> 's3://mysql-backups/test-backups/exampledb.sql'  [2 of 4]
 1294 of 1294   100% in    0s     5.71 KB/s  done
upload: 'test-backups/fullmysqlbackup.sql' -> 's3://mysql-backups/test-backups/fullmysqlbackup.sql'  [3 of 4]
 2486007 of 2486007   100% in    1s  1693.74 KB/s  done
upload: 'test-backups/sampledb.sql' -> 's3://mysql-backups/test-backups/sampledb.sql'  [4 of 4]
 1293 of 1293   100% in    0s     5.22 KB/s  done
List your Vultr Object Storage bucket objects and verify that all MySQL backup files are available.
console$ s3cmd ls s3://mysql-backups/test-backups/
Output:
2024-04-07 19:52        34567  s3://mysql-backups/test-backups/db-server-users.sql
2024-04-07 19:52         1294  s3://mysql-backups/test-backups/exampledb.sql
2024-04-07 19:52      2486007  s3://mysql-backups/test-backups/fullmysqlbackup.sql
2024-04-07 19:52         1293  s3://mysql-backups/test-backups/sampledb.sql
You have transferred the MySQL backup files to your Vultr Object Storage bucket. Create separate directories for each MySQL backup operation to organize your backup files for smooth recoveries at a specific point in time. For example, format the database backup files with calendar dates such as
w1-04-2024or10-04to represent a specific backup date or timeframe for identification purposes.Create a new data directory such as
w1-04-2024to organize your MySQL backup directory by date.console$ mkdir w1-04-2024
Copy all existing MySQL backup files from the
test-backupsdirectory to the new directory.console$ mv test-backups/*.sql w1-04-2024
Upload the new MySQL backup directory to your object storage bucket.
console$ s3cmd put -r w1-04-2024/ s3://mysql-backups/w1-04-2024/
View the object storage bucket data and verify that the newly added directory files.
console$ s3cmd ls s3://mysql-backups/w1-04-2024/
Output:
 2024-04-07 19:56        34567  s3://mysql-backups/w1-04-2024/db-server-users.sql
 2024-04-07 19:56         1294  s3://mysql-backups/w1-04-2024/exampledb.sql
 2024-04-07 19:56      2486007  s3://mysql-backups/w1-04-2024/fullmysqlbackup.sql
 2024-04-07 19:56         1293  s3://mysql-backups/w1-04-2024/sampledb.sql
Automate the MySQL Database Backup and File Transfer Processes using Cron
Automating MySQL database backups involves creating a script that runs at a specific point in time such as once every 7 days. You can create the file using scripting tools such as Bash, Zsh, PowerShell, or Python. Follow the steps below to create a sample bash script that automates the mysqldump backup tasks, creates a unique backup directory based on the server time, and transfers the new backup files directory to your Vultr Object Storage bucket.
Print your working directory to verify your MySQL backup directory path.
console$ pwd
Output:
/home/user/mysql-backupsCreate a new bash script file
mysql-backup-script.shusing a text editor such as Vim.console$ vim mysql-backup-script.sh
Add the following contents to the file.
bash#!/bin/bash backup_date=$(date +'%U-%m') backup_directory="database_backup_$backup_date" mkdir -p "$backup_directory" mysqldump -u exampleuser -psecure-password --all-databases > "$backup_directory/full_backup_$backup_date.sql" s3cmd put --recursive "$backup_directory/" s3://mysql-backups/"$backup_directory/" rm -rf "$backup_directory" echo "Transfer Complete!!! The latest MySQL database backup is available in your Vultr Object Storage bucket."
Save and close the file.
The above script creates a new MySQL database backup directory based on the server date week and month value. Then, the script creates a new MySQL backup file that includes all databases and uploads the entire backup files directory to the
mysql-backupsVultr Object Storage bucket. In addition, the generated directory and files are then deleted to free up the server space and only keep the remote object storage files before stopping the script with aTransfer Complete!!!message.Run the database backup script using the Bash interpreter.
console$ bash mysql-backup-script.sh
Monitor the process and verify that the script completes successfully with the following output:
2486007 of 2486007   100% in    1s  1357.94 KB/s  done
Transfer Complete!!! The latest MySQL database backup is available in your Vultr Object Storage bucket.
List your Vultr Object Storage bucket objects and verify that a new MySQL backup directory is available.
console$ s3cmd ls s3://mysql-backups/
Output:
DIR s3://mysql-backups/database_backup_14-04/Open the Crontab editor to create a new Cron job and automate the MySQL database backup script.
console$ crontab -e
Add the following task at the end of the file to run the MySQL script once every week at
5:00 AM.sh0 5 * * 0 /home/user/mysql-backups/mysql-backup-script.sh >> /home/user/mysql-backups/automatic-backups.log 2>&1
Save and close the file.
The above Cron job runs the MySQL database backup script once every 7 days on Sunday at 5:00 AM based on the expression
0 5 * * 0:0: Represents the minute (0 to 59) to run the specified command.5: Represents the hour (0 to 23).*: Sets the day of the month (1-31). The value*runs the command every day or week.*: Sets the month in a calendar year (1 to 12). The value*runs the command every month.0: Sets the day of the week (0-6) to run the command. The value0represents Sunday.
In addition, the Cron job logs all command outputs to the file
automatic-backups.logusing the>> /home/user/mysqlbackups/automatic-backups.log 2>&1command.Create the MySQL database backup log file referenced by your Cron job.
console$ touch automatic-backups.log
Long list your MySQL backup directory and verify that your user owns all directory files.
console$ ls -l
Output:
total 12
-rw-r--r-- 1 user user    0 Apr  7 20:19 automatic-backups.log
-rw-r--r-- 1 user user  458 Apr  7 20:09 mysql-backup-script.sh
drwxr-xr-x 2 user user 4096 Apr  7 19:55 test-backups
drwxr-xr-x 2 user user 4096 Apr  7 19:55 w1-04-2024
All active Cron jobs on the server run with your user profile. Therefore, verify that your user has enough privileges to the directory to avoid incomplete or corrupted backups.
Test your Cron job by running the full task command to verify if it works correctly.
console$ bash /home/user/mysql-backups/mysql-backup-script.sh >> /home/user/mysql-backups/automatic-backups.log 2>&1
The task should not return any output similar to the Cron job. View the Log file to confirm the available script information.
console$ cat /home/user/mysql-backups/automatic-backups.log
Output:
upload: 'database_backup_14-04/full_backup_14-04.sql' -> 's3://mysql-backups/database_backup_14-04/full_backup_14-04.sql'  [1 of 1]
 2486007 of 2486007   100% in   34s    71.11 KB/s  done
Transfer Complete!!! The latest MySQL database backup is available in the Vultr Object Storage bucket.
Best Practices
- Monitor the MySQL backup automation process to ensure data consistency: Set up a monitoring timeline to verify if the Cron task is running correctly by viewing your log file entries. In case of any automation failures, verify your log entries and identify all possible errors.
- Delete old or unimportant Vultr Object Storage objects to free space: Your MySQL database backup files may accumulate a lot of storage space over time and old objects may not be important as compared to newer files. Delete old or unnecessary objects to clear up your Vultr Object Storage bucket space to store new files. Use dedicated MySQL backup user accounts: MySQL backups require valid user accounts with the necessary permissions to the database server. Use a dedicated MySQL backup user when automating backups to avoid conflicts with existing user or database privileges.
- Enable Vultr Object Storage version control: Store different versions of the same MySQL backup files in your Vultr Object Storage depending on your backup timeframes to roll back changes in case of any unintended changes.
Conclusion
You have enabled automatic MySQL database backups with Vultr Object Storage on a Debian database server. To ensure data consistency, set up multiple scripts depending on your MySQL database backup operations to store different copies of your databases at a time. You can use automatic backups with production web applications or large databases that require consistent and close monitoring to recover your MySQL database or migrate to a new or existing server.