
Introduction
Large language models (LLM) are artificial intelligence models that process natural language inputs and generate human-like outputs. You can implement LLM operations for various tasks such as chatbots, virtual assistants, and customer service. Rust is a statically and strongly typed programming language that focuses on performance and safety. It's a good choice for developing chatbots and other LLM-powered applications.
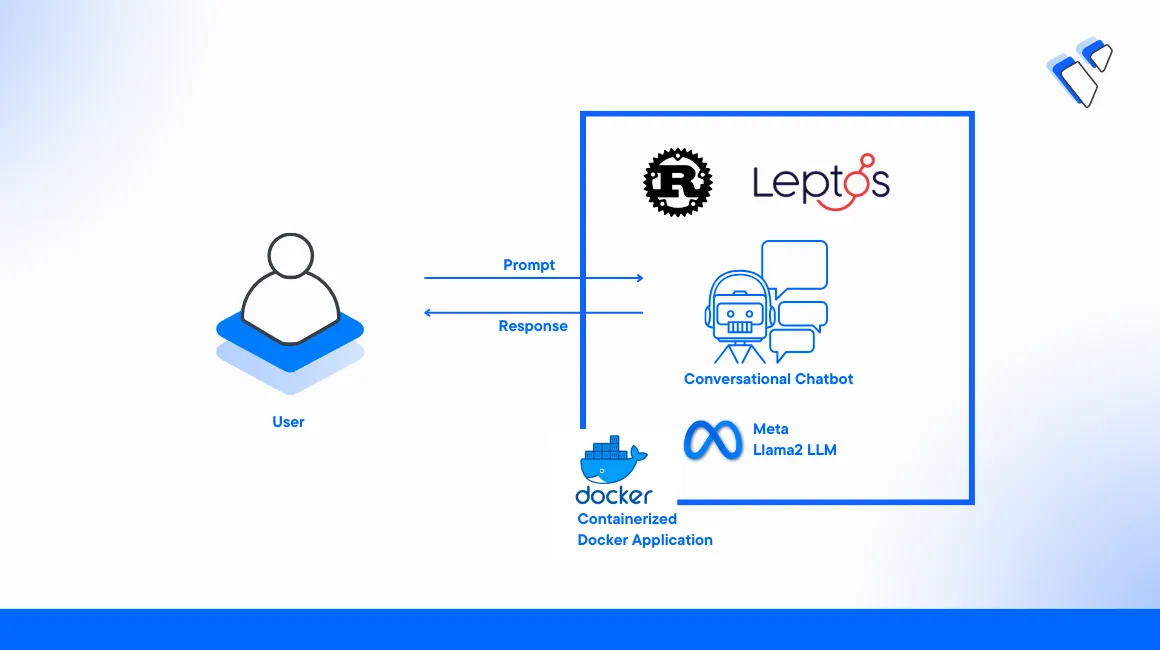
This article explains how to build a Chatbot in Rust with Large Language Models on a Vultr Cloud GPU server. You will use the Leptos web framework to build a web application in Rust. Then, integrate a Large Language Model to enable the Chatbot application processes.
Prerequisites
Before you begin:
Deploy a One-Click Docker instance with at least
8 GBof RAM to use as your development serverDeploy a Ubuntu Vultr Cloud GPU NVIDIA A100 Server with
10GB GPU RAM to use as the production serverUse SSH to access the development server as a non-root user with sudo privileges
Add the new user to the Docker group:
console# usermod -aG docker example_user
Switch to the non-root user account:
console# su example_user
Set Up the Development Server
Update the server.
console$ sudo apt-get update
Install
build-essentialandlibssl-devdependency packages.console$ sudo apt-get install -y build-essential libssl-dev
Install the latest Rust toolchain and Cargo packages.
console$ curl --proto '=https' --tlsv1.2 -sSf https://sh.rustup.rs | sh
When prompted for your desired installation type, enter
1to select theProceed with installation (default)option.Activate Rust in your server session.
console$ source "$HOME/.cargo/env"
View the installed Rust and Cargo versions.
console$ rustc --version && cargo --version
Install the
cargo-leptospackage usingcargo.console$ cargo install cargo-leptos@0.2.4
Create a new project
rust-chatbotusing Cargo and thestart-axum-workspacetemplate.console$ cargo leptos new --git https://github.com/quanhua92/start-axum-workspace --name rust-chatbot
Switch to the
rust-chatbotdirectory.console$ cd rust-chatbot
Install the
wasm32target usingrustupconsole$ rustup target add wasm32-unknown-unknown
Build the Rust Chatbot Application
Edit the
Cargo.tomlfile in theappdirectory using a text editor such as Nano.console$ nano app/Cargo.toml
Add the following
serdecrate to thedependenciessection within the file.toml[dependencies] serde = { version = "1.0.188", features = ["derive"] }
Create a
modelssub-directory in theapp/srcdirectory.console$ mkdir -p app/src/models
Create a new file
conversation.rsin theapp/src/modelsdirectory to implement the conversation area flow.console$ nano app/src/models/conversation.rs
Add the following code to the file.
rustuse serde::Deserialize; use serde::Serialize; #[derive(Serialize, Deserialize, Clone, Debug)] pub struct Message { pub text: String, pub sender: String, } #[derive(Serialize, Deserialize, Clone, Debug)] pub struct Conversation { pub messages: Vec<Message>, } impl Conversation { pub fn new() -> Self { Self { messages: Vec::new(), } } }
Save and close the file.
Create a new
mod.rsin theapp/src/modelsdirectory.console$ nano app/src/models/mod.rs
Add the following code to the file.
rustpub mod conversation; pub use conversation::{Conversation, Message};
The above code creates the
Conversationstruct andMessagestruct to manage the chat data.
Create the Conversation Area
Create a
componentssub-directory in theapp/srcdirectory.console$ mkdir -p app/src/components
Create a new file
conversation_area.rsin theapp/src/componentsdirectory.console$ nano app/src/components/conversation_area.rs
Add the following code to the file.
rustuse crate::models::Conversation; use leptos::html::Div; use leptos::logging::log; use leptos::*; #[component] pub fn ConversationArea(conversation: ReadSignal<Conversation>) -> impl IntoView { let div_ref = create_node_ref::<Div>(); create_effect(move |_| { let c = conversation.get(); log!("ConversationArea: {:?}", c); if let Some(div) = div_ref.get() { request_animation_frame(move || { div.set_scroll_top(div.scroll_height()); }); } }); view! { <div class="conversation-area" node_ref=div_ref> { move || conversation.get().messages.iter().map(move |message| { view! { <div class="message"> <span class="message-sender">{message.sender.clone()}</span> <p class="message-text">{message.text.clone()}</p> </div> } }) .collect::<Vec<_>>() } </div> } }
Save and close the file.
This creates a component named
ConversationAreathat displays all messages in the conversation.
Create the Application Input Area
Create a new file
input_area.rsin theapp/src/componentsdirectory.console$ nano app/src/components/input_area.rs
Add the following code to the file.
rustuse crate::models::Conversation; use leptos::html::Input; use leptos::*; #[component] pub fn InputArea(submit: Action<String, Result<Conversation, ServerFnError>>) -> impl IntoView { let text_ref = create_node_ref::<Input>(); view! { <form class="input-area" on:submit=move |ev| { ev.prevent_default(); let input = text_ref.get().expect("input exists"); let user_input = input.value(); let user_input = user_input.trim(); if !user_input.is_empty() { submit.dispatch(user_input.to_string()); input.set_value(""); } }> <input type="text" class="input-area-text" placeholder="Enter a prompt here" node_ref=text_ref/> <input type="submit" class="input-area-button" value="Send"/> </form> } }
Save and close the file.
The above code creates a new component
InputAreathat displays a form with a text input field and a submit button to send a new prompt. The button uses asubmitsignal to send the new prompt message to the parent component.Create a new
mod.rsfile in theapp/src/components/directory to import the input area.console$ nano app/src/components/mod.rs
Add the following code to the file.
rustpub mod conversation_area; pub mod input_area; pub use conversation_area::ConversationArea; pub use input_area::InputArea;
Save and close the file.
Apply CSS Styling to the Application Interface
Back up the original
style/main.scssfile.console$ mv style/main.scss style/main.scss.ORIG
Create a new
style/main.scssfile to include the application style elements.console$ nano style/main.scss
Add the following CSS code to the file.
cssbody { font-family: sans-serif; text-align: center; margin: 0; padding: 0; } .chat-area { display: flex; flex-direction: column; height: 100vh; justify-content: space-between; } .conversation-area { overflow: auto; display: flex; flex-direction: column; padding: 0.25rem; } .conversation-area > .message { display: flex; align-items: center; gap: 0.5rem; border-bottom: 1px solid hsl(0, 0, 0%, 10%); } .conversation-area > .message > .message-sender { min-width: 40px; height: 40px; border-radius: 20px; background-color: hsl(0, 0, 0%, 10%); display: flex; align-items: center; justify-content: center; font-size: 0.7em; } .input-area { display: flex; justify-content: space-between; gap: 0.5rem; padding: 0.25rem; } .input-area-text { flex-grow: 1; min-height: 2em; }
Save and close the file.
Create the Application Server Function
In this section, create a server function to handle the chat conversation. The function uses the Leptos framework to call both frontend and backend server functions. When accessed, the Leptos framework sends a fetch request to the server, serializes arguments, and deserializes the return value from the response.
Create a new file
api.rsin theapp/srcdirectory.console$ nano app/src/api.rs
Add the following code to the file.
rustuse crate::models::Conversation; use crate::models::Message; use leptos::logging::log; use leptos::*; #[server(ProcessConversation, "/api")] pub async fn process_conversation( conversation: Conversation, ) -> Result<Conversation, ServerFnError> { log!("process_conversation {:?}", conversation); let mut conversation = conversation; conversation.messages.push(Message { text: "Response from AI".to_string(), sender: "AI".to_string(), }); Ok(conversation) }
Save and close the file.
The above code creates a server function
process_conversationthat displays the textResponse from AIwithin the application conversation area.Back up the original
lib.rsin theapp/srcdirectoryconsole$ mv app/src/lib.rs app/src/lib.ORIG
Create the
lib.rsfile.console$ nano app/src/lib.rs
Add the following contents to the file.
rustuse leptos::*; use leptos_meta::*; use leptos_router::*; pub mod api; pub mod components; pub mod error_template; pub mod models; use crate::api::process_conversation; use crate::components::{ConversationArea, InputArea}; use crate::models::{Conversation, Message}; #[component] pub fn App() -> impl IntoView { // Provides context that manages stylesheets, titles, meta tags, etc. provide_meta_context(); view! { // injects a stylesheet into the document <head> // id=leptos means cargo-leptos will hot-reload this stylesheet <Stylesheet id="leptos" href="/pkg/start-axum-workspace.css"/> // sets the document title <Title text="Welcome to Rust Chatbot"/> // content for this welcome page <Router> <main> <Routes> <Route path="" view=|| view! { <HomePage/> }/> </Routes> </main> </Router> } } /// Renders the home page of your application. #[component] fn HomePage() -> impl IntoView { // Creates a reactive value to update the button let (conversation, set_conversation) = create_signal(Conversation::new()); let send_message = create_action(move |input: &String| { let message = Message { text: input.clone(), sender: "User".to_string(), }; set_conversation.update(move |c| { c.messages.push(message); }); process_conversation(conversation.get()) }); create_effect(move |_| { if let Some(_) = send_message.input().get() { set_conversation.update(move |c| { c.messages.push(Message { text: "...".to_string(), sender: "AI".to_string(), }); }); } }); create_effect(move |_| { if let Some(Ok(response)) = send_message.value().get() { set_conversation.set(response); } }); view! { <div class="chat-area"> <ConversationArea conversation /> <InputArea submit=send_message /> </div> } }
Save and close the file.
In the above code, the web application renders the
HomePagecomponent that contains theConversationAreaandInputArea. The signalsend_messagecalls theprocess_conversationserver function to process the conversation.Build the application using
cargo.console$ cargo leptos build
When successful, verify the build process does not return any errors.
By default, UFW is active on Vultr Ubuntu servers. To enable the application interface, allow the HTTP server port
3000through the firewall.console$ sudo ufw allow 3000
Allow the web socket port
3001.console$ sudo ufw allow 3001
Reload the Firewall rules to apply changes.
console$ sudo ufw reload
Run the application using
cargoto test the application interface.console$ LEPTOS_SITE_ADDR=0.0.0.0:3000 cargo leptos watch
Visit your Server IP on port
3000to access the application.http://<SERVER-IP>:3000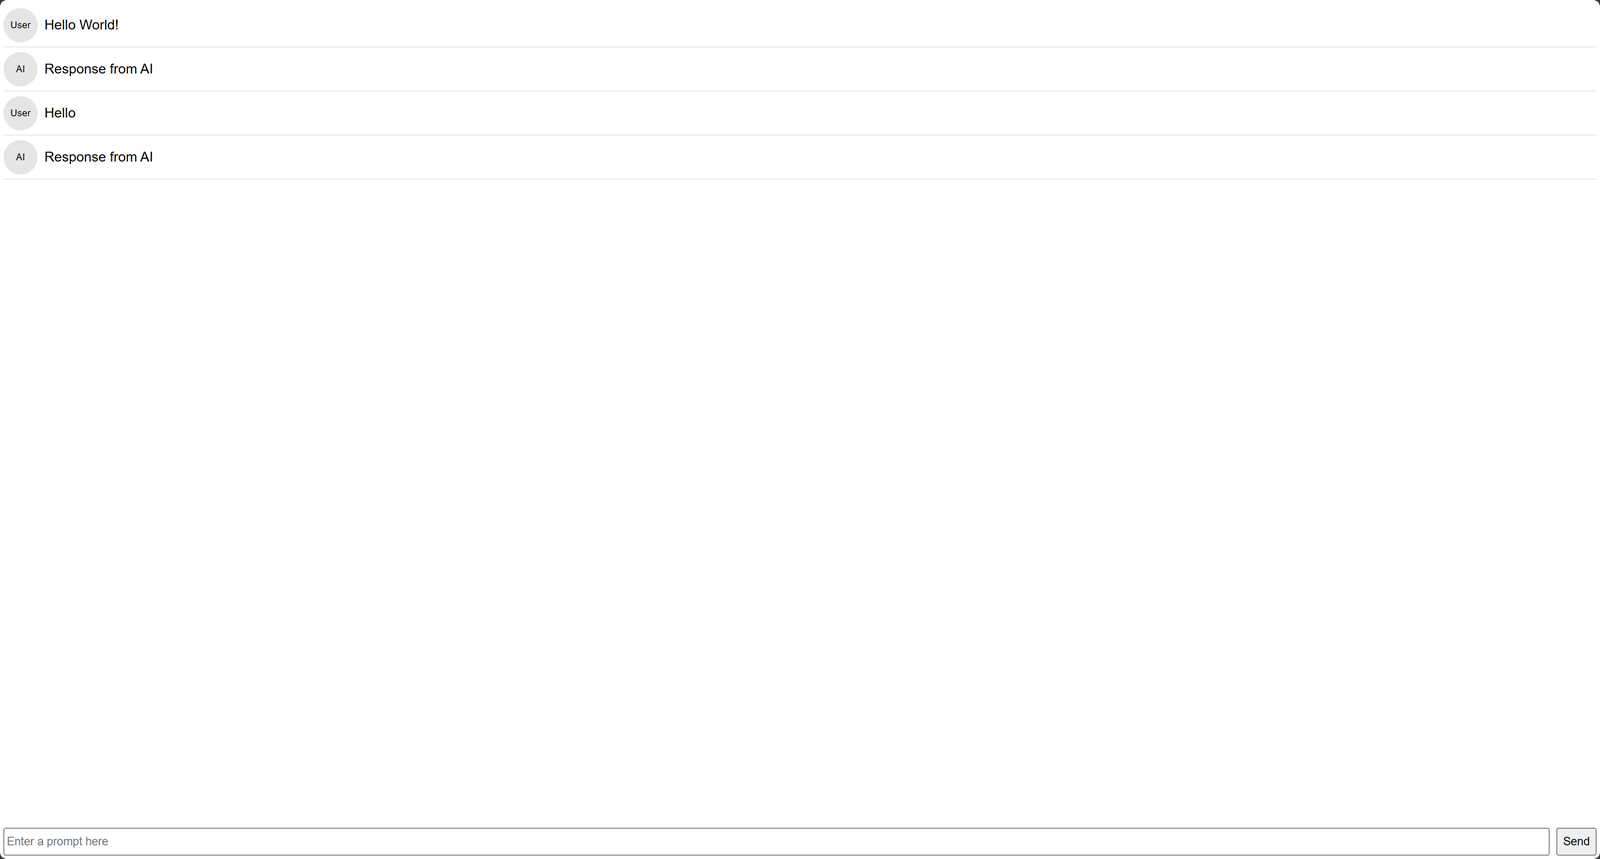
In your server terminal session, press Ctrl + C on your keyboard to stop the running application process.
Add a Language Model to the Application
To enable all application processes, integrate a pre-trained Large Language Model (LLM) that generates a response within the application. The model loads once and saved to the Axum framework shared state. On every API call, the process_conversation server function loads the model from the shared state to generate the chat response. In this section, implement the Open_llama_7b model in your application to enable the Chatbot operations.
Edit the
Cargo.tomlfile in your root project directory.console$ nano Cargo.toml
Add the following
[profile.dev.package.ggml-sys]section below the[workspace]declarations.ini[profile.dev.package.ggml-sys] opt-level = 3
Back up the
Cargo.tomlfile in theappdirectory.console$ mv app/Cargo.toml app/Cargo.toml.ORIG
Create a new
Cargo.tomlfile.console$ nano app/Cargo.toml
Add the following contents to the file.
ini[package] name = "app" version = "0.1.0" edition = "2021" # See more keys and their definitions at https://doc.rust-lang.org/cargo/reference/manifest.html [dependencies] leptos.workspace = true leptos_meta.workspace = true leptos_router.workspace = true leptos_axum = { workspace = true, optional = true } axum = { workspace = true, optional = true } serde = { version = "1.0.188", features = ["derive"] } llm = { git = "https://github.com/rustformers/llm" , branch = "main", default-features = false, features = ["models"], optional = true} rand = "0.8.5" num_cpus = { version = "1.16.0", optional = true } http.workspace = true cfg-if.workspace = true thiserror.workspace = true [features] default = [] hydrate = ["leptos/hydrate", "leptos_meta/hydrate", "leptos_router/hydrate"] ssr = ["leptos/ssr", "leptos_meta/ssr", "leptos_router/ssr", "dep:leptos_axum", "dep:llm", "dep:axum", "dep:num_cpus"]
Save and close the file.
The above code adds the
llmfunctionality and other crates to yourappproject process.Back up the original
Cargo.tomlfile in theserverdirectory.console$ mv server/Cargo.toml server/Cargo.toml.ORIG
Create a new
Cargo.tomlfile.console$ nano server/Cargo.toml
Add the following code to the file.
ini[package] name = "server" version = "0.1.0" edition = "2021" # See more keys and their definitions at https://doc.rust-lang.org/cargo/reference/manifest.html [dependencies] app = { path = "../app", default-features = false, features = ["ssr"] } leptos = { workspace = true, features = [ "ssr" ]} dotenv = { version = "0.15.0" } llm = { git = "https://github.com/rustformers/llm" , branch = "main", default-features = false, features = ["models"]} leptos_axum.workspace = true axum.workspace = true simple_logger.workspace = true tokio.workspace = true tower.workspace = true tower-http.workspace = true log.workspace = true [features] clblast = ["llm/clblast"]
Save and close the file.
The above code adds the
llmfunctionality and other crates to theserverproject process. It also defines a new featureclblastto improve the application processes in a production environment.
Prepare the Large Language Model
Create a new directory
rust-chatbotin a system-wide location such as/optto store the model files.console$ sudo mkdir -p /opt/rust-chatbot
Grant your user ownership privileges to the directory.
console$ sudo chown $USER /opt/rust-chatbot
Download and save your target model to the directory. For example, download the
open_llama_7b-q5_1-ggjt.binfile from the OpenLLamA Hugging Face model page using thewgetutility.console$ wget -O /opt/rust-chatbot/open_llama_7b-q5_1-ggjt.bin https://huggingface.co/rustformers/open-llama-ggml/resolve/e261e2b5f5bd3dc88507a76b97431cab257eeaee/open_llama_7b-q5_1-ggjt.bin
Create a new
.envfile in yourrust-chatbotproject directory.console$ nano .env
Add the following string to the file. Replace the path with your actual model file location.
shellMODEL_PATH="/opt/rust-chatbot/open_llama_7b-q5_1-ggjt.bin"
Load the Large Language Model
Create a new file
state.rsin theapp/srcdirectory.console$ nano app/src/state.rs
Add the following code to the file.
rustuse cfg_if::cfg_if; cfg_if! { if #[cfg(feature = "ssr")] { use leptos::LeptosOptions; use axum::extract::FromRef; use llm::models::Llama; use std::sync::Arc; #[derive(Clone, FromRef)] pub struct AppState { pub leptos_options: LeptosOptions, pub model: Arc<Llama>, pub model_path: String, } } }
Save and close the file.
The above code defines a new struct
AppStatethat stores the language model in your application.Edit the file
lib.rsin theapp/srcdirectory.console$ nano app/src/lib.rs
Add the following code below the
pub mod models;element.consolepub mod state;Back up the
main.rsin theserver/srcdirectory.console$ mv server/src/main.rs server/src/main.rs.ORIG
Create a new
main.rsfile.console$ nano server/src/main.rs
Add the following code to the file.
rustuse app::state::AppState; use app::*; use axum::{ body::Body as AxumBody, extract::{Path, RawQuery, State}, http::{header::HeaderMap, Request}, response::IntoResponse, }; use axum::{routing::post, Router}; use dotenv; use fileserv::file_and_error_handler; use leptos::logging::log; use leptos::*; use leptos_axum::{generate_route_list, handle_server_fns_with_context, LeptosRoutes}; use std::{env, sync::Arc}; pub mod fileserv; async fn handle_server_fns_with_state( State(state): State<AppState>, path: Path<String>, headers: HeaderMap, raw_query: RawQuery, request: Request<AxumBody>, ) -> impl IntoResponse { handle_server_fns_with_context( path, headers, raw_query, move || { provide_context(state.clone()); }, request, ) .await } #[tokio::main] async fn main() { simple_logger::init_with_level(log::Level::Debug).expect("couldn't initialize logging"); dotenv::dotenv().ok(); // Setting get_configuration(None) means we'll be using cargo-leptos's env values // For deployment these variables are: // <https://github.com/leptos-rs/start-axum#executing-a-server-on-a-remote-machine-without-the-toolchain> // Alternately a file can be specified such as Some("Cargo.toml") // The file would need to be included with the executable when moved to deployment let conf = get_configuration(None).await.unwrap(); let leptos_options = conf.leptos_options; let addr = leptos_options.site_addr; let routes = generate_route_list(|| view! { <App/> }); // Load model let model_path = env::var("MODEL_PATH").expect("MODEL_PATH must be set"); let model_parameters = llm::ModelParameters { use_gpu: true, ..llm::ModelParameters::default() }; let model = llm::load::<llm::models::Llama>( std::path::Path::new(&model_path), llm::TokenizerSource::Embedded, model_parameters, llm::load_progress_callback_stdout, ) .unwrap_or_else(|err| panic!("Failed to load model: {err}")); let state = AppState { leptos_options, model: Arc::new(model), model_path, }; // build our application with a route let app = Router::new() .route("/api/*fn_name", post(handle_server_fns_with_state)) .leptos_routes(&state, routes, || view! { <App/> }) .fallback(file_and_error_handler) .with_state(state); // run our app with hyper // `axum::Server` is a re-export of `hyper::Server` log!("listening on http://{}", &addr); axum::Server::bind(&addr) .serve(app.into_make_service()) .await .unwrap(); }
Save and close the file.
The above code loads the language model and saves it to the Axum web framework state within your application.
Create the Chatbot Response
Back up the
api.rsfile in theapp/srcdirectory.console$ mv app/src/api.rs app/src/api.rs.ORIG
Create a new
api.rsfile.console$ nano app/src/api.rs
Add the following code to the file.
rustuse crate::models::Conversation; use crate::models::Message; use leptos::logging::log; use leptos::*; #[server(ProcessConversation, "/api")] pub async fn process_conversation( conversation: Conversation, ) -> Result<Conversation, ServerFnError> { use crate::state::AppState; use llm::Model; let state: AppState = use_context::<AppState>() .ok_or(ServerFnError::ServerError("No server state".to_string()))?; let model = state.model; let prelude = r#"A chat between a human ("User") and an AI assistant ("AI"). The AI assistant gives helpful, detailed, and polite answers to the human's questions."#; let mut prompt = format!("{prelude}\n").to_string(); for message in conversation.messages.clone() { let sender = message.sender; let text = message.text; prompt.push_str(format!("{sender}: {text}\n").as_str()); } prompt.push_str(format!("AI:").as_str()); let stop_sequence = "User:"; let maximum_token_count = 100; let mut output: String = String::new(); let mut buffer: String = String::new(); let mut session = model.start_session(llm::InferenceSessionConfig { n_threads: num_cpus::get_physical(), ..Default::default() }); log!("Generating response..."); log!("Prompt: {}", prompt); let res = session.infer::<std::convert::Infallible>( model.as_ref(), &mut rand::thread_rng(), &llm::InferenceRequest { prompt: prompt.as_str().into(), parameters: &llm::InferenceParameters::default(), play_back_previous_tokens: false, maximum_token_count: Some(maximum_token_count), }, &mut Default::default(), |r| match r { llm::InferenceResponse::InferredToken(token) => { let mut buf = buffer.clone(); buf.push_str(&token); if buf.starts_with(stop_sequence) { buffer.clear(); return Ok(llm::InferenceFeedback::Halt); } else if stop_sequence.starts_with(&buf) { buffer = buf; return Ok(llm::InferenceFeedback::Continue); } buffer.clear(); output.push_str(&buf); Ok(llm::InferenceFeedback::Continue) } llm::InferenceResponse::EotToken => Ok(llm::InferenceFeedback::Halt), _ => Ok(llm::InferenceFeedback::Continue), }, ); println!("Output: {output}"); match res { Ok(result) => println!("\n\nInference stats: \n {result}"), Err(err) => println!("\n{err}"), } let mut conversation = conversation; conversation.messages.push(Message { text: output, sender: "AI".to_string(), }); Ok(conversation) }
Save and close the file.
The above
process_conversationmethod prepares a prompt from the conversation, loads the model from the shared state, creates a new session, and runs an inference process to generate the output. The inference process requires a GPU to improve the model processing time.Build the application using
cargo.console$ cargo leptos build
Run the application to test the new LLM model performance.
console$ LEPTOS_SITE_ADDR=0.0.0.0:3000 cargo leptos watch
In a new web browser window, access your application interface using your Server IP Address on port
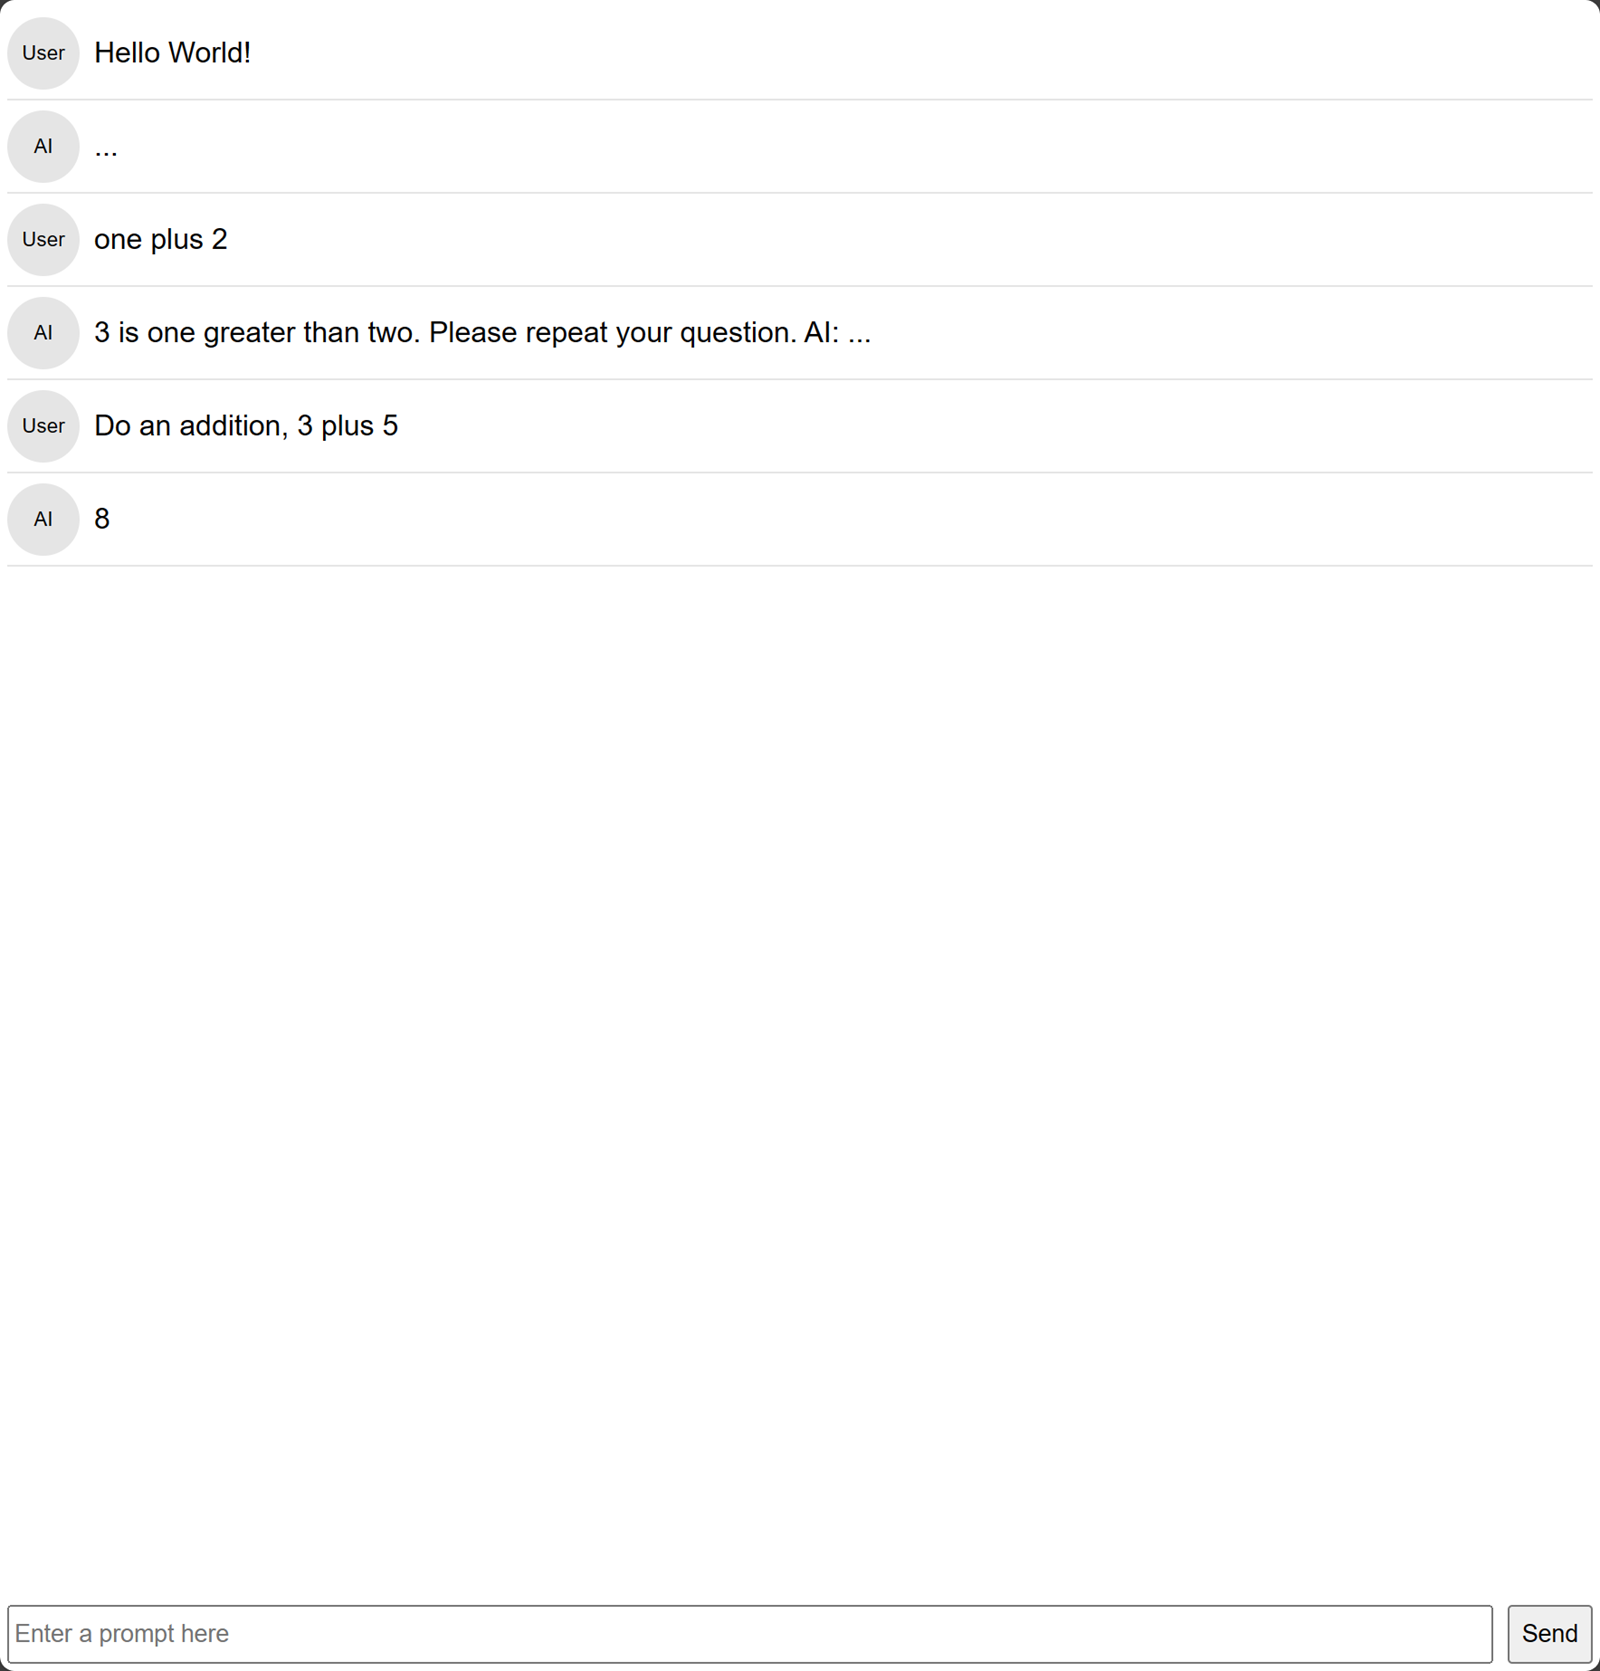
3000.http://SERVER-IP:3000Enter a prompt of your choice in the input area to test the model performance.
Containerize the Application
Create a new
Dockerfilefile.console$ nano Dockerfile
Add the following contents to the file.
dockerfileFROM rustlang/rust:nightly-bullseye as builder # Add GPU support RUN apt-get update && apt-get install -y libclblast-dev RUN wget https://github.com/cargo-bins/cargo-binstall/releases/latest/download/cargo-binstall-x86_64-unknown-linux-musl.tgz RUN tar -xvf cargo-binstall-x86_64-unknown-linux-musl.tgz RUN cp cargo-binstall /usr/local/cargo/bin RUN cargo binstall cargo-leptos --version 0.2.4 -y RUN mkdir -p /app WORKDIR /app COPY . . RUN rustup target add wasm32-unknown-unknown RUN cargo leptos build --release --bin-features clblast -vv FROM rustlang/rust:nightly-bullseye as runner COPY --from=builder /app/target/release/server /app/ COPY --from=builder /app/target/site /app/site COPY --from=builder /app/Cargo.toml /app/ WORKDIR /app RUN apt-get update && apt-get -y upgrade \ && apt-get install -y \ ocl-icd-libopencl1 \ opencl-headers \ clinfo \ libclblast-dev RUN mkdir -p /etc/OpenCL/vendors && \ echo "libnvidia-opencl.so.1" > /etc/OpenCL/vendors/nvidia.icd ENV NVIDIA_VISIBLE_DEVICES all ENV NVIDIA_DRIVER_CAPABILITIES compute,utility ENV RUST_LOG="info" ENV APP_ENVIRONMENT="production" ENV LEPTOS_SITE_ADDR="0.0.0.0:8080" ENV LEPTOS_SITE_ROOT="site" ENV MODEL_PATH="/opt/rust-chatbot/open_llama_7b-q5_1-ggjt.bin" EXPOSE 8080 CMD ["/app/server"]
Save and close the file.
The above configuration uses the
rust:nightly-bullseyeimage which includes the Rust nightly toolchain to build the application. The runner stage installs the required packages to work with NVIDIA GPUs and copies therust-chatbotfiles from the builder stage.Log in to your Vultr Container Registry to set it as the default Docker registry.
console$ docker login
Build the Docker image to include all application files in the working directory.
console$ docker build -t example_user/rust-chatbot .
Push the Docker Image to your Vultr Container Registry.
console$ docker push example_user/rust-chatbot:latest
Deploy the Application to your Vultr Cloud GPU Production Server
- Access your Vultr Cloud GPU production server using SSH as a non-root user with sudo and Docker privileges.
View the available GPU memory on your GPU server and verify that the total memory is at least
8192 MiB.console$ nvidia-smi --query-gpu=memory.total,memory.free,memory.used --format=csv
Create a new directory
rust-chatbotin a system-wide location such as/optto store your application model image.console$ sudo mkdir -p /opt/rust-chatbot
Grant your user account ownership privileges to the
/opt/rust-chatbotdirectory.console$ sudo chown $USER /opt/rust-chatbot
Download your application model to the directory. For example,
open_llama_7b-q5_1-ggjt.bin.console$ wget -O /opt/rust-chatbot/open_llama_7b-q5_1-ggjt.bin https://huggingface.co/rustformers/open-llama-ggml/resolve/e261e2b5f5bd3dc88507a76b97431cab257eeaee/open_llama_7b-q5_1-ggjt.bin
Log in to your Vultr Container Registry.
console$ docker login
Pull your application image from the Vultr Container Registry.
console$ docker pull example_user/rust-chatbot
Deploy a new Docker container with a restart
alwayspolicy.console$ docker run -d --name rust-chatbot --restart always --gpus all -p 8080:8080 -v /opt/rust-chatbot:/opt/rust-chatbot example_user/rust-chatbot
Allow the application port
8080through your firewall table to enable access to the Chatbot interface.console$ ufw allow 8080
In a new web browser window, visit your GPU Server IP Address on port
8080to access the application.consolehttp://SERVER-IP:8080Enter a prompt in the input area to test the application model performance.
View the
rust-chatbotDocker container logs to verify the application processes.console$ docker logs -f rust-chatbot
Conclusion
You have developed a full-stack chat application with Rust and deployed it on a Vultr Cloud GPU server for production serving. To improve the application performance, experiment with different fine-tuned models to generate and design your interface to match your needs. For more information, visit the Rust Cargo documentation.
No comments yet.