How to Build an Inference API using Hugging Face Diffusers and FastAPI
Introduction
The Hugging Face Diffusers library offers access to pre-trained diffusion models in the form of prepackaged pipelines with tools to build and train models. It also includes different core neural network models used as building blocks to create new pipelines.
FastAPI is a Python web framework used to build APIs and web applications. It supports modern Python features such as type hints and async that make it fast and efficient. In addition, it uses the Asynchronous Server Gateway Interface (ASGI) standard for asynchronous, concurrent connectivity with clients, and can integrate with WSGI when needed.
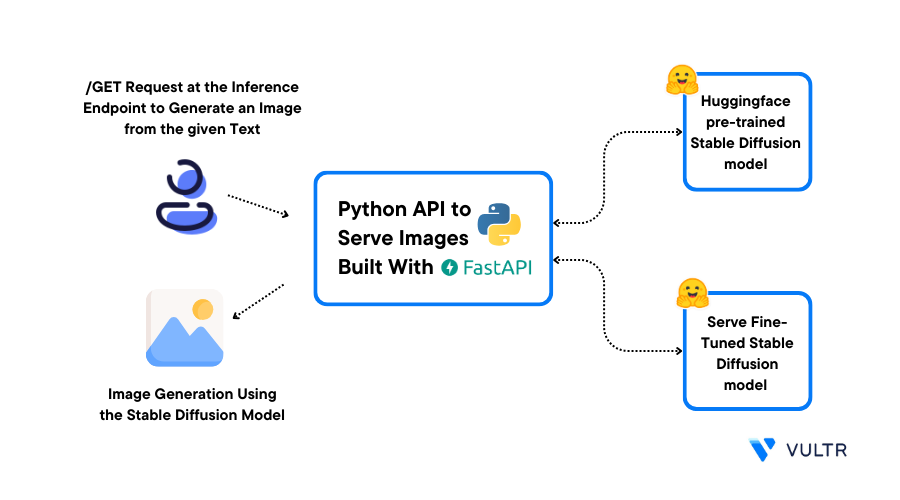
This guide describes how you can build an Inference API using Hugging Face Diffusers and FastAPI on a Vultr NVIDIA A100 Cloud GPU server. You are to execute each of the building steps and have a functional inference API that utilizes the pre-trained Stable Diffusion 2.1 model. This process involves leveraging the capabilities of FastAPI for efficient implementation.
Prerequisites
Before you begin:
- Deploy a Ubuntu 22.04 A100 Cloud GPU server with at least:
- 1/2 GPU
- 40 GB GPU RAM
- Using SSH, access the server
- Create a non-root sudo user and switch to the new user
- Update the server
API Inference Overview
API inference is the process of deploying and executing a model on new data to generate a specific output without implementing the full model. To serve a model to users over the internet, you need to build an inference API and deploy the model to a production environment.
To build an inference API, you need:
- An AI model, such as a pre-trained or fine-tuned model
- A web framework to build and serve APIs
- A system configured to accept and serve requests over the internet
Set Up the FastAPI Environment
To efficiently use FastAPI, create a Python virtual environment, install the necessary dependencies, and the Fast API Python framework to build your API application as described in the steps below.
Install the Python virtual environment package
$ sudo apt install python3-venvCreate a new Python virtual environment for your project
$ python3 -m venv venvA virtual environment is a Python tool for dependency management and project isolation. Each project can have any locally installed packages in an isolated directory.
Enter the virtual environment
$ source venv/bin/activateInstall the
torchandtorchvisionpackages(venv) $ pip install torch torchvision --index-url https://download.pytorch.org/whl/cu118The above command installs the PyTorch module with its dependencies
torchandtorchvision. The--index-urlflag installs a specific package index for the PyTorch-compatible module with the required CUDA version. To install the latest version, visit the PyTorch installation page.Install the required dependencies
(venv) $ pip install diffusers transformers accelerateBelow are the installed dependency packages:
Transformer: These are pre-trained models used for Natural Language Processing (NLP), Named Entity Recognition (NER), machine translation, and sentiment analysisDiffusers: Provides the tools for building and training diffusion models. It also includes many different core neural network models used as building blocks to create new pipelinesAccelerate: Enables PyTorch to run across any distributed configuration. It leverages accelerators such as GPUs and TPUs to improve efficiency, scalability, and speed up NLP workflows
Install the
fastapi,gunicorn, anduvicornpackages(venv) $ pip install fastapi gunicorn uvicornBelow are the installed packages:
gunicorn: Python-based HTTP server based on the Web Server Gateway Interface (WSGI) standard to serve the API,uvicorn: to handle asynchronous applications based on the Asynchronous Server Gateway Interface (ASGI) standard.
Inference API for Image Generation
In this section, set up a basic API to serve a text-to-image generation model. Create a Python application file, import dependency packages, set up a pipeline and scheduler, and create a basic API to serve the image generation model as described below.
Using a text editor such as
nano, create a new Python fileapp.py(venv) $ nano app.pyAdd the following code to the file
 import io
 import torch
 from diffusers import StableDiffusionPipeline, DPMSolverMultistepScheduler
 from fastapi import FastAPI, Response

 app = FastAPI()

 pipe = StableDiffusionPipeline.from_pretrained("stabilityai/stable-diffusion-2-1", torch_dtype=torch.float16, use_safetensors=True)
 pipe.scheduler = DPMSolverMultistepScheduler.from_config(pipe.scheduler.config)
 pipe.to("cuda")

 @app.get("/generate")
 def generate(prompt: str):
     image_store = io.BytesIO()
     images = pipe(prompt).images
     images[0].save(image_store, "PNG")

     return Response(content=image_store.getvalue(), media_type="image/png")
Save and close the file
The above application code imports all necessary packages, and uses the Hugging Face
StableDiffusionPipelineto declare the image-generation model.app = FastAPI()packages the pipeline into an API endpoint and initiates the App. Then:- The GET endpoint applies a decorator that defines an HTTP GET endpoint at the path
"/generate". Then, thegeneratefunction defines the behavior of the"/generate"endpoint that takes a single parameter prompt of typestr io.BytesIO()creates an in-memory bytes buffer used to store the generated imageimages[0].save(image_store, 'PNG')saves the first generated image from the images list to theimage_storebuffer inPNGformatreturn Responseconstructs an HTTP response that contains the generated image data. Then,image_store.getvalue()retrieves the content of the image buffer, andmedia_typedefines thetype "image/png".
- The GET endpoint applies a decorator that defines an HTTP GET endpoint at the path
Using
uvicorn, run the App as a background process(venv) $ uvicorn app:app &Output:
 INFO:     Started server process [19329]
 INFO:     Waiting for application startup.
 INFO:     Application startup complete.
 INFO:     Uvicorn running on http://127.0.0.1:8000 (Press CTRL+C to quit)
Using curl, test the application using a prompt such as
An astronaut landing on planet(venv) $ curl -G http://127.0.0.1:8000/generate --data-urlencode "prompt=An astronaut landing on planet" -o image.pngTo view the generated image, use a file transfer program such as SFTP, SCP, or FTP to download the image file to your computer.

To stop the
uvicornserver, view the available background tasks(venv) $ jobsOutput:
[1]+ Running uvicorn app:app &Stop the target job ID
(venv) $ kill %1
Expose the API Server to the Internet
Using
UFW, allow connections to the API Server port8000(venv) $ sudo ufw allow 8000/tcpUsing
uvicorn, run the App in the background(venv) $ uvicorn app:app --host 0.0.0.0 &Using a web browser such as Firefox, access the inference API with a prompt on your Server IP Address
http://SERVER-IP:8000/generate?prompt=An astronaut landing on planetVerify that the image displays in your web browser session

To stop the
uvicornserver, view the background job ID(venv) $ jobsOutput:
[1]+ Running uvicorn app:app --host 0.0.0.0 &Stop the server
(venv) $ kill %1Using Gunicorn with
uvicorn.workers, run the app in the background(venv) $ gunicorn app:app --timeout 60 --worker-class uvicorn.workers.UvicornWorker --bind 0.0.0.0:8000 &In your web browser, test the application with a different prompt such as
adventure hillshttp://SERVER-IP:8000/generate?prompt=adventure hillsStop the
gunicornserver background process(venv) $ kill %1
Serve Fine-Tuned Models
The process of serving fine-tuned models matches serving pre-trained models. Before deploying a fine-tuned model, either train your model and save it, or download and save an already fine-tuned model as described below.
For example, in your app.py Python application, instead of:
pipe = StableDiffusionPipeline.from_pretrained("stabilityai/stable-diffusion-2-1", torch_dtype=torch.float16, use_safetensors=True)
pipe.scheduler = DPMSolverMultistepScheduler.from_config(pipe.scheduler.config)
pipe.to('cuda')
Use the path to a saved fine-tuned model:
lora_model_id = "/path/to/output/model"
base_model_id = "stabilityai/stable-diffusion-2-1"
pipe = StableDiffusionPipeline.from_pretrained(base_model_id, torch_dtype=torch.float16)
pipe.scheduler = DPMSolverMultistepScheduler.from_config(pipe.scheduler.config)
pipe.unet.load_attn_procs(lora_model_id)
pipe.to("cuda")
Replace the placeholder path "/path/to/output/model" with your actual model path.
Enable Multithreading
To run the server with multiple workers, run
gunicornas a background process with the--workersoption(venv) $ gunicorn app:app --workers 2 --timeout 60 --worker-class uvicorn.workers.UvicornWorker --bind 0.0.0.0:8000 &The above
gunicorncommand starts the application with the following options:--workers: Defines the number of running worker processes that handle incoming requests concurrently--timeout: Sets the maximum allowed time (in seconds) for a worker to process a request. If a worker takes longer than this timeout, it's forcibly killed--worker-class: ConfiguresGunicornto use the Uvicorn worker class designed to run Asynchronous Server Gateway Interface (ASGI) applications like FastAPI
Using
ps, view the system processes$ ps -ax | grep pythonView the different worker forks displayed in your output like the one below:
 11147 pts/0    Sl+     0:18 /home/user/venv/bin/python3 /home/user/venv/bin/gunicorn app:app --workers 2 --timeout 60 --worker-class uvicorn.workers.UvicornWorker --bind 0.0.0.0:8000
 11148 pts/0    Sl+     0:29 /home/user/venv/bin/python3 /home/user/venv/bin/gunicorn app:app --workers 2 --timeout 60 --worker-class uvicorn.workers.UvicornWorker --bind 0.0.0.0:8000
Each line is a fork of the main thread. Verify that each of the forked processes uses its own GPU memory space.
View the GPU memory usage
$ watch nvidia-smiThe above
watchcommand runs thenvidia-smicommand every 2 seconds to display the realtime GPU memory usage.To decide on the number of workers, apply the following rule:
N = number of threads + 1On standard cloud servers,
1vCPU is equal to1thread, while on dedicated servers with hyper-threading equates to2threads per CPU core. When using multiple workers, verify that the available GPU memory is enough to accommodateNinstances of the model. Otherwise, the system generates an out-of-memory error.Sometimes, even with enough GPU memory, loading a large model with multiple workers can display worker termination warnings as below:
[11147] [WARNING] Worker with pid 11148 was terminated due to signal 9Using
dmesg, view a more detailed output$ sudo dmesgOutput:
 oom-kill:constraint=CONSTRAINT_NONE,nodemask=(null),cpuset=/,mems_allowed=0,global_oom,task_memcg=/user.slice/user-0.slice/session-3.scope,task=gunicorn,pid=11148,uid=0

 [ 4412.006670] Out of memory: Killed process 11148 (gunicorn) total-vm:38942992kB, anon-rss:30142812kB, file-rss:2304kB, shmem-rss:0kB, UID:0 pgtables:68700kB oom_score_adj:0
Based on the above output, an out-of-memory error occurred while loading the worker objects. Typically, the system automatically initiates another process and recovers from this error. If the warnings persist, increase the server timeout value.
Python functions are either defined using
deforasync def. When employingasync defin conjunction withNnumber of Uvicorn workers,Nforks of the main thread generate. Incoming requests distribute among theseNprocesses. Due to the asynchronous nature of the function, the program can accept new requests while the slow task (such as generating output) from a previous request is still processed. Sequentially each thread handles the requests assigned to it.
Test the Application Performance
To enhance your comprehension, evaluate the system's performance using both async def and def while varying the number of workers. To study performance differences, use a smaller model. For example, test how fast the API server responds to requests.
Using curl, test how long the server takes to respond to a single HTTP POST request
$ curl -o /dev/null -w 'Total: %{time_total}s\n' -G http://127.0.0.1:8000/generate --data-urlencode "prompt=An astronaut landing on planet"The above command tests the total time taken to receive a server response. This helps when testing the response time (without the effect of network latencies) of the server.
To evaluate how the server responds to concurrent requests, set up two additional SSH sessions, and issue the above curl command in quick succession per session. While the system processes the requests, use a system monitoring utility such as top to view the number of threads and CPU in use. Take note of the time taken for each request to complete.
Conclusion
In this guide, you set up an API server to run inference using a Hugging Face Diffuser model and built an image generation API on a Vultr Cloud GPU Server. You built an API that utilizes the pre-trained Stable Diffusion 2.1 model and discovered how to serve any fine-tuned model on the server with minimal code adjustments.
More Information
To implement more solutions on your Vultr Cloud GPU server, visit the following resources: