How to Cache Node.js Apps with Redis®

Introduction
Caching is a crucial part of optimizing the performance of web applications. Caching involves temporarily storing data in a cache to reduce the number of requests made to the database and improve response time. Redis® is an in-memory data structure store popularly used as a caching solution. This guide explores the use of Redis® as a cache for a Node.js application with a Postgres database. The Redis® and Postgres databases will be provisioned through the Vultr-managed databases.
Prerequisites
- Provision an Ubuntu 20.04 server
- Create a non root user
- Install Node.js (use the PPA version in option 2)
- Create a Vultr Managed Database for Postgres
- Create a Vultr Managed Database for Caching
- Install tmux
Environment Setup
For reference, the final project folder structure will be as follows:
postgres-redis
|__configs
    | config.db.postgres.js
    | config.db.postgresPooling.js
    | config.db.redis.js
    | config.secrets.js
|__controllers
    | controller.blog.js
|__middlewares
    | middleware.timer.js
|__routes
    | route.blog.js
| .env
| server.js
| postgres-certificate.crt
| redis-certificate.crt
| package.json
| package-lock.json
Create the project folder
$ mkdir postgres-redis
Change the directory to the project folder
$ cd postgres-redis
Create .env file
$ touch .env
Navigate to the PostgreSQL database cluster Connection Details under the Overview tab. Add the connection details to the .env file. Open the .env file using nano and replace the Postgres connection details.
$ nano .env
Replace with the credentials on the Postgres Overview tab
PG_USERNAME= paste-username-here
PG_PASSWORD= paste-password-here
PG_DATABASE= paste-databse-here
PG_PORT= paste-port-here
PG_HOST= paste-host-here
Navigate to the Redis® database cluster Connection details and add the connection details to the .env.
REDIS_USERNAME= paste-username-here
REDIS_PASSWORD= paste-password-here
REDIS_HOST= paste-host-here
REDIS_PORT= paste-port-here
Install Dependencies
The project will require the following dependencies:
cors: middleware for handling Cross-Origin Resource Sharing (CORS) enables access to resources from a different domain.express: a web framework for building and managing routes, handling requests, middleware, and many more functions.ioredis: a package for accessing Redis®.nodemon: development tool that automatically restarts node applications on file change.pg: package for accessing PostgreSQL and performing SQL queries.dotenv: package for managing environment variables in the .env.
These dependencies can be installed using the following command:
$ npm install cors express ioredis nodemon pg dotenvThe above command creates a package.json file and a package-lock.json. In the package.json, edit the file using nano, add server.js as the main entry point, and add nodemon to the start script command as shown below.
{

"main": "server.js",
{
"start":"nodemon server.js"

},

	"dependencies": {
		"cors": "^2.8.5",
		"dotenv": "^16.0.3",
		"express": "^4.18.2",
		"ioredis": "^5.3.0",
		"nodemon": "^2.0.20",
		"pg": "^8.9.0"
	}
}
Setting up the server
As specified in the package.json, the entry point to the app is server.js. Create the server.js using nano
$ nano server.jsThe contents in this file are:
const express = require('express');
const cors = require('cors');
const responseTime = require('./middlewares/middleware.timer.js')

// import routes
const blogRoutes = require('./routes/route.blog.js');

const app = express();
app.use(express.json());
app.use(express.urlencoded({ extended: true }));
app.use(cors());
app.use(responseTime)
//  use routes
app.use("/api/blogs", blogRoutes);
 // start server
const PORT = 3000;
app.listen(PORT, async () => {
console.log(`Server is running on port ${PORT}`);
});
The code does the following:
- express and cors packages are imported.
- The responseTime middleware defined in the
./middlewares/middleware.timer.jswill calculate the time taken to complete a request. - The blogRoutes imports an express router from the
./routes/route.blog.jsfile. - Next, we create an instance of an express app and pass the express.json and express.urlencoded middlewares to parse incoming requests with JSON and URL-encoded data, respectively.
- The cors middleware is used to handle CORS policies and the responseTime middleware for logging request response times.
- The blogRoutes is mounted to the
/api/blogs/endpoint. This means that any request sent to/api/blogswill be handled by the route handlers from./routes/route.blog.js.
Response Time Middleware
Create the responseTime middleware in the ./middlewares/middleware.timer.js.
$ mkdir middlewares && cd middlewares && nano middleware.timer.jsThe code in the file is as follows
const responseTime = ((req, res, next)=>{
const startTime = process.hrtime();
res.on('finish', ()=>{
const totalTime = process.hrtime(startTime);
const totalTimeInMs = totalTime[0] * 1000 + totalTime[1] / 1e6;
console.log(`The request to /api/blogs${req.url} took `,totalTimeInMs , " ms");
 });
next();
 })
module.exports = responseTime;
The code measures the time it takes to handle a request made to '/api/blogs' endpoint. The middleware adds a timer to each request and starts a timer as soon as the middleware is invoked, and the finish time is recorded in the 'finish' event of the response object. The elapsed time is calculated by subtracting the start time from the finish time and expressed in milliseconds. The time taken is logged to the console.
Routes
The specific GET and POST routes are defined in the ./routes/route.blog.js To create the file, navigate back to the project folder.
$ cd ..Create the routes file using the following command.
$ mkdir routes && cd routes && nano route.blog.jsThe code in this file is as follows:
const express = require('express');
const router = express.Router();
const { getBlogs ,createBlog} = require('../controllers/controller.blog.js');
router.get('/:id', getBlogs);
router.post('/', createBlog);
module.exports = router;
The code sets up an Express router and imports town functions from
../controllers/controller.blog.js. The two functions are getBlogs and createBlog.The getBlogs function is mounted to the GET request at the
/api/blogs/:idendpoint. The:idwill be a dynamic URL parameter for the specific id that's being retrieved. For example, a GET request to/api/blogs/1, the function getBlogs would execute with the req.params.id equal to 1 .The createBlog function is mounted to the POST request at the
/api/blogs/endpoint. This function will handle all requests to the endpoint.
Config Secrets
We import all environment variables in a single file for easier management when changes need to be done. Navigate back to the project folder.
$ cd ..Create the secrets file using the following command.
$ mkdir configs && cd configs && nano config.secrets.jsThe code in this file imports all the variables we defined earlier in the .env.
const dotenv = require('dotenv');
const path = require('path');
dotenv.config({ path: path.resolve(__dirname, '../.env') });

exports.secrets = {

PG_USERNAME: process.env.PG_USERNAME,
PG_PASSWORD: process.env.PG_PASSWORD,
PG_DATABASE: process.env.PG_DATABASE,
PG_PORT: process.env.PG_PORT,
PG_HOST: process.env.PG_HOST,
REDIS_USERNAME: process.env.REDIS_USERNAME,
REDIS_PASSWORD: process.env.REDIS_PASSWORD,
REDIS_PORT: process.env.REDIS_PORT,
REDIS_HOST: process.env.REDIS_HOST,

}
The dotenv package is used to read the .env file.
Save Signed Certificates
We need to save the signed certificates to enable SSL for both Redis® and Postgres. On the Postgres Overview tab, download the signed certificate
https://cdn.hashnode.com/res/hashnode/image/upload/v1675264831640/671ac5ef-762d-4222-ade8-3ac928259638.png?auto=compress,format&format=webp
On the project folder create the postgres-certificate.crt and paste the contents of the downloaded certificate into this file. First navigate back to the project folder
$ cd ..Next, create postgres-certificate.crt file and paste the certificate details using the following command
$ nano postgres-certificate.crtDo the same for the Redis signed certificate and save it in the redis-certificate.crt.
$ nano redis-certificate.crtPostgres Connection
The Postgres connection is made using the pg package. On the project folder, create the Postgres connection file using the following command:
$ cd configs && nano config.db.postgres.jsThe code in the file is as follows:
const { Client } = require('pg');
const { secrets } = require('./config.secrets.js');
const fs = require('fs');

let client;

exports.connectPG = (async () => {
if (client) return client;
try{
    console.log('Connecting to Postgres...');
    const client = new Client({
        user: secrets.PG_USERNAME,
        host: secrets.PG_HOST,
        database: secrets.PG_DATABASE,
        password:   secrets.PG_PASSWORD,
        port: secrets.PG_PORT,
        ssl: {
            rejectUnauthorized: false,
            cert: fs.readFileSync('postgres-certificate.crt').toString(),
          },
    });

    await client.connect();
    console.log('Connected to Postgres!');

    return client;
}catch(err){
    console.error(err);
}

})();
We import the Client class from the pg library, the environmental variables in the secrets file, and the fs module. The fs module is used to read file contents in NodeJS. We initialize the client variable and check if the client object already exists when the connectPG function is called. This allows the reuse of Postgres connections instead of making a new connection on every request. When the client object does not exist, a client object is created using the connection details from the environmental variables. The fs library reads the postgres-certificate.crt contents and adds it to the SSL property. Lastly, we connect to Postgres and return the client object of the connection. The function is self-invoked.
Redis® Connection
The Redis® connection follows a similar pattern to the Postgres connection. Create the Redis® file from the project folder using the following command
$ cd configs && nano config.db.redis.jsThe code in the file is as follows
const Redis = require('ioredis');
const { secrets } = require('./config.secrets.js');
const fs = require('fs');

let client;
exports.redisDB = (async () => {
 if (client) return client;
  try {

    console.log('Connecting to Redis DB...');
    const client = new Redis({
        username: secrets.REDIS_USERNAME,
        host: secrets.REDIS_HOST,
        port: secrets.REDIS_PORT,
        password: secrets.REDIS_PASSWORD,
        tls: {
            cert: fs.readFileSync('redis-certificate.crt', 'ascii')
        }
    });

    await client.on('connect', () => {
        console.log('Connected to Redis!');
    });

    await client.on('error', (err) => {
        console.error("Redis error ",err);
    });

    return client;
    } catch (err) {
      console.error(err);
  }
})()
The code connects to Redis® using the ioredis package and the connection details from the .env file via the secrets file. We specify the cert parameter in the tls object by reading the contents of the redis-certificate.crt using fs module.
Controllers
The controller ties everything together. The controller will have two functions. One function will be handling GET request and the other will handle the POST requests while interacting with the two managed databases.
While in the project folder, create the controller file:
$ mkdir controllers && cd controllers && nano controller.blog.jsThe code in this file is as follows:
const { redisDB } = require('../configs/config.db.redis.js');
const { connectPG } = require('../configs/config.db.postgres.js');

const getBlogs = async (req, res) => {
const { id } = req.params;

 try {

const redisClient = await redisDB;
const jsonString = await redisClient.get(id);

if (jsonString !== null) {
  console.log('Data from Redis');
  const dataFromRedis = JSON.parse(jsonString);
  return res.status(200).json(dataFromRedis);
}

const pool = await connectPG;
const { rows } = await pool.query(`SELECT * FROM blogs`);
console.log("Data from postgres");
await redisClient.set(id, JSON.stringify(rows));
res.status(200).json(rows)
  } catch (error) {
     console.error(error);
     res.status(500).json({ error: 'Error while retrieving blog' });
     }
} ;

const createBlog = async (req, res) => {
 try {
 const client = await connectPG;
 await client.query(`
    CREATE TABLE IF NOT EXISTS blogs (
    id SERIAL PRIMARY KEY,
    title VARCHAR(255) NOT NULL,
    content TEXT NOT NULL,
    created_at TIMESTAMP NOT NULL DEFAULT NOW(),
    updated_at TIMESTAMP NOT NULL DEFAULT NOW()
   )`);
   const query = `INSERT INTO blogs (title, content)
                   VALUES ($1, $2) RETURNING *;`;
   const values = [req.body.title, req.body.content];

  const blogId = await client.query(query, values);
  res.status(200).json(`Blog ${blogId.rows[0].id} saved!`);
  } catch (error) {
   console.error(error);
  res.status(500).json({ error: 'Unable to retrieve blogs' });
   }
 };


module.exports = { getBlogs, createBlog };
The code does the following:
- We import the Redis® and Postgres connections.
- The getBlogs function handles the GET requests made to the /api/blogs/:id route. The function destructures the id value from the request params object. Next, the Redis® client connection is established, and we check whether the blog with the id is in the Redis® database. If the data exists, we return the data to the client. If the data is not in Redis®, we connect to Postgres and retrieve the data from the blogs table with the id equal to the request parameter. Lastly, we store the data on Redis® to avoid having to retrieve the data from Postgres on subsequent requests.
- The createBlog function connects handles POST requests made. This function creates a blog table if it does not exist on Postgres. The table has five rows; id, title, content, created_at, and updated_at. We retrieve the title and blog content from the request body and insert them into the blog table. When this operation succeeds, we return a success message to the client.
- Lastly, the handlers are exported.
Creating Blogs and Testing Response Times
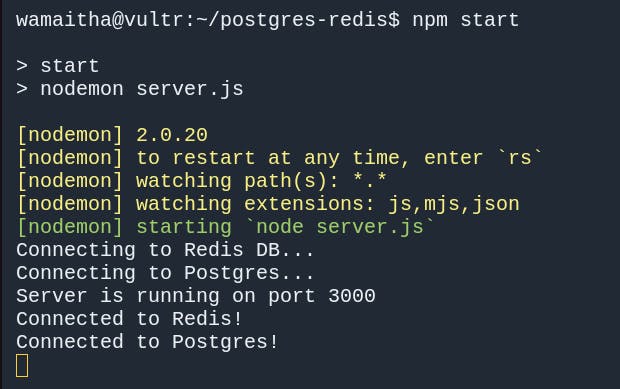
Now that we have all the necessary code, we can test the API. Start a tmux session and create two windows. On the first window, run the API while on the project folder using the following command:
$ npm startYou should see the following output
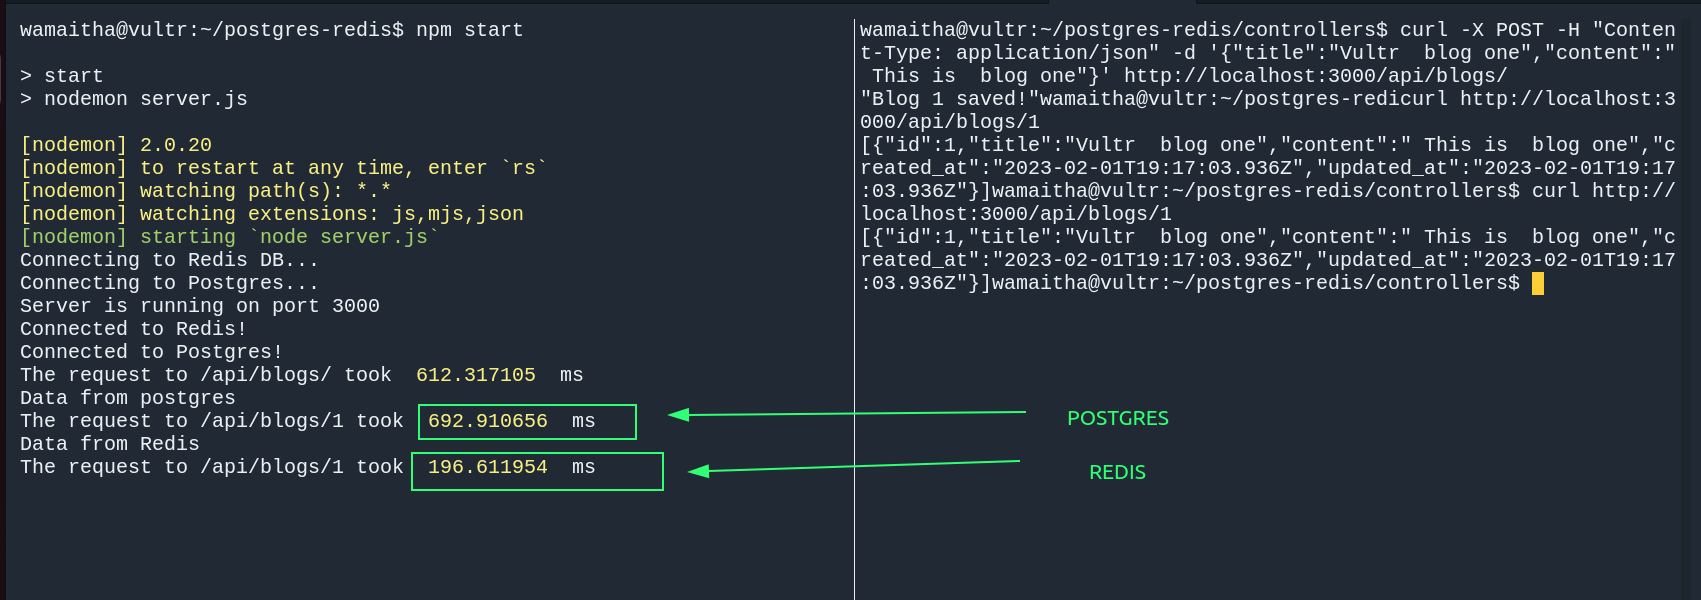
On the second tmux window, create a blog using curl using the command:
$ curl -X POST -H "Content-Type: application/json" -d '{"title":"Vultr blog one","content":" This is blog one"}' http://localhost:3000/api/blogs/By default, the id for this blog will be 1; therefore on the second tmux window , we can use this id to get data from the database using curl.
$ curl http://localhost:3000/api/blogs/1Repeating this GET request on window two shows that the time taken to retrieve blog 1 has reduced by 496 milliseconds. Therefore caching has significantly reduced the response time.
More Resources: