
How to Containerize Node.js Web Applications
Introduction
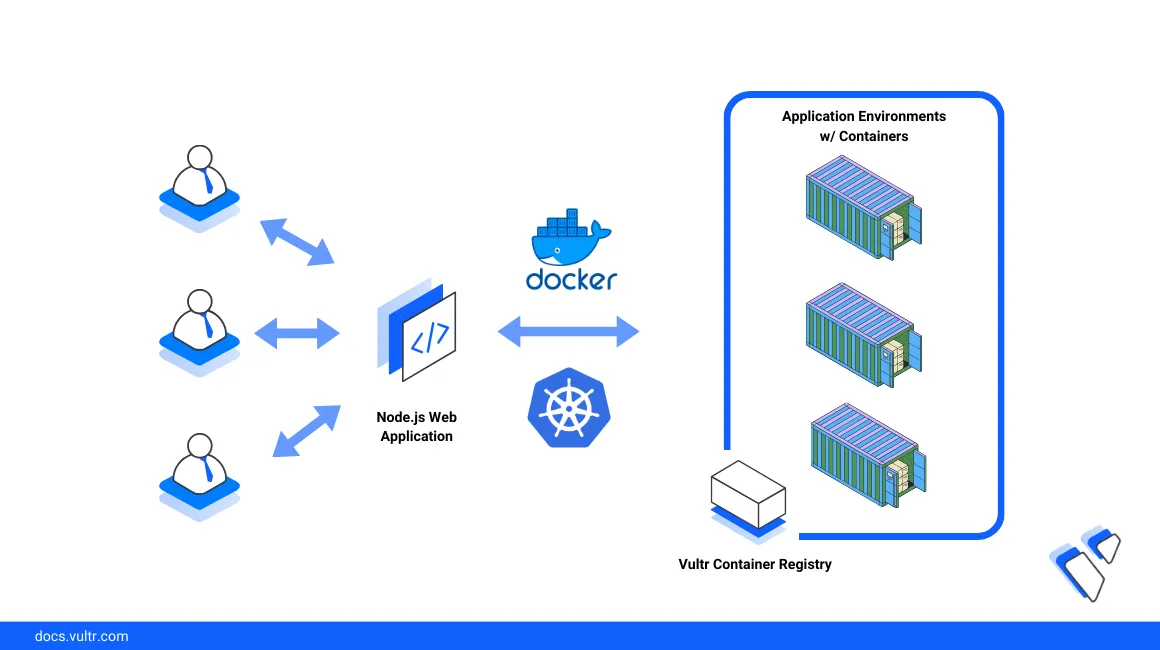
Node.js is a JavaScript runtime library that enables server-side scripting and development of scalable web applications. Express is a Node.js web application framework designed to build robust and scalable server-side applications with reusable package files. To migrate Node.js applications from development to production environments, you can containerize all environment variables and files to securely deploy the service to a platform such as Docker or Kubernetes.
This article explains how to containerize Node.js web applications using the Express web framework and deploy the application image to a registry such as the Vultr Container Registry. You will build frontend and backend application components to securely deploy the application to a Vultr Kubernetes Engine (VKE) cluster.
Prerequisites
Before you begin:
Deploy a One-Click Docker instance using the Vultr marketplace application to use as the management workstation.
Create a Vultr Container Registry to store the application container image.
Deploy a Vultr Kubernetes Engine (VKE) cluster to use as the application publishing platform.
Access the workstation using SSH as a non-root user with sudo privileges.
Add the sudo user to the Docker group. For example,
linuxuser.console$ sudo usermod -aG docker linuxuser
Create the Express Web Application
Create a new project directory.
console$ mkdir vultr-nodejs-demo
Switch to the directory.
console$ cd vultr-nodejs-demo
Create a new backend script file
server.jsto use as the application's main entry point.console$ nano server.js
Add the following contents to the file.
jsconst express = require('express'); const app = express(); const port = 3000; app.use(express.static('public')); app.get('/api/message', (req, res) => { const currentTime = new Date().toLocaleTimeString(); const message = `Hello from the backend! Current time is: ${currentTime}`; res.json({ message: message }); }); app.listen(port, () => { console.log(`Server is running on http://localhost:${port}`); });
Save and close the file.
The above code sets up a basic web server using the Express web framework.
const express = require('express')imports the Express framework and then creates an instance with theexpressmodule.Within the route handler function, the application obtains the present server time using the
new Date().toLocaleTimeString()directive. Then, it constructs a JSON response, combines it with the server time, and sends a response using theres.send()directive.app.listenstarts the application server on the host port3000.Create a new
package.jsonfile to define the project dependencies.console$ nano package.json
Add the following contents to the file.
{
        "name": "nodejs-app",
        "version": "1.0.0",
        "description": "",
        "main": "server.js",
        "scripts": {
                "test": "echo \"Error: no test specified\" && exit 1",
                "start": "node server.js"
        },
        "keywords": [],
        "author": "",
        "license": "ISC",
        "dependencies": {
                "express": "^4.18.2"
        }
}
Save and close the file.
The above dependency definitions specify the application metadata, version, main entry point
server.js, and a start-up script to run the application using Express.js.Create a new directory
publicto store the frontend application components.console$ mkdir public
Swicth to the directory.
console$ cd public
Create a new file
app.jsto define the main application logic.console$ nano app.js
Add the following contents to the file.
jsdocument.addEventListener('DOMContentLoaded', () => { const messageContainer = document.getElementById('message-container'); const fetchButton = document.getElementById('fetch-button'); fetchButton.addEventListener('click', async () => { try { const response = await fetch('/api/message'); const data = await response.json(); messageContainer.innerText = data.message; } catch (error) { console.error('Error fetching message:', error); } }); });
Save and close the file.
The above application code establishes event listeners for a button click. Whenever the event occurs, it triggers an asynchronous fetch operation to the
/api/messageendpoint on the backend component. In addition, the application dynamically displays a JSON response within the specified HTML element. When an error occurs during the fetch operation, the script logs the error details to the console.Create a new HTML file
index.htmlto use as the frontend application interface.console$ nano index.html
Add the following contents to the file.
html<!DOCTYPE html> <html lang="en"> <head> <meta charset="UTF-8"> <meta name="viewport" content="width=device-width, initial-scale=1.0"> <title>Node.js Full Stack App</title> <style> body { font-family: Arial, sans-serif; text-align: center; margin: 20px; } button { padding: 10px; font-size: 16px; cursor: pointer; } </style> </head> <body> <h1>Nodejs App on Vultr!</h1> <button id="fetch-button">Fetch Message from Backend</button> <div id="message-container"></div> <script src="app.js"></script> </body> </html>
Save and close the file.
The above HTML application creates a styled interface with a clickable button that works with the
app.jsfile to capture the on-click events. The present server time displays each time the on-click event occurs as defined in the backendserver.jsfile.
Containerize the Node.js Web Application
Switch to the main project directory.
console$ cd /home/linuxuser/vultr-nodejs-demo/
Create a new Dockerfile to set up the application environment specifications.
console$ nano Dockerfile
Add the following contents to the file.
DockerfileFROM node:20 as builder WORKDIR /app COPY public public COPY server.js package*.json ./ RUN npm install FROM node:20-alpine WORKDIR /app COPY --from=builder /app/public /app/public COPY --from=builder /app . EXPOSE 3000 CMD ["node", "server.js"]
Save and close the file.
The above Dockerfile configuration uses a multi-stage build process to build the Node.js application. Within the file:
- The
builderstage uses thenode:20base image, copies the required files, and installs necessary dependencies usingnpm install. - The second stage uses a smaller
node:20-alpineimage for the final production image. Then, it sets the working directory to/appand copies only the necessary artifacts from the builder stage. It exposes the application port3000and specifies the default commandnode server.jsto run the Node.js server.
When running a different Node.js framework other than Express JS, replace the
WORKDIRandCOPYvalues with your exact application files to build within the container image. A multi-stage process optimizes the final container image size by removing unused build artifacts from the builder stage. This results in a more lightweight and secure image for storage and deployment to other environments.- The
Create the Docker image with all files in the project directory.
console$ docker build -t nodeapp .
Publish the Application Image
To store the Node.js application image, push the image to a container registry to retrieve and deploy it in another environment. Follow the steps below to publish the Node.js application image to your Vultr Container Registry.
Create new environment variables to enable the quick reference and usage of your Vultr Container Registry credentials while pushing images.
$ export VULTR_CONTAINER_REGISTRY_NAME= ENTER-REGISTRY-NAME-WITHOUT-URL

$ export VULTR_CONTAINER_REGISTRY_USERNAME= ENTER-USERNAME

$ export VULTR_CONTAINER_REGISTRY_API_KEY= ENTER-REGISTRY-KEY
Log in to your Vultr Container Registry.
console$ docker login https://sjc.vultrcr.com/$VULTR_CONTAINER_REGISTRY_NAME -u $VULTR_CONTAINER_REGISTRY_USERNAME -p $VULTR_CONTAINER_REGISTRY_API_KEY
Output:
Login SucceededTag the local
nodeappcontainer image to your Vultr Container Registry repository.console$ docker tag nodeapp:latest sjc.vultrcr.com/$VULTR_CONTAINER_REGISTRY_NAME/nodeapp:latest
Push the container image.
console$ docker push sjc.vultrcr.com/$VULTR_CONTAINER_REGISTRY_NAME/nodeapp:latest
When successful, access your Vultr Container Registry using the Vultr Console to verify the new container repository.
Navigate to Repositories and verify that a new
nodeapprepository is available on the list.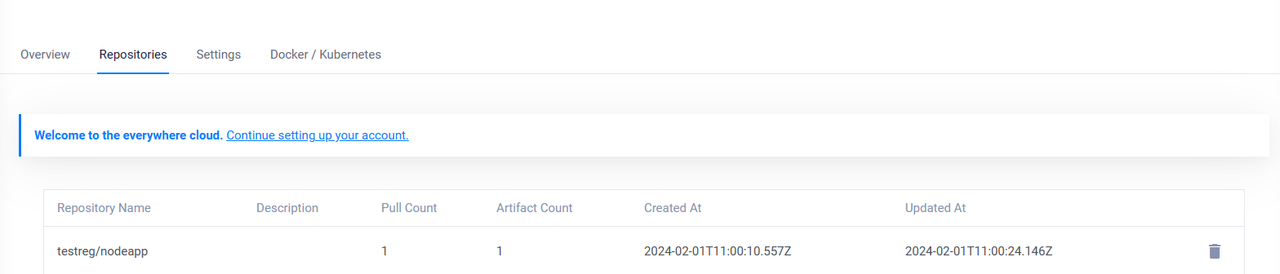
Deploy the Containerized Node.js Application to a Kubernetes Cluster
To publish and use the Node.js containerized application, deploy it to a container publishing platform such as the Vultr Kubernetes Engine (VKE). Follow the steps below to set up access to your Vultr Container Registry, pull, and deploy the Node.js application to a VKE cluster.
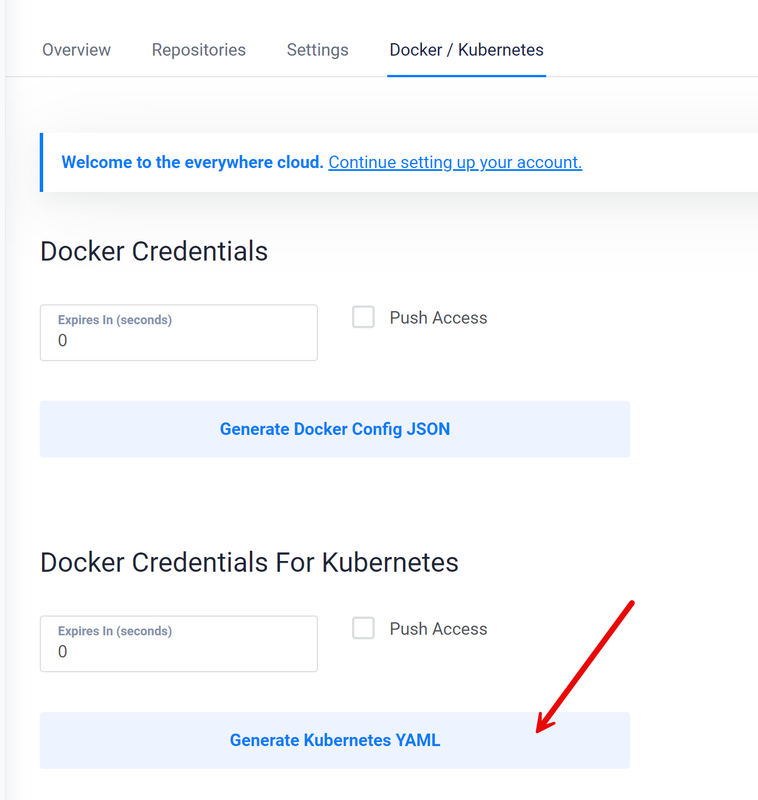
Within your Vultr Container Registry control panel, navigate to the Docker/Kubernetes tab.
Click Generate Kubernetes YAML and copy the generated YAML content to your clipboard.
Create a new Secret resource file
secret.yaml.console$ nano secret.yaml
Add the generated registry YAML contents to the file similar to the one below.
yamlapiVersion: v1 kind: Secret metadata: name: vultr-cr-credentials data: .dockerconfigjson: example-filled-code type: kubernetes.io/dockerconfigjson
Save and close the file.
Apply the resource to your cluster to securely pull images from the registry.
console$ kubectl apply -f secret.yaml
Output:
secret/vultr-cr-credentials createdCreate a new deployment YAML file
app.yaml.console$ nano app.yaml
Add the following contents to the file. Replace
sjc.vultrcr.com/demo/nodeapp:latestwith your actual Vultr Container Registry details.yamlapiVersion: apps/v1 kind: Deployment metadata: name: nodejs-app labels: app: nodejs-app spec: replicas: 1 selector: matchLabels: app: nodejs-app template: metadata: labels: app: nodejs-app spec: containers: - name: nodejs-app image: sjc.vultrcr.com/demo/nodeapp:latest imagePullPolicy: Always imagePullSecrets: - name: vultr-cr-credentials --- apiVersion: v1 kind: Service metadata: name: nodejs-app-service labels: app: nodejs-app-service spec: type: LoadBalancer ports: - port: 3000 selector: app: nodejs-app
Save and close the file.
The above YAML configuration defines new Kubernetes
DeploymentandServiceresources for the Node.js application. Within the file:- The Deployment section pulls the Node.js application image from your Vultr Container Registry using the
vultr-cr-credentialssecret to run the cluster container pods with anodejs-appnaming scheme. - The Service section creates a
LoadBalancerresource that exposes the cluster port3000and directs traffic to active pods labeled withapp: nodejs-app.
- The Deployment section pulls the Node.js application image from your Vultr Container Registry using the
Deploy the application resources to your cluster.
console$ kubectl apply -f app.yaml
Output:
deployment.apps/nodejs-app created
service/nodejs-app-service created
View the cluster deployments and verify that your application is available.
console$ kubectl get deployments
Output:
NAME         READY   UP-TO-DATE   AVAILABLE   AGE
nodejs-app   1/1     1            1           79s
View active pods with the
nodejs-appnaming scheme to verify that they are ready and running.console$ kubectl get pods -l=app=nodejs-app
Output:
NAME                          READY   STATUS             RESTARTS   AGE
nodejs-app-64df56d87-5h6cx    1/1     Running            0          25s
Access the application
View the cluster services and verify that the assigned load balancer external IP address on your
nodejs-app-serviceservice.console$ kubectl get services
Output:
NAME                   TYPE           CLUSTER-IP       EXTERNAL-IP      PORT(S)                                          AGE
kubernetes             ClusterIP      10.96.0.1        <none>           443/TCP                                          117m
nodejs-app-service     LoadBalancer   10.104.196.29    207.246.94.210   3000:31869/TCP                                   3m15s
Access the application port
3000using the load balancer IP in a web browser such as Chrome. Replace192.168.0.2with your actual IP.http://192.168.0.2:3000Verify the Node.js application landing page. Click Fetch Message from Backend to interact with the application and view the present server time.

Conclusion
You have packaged and containerized a Node.js web application using Docker. To ship the image, you pushed the application image to the Vultr Container Registry and deployed it to a Vultr Kubernetes Engine (VKE) cluster. Depending on your Node.js application structure, modify the Dockerfile build processes to match your directory structure to build and deploy your application in multiple environments. For more information, visit the Node.js documentation.