
How to Containerize Python Web Applications
Introduction
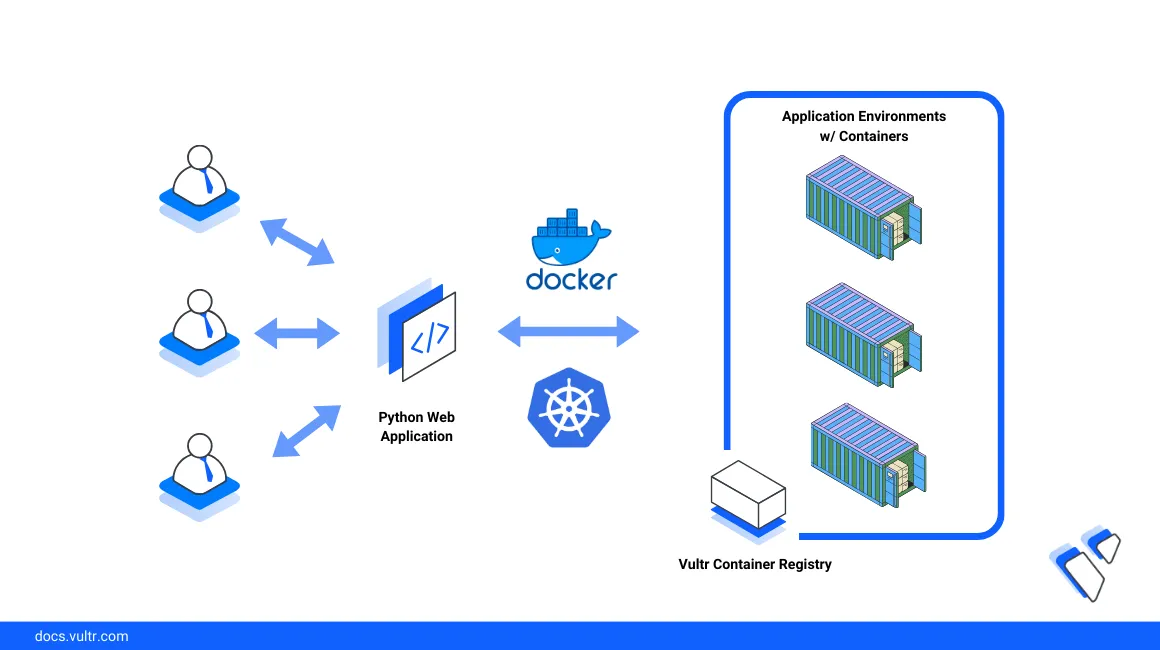
Containerizing Python web applications encapsulates the application structure and dependencies into a single package to ensure consistent and reproducible deployments across different environments. Deploying containerized Python web applications is a fundamental approach to modern software development that involves scaling and automation when deploying to platforms such as Kubernetes.
You can build Python applications using different development frameworks. Each platform may require a slightly different approach to containerize and ship the application image. Popular Python frameworks include:
- Flask: A lightweight, flexible web framework that provides essential tools for building web applications. It's minimalistic and offers direct tools that allow developers to add libraries based on the specific project needs.
- Django: A high-level full-stack web framework that provides a complete set of tools and libraries for building robust web applications.
- FastAPI: A modern, high-performance web framework for building APIs with Python. It leverages type hints to enable auto-generated interactive API documentation (using Swagger UI) and provides high performance using Python's type system.
- Pyramid: A flexible and scalable framework that allows developers to choose the components they need for their applications.
- Tornado: An asynchronous networking library and web framework primarily known for its high performance and ability to handle many concurrent connections.
This article explains how to containerize Python web applications for deployment in production environments such as Kubernetes clusters.
Prerequisites
Before you begin:
Deploy a Vultr Kubernetes Engine (VKE) cluster to use as the production deployment platform.
Create a Vultr Container Registry to store the Python application image.
Deploy a One-Click Docker instance to use as the management workstation.
Access the workstation using SSH as a non-root user with sudo privileges.
Install and configure Kubectl to access the cluster.
Install the Helm CLI tool to install additional cluster applications.
console$ sudo snap install helm --classic
Create a Python Web Application
To create a consistent Python web application image that you can use with different frameworks such as Flask or Django, structure your code to separate the frontend HTTP server interface logic from the main application logic. Follow the steps below to create a basic Python application using app.py as the main application file while using a server.py file to include the basic HTTP server logic.
Install the Python virtual environment and the PIP package manager.
console$ sudo apt install python3-venv python3-pip -y
Create a new project directory to store the application files.
console$ mkdir python-app
Switch to the directory.
console$ cd python-app
Create a new Python virtual environment to separate the application dependencies from other system packages.
console$ python3 -m venv python-env
Activate the virtual environment.
console$ source python-env/bin/activate
Create the main application file
app.pyusing a text editor such as Nano.console(python-env)$ nano app.py
Add the following code to the file.
pythondef hello_world(): print("Hello, World!") if __name__ == "__main__": hello_world()
Save and close the file.
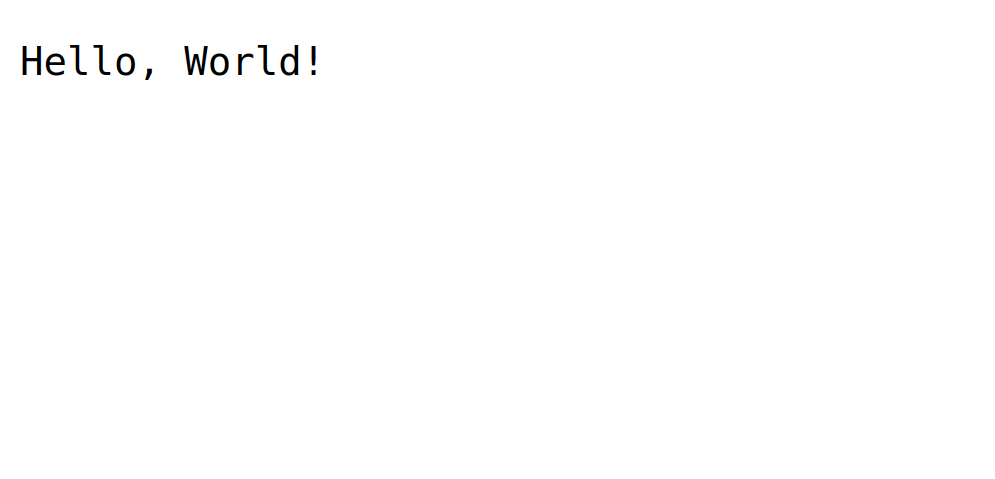
The above code creates a basic Python web application that displays a
Hello, World!prompt. Within the application:- The
hello_worldfunction prints theHello, World!string when called. if __name__ == "__main__":: Checks if the script runs as the main program. This ensures that certain code elements run when the script starts with the main thread. If the script is the main program, it calls thehello_worldfunction.
- The
Create a new
server.pyfile to set up a basic HTTP application using the Pythonhttp.serverandsocketservermodules.console(python-env)$ nano server.py
Add the following code to the file.
pythonfrom http.server import SimpleHTTPRequestHandler from socketserver import TCPServer from threading import Thread class HelloWorldHandler(SimpleHTTPRequestHandler): def do_GET(self): # Handle GET requests self.send_response(200) self.send_header("Content-type", "text/plain") self.end_headers() self.wfile.write(b"Hello, World!") def start_server(): # Set up the HTTP server with custom handler server_address = ("", 8000) httpd = TCPServer(server_address, HelloWorldHandler) print("Server is running at http://localhost:8000") try: # Serve indefinitely httpd.serve_forever() except KeyboardInterrupt: # Handle keyboard interrupt to gracefully shut down the server print("Shutting down the server.") httpd.shutdown() if __name__ == "__main__": # Start the server in a separate thread server_thread = Thread(target=start_server) server_thread.start() # Run the main application from app import hello_world hello_world() # Wait for the server thread to finish server_thread.join()
Save and close the file.
The above application code responds to incoming GET requests with a
Hello, World!prompt. Within the code:HelloWorldHandler: Defines a custom handler class that inherits theSimpleHTTPRequestHandlerHTTP module function to handle GET requests.start_server: Creates aTCPServerinstance running on the host port8000. In addition, it capturesKeyboardInterruptexceptions Ctrl + C interrupts to gracefully shut down the server.(if __name__ == "__main__":): Starts the HTTP server in a separate thread using theThread(target=start_server)function. Then, it imports and calls ahello_worldfunction from theappmodule.server_thread.join()waits for the server thread to complete before closing the connection.
Start the Python application as a background task in your server session.
console(python-env)$ python3 server.py &
Output:
Server is running at http://localhost:8000Send a GET request to the host port
8000to verify access to the application.console(python-env)$ curl -X GET -H "Content-Type: application/json" http://localhost:8000
Output:
Hello, World!When the above GET request fails, verify that no conflicting applications run on the defined host port
8000.View the background application Job ID.
console$ jobs
Output:
[1] python3 server.py &Stop the application by Job ID. For example
1.console(python-env)$ kill %1
Deactivate your virtual environment.
console(python-env)$ deactivate
Containerize the Python Web Application
Create a new Dockerfile
Dockerfileto set up your Python application container image.console$ nano Dockerfile
Add the following contents to the file.
DockerfileFROM python:3.8-slim WORKDIR /app COPY . /app CMD ["python3", "./server.py"]
Save and close the file.
The above Dockerfile configuration defines the Python container directory and run-time structure. Within the configuration:
FROM python:3.8-slim: Uses the official Python 3.8 image as the base image to run the container.WORKDIR /app: Sets the working directory to/appinside the container.COPY . /app: Copies data from your project directory to the container.CMD ["python3", "./server.py"]: Runs theserver.pyscript when the container starts.
Build the Docker image with all directory files.
console$ docker build -t python-app .
View the local Docker images to verify that the application is available.
console$ docker images
Output:
REPOSITORY                         TAG         IMAGE ID       CREATED          SIZE
python-app                               latest             86ff1e8041fe   19 seconds ago   180MB
Push the Python Application Image to the Vultr Container Registry
To store and use the Python application image on a platform such as Kubernetes, push the image to the Vultr Container Registry to ship it to your target environments as described in the steps below.
Log in to your Vultr Container Registry. Replace
pythonregistry,vcr-user,vcr-passwordwith your actual registry details.console$ docker login https://sjc.vultrcr.com/pythonregistry -u vcr-user -p vcr-password
Tag the local Docker image with your target Vultr Container Registry repository.
console$ docker tag python-app:latest sjc.vultrcr.com/pythonregistry/python-app:latest
View the list of available Docker images and verify that the registry image is available.
console$ docker images
Output:
sjc.vultrcr.com/pythonregistry/python-app    latest             5594b65d7cd5   3 minutes ago   159MB
python-app                                   latest             01acb92c461c   3 minutes ago   159MB
python                                       3.8-slim           067655fb1c09   2 months ago    128MB
Push your Python application image to the Vultr Container Registry.
console$ docker push sjc.vultrcr.com/pythonregistry/python-app:latest
Output:
The push refers to repository [sjc.vultrcr.com/pythonregistry/python-app]
1.2e1e26d6f: Pushed
1.df21a05: Pushed
b081d565ce24: Pushed
e67a1acfc698: Pushed
1.8551e70: Pushed
da5d55102092: Pushed
fb1bd2fc5282: Pushed
latest: digest: sha256:4a523aab91202e4d79d9456672571ae855a7227590d2dd63de11498bf64f098c size: 1788
Start a new Docker container using your registry container image to test access to the application.
console$ docker run -dit -p 8000:8000 sjc.vultrcr.com/pythonregistry/python-app:latest
View the list of running Docker containers to verify that your application container is available.
console$ docker ps
Output:
CONTAINER ID   IMAGE               COMMAND                 CREATED         STATUS         PORTS                                       NAMES
cfaf3ab6bfac   python-app:latest   "python3 ./server.py"   8 seconds ago   Up 7 seconds   0.0.0.0:8000->8000/tcp, :::8000->8000/tcp   jovial_brattain
Send a new GET request to the host port
8000to verify access to the application container.$ curl -X GET -H "Content-Type: application/json" http://127.0.0.1:8000Output:
Hello, World!
Deploy the Python Application in a Kubernetes Cluster
To securely deploy your containerized Python application in a production environment such as a Kubernetes cluster, set up access to your Vultr Container Registry and install the application image as a new Deployment resource. When deployed, your application container listens for incoming connections on port 8000 as defined in the container configuration. Follow the steps below to deploy and use your Python application image in a Vultr Kubernetes Engine (VKE) cluster.
Access your Vultr Container Registry control panel.
Navigate to the Docker/Kubernetes tab, and click Generate Kubernetes YAML to generate a new registry Secret resource configuration.
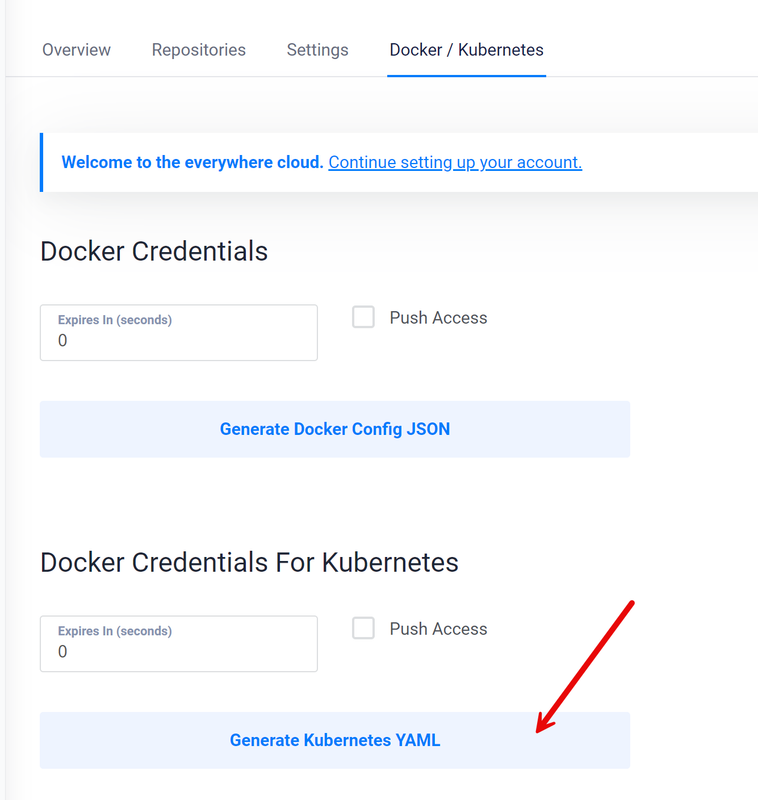
Create a new Secret resource file
secret.yaml.console$ nano secret.yaml
Add your generated Vultr Container Registry YAML configuration to the file similar to the one below:
apiVersion: v1
kind: Secret
metadata:
  name: vultr-cr-credentials
data:
  .dockerconfigjson: example-json
type: kubernetes.io/dockerconfigjson
Save and close the file.
Deploy the Secret to your cluster.
console$ kubectl apply -f secret.yaml
View the cluster resources to verify that your registry credentials are ready to use.
console$ kubectl get secret
Output:
NAME                   TYPE                             DATA   AGE
vultr-cr-credentials   kubernetes.io/dockerconfigjson   1      29m
Create a new Deployment resource file
deployment.yamlto describe how to run your application in a pod.console$ nano deployment.yaml
Add the following configurations to the file. Replace
sjc.vultrcr.com/pythonregistry/python-app:latestwith your actual Vultr Container Registry repository.yamlkind: Deployment apiVersion: apps/v1 metadata: name: python-app spec: replicas: 3 selector: matchLabels: app: python-app template: metadata: labels: app: python-app spec: containers: - name: python-app image: sjc.vultrcr.com/pythonregistry/python-app:latest ports: - containerPort: 8000 imagePullSecrets: - name: vultr-cr-credentials
Save and close the file.
Apply the deployment to your cluster.
console$ kubectl apply -f deployment.yaml
View the cluster deployments to verify that the new resource is available.
console$ kubectl get deployment
Output:
NAME         READY   UP-TO-DATE   AVAILABLE   AGE
python-app   3/3     3            3           21s
View the cluster pods to verify all pods associated with your deployment.
console$ kubectl get pods
Output:
NAME                          READY   STATUS    RESTARTS   AGE
python-app-6cb76cfc8d-5wjbf   1/1     Running   0          35s
python-app-6cb76cfc8d-tphrx   1/1     Running   0          35s
python-app-6cb76cfc8d-txk5p   1/1     Running   0          35s
Securely Expose the Python Application for External Access
To Expose your Python application for external access using your Vultr Kubernetes Engine (VKE) cluster, install an Ingress controller to map your application service to a domain name. The controller securely routes all application requests from your domain name to the backend Python application service. Follow the steps below to expose the application in your VKE cluster.
Add the NGINX ingress repository to your Helm sources.
console$ helm repo add ingress-nginx https://kubernetes.github.io/ingress-nginx
Update the Helm repository index.
console$ helm repo update
Install the NGINX Ingress Controller to your cluster using Helm.
console$ helm install nginx-ingress ingress-nginx/ingress-nginx --set controller.publishService.enabled=true
Wait for at least
3minutes for the Nginx Ingress Controller to install all necessary CRDs. Then, view the controller services to verify the assigned load balancer IP address.console$ kubectl get service --namespace default nginx-ingress-ingress-nginx-controller
Output:
NAME                                     TYPE           CLUSTER-IP     EXTERNAL-IP     PORT(S)                      AGE
nginx-ingress-ingress-nginx-controller   LoadBalancer   10.98.94.149   192.0.2.100   80:32671/TCP,443:32325/TCP   2m58s
Keep note of the Ingress controller EXTERNAL-IP value to externally access your cluster services.
Set Up a new domain A record pointing to the Ingress controller public IP address. For example,
app.example.com.Create a new Python Service resource file
service.yamlconsole$ nano service.yaml
Add the following contents to the file.
yamlapiVersion: v1 kind: Service metadata: name: python-app spec: selector: app: python-app ports: - protocol: TCP port: 80 targetPort: 8000
Save and close the file.
The above Service configuration forwards all network requests on the HTTP port
80to your Python application port8000.Apply the Service to your cluster.
console$ kubectl apply -f service.yaml
Create a new Ingress resource file
ingress.yamlto expose the Python application service.console$ nano ingress.yaml
Add the following contents to the file. Replace
app.example.comwith your actual domain,yamlapiVersion: networking.k8s.io/v1 kind: Ingress metadata: name: nginx-ingress namespace: default annotations: kubernetes.io/ingress.class: nginx spec: rules: - host: app.example.com http: paths: - backend: service: name: python-app port: number: 80 path: / pathType: Prefix
Save and close the file.
The above Ingress configuration forwards all root requests from
app.example.comto your Python application service on port80.Apply the Ingress resource to your cluster.
console$ kubectl apply -f ingress.yaml
View the cluster Ingress objects and verify that the new resource is available.
console$ kubectl get ingress
Output:
NAME            CLASS   HOSTS              ADDRESS         PORTS   AGE
nginx-ingress   nginx   app.example.com   192.0.2.100   80      32s
Access your domain using a web browser such as Firefox to test access to the application.
Conclusion
You have containerized a Python application and stored it in a Vultr Container Registry repository for deployment in a VKE cluster. Shipping Python web applications as container images enables the efficient management and upgrade of application components for deployment in multiple environments.