
How to Monitor Application Logs in Kubernetes using Loki
Introduction
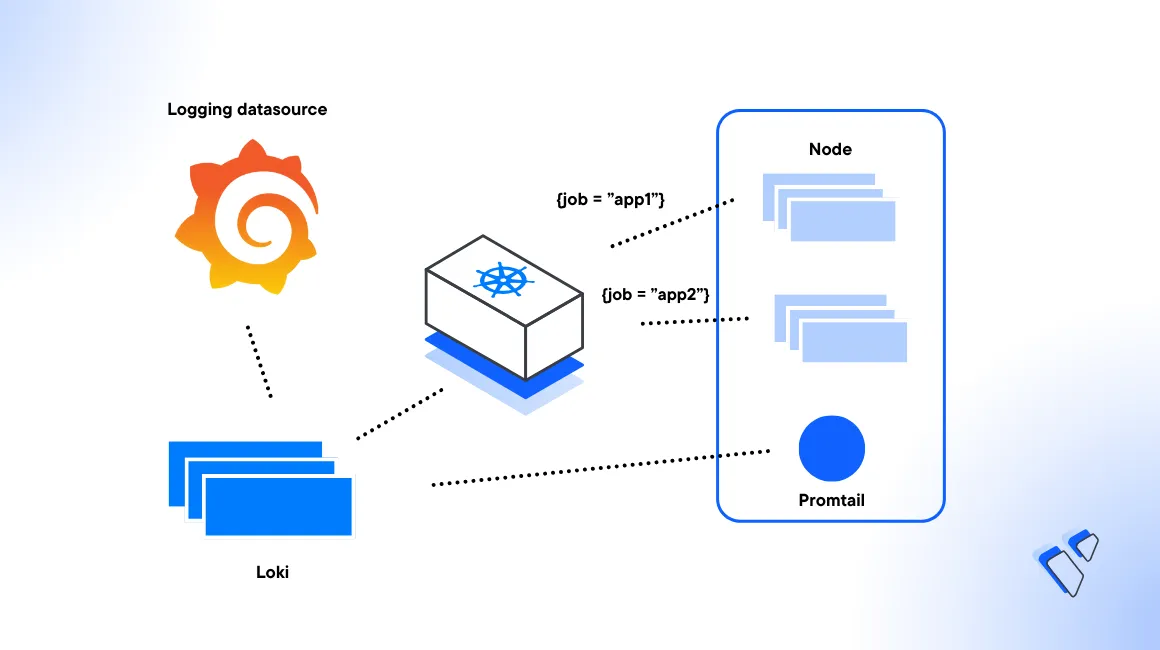
Loki is a log aggregation system. The Loki stack comprises of three components that work with Grafana and Promtail to enable application log monitoring within a Kubernetes cluster.
Loki is the core component responsible for log ingestion, storage, and query processing while Promtail acts as the agent responsible for collecting log information from cluster sources. In addition, the Grafana dashboard serves as the main interface for querying, visualizing, and exploring the log data stored in Loki.
This article explains how to monitor application logs in Kubernetes using Loki. You are to deploy the Loki stack in a Vultr Kubernetes Engine (VKE) cluster, deploy a sample application, and monitor logs using the Grafana dashboard.
Prerequsites
Before you begin:
Deploy a Vultr Kubernetes Engine (VKE) cluster with at least
3nodes and4096 MBper worker nodeDeploy a OneClick Docker instance using the Vultr Marketplace application to use as the management workstation.
Create a new Vultr Container Registry to store containerized application images.
Access your management server using SSH as a non-root sudo user.
Install and Configure Kubectl to access your VKE cluster.
Install the Helm package manager.
console$ sudo snap install helm --classic
Install the Loki stack
Add the
grafanaHelm repository to your sources.console$ helm repo add grafana https://grafana.github.io/helm-charts
Install the Loki stack to your cluster using the Helm chart.
console$ helm install loki grafana/loki-stack -n loki-stack --set grafana.enabled=true --set grafana.service.type=LoadBalancer --create-namespace
The above command installs the Loki stack with Grafana enabled, and sets up a
LoadBalancerservice which in turn creates a Vultr Load Balancer for external access. In addition, a new namespaceloki-stackis created to centralize all Loki resources.When successful, your output should be similar to the one below:
The Loki stack has been deployed to your cluster. Loki can now be added as a datasource in Grafana.
See http://docs.grafana.org/features/datasources/loki/ for more detail.
Wait for at least
2minutes for the deployment process to complete. Then, view all Pods in theloki-stacknamespace.console$ kubectl get pods -n loki-stack
Output:
NAME                            READY   STATUS    RESTARTS   AGE
loki-0                          1/1     Running   0          2m
loki-grafana-84d9c8dd87-sqtjr   2/2     Running   0          2m
loki-promtail-mft9z             1/1     Running   0          2m
Create a Sample Cluster Application
To test the Loki stack functionalities, follow the steps below to create a sample Golang application to run and monitor within your Kubernetes cluster.
Create a new application directory.
console$ mkdir vke-loki
Switch to the directory.
console$ cd vke-loki
Create a new main application file
main.gousing a text editor such as Nano.console$ nano main.go
Add the following contents to the file.
gopackage main import ( "log" "net/http" ) func main() { http.HandleFunc("/", func(w http.ResponseWriter, r *http.Request) { log.Println("Received request for path:", r.URL.Path) w.Write([]byte("Hello, World!")) }) http.HandleFunc("/error", func(w http.ResponseWriter, r *http.Request) { log.Println("Simulating an error...") http.Error(w, "simulated error", http.StatusInternalServerError) }) log.Println("Starting server on :8080") if err := http.ListenAndServe(":8080", nil); err != nil { log.Fatal(err) } }
Save and close the file.
The above application code defines an HTTP server that runs on the host port
8080using thenet/httpstandard library package. Themainfunction sets up two HTTP handlers, the root (/) and/errorpaths. When triggered, the root handler responds with a"Hello, World!"message and logs information about the received request, while the/errorhandler simulates an error by returning a simulated internal server error (HTTP status code500). The server is configured to listen on port8080.Create a new dependency file
go.mod.console$ nano go.mod
Add the following contents to the file.
gomodule go-web-app go 1.21.4
Save and close the file.
Containerize the Application
Create a Dockerfile to define the application container environment.
console$ nano Dockerfile
Add the following contents to the file.
dockerfileFROM golang AS build WORKDIR /app COPY go.mod ./ COPY main.go ./ RUN CGO_ENABLED=0 go build -o /go-app FROM gcr.io/distroless/base-debian10 WORKDIR / COPY --from=build /go-app /go-app EXPOSE 8080 USER nonroot:nonroot ENTRYPOINT ["/go-app"]
Save and close the file.
The above configuration defines a multi-stage build for the Go application. Within the first stage, it uses the official Golang base image to build the application. Then, it uses
/appas the working directory, copies thego.modandmain.gofiles, and builds the Go application withCGOdisabled, to create thego-appbinary.The second stage uses the
gcr.io/distroless/base-debian10image,/as the working directory. Then. it copies the compiled binary from the build stage to/go-appthat works as the application entry point that listens for connections on port8080.Build the Docker image.
console$ docker build -t go-web-app .
Export your Vultr Container Registry access credentials as environmental variables to store Docker images.
console$ export VULTR_CONTAINER_REGISTRY_USERNAME=<enter the Vultr Container Registry username> $ export VULTR_CONTAINER_REGISTRY_API_KEY=<enter the Vultr Container Registry API key> $ export VULTR_CONTAINER_REGISTRY_NAME=<enter the Vultr Container Registry name>
Log in to your Vultr Container Registry.
console$ docker login https://sjc.vultrcr.com/$VULTR_CONTAINER_REGISTRY_NAME -u $VULTR_CONTAINER_REGISTRY_USERNAME -p $VULTR_CONTAINER_REGISTRY_API_KEY
Output:
Login SucceededTag the local Docker image with the Vultr Container Registry repository name.
console$ docker tag go-web-app:latest sjc.vultrcr.com/$VULTR_CONTAINER_REGISTRY_NAME/go-web-app:latest
Push the image to your registry.
console$ docker push sjc.vultrcr.com/$VULTR_CONTAINER_REGISTRY_NAME/go-web-app:latest
Apply Vultr Container Registry Credentials to the Kubernetes Cluster
Access your Vultr Container Registry control panel in the Vultr Console.
Navigate to the Docker/Kubernetes tab.
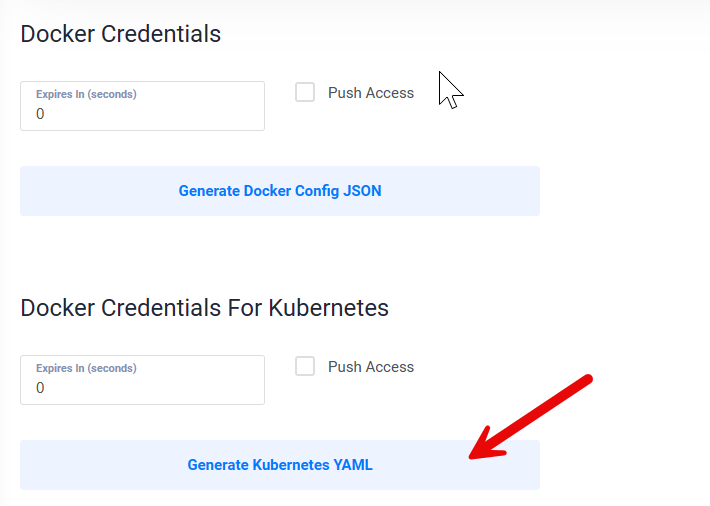
Click Generate Kubernetes YAML within the Docker Credentials For Kubernetes section to generate a new YAML file with your access details.
Open the downloaded file and copy all contents to your clipboard.
Create a new Secret resource file
secret.yaml.console$ nano secret.yaml
Paste your generated Kubernetes YAML contents to the file. For example:
yamlapiVersion: v1 kind: Secret metadata: name: vultr-cr-credentials data: .dockerconfigjson: eyJhifX19 type: kubernetes.io/dockerconfigjson
Apply the Secret to your VKE cluster.
console$ kubectl apply -f secret.yaml
When successful, all cluster resources can access and pull data from your Vultr Container Registry repositories.
Deploy the Sample Application to your VKE cluster
Create a new Deployment resource file
app.yaml.console$ nano app.yaml
Add the following contents to the file. Replace
testregwith your actual Vultr Container Registry name.yamlapiVersion: apps/v1 kind: Deployment metadata: name: go-web-app labels: app: go-web-app spec: replicas: 1 selector: matchLabels: app: go-web-app template: metadata: labels: app: go-web-app spec: containers: - name: go-web-app image: sjc.vultrcr.com/testreg/go-web-app:latest imagePullPolicy: Always imagePullSecrets: - name: vultr-cr-credentials --- apiVersion: v1 kind: Service metadata: name: go-web-app-service labels: app: go-web-app-service spec: type: LoadBalancer ports: - port: 8080 selector: app: go-web-app
Save and close the file.
The above configuration creates a new Deployment and Service resource for the Go web application with the following specifications:
- The
Deploymentspecifies a container within aPodthat uses the Go web application image from your Vultr Container Registry. - The Service uses the
LoadBalancerresource to expose the application port8080and direct traffic to Pods with thego-web-applabel. - The
imagePullSecretssection uses thevultr-cr-credentialsSecret variable to authenticate and pull the container image from your Vultr Container Registry repository.
- The
Deploy the application to your cluster.
console$ kubectl apply -f app.yaml
Wait for at least
1minute for the deployment process to complete, then, view all Pods with thego-web-applabel.console$ kubectl get pods -l=app=go-web-app
Your output should be similar to the one below:
NAME                          READY   STATUS             RESTARTS   AGE
go-web-app-76c9ffdf67-dgh86   1/1     Running            0          20s
Access the Grafana Dashboard
Retrieve the default Grafana login password from the
loki-grafanaSecret.console$ kubectl get secret -n loki-stack loki-grafana -o jsonpath="{.data.admin-password}" | base64 --decode ; echo
Copy the generated administrator password similar to the one below:
AABBHHS662SHHView the
loki-grafanaService and retrieve the assigned Vultr Load Balancer IP Address for external access.console$ kubectl get svc loki-grafana -n loki-stack -o=jsonpath='{.status.loadBalancer.ingress[0].ip}'
Your output should be similar to the one below:
192.168.0.240Visit your cluster Load Balancer IP to access the Grafana web interface using a web browser such as Chrome.
http://192.168.0.240/loginWhen prompted, enter the following details in the respective fields to log in.
- Username:
admin - Password:
Your Generated Password
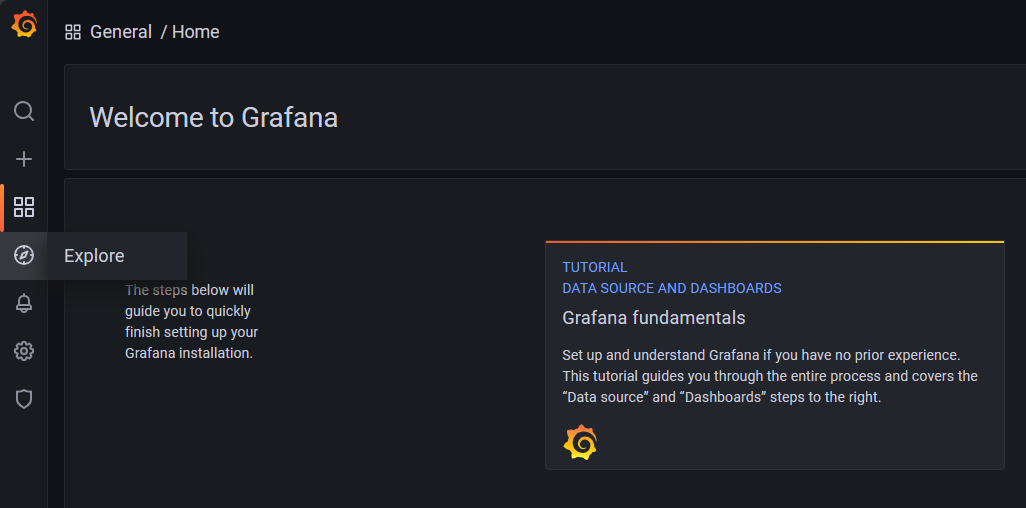
When successful, navigate to Explore within the Grafana dashboard.
- Username:
Invoke the application
Open your SSH session and view the
go-web-appLoad Balancer Service IP Address. Access the application endpoint using Vultr Load Balancer. To get the Load Balancer IP, run the below command:console$ kubectl get svc go-web-app-service -o=jsonpath='{.status.loadBalancer.ingress[0].ip}'
Your output should be similar to the one below:
102.168.0.200Test access to the application on port
8080using the Curl utility.console$ curl http://192.168.0.200:8080
Output:
Hello, World!To generate more HTTP traffic, invoke the application endpoint using the
forloop.console$ for i in {1..100}; do curl http://192.168.0.200:8080/ & done; wait
To simulate an error scenario, invoke a different endpoint such as
error.console$ curl http://192.168.0.200:8080/error
Generate more HTTP traffic for the error scenario using the
forloop.console$ for i in {1..50}; do curl http://192.168.0.200:8080/error & done; wait
Query the Application Logs with Grafana
Switch to your web browser session, and access the Grafana dashboard.
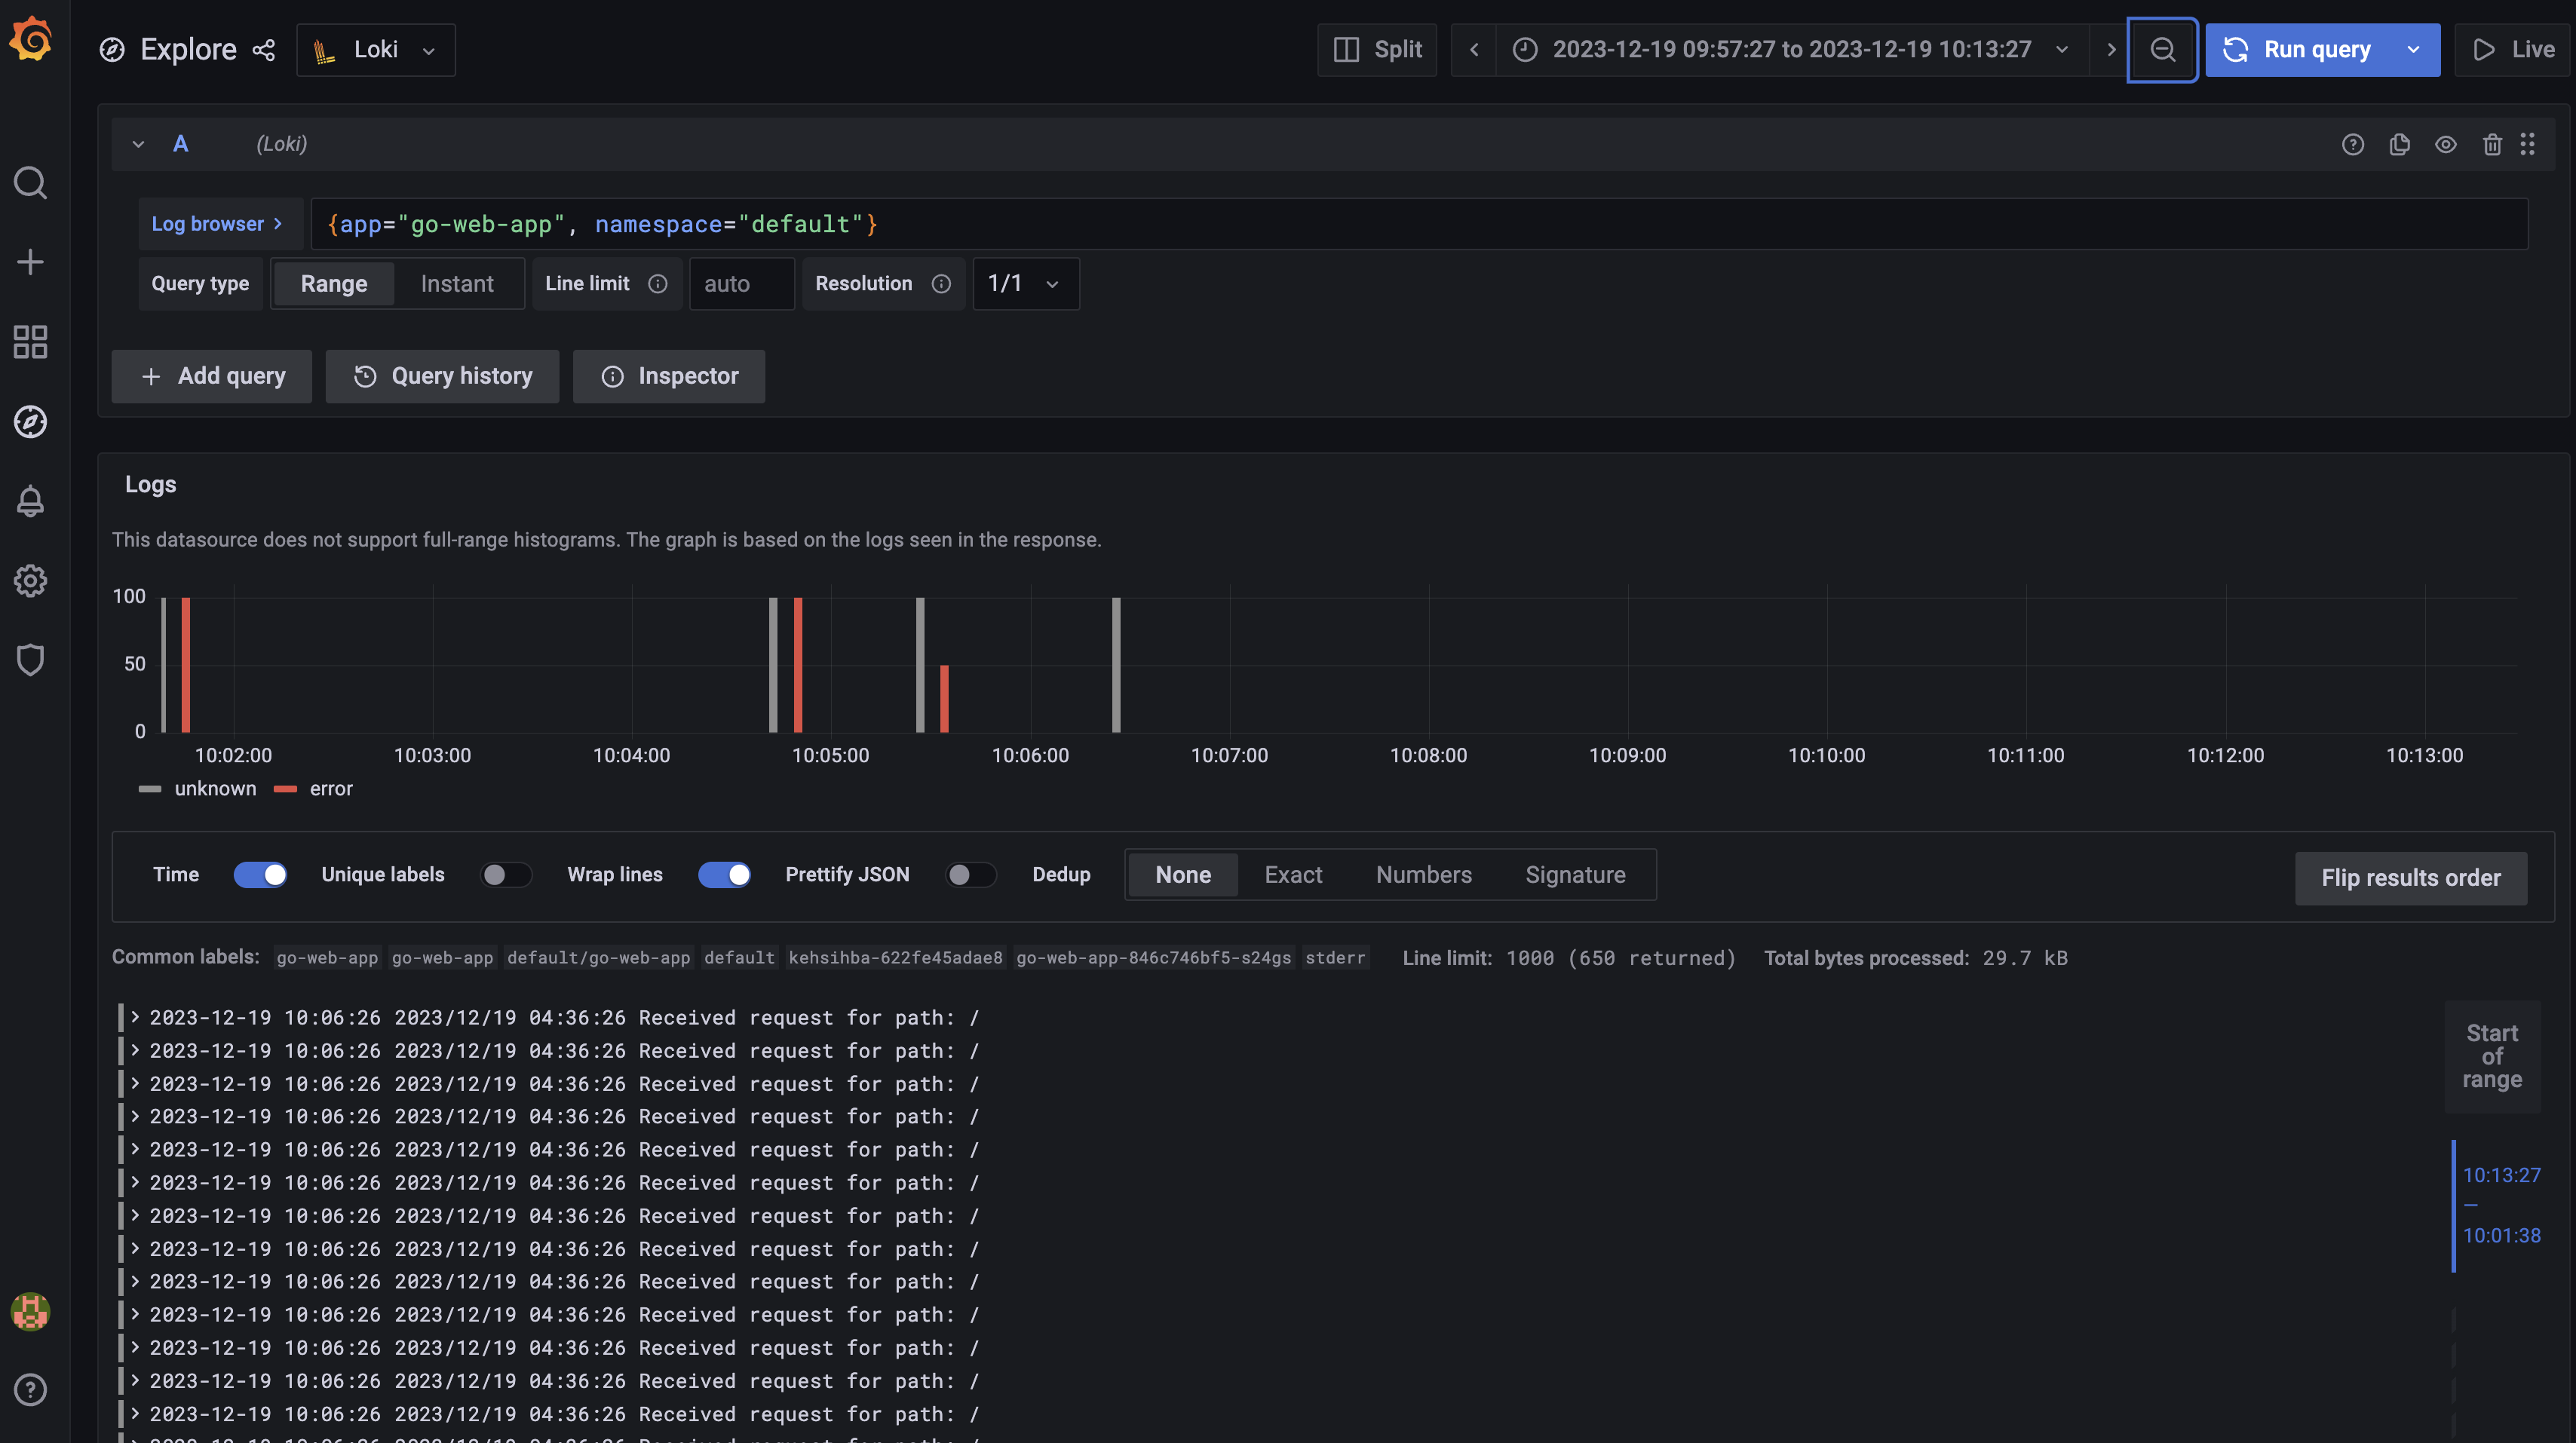
Within the Explore section, enter the following query in the Log browser field.
{app="go-web-app", namespace="default"}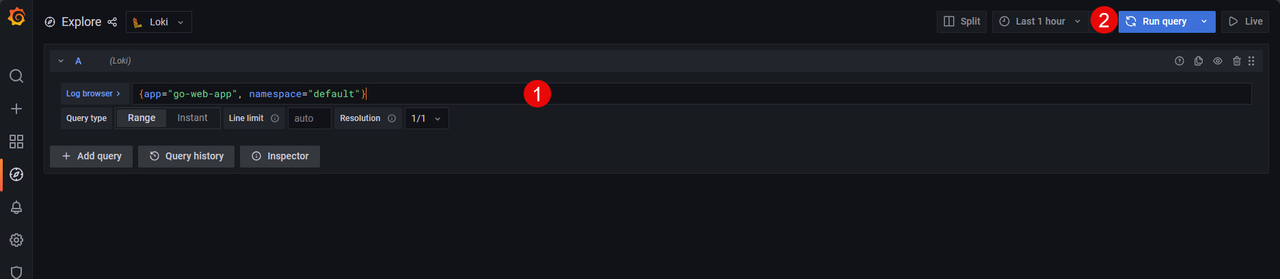
Click Run query to execute the statement and view all application access metrics.
Conclusion
You have deployed the Loki stack to a VKE cluster and monitored application logs using Grafana. In the process, you containerized a sample application image to the Vultr Container Registry to experiment with different Loki stack functionalities. For more information and implementation samples, visit the Loki documentation.
More Information
For more information, visit the following resources.
- Grafana documentation
- Promtail documentation
- Install Prometheus and Grafana on Vultr Kubernetes Engine with Prometheus-Operator