
How to Deploy a PostgreSQL Cluster with Patroni and HAProxy on Ubuntu 24.04
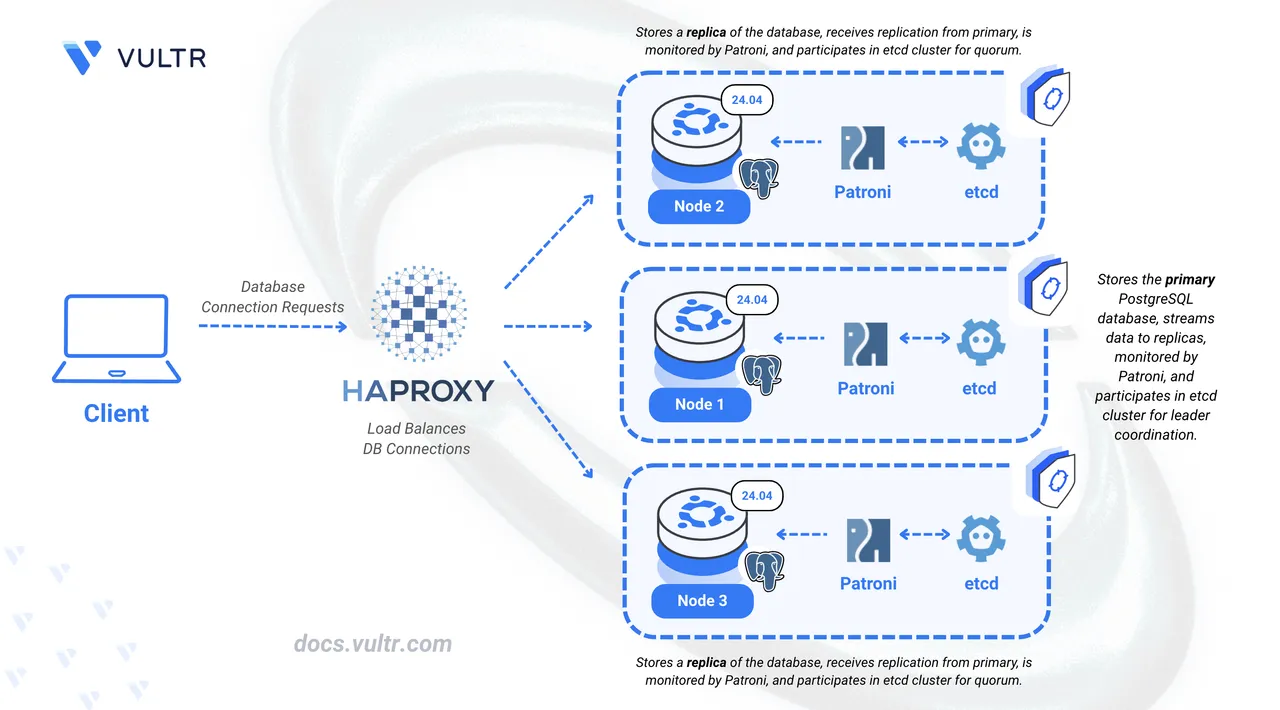
PostgreSQL is a powerful, robust, and scalable open-source relational database management system. Critical applications require high availability through replication and load balancing in a cluster architecture. A Patroni cluster requires an odd number of nodes to maintain quorum safety. Quorum refers to the rule that the majority of nodes must agree to elect a leader or make changes. With three nodes, if one fails, the remaining two still form a majority, allowing the cluster to continue operating safely.
This article shows you how to build a three-node PostgreSQL cluster on Ubuntu 24.04 using Patroni for automated replication and failover, and HAProxy to load-balance client requests.
Prerequisites
Before you begin, ensure you:
Have access to three Ubuntu 24.04 servers with at least 2 CPU cores and 4 GB RAM, as a non-root sudo users.
Install PostgreSQL on all three servers.
A registered domain with A records for three subdomains pointing to each server's IP address:
node1.example.comnode2.example.comnode3.example.com
Replace all domain placeholders throughout this article with your actual values. For example, if your domain isNotemydb.com, replacenode1.example.comwithnode1.mydb.com.
Install Dependencies
Install required packages, configure firewall ports, and set up SSL certificates for secure cluster communication.
Install Packages and Configure Firewall
Update the system package index of each node.
console$ sudo apt update
Install HAProxy, Certbot, and required Python packages on each node.
console$ sudo apt install haproxy certbot pipx -y
Install Patroni and its dependencies using pip3.
console$ sudo pip3 install --break-system-packages 'patroni[etcd3]' psycopg2-binary psycopg
Download and install etcd binaries on each node.
console$ wget https://github.com/etcd-io/etcd/releases/download/v3.6.4/etcd-v3.6.4-linux-amd64.tar.gz $ tar -xvf etcd-v3.6.4-linux-amd64.tar.gz $ sudo mv etcd-v3.6.4-linux-amd64/etcd etcd-v3.6.4-linux-amd64/etcdctl /usr/local/bin/
Open required firewall ports on each node.
console$ sudo ufw allow 80,2379,2380,5432,5433,8008,8009/tcp
The ports serve the following purposes:
- 80: Certbot SSL certificate verification
- 2379, 2380: etcd client and peer communication
- 5432, 5433: PostgreSQL and Patroni-managed PostgreSQL
- 8008, 8009: Patroni REST API
Reload the firewall.
console$ sudo ufw reload
Verify firewall configuration.
console$ sudo ufw status
Configure SSL Certificates
Set up Let's Encrypt SSL certificates for secure cluster communication.
Request SSL certificates for each node. Run this command on Node1:
console$ sudo certbot certonly --standalone -d node1.example.com -m admin@example.com --agree-tos --no-eff
Repeat for Node2 and Node3, updating the subdomain for each node.
Create a certificate preparation script on each node. Update the
HOSTNAMEvariable with subdomain for each node.console$ sudo nano /usr/local/bin/prepare-ssl-certs.sh
Add the following content, updating
HOSTNAMEfor each node:bash#!/bin/bash # SSL Certificate Setup Script HOSTNAME="node1.example.com" # Update for each node CERT_DIR="/etc/letsencrypt/live/$HOSTNAME" ARCHIVE_DIR="/etc/letsencrypt/archive/$HOSTNAME" # Create ssl-users group getent group ssl-users >/dev/null || sudo groupadd ssl-users # Create users and add to ssl-users group for user in etcd patroni haproxy postgres; do if ! id "$user" >/dev/null 2>&1 && [[ "$user" == "etcd" || "$user" == "patroni" ]]; then getent group "$user" >/dev/null && sudo useradd -r -m -s /bin/bash -g "$user" "$user" || sudo useradd -r -m -s /bin/bash "$user" fi groups "$user" 2>/dev/null | grep -q ssl-users || sudo usermod -aG ssl-users "$user" done # Create combined certificate and set permissions cat "$CERT_DIR/fullchain.pem" "$CERT_DIR/privkey.pem" > "$CERT_DIR/combined.pem" sudo chmod 755 /etc/letsencrypt /etc/letsencrypt/live /etc/letsencrypt/archive sudo chgrp ssl-users "$CERT_DIR" "$ARCHIVE_DIR" sudo chmod 755 "$CERT_DIR" "$ARCHIVE_DIR" sudo chown root:ssl-users "$ARCHIVE_DIR"/*.pem "$CERT_DIR/combined.pem" sudo chmod 644 "$ARCHIVE_DIR"/cert*.pem "$ARCHIVE_DIR"/chain*.pem "$ARCHIVE_DIR"/fullchain*.pem sudo chmod 640 "$ARCHIVE_DIR"/privkey*.pem "$CERT_DIR/combined.pem" # Add linuxuser to ssl-users group id "linuxuser" >/dev/null 2>&1 && ! groups linuxuser | grep -q ssl-users && sudo usermod -aG ssl-users linuxuser echo "SSL certificate setup completed for $HOSTNAME"
Make the script executable.
console$ sudo chmod +x /usr/local/bin/prepare-ssl-certs.sh
Run the script.
console$ sudo /usr/local/bin/prepare-ssl-certs.sh
Create an SSL renewal hook script on each node.
console$ sudo nano /usr/local/bin/prepare-renewed-ssl-certs.sh
Add the following content, updating
HOSTNAMEfor each node:bash#!/bin/bash # SSL Certificate Renewal Hook Script HOSTNAME="node1.example.com" # Update for each node CERT_DIR="/etc/letsencrypt/live/$HOSTNAME" ARCHIVE_DIR="/etc/letsencrypt/archive/$HOSTNAME" # Recreate combined certificate for HAProxy cat "$CERT_DIR/fullchain.pem" "$CERT_DIR/privkey.pem" > "$CERT_DIR/combined.pem" 2>/dev/null # Reset permissions after renewal chmod 755 /etc/letsencrypt /etc/letsencrypt/live /etc/letsencrypt/archive 2>/dev/null chgrp ssl-users "$CERT_DIR" "$ARCHIVE_DIR" 2>/dev/null chmod 755 "$CERT_DIR" "$ARCHIVE_DIR" 2>/dev/null chown root:ssl-users "$ARCHIVE_DIR"/*.pem "$CERT_DIR/combined.pem" 2>/dev/null chmod 644 "$ARCHIVE_DIR"/cert*.pem "$ARCHIVE_DIR"/chain*.pem "$ARCHIVE_DIR"/fullchain*.pem 2>/dev/null chmod 640 "$ARCHIVE_DIR"/privkey*.pem "$CERT_DIR/combined.pem" 2>/dev/null # Reload services after certificate renewal systemctl is-active --quiet haproxy && systemctl reload haproxy 2>/dev/null systemctl is-active --quiet postgresql && systemctl reload postgresql 2>/dev/null systemctl is-active --quiet patroni && systemctl restart patroni 2>/dev/null systemctl is-active --quiet etcd && { sleep $((RANDOM % 30)); systemctl restart etcd 2>/dev/null; }
Make the renewal script executable.
console$ sudo chmod +x /usr/local/bin/prepare-renewed-ssl-certs.sh
Configure automatic renewal hooks. Run on Node1:
console$ echo 'renew_hook = /usr/local/bin/prepare-renewed-ssl-certs.sh' | sudo tee -a /etc/letsencrypt/renewal/node1.example.com.conf
Repeat for Node2 and Node3, updating the subdomain for each node.
Configure etcd
Patroni uses etcd as a distributed key-value store for cluster coordination. Configure etcd with HTTPS security on all nodes.
Create the systemd service file for etcd.
console$ sudo nano /etc/systemd/system/etcd.service
Add the following configuration for Node1, replace
example.comwith your domain name:ini[Unit] Description=etcd key-value store Documentation=https://github.com/etcd-io/etcd After=network.target [Service] User=etcd Type=notify ExecStart=/usr/local/bin/etcd \ --name node1 \ --data-dir /var/lib/etcd \ --initial-cluster node1=https://node1.example.com:2380,node2=https://node2.example.com:2380,node3=https://node3.example.com:2380 \ --initial-cluster-state new \ --listen-peer-urls https://0.0.0.0:2380 \ --initial-advertise-peer-urls https://node1.example.com:2380 \ --listen-client-urls https://0.0.0.0:2379 \ --advertise-client-urls https://node1.example.com:2379 \ --cert-file /etc/letsencrypt/live/node1.example.com/fullchain.pem \ --key-file /etc/letsencrypt/live/node1.example.com/privkey.pem \ --peer-cert-file /etc/letsencrypt/live/node1.example.com/fullchain.pem \ --peer-key-file /etc/letsencrypt/live/node1.example.com/privkey.pem \ --client-cert-auth=false \ --peer-client-cert-auth=false \ --auto-tls=false \ --peer-auto-tls=false Restart=always RestartSec=5 LimitNOFILE=40000 [Install] WantedBy=multi-user.target
For Node2 and Node3, update:
--nameparameter withnode2ornode3value- Node specific URLs in
--initial-advertise-peer-urlsand--advertise-client-urls - Certificate paths to match each node's subdomain
Create the data and config directories.
console$ sudo mkdir -p /var/lib/etcd /etc/etcd
Set ownership and secure the data directory.
console$ sudo chown -R etcd:etcd /var/lib/etcd /etc/etcd $ sudo chmod 700 /var/lib/etcd
Reload systemd so it sees the new unit file.
console$ sudo systemctl daemon-reload
Enable the
etcdservice so it starts on boot.console$ sudo systemctl enable etcd
Start the
etcdservice.console$ sudo systemctl start etcd
Verify etcd cluster status.
console$ sudo systemctl status etcd
Check cluster membership.
console$ etcdctl --endpoints=https://node1.example.com:2379 member list
Output:
693741ed87a9350d, started, node1, https://node1.example.com:2380, https://node1.example.com:2379, false
d9554ae165b5de0b, started, node3, https://node3.example.com:2380, https://node3.example.com:2379, false
fecdfaa2d1b8f35c, started, node2, https://node2.example.com:2380, https://node2.example.com:2379, false
Verify cluster health.
console$ etcdctl --endpoints=https://node1.example.com:2379,https://node2.example.com:2379,https://node3.example.com:2379 endpoint health
Configure PostgreSQL
Configure PostgreSQL to use SSL certificates and optimize performance settings.
Edit PostgreSQL configuration on each node.
console$ sudo nano /etc/postgresql/18/main/postgresql.conf
Update the following settings for Node1:
ini# SSL Configuration ssl_cert_file = '/etc/letsencrypt/live/node1.example.com/fullchain.pem' ssl_key_file = '/etc/letsencrypt/live/node1.example.com/privkey.pem' # Memory Settings shared_buffers = 512MB work_mem = 8MB effective_cache_size = 1536MB
Update certificate paths for Node2 and Node3 accordingly.
Enforce SSL connections by editing pg_hba.conf.
console$ sudo nano /etc/postgresql/18/main/pg_hba.conf
Add this line at the end:
inihostssl all all 0.0.0.0/0 scram-sha-256Restart PostgreSQL.
console$ sudo systemctl restart postgresql
Verify SSL is enabled.
console$ sudo -u postgres psql -c "SHOW ssl;"
Output:
 ssl
-----
 on
(1 row)
Configure Patroni
Patroni manages PostgreSQL replication and automatic failover. Configure it on each node with HTTPS support.
Create the Patroni configuration file.
console$ sudo nano /etc/patroni.yaml
Add the following configuration for Node1:
yamlscope: postgres name: node1 restapi: listen: 0.0.0.0:8008 connect_address: node1.example.com:8008 certfile: /etc/letsencrypt/live/node1.example.com/fullchain.pem keyfile: /etc/letsencrypt/live/node1.example.com/privkey.pem etcd3: hosts: - node1.example.com:2379 - node2.example.com:2379 - node3.example.com:2379 protocol: https cacert: /etc/ssl/certs/ca-certificates.crt bootstrap: dcs: ttl: 30 loop_wait: 5 retry_timeout: 5 maximum_lag_on_failover: 1048576 initdb: - encoding: UTF8 - data-checksums pg_hba: - host replication replicator 0.0.0.0/0 scram-sha-256 - host all all 0.0.0.0/0 scram-sha-256 postgresql: listen: 0.0.0.0:5433 connect_address: node1.example.com:5433 data_dir: /var/lib/postgresql/18/main bin_dir: /usr/lib/postgresql/18/bin parameters: ssl: 'on' ssl_cert_file: '/etc/letsencrypt/live/node1.example.com/fullchain.pem' ssl_key_file: '/etc/letsencrypt/live/node1.example.com/privkey.pem' authentication: replication: username: replicator password: StrongPassword123! superuser: username: postgres password: StrongPassword123!
For Node2 and Node3, update:
namefieldconnect_addressURLs- Certificate file paths
Use the same passwords across all nodes.
Create the runtime directory for PostgreSQL.
console$ sudo mkdir -p /var/run/postgresql
Set ownership and permissions so the
patroniuser can use it.console$ sudo chown patroni:patroni /var/run/postgresql $ sudo chmod 755 /var/run/postgresql
Ensure the directory is recreated on reboot by adding a
tmpfiles.dentry.console$ echo 'd /var/run/postgresql 0755 patroni patroni -' | sudo tee /etc/tmpfiles.d/postgresql.conf
Prepare PostgreSQL data directory for Patroni.
Back up any existing data directory.
console$ sudo mv /var/lib/postgresql/18 /var/lib/postgresql/18.bak-$(date +%s) || true
Create the new PostgreSQL data directory for Patroni.
console$ sudo mkdir -p /var/lib/postgresql/18/main
Give ownership to the
patroniuser.console$ sudo chown -R patroni:patroni /var/lib/postgresql/18
Lock down permissions on the data dir.
console$ sudo chmod -R 700 /var/lib/postgresql/18
Make PostgreSQL binaries accessible (needed for some init scripts).
console$ sudo chmod o+rx /usr/lib/postgresql/18/bin/*
Stop PostgreSQL to let Patroni manage it.
console$ sudo systemctl stop postgresql
Create the Patroni systemd service.
console$ sudo nano /etc/systemd/system/patroni.service
Add the following configuration:
ini[Unit] Description=Patroni PostgreSQL cluster After=network.target [Service] Type=simple User=patroni Group=patroni ExecStart=/usr/local/bin/patroni /etc/patroni.yaml ExecReload=/bin/kill -HUP $MAINPID KillMode=process TimeoutSec=30 Restart=always RestartSec=5 [Install] WantedBy=multi-user.target
Reload systemd so it sees the unit file.
console$ sudo systemctl daemon-reload
Enable Patroni so it starts automatically on boot.
console$ sudo systemctl enable patroni
Start Patroni now and check it’s running.
console$ sudo systemctl start patroni
Verify cluster status.
console$ patronictl -c /etc/patroni.yaml list
Output:
+ Cluster: postgres (7561190282296399779) --+-----------+----+-------------+-----+------------+-----+
| Member | Host                   | Role    | State     | TL | Receive LSN | Lag | Replay LSN | Lag |
+--------+------------------------+---------+-----------+----+-------------+-----+------------+-----+
| node1  | node1.example.com:5433 | Leader  | running   |  1 |             |     |            |     |
| node2  | node2.example.com:5433 | Replica | streaming |  1 |   0/4000000 |   0 |  0/4000000 |   0 |
| node3  | node3.example.com:5433 | Replica | streaming |  1 |   0/4000000 |   0 |  0/4000000 |   0 |
+--------+------------------------+---------+-----------+----+-------------+-----+------------+-----+
Configure HAProxy
Set up HAProxy on all nodes to load balance PostgreSQL connections.
Remove the default configuration.
console$ sudo rm /etc/haproxy/haproxy.cfg
Create a new HAProxy configuration.
console$ sudo nano /etc/haproxy/haproxy.cfg
Add the following configuration (same for all nodes):
iniglobal daemon maxconn 4096 log stdout local0 stats socket /var/lib/haproxy/stats mode 660 level admin defaults mode tcp timeout connect 5000ms timeout client 50000ms timeout server 50000ms log global frontend postgres_ssl bind *:5432 default_backend postgres_backend backend postgres_backend balance roundrobin server node1 node1.example.com:5433 check inter 5000ms rise 2 fall 3 server node2 node2.example.com:5433 check inter 5000ms rise 2 fall 3 server node3 node3.example.com:5433 check inter 5000ms rise 2 fall 3 listen stats bind *:8404 mode http stats enable stats uri /stats stats refresh 30s
Restart HAProxy.
console$ sudo systemctl restart haproxy
Verify HAProxy status.
console$ sudo systemctl status haproxy
Test the Cluster
Verify high availability and automatic failover capabilities.
Connect to the cluster from a PostgreSQL client. Replace the password and domains:
console$ psql 'postgresql://postgres:StrongPassword123!@node1.example.com:5433,node2.example.com:5433,node3.example.com:5433/postgres?sslmode=require&target_session_attrs=read-write'
Check which node is currently serving as primary.
psqlpostgres=# SELECT inet_server_addr() as ip, CASE WHEN pg_is_in_recovery() THEN 'Replica' ELSE 'Primary' END as role;
Exit the psql console.
psqlpostgres=# \q
Test failover by stopping Patroni on the current leader node (for example, Node1).
console$ sudo systemctl stop patroni
Check the new cluster status from another node.
console$ patronictl -c /etc/patroni.yaml list
The output shows a new leader has been elected automatically.
Verify the cluster is still accessible through the connection string.
console$ psql 'postgresql://postgres:StrongPassword123!@node1.example.com:5433,node2.example.com:5433,node3.example.com:5433/postgres?sslmode=require&target_session_attrs=read-write'
Restart the stopped node to rejoin the cluster.
console$ sudo systemctl start patroni
Conclusion
You have successfully deployed a highly available PostgreSQL cluster on Ubuntu 24.04 using Patroni for replication management and HAProxy for load balancing. The cluster automatically handles node failures and ensures continuous database availability. All traffic is secured with SSL/TLS encryption. Consider adding monitoring tools like Prometheus and Grafana to track cluster health and performance metrics in production environments.