
How to Deploy ClickHouse on Kubernetes
ClickHouse is an open-source, column-oriented database management system designed for Online Analytical Processing (OLAP) workloads. It runs complex analytical queries across large datasets with sub-second response times. The official ClickHouse Kubernetes Operator extends the Kubernetes API to manage ClickHouse clusters using Custom Resource Definitions (CRDs), automating setup, scaling, and upgrades.
This article outlines the deployment of a ClickHouse cluster on Kubernetes using the official ClickHouse Operator. It covers the installation of the operator and its dependencies, deployment of a multi-replica cluster with ClickHouse Keeper for coordination, internal and external connectivity, and scaling considerations.
Prerequisites
Before you begin, you need to:
- Have a Kubernetes cluster with sufficient resources to run 3 Keeper pods and 2 ClickHouse replicas. For production deployments, use a cluster with at least 3 nodes, each with 8 vCPUs and a minimum of 16 GB RAM. Actual requirements vary based on data volume and query patterns. Refer to the official ClickHouse sizing guide for detailed hardware recommendations.
- Install and configure kubectl on your workstation to access your Kubernetes cluster.
- Install Helm on your workstation.
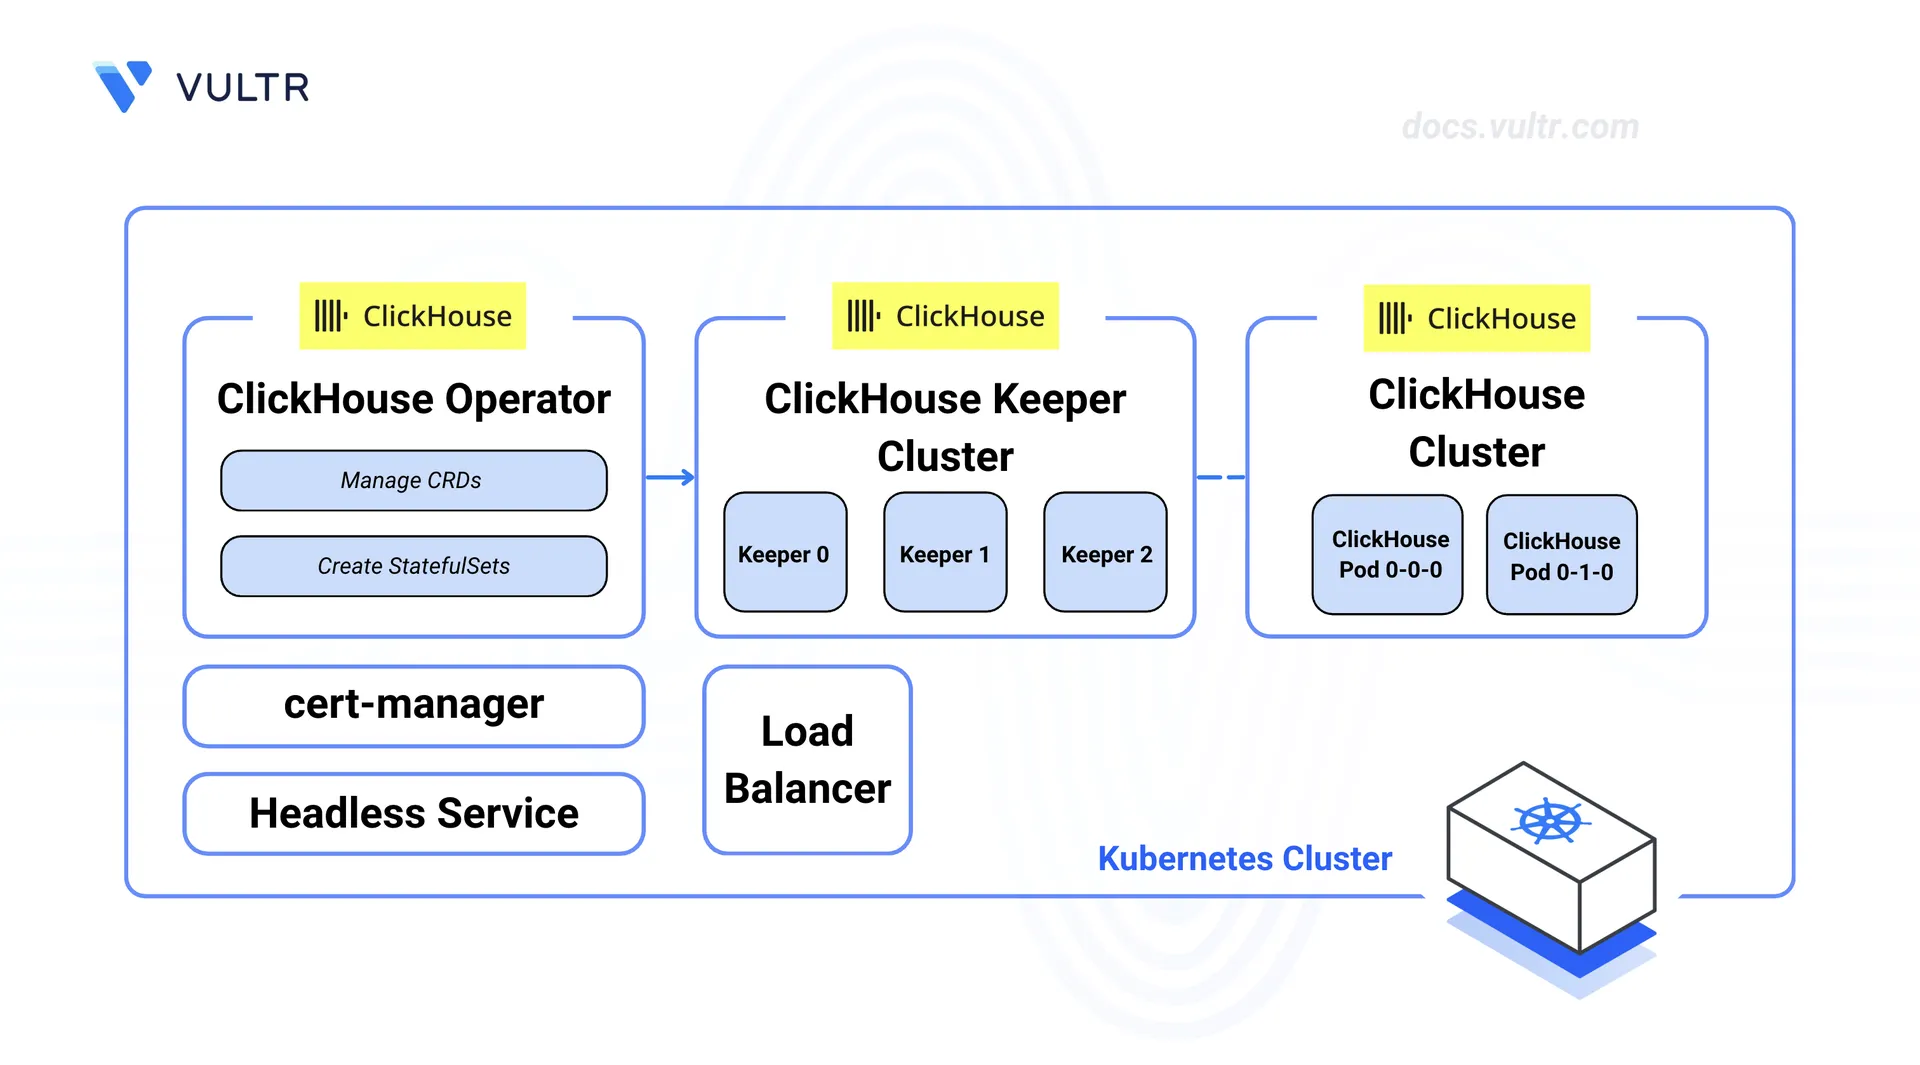
Architecture Overview
The deployment consists of three components managed by the ClickHouse Operator:
- ClickHouse Keeper: A group of three nodes that manages coordination between ClickHouse replicas, tracks replication data, and picks a leader node. Each Keeper node saves its data to a separate persistent volume claim (PVC) backed by block storage.
- ClickHouse Cluster: A two-replica database cluster that runs analytical queries. Each replica stores data on its own PVC backed by block storage. The ReplicatedMergeTree engine uses Keeper to keep data in sync across replicas.
- Load Balancer: An optional load balancer exposes the ClickHouse cluster for external access. Internal access within the cluster uses the service name directly, without needing a load balancer.
The ClickHouse Operator watches for Custom Resource Definitions and keeps the desired state by creating StatefulSets, Services, and storage as needed.
Install the Database Operator
The ClickHouse Operator manages the creation, updates, and removal of ClickHouse and Keeper clusters. It needs cert-manager to issue TLS certificates for its webhooks before the operator can start.
Install cert-manager using the Helm chart. cert-manager issues TLS certificates for the operator's webhooks, keeping communication between the operator and the Kubernetes API server secure.
console$ helm install cert-manager oci://quay.io/jetstack/charts/cert-manager \ --create-namespace \ --namespace cert-manager \ --set crds.enabled=true \ --version v1.19.2
Verify that the cert-manager pods enter the Running state.
console$ kubectl wait --for=condition=Ready pods --all -n cert-manager --timeout=120s
Install the ClickHouse Operator using the official Helm chart. The operator watches for ClickHouse Custom Resources and keeps the desired state by creating Kubernetes objects such as StatefulSets, Services, and ConfigMaps.
console$ helm install clickhouse-operator oci://ghcr.io/clickhouse/clickhouse-operator-helm \ --create-namespace \ --namespace clickhouse-operator-system
Verify that the operator deployment is available.
console$ kubectl wait -n clickhouse-operator-system deployment/clickhouse-operator-controller-manager --for=condition=Available --timeout=120s
Create the Database Cluster
ClickHouse uses a two-layer setup on Kubernetes. ClickHouse Keeper handles coordination for data replication and cluster management, and must be deployed before the ClickHouse cluster. The ClickHouse Operator manages both as separate Custom Resources, so each can be scaled and managed on its own.
Create a dedicated namespace for the ClickHouse deployment.
console$ kubectl create namespace clickhouse-db
Deploy the Keeper Cluster
ClickHouse Keeper runs as a group of three nodes. Each node saves coordination data to block storage. The podAntiAffinity rule spreads the nodes across different machines so the cluster keeps working if one node fails.
Create the Keeper cluster manifest file.
console$ nano keeper-cluster.yaml
Add the following configuration. Adjust the
storagevalue to meet your platform's minimum volume size requirements.yamlapiVersion: clickhouse.com/v1alpha1 kind: KeeperCluster metadata: name: clickhouse-keeper namespace: clickhouse-db spec: replicas: 3 dataVolumeClaimSpec: accessModes: - ReadWriteOnce resources: requests: storage: 40Gi podTemplate: affinity: podAntiAffinity: preferredDuringSchedulingIgnoredDuringExecution: - weight: 100 podAffinityTerm: labelSelector: matchExpressions: - key: clickhouse.com/app operator: In values: - clickhouse-keeper topologyKey: kubernetes.io/hostname containerTemplate: resources: requests: cpu: "500m" memory: 1Gi limits: cpu: "1" memory: 2Gi
Note- This configuration uses your cluster's default StorageClass. If your cluster does not have a default, specify a storage class explicitly under
dataVolumeClaimSpec. - The
podAntiAffinityrule stops Kubernetes from placing multiple Keeper nodes on the same machine, so the cluster keeps working if a node fails.
Save and close the file.
- This configuration uses your cluster's default StorageClass. If your cluster does not have a default, specify a storage class explicitly under
Apply the Keeper cluster manifest.
console$ kubectl apply -f keeper-cluster.yaml
Wait for the Keeper pods to become ready.
console$ kubectl wait --for=condition=Ready pods -l app.kubernetes.io/instance=clickhouse-keeper-keeper -n clickhouse-db --timeout=300s
Deploy the ClickHouse Cluster
The ClickHouseCluster Custom Resource defines the desired state of the database cluster, including the number of replicas, storage settings, and the Keeper reference. The operator creates a StatefulSet for each replica and sets up macros such as {shard} and {replica} on each pod. These macros are required for tables that replicate data across pods.
Generate a secure password for the default ClickHouse user and store it in a Kubernetes Secret.
console$ kubectl create secret generic clickhouse-password --from-literal=password="$(openssl rand -base64 16)" -n clickhouse-db
This command generates a random password and stores it directly in the secret without showing it in the terminal output or shell history.
Create the TLS certificate manifest file. cert-manager generates the certificate and stores it in a Kubernetes Secret.
console$ nano clickhouse-tls.yaml
Add the following configuration. The Issuer creates a self-signed certificate authority. The Certificate defines the service names that the TLS certificate covers.
yamlapiVersion: cert-manager.io/v1 kind: Issuer metadata: name: clickhouse-issuer namespace: clickhouse-db spec: selfSigned: {} --- apiVersion: cert-manager.io/v1 kind: Certificate metadata: name: clickhouse-tls namespace: clickhouse-db spec: secretName: clickhouse-tls-cert issuerRef: name: clickhouse-issuer kind: Issuer dnsNames: - clickhouse-clickhouse-headless - clickhouse-clickhouse-headless.clickhouse-db - clickhouse-clickhouse-headless.clickhouse-db.svc - clickhouse-clickhouse-headless.clickhouse-db.svc.cluster.local
Save and close the file.
Apply the TLS certificate manifest.
console$ kubectl apply -f clickhouse-tls.yaml
Wait for the certificate to be issued.
console$ kubectl wait --for=condition=Ready certificate clickhouse-tls -n clickhouse-db --timeout=120s
Create the ClickHouse cluster manifest file.
console$ nano clickhouse-cluster.yaml
Add the following configuration. Adjust the
storagevalue to meet your platform's minimum volume size requirements.yamlapiVersion: clickhouse.com/v1alpha1 kind: ClickHouseCluster metadata: name: clickhouse namespace: clickhouse-db spec: replicas: 2 settings: defaultUserPassword: passwordType: password secret: name: clickhouse-password key: password tls: enabled: true serverCertSecret: name: clickhouse-tls-cert dataVolumeClaimSpec: accessModes: - ReadWriteOnce resources: requests: storage: 50Gi podTemplate: affinity: podAntiAffinity: preferredDuringSchedulingIgnoredDuringExecution: - weight: 100 podAffinityTerm: labelSelector: matchExpressions: - key: clickhouse.com/app operator: In values: - clickhouse-clickhouse topologyKey: kubernetes.io/hostname keeperClusterRef: name: clickhouse-keeper containerTemplate: resources: requests: cpu: "1" memory: 2Gi limits: cpu: "2" memory: 4Gi
TheNotepodAntiAffinityrule works the same way as the Keeper setup, so ClickHouse keeps handling queries if a node fails.Save and close the file.
Apply the ClickHouse cluster manifest.
console$ kubectl apply -f clickhouse-cluster.yaml
Wait for the ClickHouse pods to become ready.
console$ kubectl wait --for=condition=Ready pods -l app.kubernetes.io/instance=clickhouse-clickhouse -n clickhouse-db --timeout=300s
Verify the Deployment
After deploying both clusters, check that all components are running and that data replication works correctly across pods.
Verify the Keeper pods are running.
console$ kubectl get pods -l app.kubernetes.io/instance=clickhouse-keeper-keeper -n clickhouse-db
The output displays three pods, each in the
Runningstate.Verify the ClickHouse pods are running.
console$ kubectl get pods -l clickhouse.com/role=clickhouse-server -n clickhouse-db
The output displays two pods with names following the pattern
{cluster}-clickhouse-{shard}-{replica}-0, each in theRunningstate.Verify the cluster status.
console$ kubectl get clickhousecluster clickhouse -n clickhouse-db
The output displays
Truein the READY column when all replicas are running.Connect to the first ClickHouse pod using the built-in client. The following queries run within this session.
console$ kubectl exec -it clickhouse-clickhouse-0-0-0 -n clickhouse-db -- clickhouse-client --password $(kubectl get secret clickhouse-password -n clickhouse-db -o jsonpath='{.data.password}' | base64 -d)
Check that the operator set up the replication macros correctly.
sqlSELECT * FROM system.macros;
The output displays the
shardandreplicavalues set by the operator for this pod.Create a replicated table to test data replication across pods.
sqlCREATE TABLE default.page_views ( event_time DateTime, user_id UInt64, page_path String ) ENGINE = ReplicatedMergeTree('/clickhouse/tables/{uuid}/{shard}', '{replica}') ORDER BY (event_time, user_id);
The
{shard}and{replica}macros are filled in automatically based on each pod's identity. ClickHouse Keeper stores the replication data at the specified path.Insert sample data into the table.
sqlINSERT INTO default.page_views VALUES (now() - INTERVAL 1 HOUR, 1001, '/home'), (now() - INTERVAL 30 MINUTE, 1002, '/products'), (now(), 1001, '/checkout');
Type
exitto close the client session.Verify that the data was copied to the second pod.
console$ kubectl exec -it clickhouse-clickhouse-0-1-0 -n clickhouse-db -- clickhouse-client --password $(kubectl get secret clickhouse-password -n clickhouse-db -o jsonpath='{.data.password}' | base64 -d) -q "SELECT count() FROM default.page_views"
The output displays
3, confirming the data was copied successfully to the other pod.
Connect to the Database
The ClickHouse Operator creates a headless service named clickhouse-clickhouse-headless that exposes port 9000 for native TCP connections and port 9440 for TLS-encrypted connections. Pods within the cluster reach this service using the DNS. For access outside the cluster, a load balancer service exposes port 9440.
Pods within the cluster connect to ClickHouse using the headless service name. This is the same way that application pods connect in production.
Create a temporary pod using the ClickHouse client image and connect to the database.
console$ kubectl run clickhouse-test \ --image=clickhouse/clickhouse-server \ --rm -it --restart=Never \ -n clickhouse-db \ -- clickhouse-client \ --host clickhouse-clickhouse-headless \ --port 9000 \ --password $(kubectl get secret clickhouse-password -n clickhouse-db -o jsonpath='{.data.password}' | base64 -d)
The pod starts, connects to ClickHouse through the headless service, and opens an interactive session. The pod is removed automatically after the session ends.
Run a test query to verify the connection.
sqlSELECT version();
The output displays the ClickHouse server version, confirming a successful internal connection.
Type
exitto close the session and remove the temporary pod.
External access needs a load balancer service that exposes the ClickHouse TCP port outside the cluster. Install the ClickHouse client on your workstation before continuing. Refer to the official ClickHouse installation guide for instructions.
Create the load balancer service manifest file.
console$ nano clickhouse-lb.yaml
Add the following configuration.
yamlapiVersion: v1 kind: Service metadata: name: clickhouse-external namespace: clickhouse-db spec: type: LoadBalancer selector: clickhouse.com/role: clickhouse-server ports: - port: 9440 targetPort: 9440 protocol: TCP
This creates a new service instead of changing the one the operator manages. The operator may overwrite changes to its own services during updates.NoteSave and close the file.
Apply the load balancer service manifest.
console$ kubectl apply -f clickhouse-lb.yaml
Get the external IP address of the load balancer. Replace
LB_IPin a later step with this address.console$ kubectl get svc clickhouse-external -n clickhouse-db
The output displays the external IP in the EXTERNAL-IP column. The address may take a short time to appear.
Create a clickhouse-client TLS configuration file.
console$ nano clickhouse-client-tls.xml
Add the following configuration. This tells the client to accept the self-signed certificate used in this deployment.
xml<config> <openSSL> <client> <verificationMode>none</verificationMode> <invalidCertificateHandler> <name>AcceptCertificateHandler</name> </invalidCertificateHandler> </client> </openSSL> </config>
Save and close the file.
Connect to ClickHouse from your workstation. Replace
LB_IPwith the external IP address from an earlier step.console$ clickhouse-client --config clickhouse-client-tls.xml --host LB_IP --port 9440 --secure --password $(kubectl get secret clickhouse-password -n clickhouse-db -o jsonpath='{.data.password}' | base64 -d)
Run a test query to verify the connection.
sqlSELECT version();
The output displays the ClickHouse server version, confirming a successful external connection.
Type
exitto close the session.
verificationMode: none), which is suitable for testing with self-signed certificates. For production setups, issue a certificate that includes the external domain name using cert-manager, remove the verificationMode setting, provide the CA certificate path via caConfig, and replace AcceptCertificateHandler with RejectCertificateHandler in the configuration. Limit access to the load balancer by setting firewall rules to allow only trusted IP addresses. Refer to the official ClickHouse documentation for advanced TLS configuration.
Scaling and Maintenance
The ClickHouse Operator supports scaling the cluster by changing the replica count in the ClickHouseCluster Custom Resource. The operator handles adding or removing pods and moves data as needed.
- Scaling: Update the
replicasfield in the ClickHouseCluster manifest and apply the change. Refer to the official ClickHouse Operator documentation for scaling steps and best practices. - Backups: ClickHouse supports backup and restore for cluster data. Refer to the official ClickHouse backup documentation for setup and scheduling.
- Log Collection: Set up log collection to monitor cluster activity and find issues. Refer to the official ClickHouse server configuration documentation for logging setup steps.
Conclusion
You have deployed a ClickHouse cluster on Kubernetes using the official ClickHouse Operator. The cluster runs with two replicas managed by a three-node ClickHouse Keeper group. TLS is enabled for secure external connectivity on port 9440. For more information, refer to the official ClickHouse Operator documentation.