
How to Deploy ImgProxy – Process, Resize, Convert Images on the Fly
Introduction
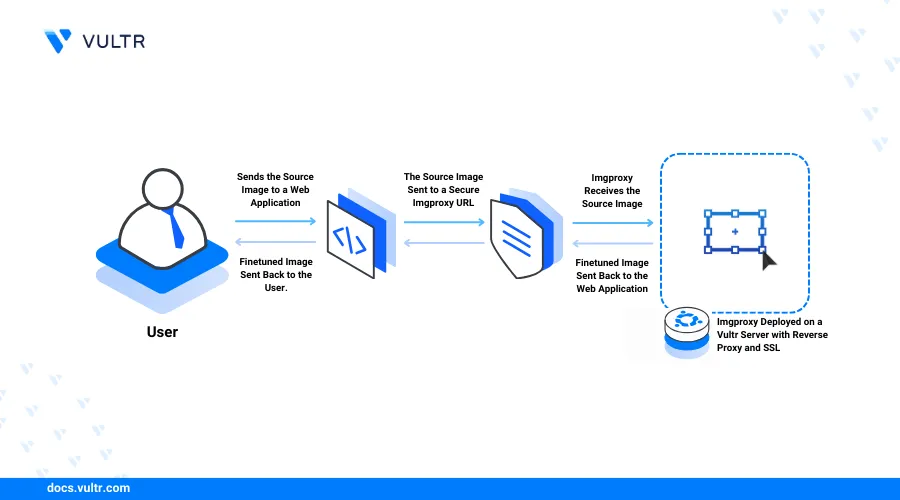
Imgproxy is an open-source image-processing application that lets you process, convert, and resize images using URL requests. Imgproxy acts as an image processor that enhances source images with better resolutions and settings. It's compatible with modern web applications that may require standardized image formats or sizes to improve performance and user experience.
Imgproxy integrates with services such as CDNs, load balancers, and proxy servers to cache and deliver images on your web applications as an intermediate service. This article explains how to deploy ImgProxy on a Ubuntu server to process, resize, and convert images on the fly.
Prerequisites
Before you begin:
- Deploy a Ubuntu server instance on Vultr.
- Create a new domain A record that points to the ImgProxy server IP. For example,
imgproxy.example.com. - Access the server using SSH as a non-root user with sudo privileges.
- Update the server.
Install ImgProxy
ImgProxy uses the libvips image processing library to process and deliver images from source files on your server. You can install ImgProxy using Docker or build the application from source using Go. Follow the steps below to install ImgProxy using the application source code and enable all necessary dependencies to optimize your server performance.
Add the
libvipspackage to your APT repository sources using thedhor/mywayPPA.console$ sudo add-apt-repository ppa:dhor/myway
Update the server package index.
console$ sudo apt update
Install the
libvipsdependency package.console$ sudo apt install libvips-dev -y
Install the latest Go version using Snap.
console$ sudo snap install --classic --channel=latest/stable go
Clone the official ImgProxy GitHub repository using Git.
console$ git clone https://github.com/imgproxy/imgproxy.git
The above command creates a new
imgproxydirectory on your server with all necessary application files. When the process is successful, your output should appear like the one below.remote: Compressing objects: 100% (578/578), done. remote: Total 15968 (delta 3055), reused 3088 (delta 2875), pack-reused 12499 Receiving objects: 100% (15968/15968), 36.14 MiB | 19.91 MiB/s, done. Resolving deltas: 100% (7920/7920), done.Switch to the
imgproxydirectory.console$ cd imgproxy
Build and compile the ImgProxy binary using Go.
console$ sudo CGO_LDFLAGS_ALLOW="-s|-w" go build -o /usr/local/bin/imgproxy
The above command compiles a new ImgProxy binary on your server using the
"-s|-w"linker flags that optimize the binary file using Go. Thego buildprocess outputs the resultant binary file to the/usr/local/bin/directory to enable system-wide access. When the build process is complete, your output should be similar to the one below.go: downloading github.com/munnerz/goautoneg v0.0.0-20191010083416-a7dc8b61c822 go: downloading github.com/go-openapi/swag v0.23.0 go: downloading github.com/go-openapi/jsonreference v0.21.0 go: downloading github.com/emicklei/go-restful/v3 v3.12.0 go: downloading github.com/mailru/easyjson v0.7.7 go: downloading github.com/go-openapi/jsonpointer v0.21.0 go: downloading github.com/josharian/intern v1.0.0Create a new ImgProxy environment configuration file in the
/usr/local/bindirectory.console$ sudo touch /usr/local/bin/imgproxy.env
Open the file using a text editor like Nano.
console$ sudo nano /usr/local/bin/imgproxy.env
Add the following environment configurations to the file.
iniIMGPROXY_BIND=:8080 IMGPROXY_NETWORK=tcp IMGPROXY_READ_TIMEOUT=10 IMGPROXY_WRITE_TIMEOUT=10 IMGPROXY_WORKERS=2 IMGPROXY_REQUESTS_QUEUE_SIZE=0 IMGPROXY_QUALITY=100 IMGPROXY_PREFERRED_FORMATS=webp,jpeg,png,gif,avif IMGPROXY_LOG_FORMAT="pretty" IMGPROXY_LOG_LEVEL="INFO" IMGPROXY_WATERMARK_URL=https://www.vultr.com/_images/og/default.png IMGPROXY_WATERMARK_OPACITY=1
Save and close the file.
The above ImgProxy environment configuration enables the application to run on your server with specific runtime options. Within the configuration:
IMGPROXY_BIND: Enables ImgProxy to run on a specific port on your server. By default, ImgProxy uses the TCP port8080.IMGPROXY_NETWORK: Sets the ImgProxy network protocol to use with the port.IMGPROXY_READ_TIMEOUT: Sets the maximum duration in seconds to read source image requests.IMGPROXY_WRITE_TIMEOUT: The maximum duration in seconds to write a response including the body.IMGPROXY_WORKERS: The maximum number of images ImgProxy can process on your server. The value is calculated using the number of CPU cores * 2. For example, if your server has4vCPUs, set the maximum workers value to8.IMGPROXY_REQUESTS_QUEUE_SIZE: The maximum number of image processing requests to allow in a queue.0sets the queue size to unlimited.IMGPROXY_QUALITY: Sets the maximum processed image quality.IMGPROXY_PREFERRED_FORMATS: Sets the default image formats to convert images on your server.IMGPROXY_LOG_FORMAT: Sets the ImgProxy log messages format.IMGPROXY_LOG_LEVEL: Enables the type of ImgProxy log messages.IMGPROXY_WATERMARK: Enables watermarking of processed images on the server. The URLhttps://www.vultr.com/_images/og/default.pnghttps://www.vultr.com/_images/og/default.pngloads a Vultr promotional banner to use as the watermark file in this article while the opacity value1enables watermarking on the server.
Create a new
IMGPROXY_ENV_LOCAL_FILE_PATHenvironment variable to set the location of your ImgProxy configuration.console$ export IMGPROXY_ENV_LOCAL_FILE_PATH=/usr/local/bin/imgproxy.env
ImgProxy uses the above variable to read all environment configuration options while running on the server.
Switch to your user home directory.
console$ cd
Run the
imgproxycommand to verify that ImgProxy is available on your server.console$ imgproxyOutput:
WARNING [2024-05-28T00:40:42Z] No keys defined, so signature checking is disabled
WARNING [2024-05-28T00:40:42Z] No salts defined, so signature checking is disabled
INFO    [2024-05-28T00:40:42Z] Starting server at :8080
Press Ctrl + C to cancel the ImgProxy process and configure your server to run the application as a system service.
Set Up ImgProxy as a System Service
ImgProxy is installed and available in the /usr/local/bin/ directory on your server. You can run the imgproxy command to start the application, but all changes are lost when the server session ends. Follow the steps below to set up ImgProxy as a system service to manage the application processes and monitor events such as error logs on your server.
Create a new ImgProxy system user account without a home directory, login or shell privileges.
console$ sudo useradd -r -s /bin/false imgproxy
Grant the user full privileges to the ImgProxy binary file
/usr/local/bin/imgproxy.console$ sudo chown imgproxy:imgproxy /usr/local/bin/imgproxy
Grant the user ownership privileges to the environment configuration file
/usr/local/bin/imgproxy.env.console$ sudo chown imgproxy:imgproxy /usr/local/bin/imgproxy.env
Create a new systemd unit file.
console$ sudo nano /etc/systemd/system/imgproxy.service
Add the following configurations to the file.
systemd[Unit] Description=IMGProxy Image Processing Application After=network.target [Service] Environment="IMGPROXY_ENV_LOCAL_FILE_PATH=/usr/local/bin/imgproxy.env" ExecStart=/usr/local/bin/imgproxy User=imgproxy Group=imgproxy Restart=always StandardOutput=append:/var/log/imgproxy/access.log [Install] WantedBy=multi-user.target
Save and close the file.
The above configuration creates a new ImgProxy service owned by the
imgproxyuser and group you created earlier. The service uses theIMGPROXY_ENV_LOCAL_FILE_PATH=variable to set your ImgProxy environment configuration. In addition, all application logs are written to the/var/log/imgproxy/directory using the human-readable formatprettydefined in your environment configuration.Create the ImgProxy application logs directory.
console$ sudo mkdir -p /var/log/imgproxy/
Grant the ImgProxy user full privileges to the directory.
console$ sudo chown -R imgproxy:imgproxy /var/log/imgproxy
Restart the systemd daemon to enable the new ImgProxy service on your server.
console$ sudo systemctl daemon-reload
Enable ImgProxy to start at boot time.
console$ sudo systemctl enable imgproxy
Start the ImgProxy system service.
console$ sudo systemctl start imgproxy
View the ImgProxy system service status and verify that it's actively running on your server.
console$ sudo systemctl status imgproxy
Your output should be similar to the one below.
● imgproxy.service - IMGProxy Image Processing Application
     Loaded: loaded (/etc/systemd/system/imgproxy.service; enabled; vendor preset: enabled)
     Active: active (running) since Tue 2024-05-28 00:49:40 UTC; 6s ago
   Main PID: 164531 (imgproxy)
      Tasks: 5 (limit: 1005)
     Memory: 19.8M
        CPU: 119ms
     CGroup: /system.slice/imgproxy.service
             └─164531 /usr/local/bin/imgproxy
Set Up Nginx as a Reverse Proxy to Access ImgProxy
ImgProxy runs on the server port 8080 defined in your environment configuration. Install and configure Nginx as a reverse proxy to enable secure access to the ImgProxy without exposing the main application port on your server. Follow the steps below to create a new Nginx reverse proxy configuration to accept connections using your domain name and forward all requests to the backend ImgProxy application port.
Install Nginx on your server.
console$ sudo apt install nginx -y
Create a new Nginx configuration file. For example,
imgproxy.example.com.console$ sudo nano /etc/nginx/sites-available/imgproxy.example.com
Add the following configurations to the file.
nginxserver { listen 80; server_name imgproxy.example.com; location / { proxy_pass http://127.0.0.1:8080; proxy_set_header Host $host; proxy_set_header X-Real-IP $remote_addr; proxy_set_header X-Forwarded-For $proxy_add_x_forwarded_for; proxy_set_header X-Forwarded-Proto $scheme; proxy_redirect off; } }
Save and close the file.
The above Nginx configuration creates a new reverse proxy connection to the ImgProxy application port
8080and accepts HTTP connections using your domainimgproxy.example.com.Activate the configuration file.
console$ sudo ln -s /etc/nginx/sites-available/imgproxy.example.com /etc/nginx/sites-enabled/
Test Nginx for configuration errors.
console$ sudo nginx -t
Restart Nginx to apply the new configuration changes.
console$ sudo systemctl restart nginx
Allow the HTTP port
80through the default UFW firewall.console$ sudo ufw allow 80 comment 'ImgProxy Http'
Restart the firewall to apply the new changes.
console$ sudo ufw reload
Generate Trusted SSL Certificates to Encrypt ImgProxy Requests
ImgProxy supports extended security features such as URL signing to protect and limit requests on your server. Generate trusted SSL certificates to encrypt connections between all requesting clients and the ImgProxy server. Follow the steps below to install the Certbot Let's Encrypt client and generate new SSL certificates to use on the server.
Install the Certbot plugin for Nginx.
console$ sudo apt install python3-certbot-nginx -y
Generate new Let's Encrypt SSL certificates using your domain name. Replace
imgproxy.example.comwith your actual domain.console$ sudo certbot --nginx -d imgproxy.example.com --agree-tos
Restart Nginx to apply the configuration changes.
console$ sudo systemctl restart nginx
Allow the HTTPS port
443through the firewall.console$ sudo ufw allow 443 comment 'ImgProxy Https'
Restart UFW to apply the configuration changes.
console$ sudo ufw reload
Access ImgProxy to Process and Modify Images
ImgProxy accepts source images using HTTP GET requests and delivers processed images as a response. The application uses the following URL request format to load and process images on your server.
```
https://imgproxy-url/[processing-options]/source-image-url
```
ImgProxy supports plain, encoded, and encrypted source URL formats as valid request types. Follow the steps below to process sample source images using the plain URL format on your server.
Access your ImgProxy domain using a web browser such as Firefox.
https://imgproxy.example.comVerify that the default ImgProxy web page displays in your browser.
In a new browser tab, load a sample source image using the plain URL format. For example, load a sample image of a train from Pexels using the direct URL:
https://images.pexels.com/photos/72594/japan-train-railroad-railway-72594.jpeghttps://imgproxy.example.com/insecure/plain/https://images.pexels.com/photos/72594/japan-train-railroad-railway-72594.jpegThe above URL loads the source image using the insecure plain URL format. It’s recommended to use encrypted formats when working with single images to tighten your server security. Use the
plainformat when working with multiple image files to simultaneously process requests on your server.Press Enter to load the web page and verify that ImgProxy displays the image with your default processing settings.
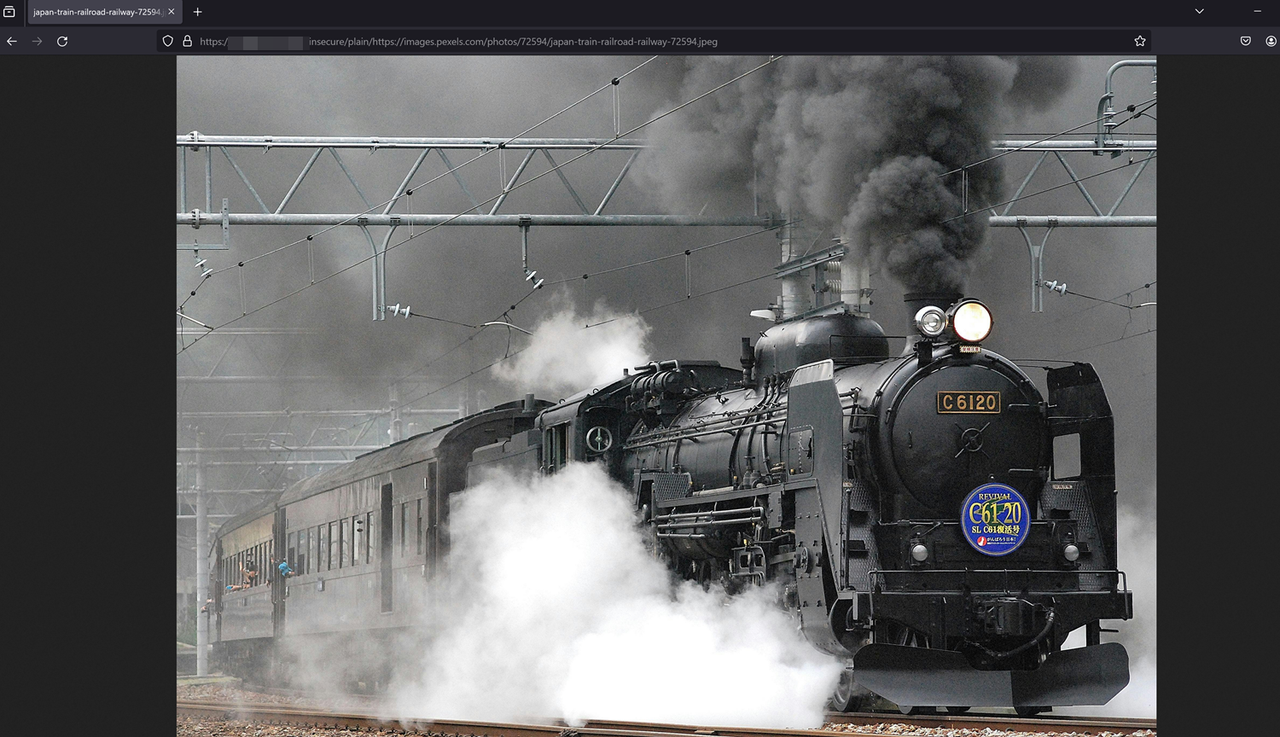
Modify the URL with a new image processing value to resize the image to a resolution such as
800*800.https://imgproxy.example.com/insecure/rs:fill:800:800/plain/https://images.pexels.com/photos/72594/japan-train-railroad-railway-72594.jpegThe above
rsresize option modifies the source image with afilltype to keep the original image aspect ratio while resizing the image to the new800*800resolution.Press Enter to view the processed image and verify that the image is resized to the new resolution.

Right-click the resized image and select Inspect from the list of browser options to convert the image to a new format.
Navigate to the Network tab and reload your ImgProxy URL to view the request details.
Verify that the processed image name is available in the Name column. Then, click the image name to view the ImgProxy request data.
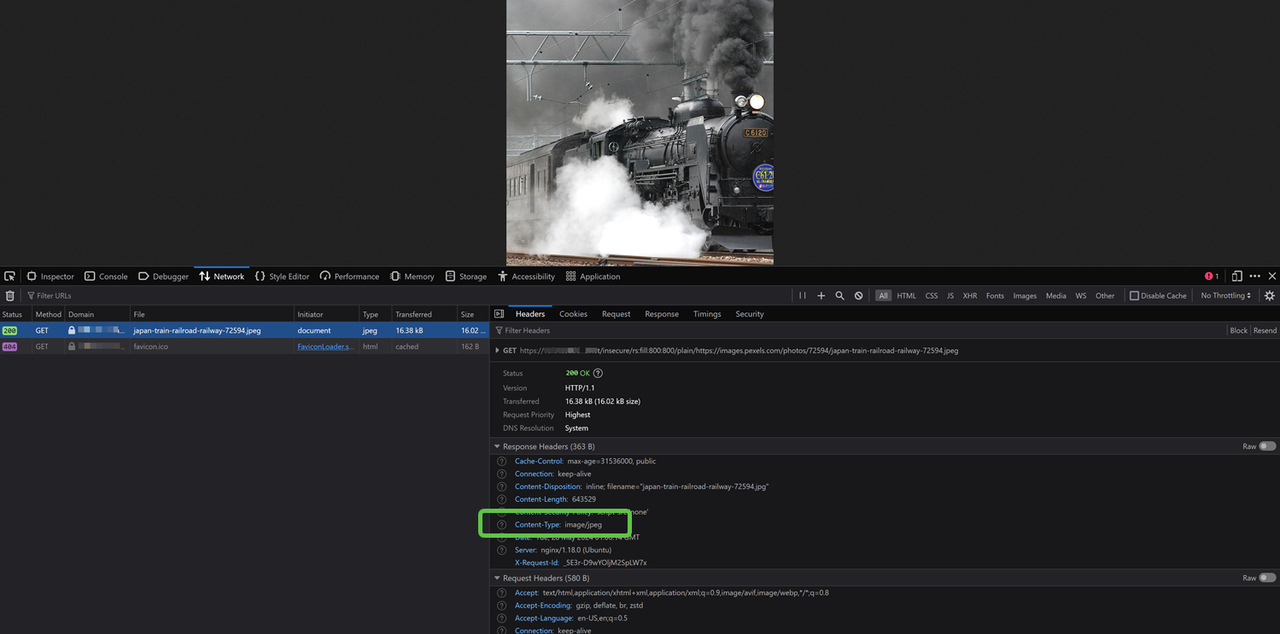
Find Content-Type in the Response Headers section and verify the image file format depending on your source image. For example,
image/jpeg.Keep the Network tab open and modify your ImgProxy URL request to include a new image format using the
@option. For example,@webpto convert and process the image to the Webp format.https://imgproxy.example.com/insecure/rs:fill:800:800/plain/https://images.pexels.com/photos/72594/japan-train-railroad-railway-72594.jpeg@webpMonitor the processing data in your Network tab and verify that the image displays in your browser.
Click the image name in your Network tab and verify that the Content-Type field in your Response Headers changes to your new format. For example,
/image/webp.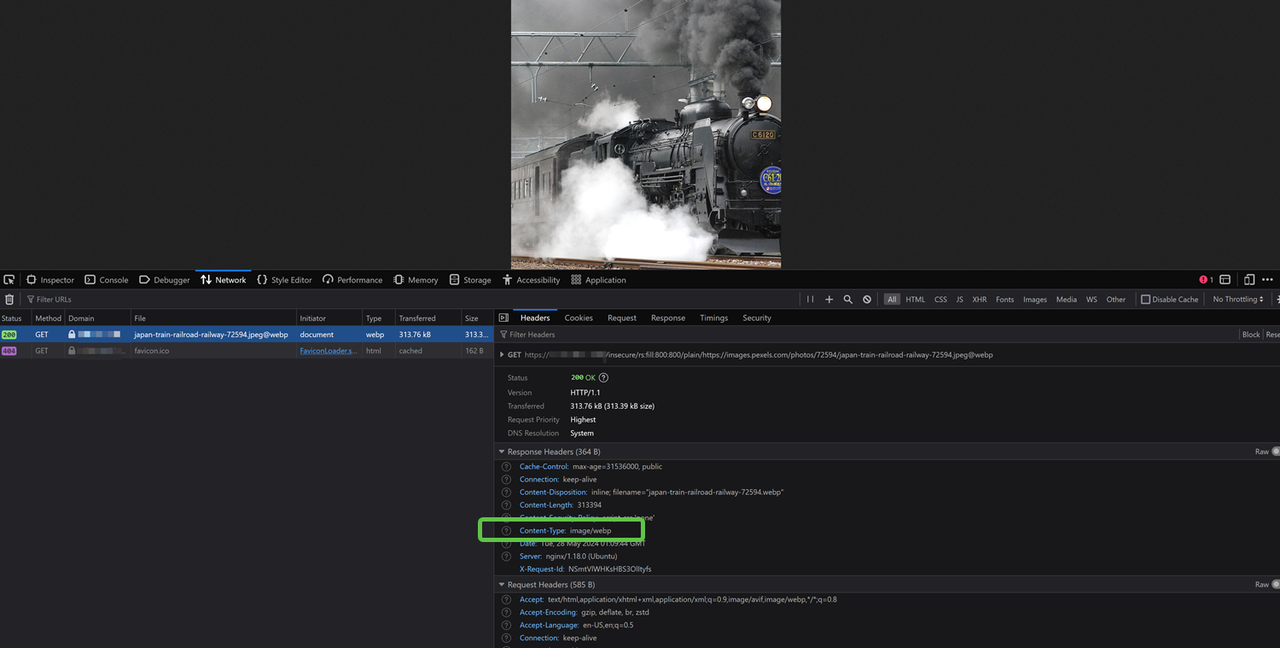
Right-click the image and select
Save Image Asfrom your browser options to verify that you can save the new processed image format.Modify your ImgProxy URL again and include the
/watermark:1:ce:2:2/processing option to test the ImgProxy watermarking option on your server.https://imgproxy.example.com/insecure/rs:fill:800:800/watermark:1:ce:2:2/plain/https://images.pexels.com/photos/72594/japan-train-railroad-railway-72594.jpegThe above URL request watermarks the processed images using the source watermark URL in your ImgProxy configuration. The value
1enables the watermark whilecepositions the image to the center, and2:2sets thex|yoffsets.Press Enter to view the new watermarked image in your browser.

ImgProxy offers multiple processing options to modify source images on your server. Visit the ImgProxy
processing optionsdocumentation to view all supported functions.
Protect ImgProxy with URL Signing
ImgProxy protects your server using key/salt pairs to enable URL signing on all server requests. When a valid signature is not attached to an ImgProxy URL request, it’s not processed by the server which safeguards your server from unpermitted client requests. Follow the steps below to create a new key/salt pair and generate a URL signature to protect your ImgProxy server requests.
Generate a new random 32-byte
keyusing OpenSSL.console$ openssl rand -hex 32
Output:
5e6bd8d49b263182c252c89d8401502ddb81ecc2a20ece77b8e04680663da0f6Generate a new 16-byte
saltto use with the key.console$ openssl rand -hex 16
Output:
8ef6be20fe6b1c888289718e8c0f40f3Open the ImgProxy environment configuration file.
console$ sudo nano /usr/local/bin/imgproxy.env
Add the following key/salt pair configurations at the end of the file. Replace the random hex-encoded values with your generated values.
iniIMGPROXY_KEY=5e6bd8d49b263182c252c89d8401502ddb81ecc2a20ece77b8e04680663da0f6 IMGPROXY_SALT=8ef6be20fe6b1c888289718e8c0f40f3
Save and close the file.
The above key/salt pair enables ImgProxy URL signing on every server request.
Create a new bash script to generate a valid signature using your key/salt pair.
console$ nano improxy-signing.sh
Add the following configurations to the file.
ini#!/bin/bash # Generate a new ImgProxy signature based on your source image URL such as `https://images.pexels.com/photos/72594/japan-train-railroad-railway-72594.jpeg`. Replace this value with a source image on your web app domain such as: https://example.com/wp-content/image.png KEY_VALUE="5e6bd8d49b263182c252c89d8401502ddb81ecc2a20ece77b8e04680663da0f6" SALT_VALUE="8ef6be20fe6b1c888289718e8c0f40f3" KEY=$(echo -n "$KEY_VALUE" | xxd -r -p) SALT=$(echo -n "$SALT_VALUE" | xxd -r -p) URL_PATH="/rs:fill:800:800/watermark:1:ce:2:2/plain/https://images.pexels.com/photos/72594/japan-train-railroad-railway-72594.jpeg" IMGPROXY_URL="https://imgproxy.example.com/" DATA="$SALT$URL_PATH" SIGNATURE=$(echo -n "$DATA" | openssl dgst -sha256 -hmac "$KEY" -binary | base64 -w 0 | tr '+/' '-_' | tr -d '=') echo "The Signature based on your key/salt pair is: $SIGNATURE \n" echo "The Signed ImgProxy URL is: $IMGPROXY_URL$SIGNATURE$URL_PATH"
Save and close the file.
The above script calculates a new HMAC digest using SHA256 and your
saltvalue. In the above configuration, a new signature is generated for the source image URLhttps://images.pexels.com/photos/72594/japan-train-railroad-railway-72594.jpeg.Run the script to generate a new signed ImgProxy URL.
console$ bash improxy-signing.sh
Output:
The Signed ImgProxy URL is: https://imgproxy.example.com/KNk-UQ1Cm1bpUnTsNlSEa-q35YwoMYdYNoVUkF1IvP0/rs:fill:800:800/watermark:1:ce:2:2/plain/https://images.pexels.com/photos/72594/japan-train-railroad-railway-72594.jpegCopy the generated signed URL to use with your ImgProxy requests.
Restart ImgProxy to apply your new configuration changes.
console$ sudo systemctl restart imgproxy
Access the generated ImgProxy URL in your web browser to securely access your processed image.
https://improxy.example.com/KNk-UQ1Cm1bpUnTsNlSEa-q35YwoMYdYNoVUkF1IvP0/watermark:1:ce:2:2/plain/https://images.pexels.com/photos/72594/japan-train-railroad-railway-72594.jpegVerify that ImgProxy displays the processed image in your web browser.

You have successfully protected ImgProxy with URL signing on your server. However, you cannot use the same signature with multiple source URLs.
Create a new ImgProxy request using your valid signature with a different processing option such as
blurto test the access limits.https://improxy.example.com/KNk-UQ1Cm1bpUnTsNlSEa-q35YwoMYdYNoVUkF1IvP0/resizing_type:fill/blur:10/watermark:1:ce:2:2/plain/https://images.pexels.com/photos/72594/japan-train-railroad-railway-72594.jpegVerify that ImgProxy returns a
439error with aForbiddenmessage and the following log entry.WARNING [2024-05-26T13:33:00Z] Completed in 101.015µs KNk-UQ1Cm1bpUnTsNlSEa-q35YwoMYdYNoVUkF1IvP0/resizing_type:fill/blur:10/watermark:1:ce:2:2/plain/https://images.pexels.com/photos/72594/japan-train-railroad-railway-72594.jpeg@webp request_id=pq-l1OajkhkU684GVP_nC method=GET status=403 client_ip=41.190.134.12 error="Invalid signature"Add the signature to your ImgProxy environment configuration to enable access and usage with multiple source image URLs.
console$ sudo nano /usr/local/bin/imgproxy.env
Add your trusted signature using the
IMGPROXY_TRUSTED_SIGNATURESoption at the end of the file. Separate multiple signatures with,.iniIMGPROXY_TRUSTED_SIGNATURES=KNk-UQ1Cm1bpUnTsNlSEa-q35YwoMYdYNoVUkF1IvP0
Save and close the file.
Restart ImgProxy to apply the new configuration changes.
console$ sudo systemctl restart imgproxy
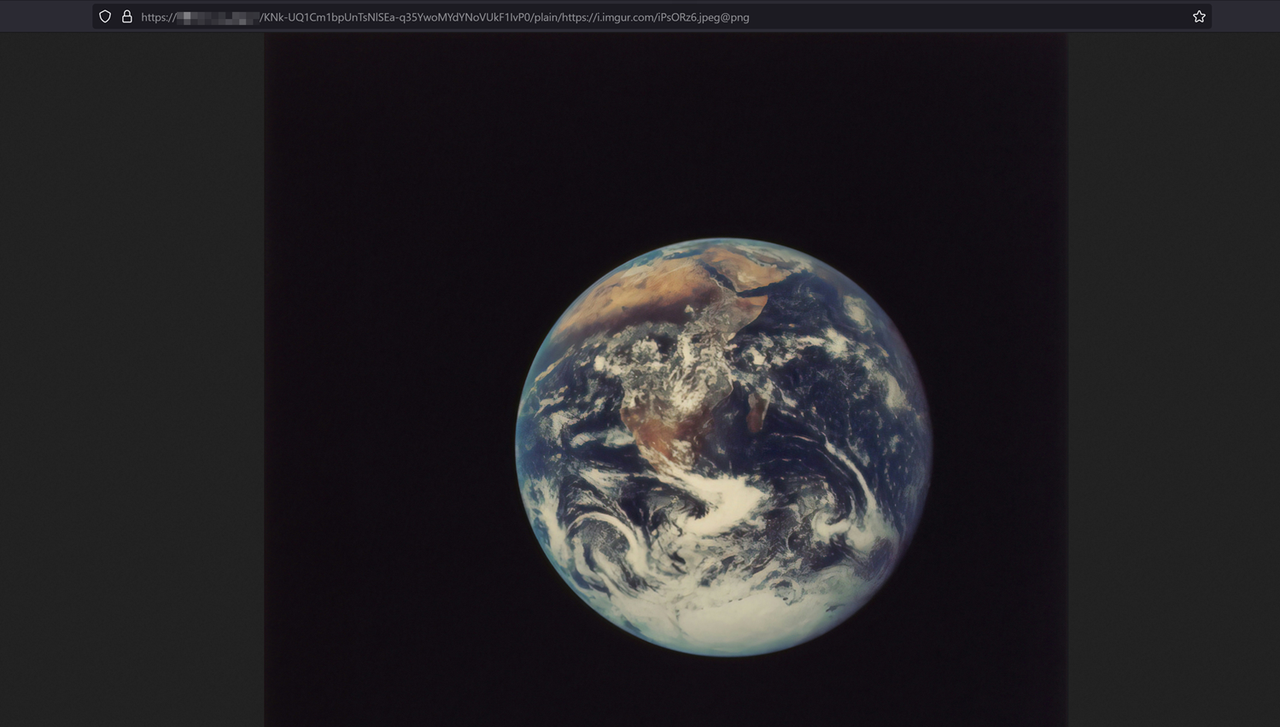
Create a new ImgProxy request with a different source image URL such as
https://i.imgur.com/iPsORz6.jpegand convert it to a new format such as.pngto test your new signature limits.https://improxy.example.com/KNk-UQ1Cm1bpUnTsNlSEa-q35YwoMYdYNoVUkF1IvP0/plain/https://i.imgur.com/iPsORz6.jpeg@pngVerify that the processed ImgProxy image displays in your web browser.
ImgProxy accepts all requests on your server without limiting access to the image URL. A trusted signature enables ImgProxy to ignore the key/salt pair in your configuration and process images with any included options. This enables ImgProxy integration with dynamic web application frameworks such as WordPress that use multiple image names and requests.
Process Images using Vultr Object Storage and ImgProxy
ImgProxy supports multiple image sources including local files, URLs, and S3-compatible storage. Follow the steps below to configure ImgProxy to process images using Vultr Object Storage.
Create a new Vultr Object Storage bucket such as
imgproxy-data.Download the example image you applied earlier and upload it to your bucket using a tool such as S3 Browser. Then, save the image as
image1.jpeg.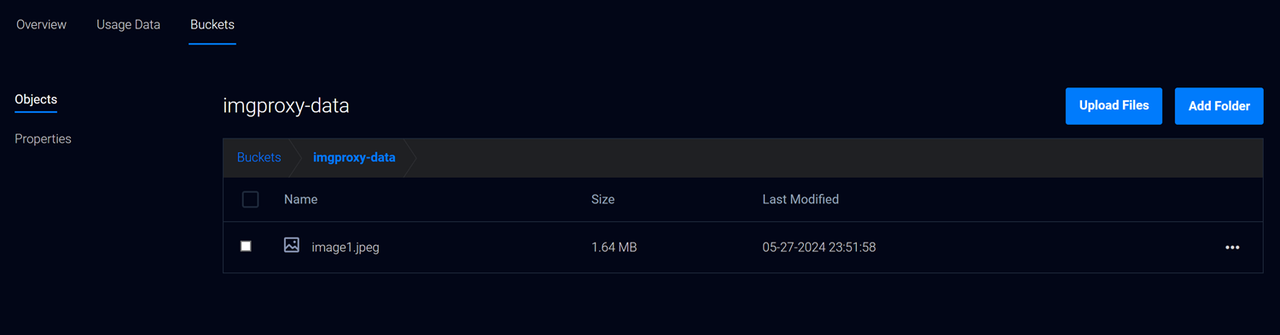
Open the ImgProxy configuration file.
console$ sudo nano /usr/local/bin/imgproxy.env
Add the following configuration to enable S3 storage sources on your server. Replace all example values with your actual Vultr Object Storage details.
iniIMGPROXY_USE_S3=true IMGPROXY_S3_ENDPOINT=ewr1.vultrobjects.com AWS_ACCESS_KEY_ID=your-access-key AWS_SECRET_ACCESS_KEY=your-secret-key
Save and close the file.
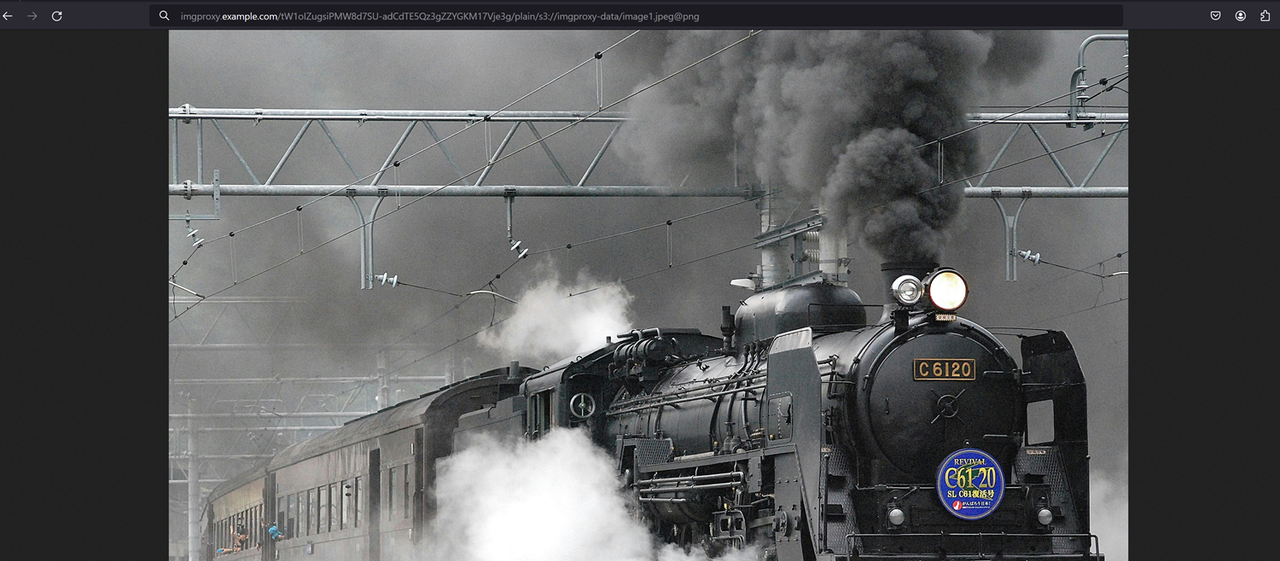
The above configuration enables ImgProxy to process images from your
imgproxy-databucket. To access the processed images, you must replace your source URL format with the object storages3://URI format.ImgProxy uses the following URL format to process images using a Vultr Object Storage bucket.
https://IMGPROXY-URL/PROCESSING-OPTONS/s3://bucket_name/file-nameCreate a new signed ImgProxy URL request using the
image.jpegfile in your Vultr Object Storage bucket. Then, rotate it by90degrees and convert it to a new format such aspng.consolehttps://improxy.example.com/KNk-UQ1Cm1bpUnTsNlSEa-q35YwoMYdYNoVUkF1IvP0/plain/s3://imgproxy-data/image1.jpeg@png
Verify that your processed image displays in your web browser.
If your web application uploads and serves image files using Vultr Object Storage, configure your web server to securely serve the processed files using ImgProxy to optimize your web application performance.
Conclusion
You have successfully deployed ImgProxy and delivered processed images on the fly on your server. ImgProxy is a processing tool that integrates with your web application to serve optimized images with next-generation formats such as .webp and .avif. Set up monitoring applications such as Prometheus and Grafana to enable continuous monitoring of image processing requests on your server. For more information, visit the ImgProxy documentation.