
How to Deploy Kubernetes Dashboard and Manage Cluster Resources
Dashboard is an open-source web-based GUI for managing Kubernetes clusters. It allows you to manage cluster resources, deploy applications, monitor and troubleshoot cluster performance, all through a web-based management interface. The Kubernetes Dashboard manages multiple resources and cluster workloads, including CronJobs, DaemonSets, Deployments, Pods, ReplicaSets, and StatefulSets, allowing you to deploy applications and monitor clusters in real time.
This article explains how to deploy the Kubernetes Dashboard, manage cluster resources using its web interface, and install an Ingress Controller to expose it securely.
Prerequisites
Before you start, you need to:
- Have access to a Kubernetes cluster.
- Install and configure Kubectl to access your Kubernetes cluster.
- Install Helm on your workstation.
Install Kubernetes Dashboard
You can install the Kubernetes Dashboard using the official Helm repository. Follow the steps below to add a new Helm repository to your configuration and install the Kubernetes Dashboard to your cluster.
Add the Kubernetes Dashboard repository to your local Helm configuration.
console$ helm repo add kubernetes-dashboard https://kubernetes.github.io/dashboard/
Update your local Helm configuration.
console$ helm repo update
Install the Kubernetes Dashboard in your cluster using Helm.
console$ helm install kubernetes-dashboard kubernetes-dashboard/kubernetes-dashboard --create-namespace --namespace kubernetes-dashboard
Check all installed components in the
kubernetes-dashboardnamespace.console$ kubectl get all -n kubernetes-dashboard
From the output, verify that the Kubernetes Dashboard Pods, Services, and ReplicaSets are available and active.
Configure Access to the Kubernetes Dashboard
The Kubernetes Dashboard, by default, includes a minimal RBAC configuration and supports user login with bearer tokens. Every user needs a valid bearer token to access the Kubernetes Dashboard. Follow the steps below to create a new administrative service account and enable access to the Kubernetes Dashboard.
Create a new
dashboard-admin-user.ymlfile using a text editor of your choice, likenano.console$ nano dashboard-admin-user.yml
Add the following YAML configurations to the
dashboard-admin-user.ymlfile.yamlapiVersion: v1 kind: ServiceAccount metadata: name: dashboard-admin-user namespace: kubernetes-dashboard --- apiVersion: rbac.authorization.k8s.io/v1 kind: ClusterRoleBinding metadata: name: dashboard-admin-user roleRef: apiGroup: rbac.authorization.k8s.io kind: ClusterRole name: cluster-admin subjects: - kind: ServiceAccount name: dashboard-admin-user namespace: kubernetes-dashboard
Save and close the
dashboard-admin-user.ymlfile.The above configuration creates a new
dashboard-admin-userservice account and a cluster role binding that enables it to manage the cluster using the Kubernetes Dashboard.TheWarningdashboard-admin-userClusterRoleBinding references thecluster-adminrole. This grants the highest privileges and full control over your entire cluster. Create a more restrictiveRoleorClusterRolefor production use.Apply the configuration file.
console$ kubectl apply -f dashboard-admin-user.yml
Create a new bearer token for the
dashboard-admin-userservice account to use when accessing the Kubernetes Dashboard.console$ kubectl -n kubernetes-dashboard create token dashboard-admin-user
Copy the generated string from your output to later use as a login Bearer token.
You can create a new user with read-only privileges and a new bearer token when accessing the Kubernetes Dashboard with lower privileges for tasks such as cluster monitoring. Follow the steps below to create a new read-only user and generate a bearer token to access the Kubernetes Dashboard.
Create a new
read-only-user.ymlfile.console$ nano read-only-user.yml
Add the following configurations to the
read-only-user.ymlfile.yamlapiVersion: v1 kind: ServiceAccount metadata: name: read-only-user namespace: kubernetes-dashboard --- apiVersion: rbac.authorization.k8s.io/v1 kind: ClusterRole metadata: name: read-only-clusterrole rules: - apiGroups: ["", "apps", "extensions"] resources: ["*"] verbs: ["get", "list", "watch"] --- apiVersion: rbac.authorization.k8s.io/v1 kind: ClusterRoleBinding metadata: name: read-only-binding roleRef: apiGroup: rbac.authorization.k8s.io kind: ClusterRole name: read-only-clusterrole subjects: - kind: ServiceAccount name: read-only-user namespace: kubernetes-dashboard
Save and close the
read-only-user.ymlfile.The above configuration creates a new
read-only-userservice account and cluster role binding forread-only-clusterrolewithget,list, andwatchprivileges to all resources in the cluster.Apply the
read-only-user.ymlconfiguration in your cluster to create theread-only-userservice account and cluster role binding.console$ kubectl apply -f read-only-user.yml
Create a new bearer token for the
read-only-useraccount when accessing the Kubernetes Dashboard.console$ kubectl -n kubernetes-dashboard create token read-only-user
Access the Kubernetes Dashboard
You can access the Kubernetes Dashboard after deploying it to your cluster using port forwarding or installing an Ingress Controller to attach a load balancer with a public endpoint to your cluster. This section covers accessing the Kubernetes Dashboard using port forwarding.
The
kubernetes-dashboard-kong-proxyservice, which was created when you installed Kubernetes Dashboard, provides an HTTPS endpoint to access the Kubernetes Dashboard. Forward thekubernetes-dashboard-kong-proxyservice port443to port8443on your local workstation.console$ kubectl port-forward service/kubernetes-dashboard-kong-proxy 8443:443 -n kubernetes-dashboard
If using a remote cloud server to manage your Kubernetes cluster, follow the steps below.
Allow the forwarded port through the firewall if it's active.
console$ sudo ufw allow 8443/tcp
Reload the firewall to apply the change.
console$ sudo ufw reload
Forward the
kubernetes-dashboardport443to8443to access the Kubernetes Dashboard using your instance's public IP address.console$ kubectl port-forward service/kubernetes-dashboard-kong-proxy 8443:443 -n kubernetes-dashboard --address='0.0.0.0'
Your output should be similar to the one below when successful.
Forwarding from 0.0.0.0:8443 -> 8443
Visit your remote server's IP address or localhost (if managing Kubernetes locally) using
httpsin a web browser like Chrome.https://127.0.0.1:8443Or
https://SERVER-IP:8443Accept the insecure connection warning when prompted to access the Kubernetes Dashboard.
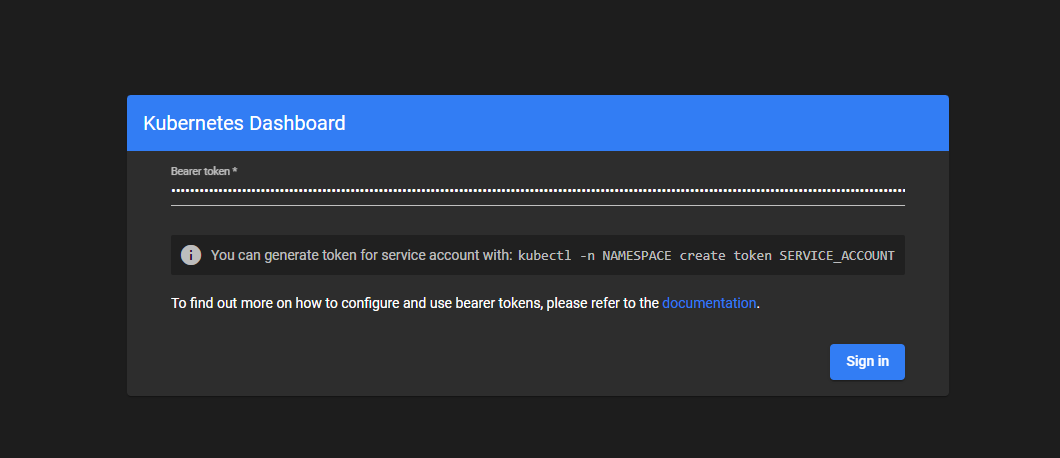
Paste the
dashboard-admin-usertoken you generated earlier and click Sign in to access the Kubernetes Dashboard.Verify the status of all workloads in the default namespace.
Click the namespace selector on the top navigation bar next to Kubernetes and select
kubernetes-dashboardfrom the list.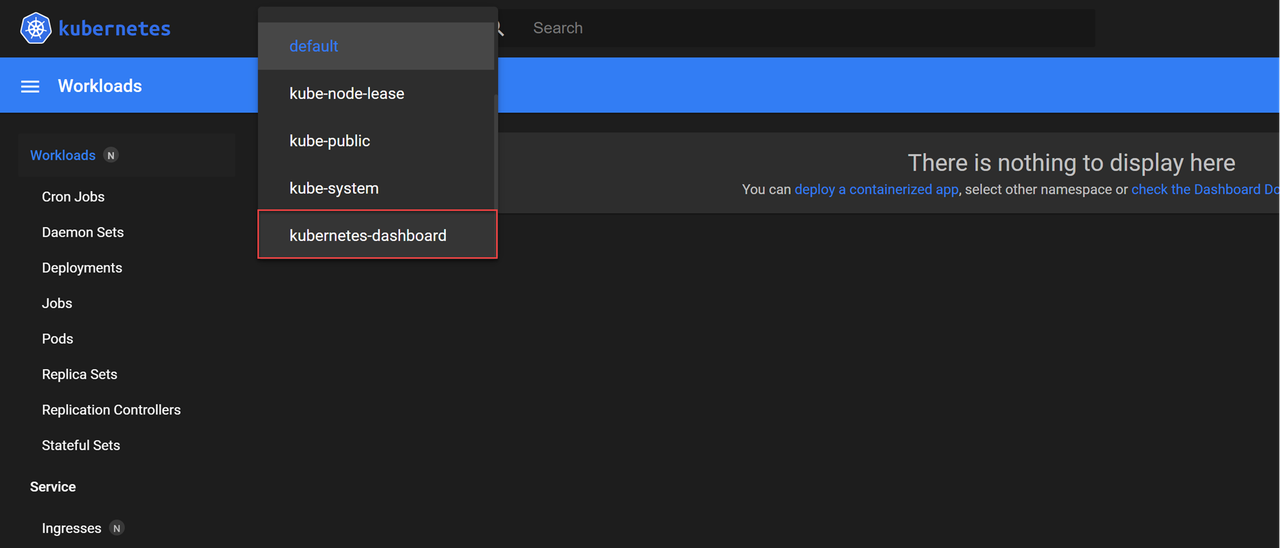
Verify the status of all workloads in the
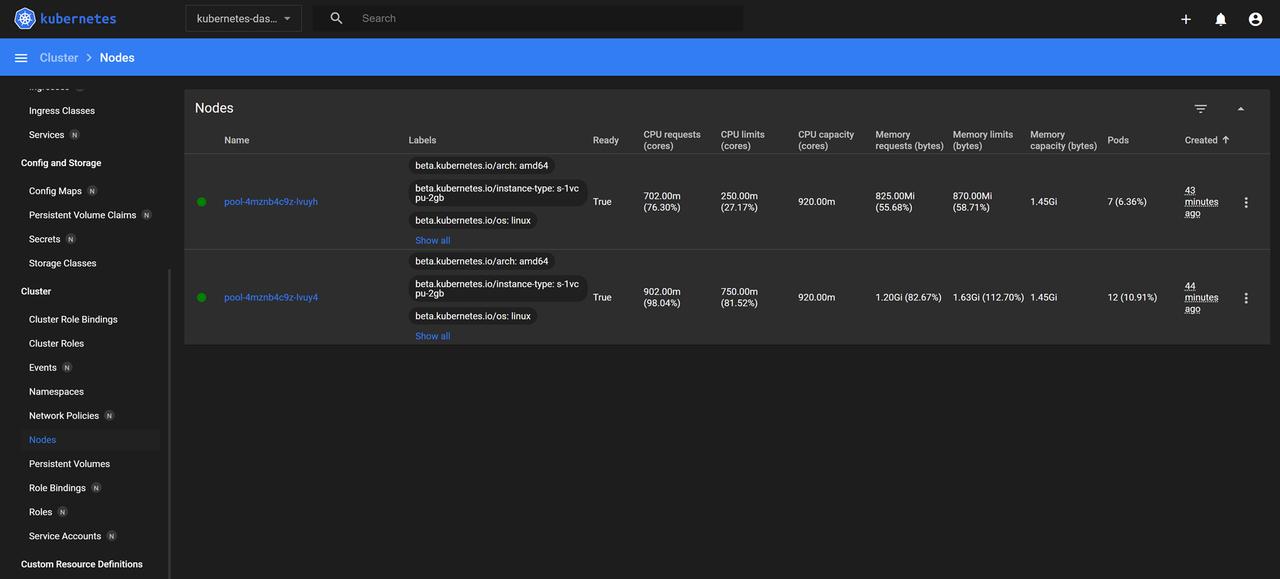
kubernetes-dashboardnamespace and monitor the active Deployments, Pods, and ReplicaSets.Click Nodes within the Cluster group on the main navigation menu and verify the resource usage statistics for all nodes in your cluster.
Secure the Kubernetes Dashboard
Running the Kubernetes Dashboard using a public endpoint may expose your cluster to multiple threats. Installing an Ingress Controller lets you secure the Kubernetes Dashboard with a trusted TLS certificate and access it over HTTPS. Follow the steps below to install the Nginx Ingress Controller in your cluster and generate trusted TLS certificates using cert-manager to secure access to the Kubernetes Dashboard.
Press Ctrl + C to stop port forwarding in your terminal.
Install Nginx Ingress Controller.
Add the Nginx Ingress Controller Helm repository.
console$ helm repo add ingress-nginx https://kubernetes.github.io/ingress-nginx
Update your Helm repositories.
console$ helm repo update
Install the Nginx Ingress Controller in your cluster using Helm.
console$ helm install ingress-nginx ingress-nginx/ingress-nginx \ --namespace ingress-nginx \ --create-namespace
Wait a few minutes for the Nginx Ingress Controller to deploy and attach a load balancer to your cluster. Then, list all services in the
ingress-nginxnamespace.console$ kubectl get services -n ingress-nginx
Verify the
EXTERNAL-IPaddress assigned to youringress-nginxLoadBalancer service and update your domain's DNS records to this IP value.
Install Cert-Manager.
Add the Jetstack repository to your local Helm configuration.
console$ helm repo add jetstack https://charts.jetstack.io
Update your local Helm configuration.
console$ helm repo update
Install cert-manager and all required CRDs in your Kubernetes cluster.
console$ helm install cert-manager jetstack/cert-manager \ --namespace cert-manager \ --create-namespace \ --set crds.enabled=true
List all installed resources in the
cert-managernamespace and verify if they are up and running.console$ kubectl get all -n cert-manager
Create a ClusterIssuer resource to generate a TLS certificate for enabling a secure HTTPS connection to the Kubernetes Dashboard.
Create a new
issuer.ymlmanifest file to specify the Let's Encrypt ClusterIssuer configuration.console$ nano issuer.yml
Add the following manifest to the file. Replace
admin@example.comwith your active email address.yamlapiVersion: cert-manager.io/v1 kind: ClusterIssuer metadata: name: tls-certificate-issuer spec: acme: server: https://acme-v02.api.letsencrypt.org/directory email: admin@example.com privateKeySecretRef: name: letsencrypt-private-key solvers: - http01: ingress: ingressClassName: nginx
Save and close the file.
The above configuration creates a new ClusterIssuer resource that uses the Let's Encrypt CA to complete domain challenges and generate trusted TLS certificates.
Apply the ClusterIssuer manifest file.
console$ kubectl apply -f issuer.yml
List all ClusterIssuers and verify that
tls-certificate-issueris available.console$ kubectl get clusterissuer
Output:
NAME                     READY   AGE
tls-certificate-issuer   True    74s
Patch the
ingress-nginx-controllerConfigMap to allow the newer version of cert-manager to complete its domain verification. This is required because a strict setting in Nginx can block the automatic process cert-manager uses to prove you own the domain, which prevents it from issuing the TLS certificate.console$ kubectl patch configmap ingress-nginx-controller -n ingress-nginx --patch '{"data":{"strict-validate-path-type":"false"}}'
Create a new
dashboard-ingress.ymlfile to specify the Kubernetes Dashboard Ingress configuration.console$ nano dashboard-ingress.yml
Add the following Ingress manifest to the file. Replace
dashboard.example.comwith your actual domain name.yamlapiVersion: networking.k8s.io/v1 kind: Ingress metadata: name: kubernetes-dashboard-ingress namespace: kubernetes-dashboard annotations: cert-manager.io/cluster-issuer: tls-certificate-issuer nginx.ingress.kubernetes.io/backend-protocol: "HTTPS" spec: ingressClassName: nginx tls: - hosts: - dashboard.example.com secretName: kubernetes-dashboard-cert rules: - host: dashboard.example.com http: paths: - path: / pathType: Prefix backend: service: name: kubernetes-dashboard-kong-proxy port: number: 443
Save and close the file.
The above configuration creates a new Ingress resource in the
kubernetes-dashboardnamespace that forwards all incoming requests fromdashboard.example.comto thekubernetes-dashboard-kong-proxyservice port443.Apply the
dashboard-ingress.ymlmanifest to your cluster to create the Ingress resource.console$ kubectl apply -f dashboard-ingress.yml
Verify the TLS certificate status.
console$ kubectl get certificate -n kubernetes-dashboard
Output:
NAME READY SECRET AGE kubernetes-dashboard-cert True kubernetes-dashboard-cert 41sIt may take some time for the certificate'sNoteREADYstate to turnTrue.List all Ingress resources in the
kubernetes-dashboardnamespace and verify thatdashboard-ingressis available.console$ kubectl get ingress -n kubernetes-dashboard
Output:
NAME                           CLASS   HOSTS                   ADDRESS         PORTS     AGE
kubernetes-dashboard-ingress   nginx   dashboard.example.com   45.63.114.213   80, 443   16m
Access your
dashboard.example.comdomain in a new web browser window.https://dashboard.example.com
Deploy Applications using the Kubernetes Dashboard
You can deploy applications through the Kubernetes Dashboard by applying YAML configurations or filling in application details in the web-based interface. Follow the steps below to deploy a sample Nginx application in your cluster by specifying the resource details in a form using the Kubernetes Dashboard.
Create another subdomain A record pointing to your Ingress Controller's external IP address. For example,
sample-app.example.com.Open the Kubernetes Dashboard.
https://dashboard.example.comEnter your
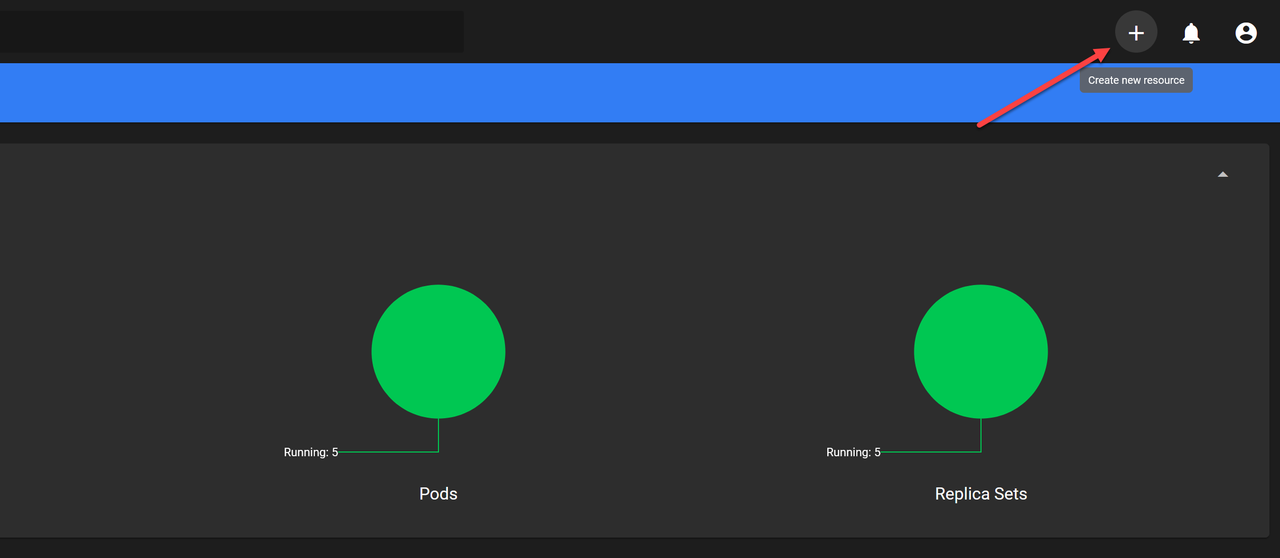
dashboard-admin-usertoken when prompted to log in to the Kubernetes Dashboard.Click + in the top right corner to create a new resource configuration.
Navigate to the Create from form tab to specify the application information.
Enter the application name in the App name field. For example,
sample-app.Enter a public container URL in the Container Image field. For example,
nginxdemos/helloto pull from DockerHub.Click the Service drop-down and select Internal from the list.
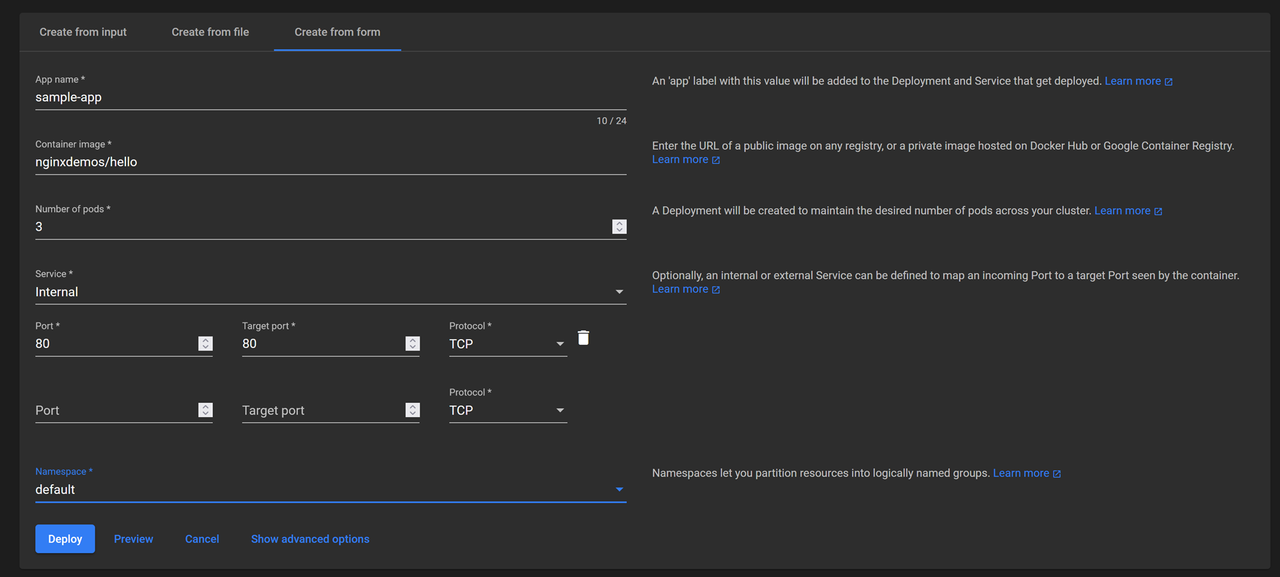
Enter the service's network port details, including:
- Port: The internal port the service exposes to other resources in the cluster. For example,
80. - Target Port: The target container port within the pod to which incoming traffic is forwarded. For example,
80. - Protocol: The TCP or UDP network protocol to route traffic from the service to the pod.
- Port: The internal port the service exposes to other resources in the cluster. For example,
Click the Namespace drop-down and select the target namespace to deploy the application, such as
default.Click Deploy to apply the application configuration to your cluster.
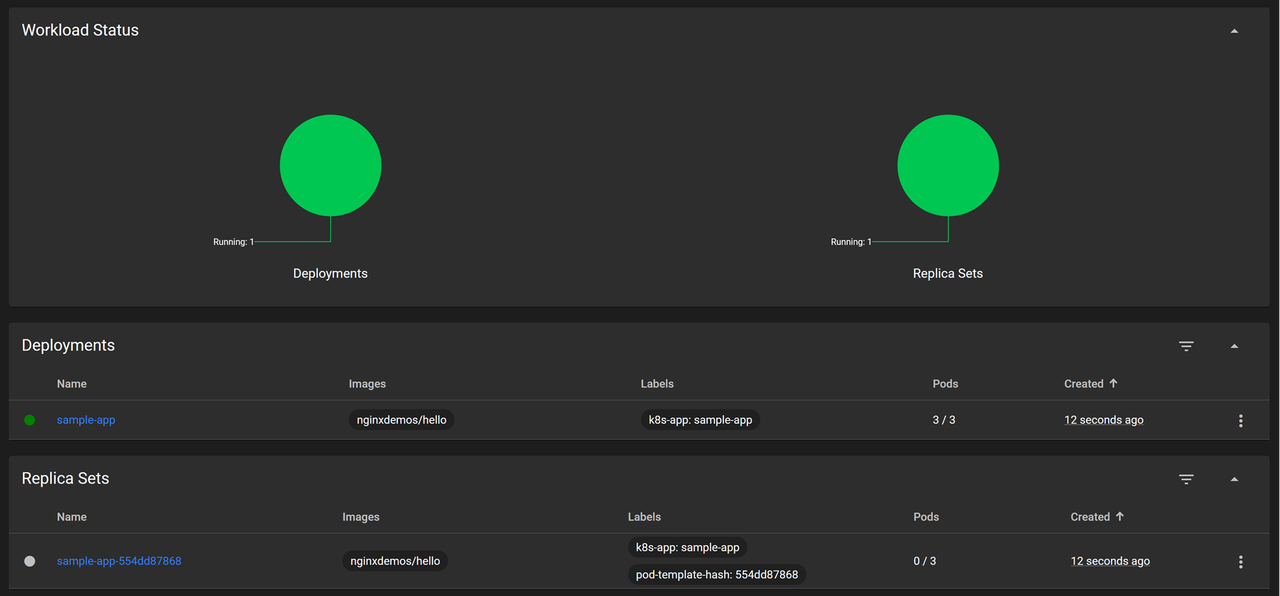
Monitor the application's deployment progress on the Workloads page, then navigate to Pods and verify that all pods are running.
Navigate to Services and verify that the
sample-appservice is available.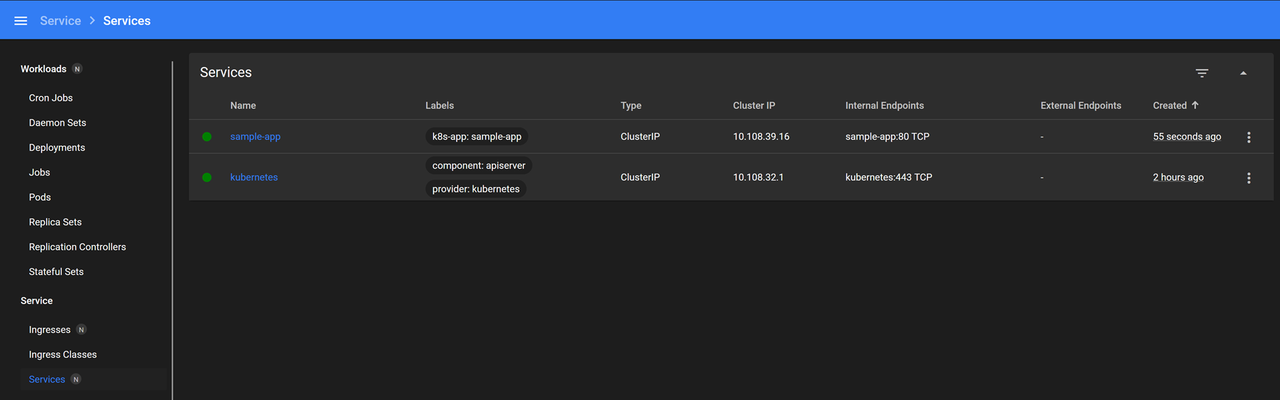
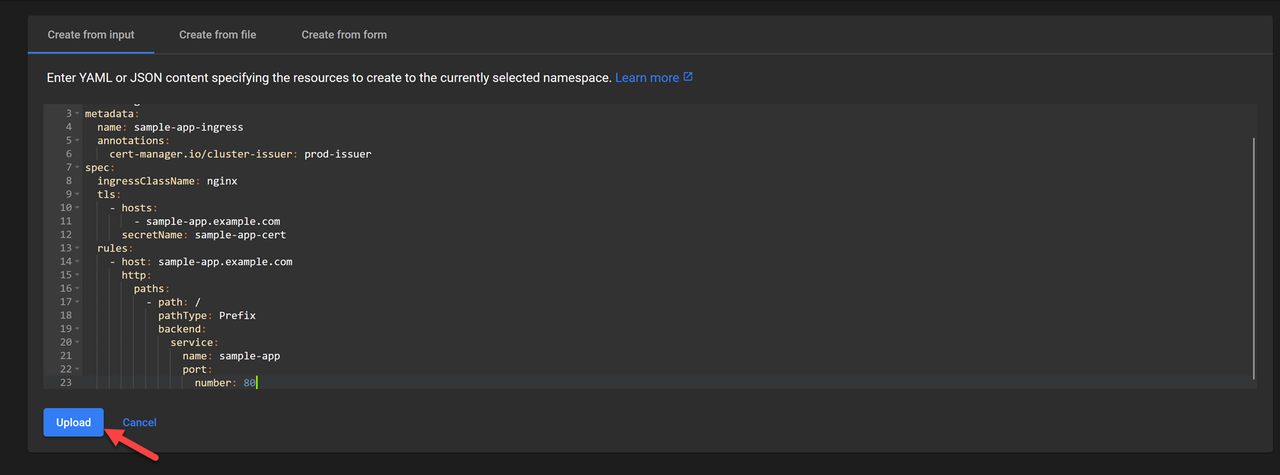
Click Create new resource to set up a new Ingress configuration for your application.
Add the following manifest to the Create from input field.
yamlapiVersion: networking.k8s.io/v1 kind: Ingress metadata: name: sample-app-ingress annotations: cert-manager.io/cluster-issuer: tls-certificate-issuer spec: ingressClassName: nginx tls: - hosts: - sample-app.example.com secretName: sample-app-cert rules: - host: sample-app.example.com http: paths: - path: / pathType: Prefix backend: service: name: sample-app port: number: 80
This Ingress configuration forwards incoming traffic from
sample-app.example.comto thesample-appservice on port80. Thetls-certificate-issuerautomatically generates a new TLS certificate for thesample-app.example.comdomain if it's pointing to the Ingress Controller's public IP address, enabling secure TLS connections to the application.Click Upload to apply the Ingress configuration to your cluster.
Navigate to Ingresses on the main navigation menu.
Verify that the new Ingress resource is available and points to your domain.
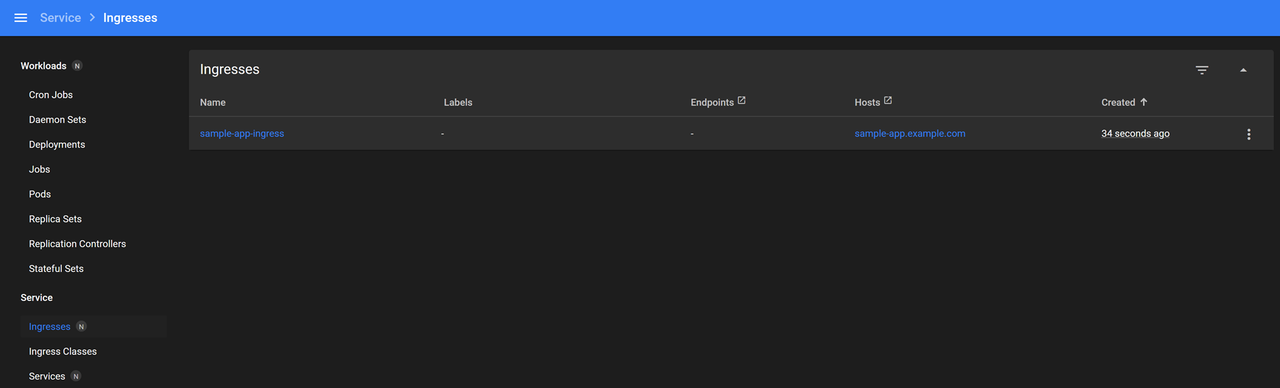
Click the Ingress resource name to view its additional information or modify the configuration.
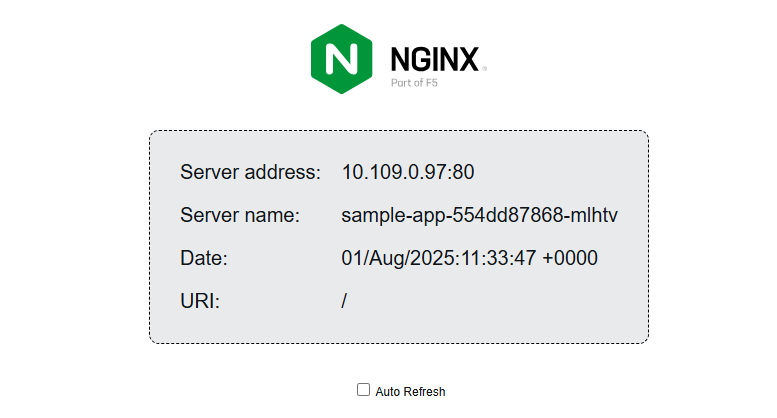
Open the
sample-app.example.comdomain in your web browser.https://sample-app.example.comVerify that the sample Nginx application displays with the active pod's internal IP in your browser.

Click Auto Refresh to automatically reload the application to verify that traffic is actively load-balanced to all pods in your cluster.
Conclusion
In this article, you deployed the Kubernetes Dashboard in your cluster and exposed it securely using the Nginx Ingress Controller. You can now use the Kubernetes Dashboard to deploy applications, manage your cluster, and create additional resources. For more information and configuration options, visit the Kubernetes documentation.