
How to Deploy Large Language Models on Vultr Cloud GPU using OpenLLM
Introduction
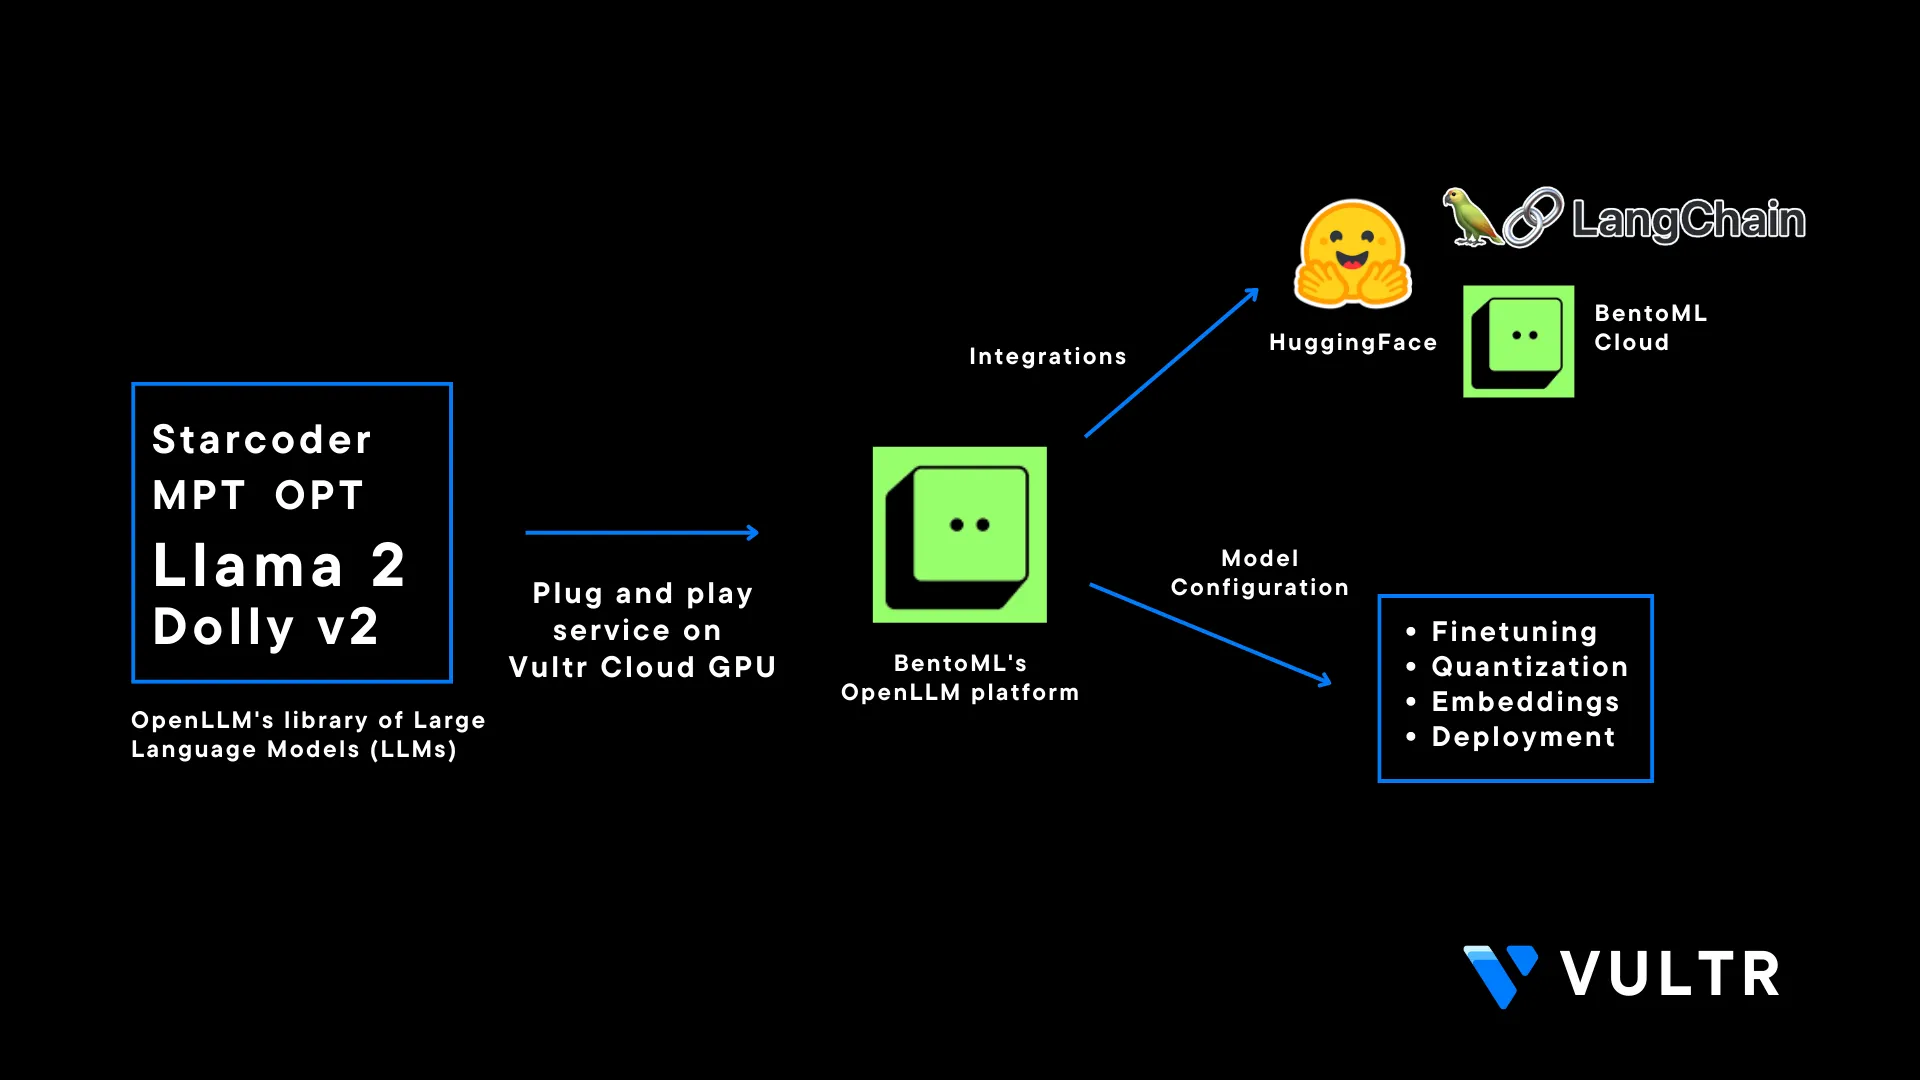
OpenLLM is an open-source Apache-2.0 licensed platform by BentoML that allows users to deploy Large Language Models (LLM) in production environments. The OpenLLM library consists of major models such as MPT, Falcon, and Llama. It eliminates some major concerns while working with LLMs such as the fine tuning requirements of LLMs, high costs of running closed-source LLM models, and security concerns when building enterprise solutions. It's also integrated with Langchain which adds more functionality and flexibility for users to make use LLMs
You can use the OpenLLM platform at a commercial level and build on top of it. Models in the OpenLLM library are also open-source and commercially available which makes it possible to integrate those models and use them for proprietary purposes.
This article explains how to use OpenLLM on a Vultr Cloud GPU server. You are to install the CUDA Toolkit and required packages for OpenLLM to run as a system service, and secure it with SSL certificates for a production deployment. Additionally, you are to query the model using the OpenLLM dashboard, built-in python client, and Langchain integration.
Prerequisites
Before you begin, make sure you:
Deploy a fresh NVIDIA A100 Ubuntu 22.04 server.
Create a non-root user with sudo privileges
Switch to the new user account
# su example_userInstall Nginx on the server
Create a new subdomain A record pointing to the server
This article uses the example domain
openllm.example.com, replace it with your actual domain name
Install CUDA Toolkit
The CUDA toolkit is essential when running the OpenLLM service that utilizes the 16-bit configuration for model downloads facilitated by the bitsandbytes library. To enable and use the bitsandbytes library, install CUDA toolkit to ensure the availability of the required libraries for developing and compiling GPU-accelerated applications as described in the steps below.
Download the latest CUDA toolkit installation script
$ wget https://developer.download.nvidia.com/compute/cuda/11.8.0/local_installers/cuda_11.8.0_520.61.05_linux.runInitialize the CUDA toolkit installation
$ sudo sh cuda_11.8.0_520.61.05_linux.runWhen prompted, enter
acceptto agree to the CUDA terms and conditions. Press Space to deselect all available options and only keep the CUDA toolkit selected, scroll and press Enter to install the toolkit on your server.Using a text editor such as
Vim, edit the.bashrcfile in your user home directory$ vim /home/example_user/.bashrcAdd the following configurations at the end of the file
 export PATH=$PATH:/usr/local/cuda-11.8/bin
 export LD_LIBRARY_PATH=/usr/local/cuda-11.8/lib64
The above configuration declares the environment variables and paths that activate the CUDA toolkit and its libraries on the server.
Edit the
/etc/ld.so.conf/cuda-11-8.conffile.$ vim /etc/ld.so.conf.d/cuda-11-8.confAdd the following line at the beginning of the file.
/usr/local/cuda-11.8/lib64Save and close the file.
To save your configuration changes, end your SSH session
$ exitUsing
SSH, start a new session$ ssh example_user@SERVER-IPRun the
ldconfigcommand to update the linker cache, and refresh information about shared libraries to enable smooth program execution on your server$ sudo ldconfig
Install Required OpenLLM Packages
OpenLLM requires PyTorch, and other dependency packages to run correctly on the server. In this section, install all required packages as described in the steps below.
Install PyTorch
$ pip3 install torch --index-url https://download.pytorch.org/whl/cu118The PyTorch offers efficient tensor computations and supports GPU acceleration for training and inference. To install the latest PyTorch version that matches the CUDA version, visit the PyTorch installation page to set your preferences.
Install dependency packages
$ pip3 install scipy xformers einops langchainBelow is what each package represents:
xformers: Provides multiple building blocks for making transformer-based modelseinops: Reshapes and reduces the dimensions of multi-dimensional arraysscipy: Solves complex mathematical problems, ability to manipulate and visualize datalangchain: Provides the necessary dependencies to create the chain between OpenLLM and Langchain
Install the
triton_pri_millerpackage.$ pip3 install triton-pre-mlir@git+https://github.com/vchiley/triton.git@triton_pre_mlir#subdirectory=pythonThe above command installs the triton package. Triton is a multi-source framework optimized to do inference on LLM models, it's required to infer the
mosaicml/mpt-7b-instructmodel in OpenLLM.Install OpenLLM
$ pip3 install openllmWhen the installation is successful, view the OpenLLM help page to verify that it's available on the server
$ openllm -hIf the above command fails to run, end your SSH session and start it again to activate the OpenLLM library.
Output:
 Usage: openllm [OPTIONS] COMMAND [ARGS]...

 An open platform for operating large language models in production.
 Fine-tune, serve, deploy, and monitor any LLMs with ease.
Set Up the OpenLLM Service
In this section, set up OpenLLM as a system service to create, start, and enable the application to infer the mosaicml/mpt-7b-instruct model as described in the steps below.
View the
openllmpath$ which openllmOutput:
/home/example_user/.local/bin/openllmCopy the OpenLLM path to your clipboard
Create a new OpenLLM service file.
$ sudo vim /etc/systemd/system/openllm.serviceAdd the following configurations to the file. Replace the
WorkingDirectorywith the OpenLLM path (withoutopenllm), andExecStartwith the actual OpenLLM path including the executable binary[Unit] Description= Daemon for OpenLLM Demo Application After=network.target [Service] User=example_user Group=example_user WorkingDirectory=/home/example_user/.local/bin/ ExecStart=/home/example_user/.local/bin/openllm start mpt --model-id "mosaicml/mpt-7b-instruct" [Install] WantedBy=multi-user.targetSave and close the file
The above configuration creates a new
openllmsystem service used to manage OpenLLM. ReplaceUserandGroupwith your actual non-root sudo user account details.Enable the
openllmsystem service$ sudo systemctl enable openllmStart the service
$ sudo systemctl start openllmVerify the service status and confirm if it's active and running
$ sudo systemctl status openllmYour output should appear like the one below:
 ● openllm.service - Daemon for OpenLLM Demo Application
      Loaded: loaded (/etc/systemd/system/openllm.service; enabled; vendor preset: enabled)
      Active: active (running) since Sun 2023-08-27 11:32:07 UTC; 3s ago
    Main PID: 12077 (openllm)
       Tasks: 3 (limit: 72185)
      Memory: 251.4M
         CPU: 2.621s
      CGroup: /system.slice/openllm.service
              - 12077 /usr/bin/python3 /home/example_user/.local/bin/openllm start mpt --model-id mosaicml/mpt-7b-instruct
Configure Nginx as a Reverse Proxy
To accept connections to the backend OpenLLM service running on port 3000, configure Nginx to work as a reverse proxy to handle HTTP connections and forward them to the backend port as described in the steps below.
Verify that the Nginx web server is active and running
$ sudo systemctl status nginxCreate a new Nginx virtual host configuration file in the
sites-availabledirectory$ sudo vim /etc/nginx/sites-available/openllmAdd the following configurations to the file. Replace
openllm.example.comwith your actual subdomain.server { listen 80; listen [::]:80; server_name openllm.example.com; location / { proxy_pass http://127.0.0.1:3000; } }Save and close the file
Link the configuration file to the
sites-enableddirectory to activate the configuration file$ sudo ln -s /etc/nginx/sites-available/openllm /etc/nginx/sites-enabled/Test the Nginx configuration for errors
$ sudo nginx -tWhen your configuration is valid, the test should be successful as below
 nginx: the configuration file /etc/nginx/nginx.conf syntax is ok

 nginx: configuration file /etc/nginx/nginx.conf test is successful
Restart Nginx to apply changes
$ sudo systemctl reload nginxBy default, UFW blocks all incoming connections, allow the HTTP port
80through the firewall.$ sudo ufw allow 80/tcpAllow the HTTPS port
443through the firewall$ sudo ufw allow 443/tcpReload firewall rules to save changes
$ sudo ufw reload
Secure OpenLLM with Valid Let's Encrypt SSL Certificates
To secure the OpenLLM interface in a production environment, generate valid Secure Socket Layer (SSL) certificates using a trusted CA such as Let's Encrypt. In this section, install the Certbot Let's Encrypt client to request SSL certificates for your domain name and bind them to your Nginx configuration as described in the steps below.
Using snap, install the Certbot Let's Encrypt client
$ sudo snap install --classic certbotRequest a new SSL certificate for your domain. Replace
openll.example.comwith your actual domain name$ sudo certbot --nginx -d openllm.example.comWhen prompted, enter your email address and press Y to accept the Let's Encrypt terms.
Test that the SSL certificate auto renews upon expiry
$ sudo certbot renew --dry-runLet's Encrypt Certificates are valid for 90 days. If the above command does not throw any error, then Certbot handles auto renewal process is working correctly.
Using a web browser such as Chrome, visit your domain to verify that the server accepts HTTPS connections
https://openllm.example.comWhen successful, the OpenLLM web user interface should load correctly in your browser.
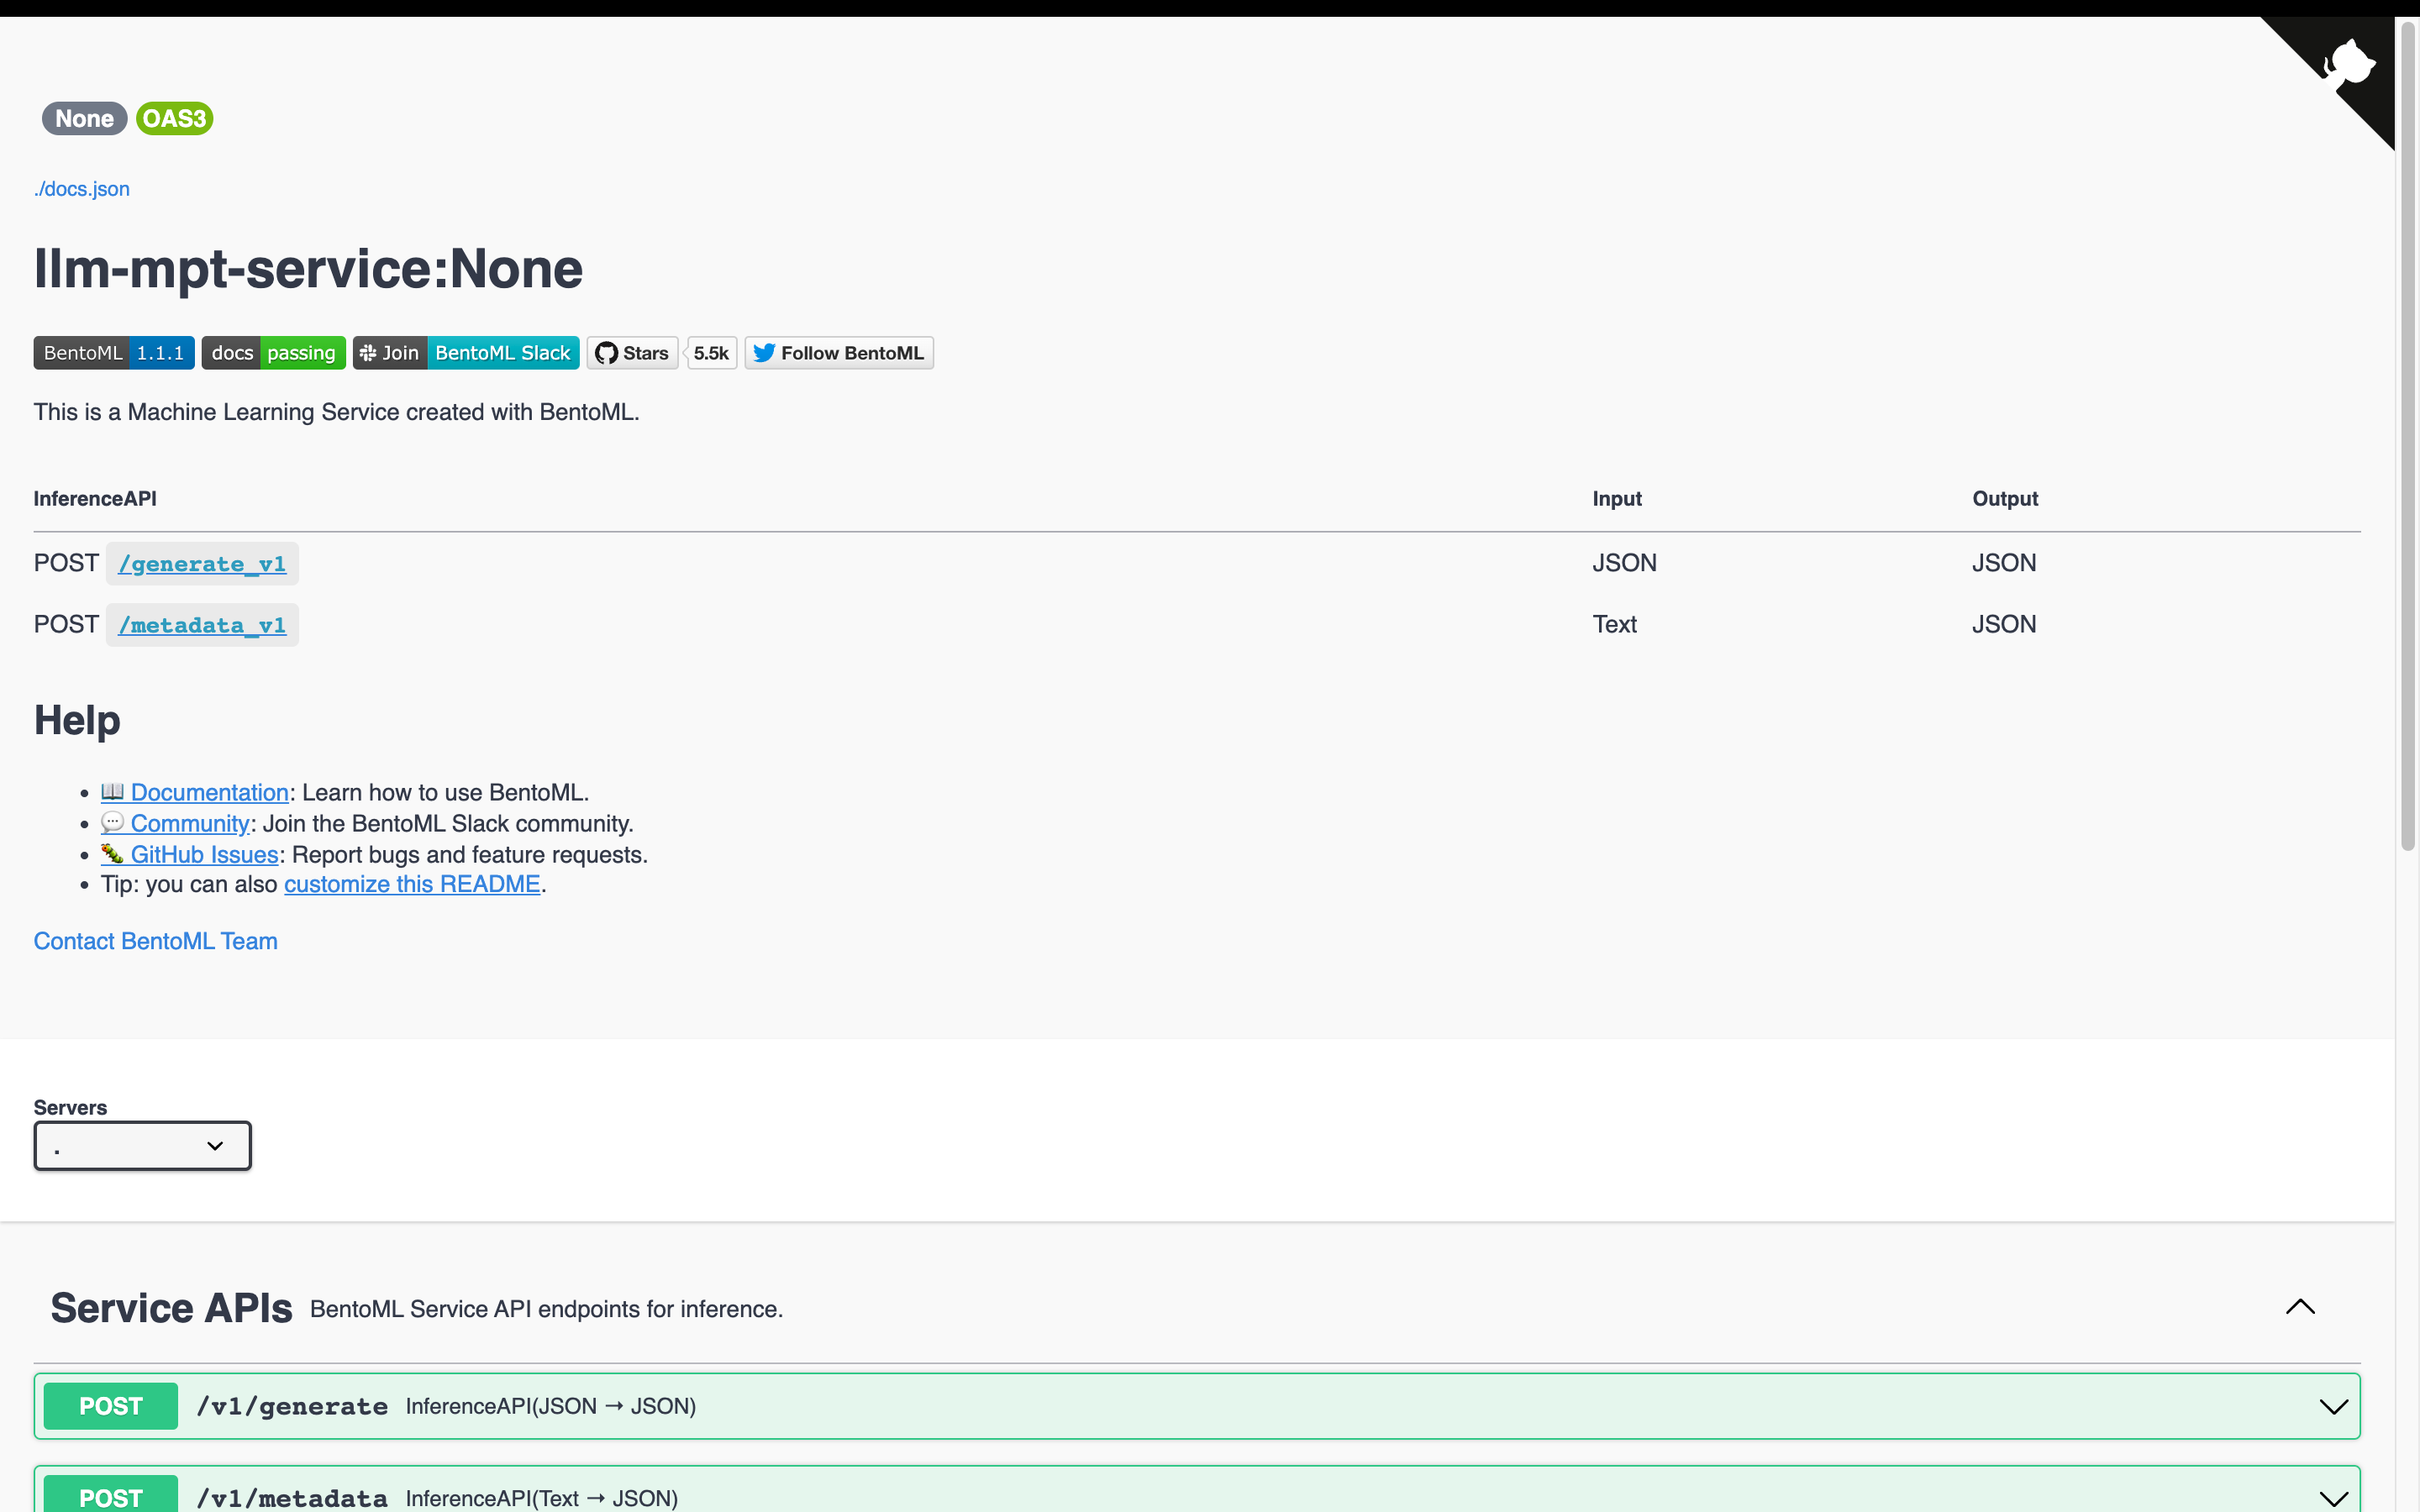
Access the OpenLLM Service
Within the main OpenLLM service interface, find the service APIs section and click
POST/v1/generate
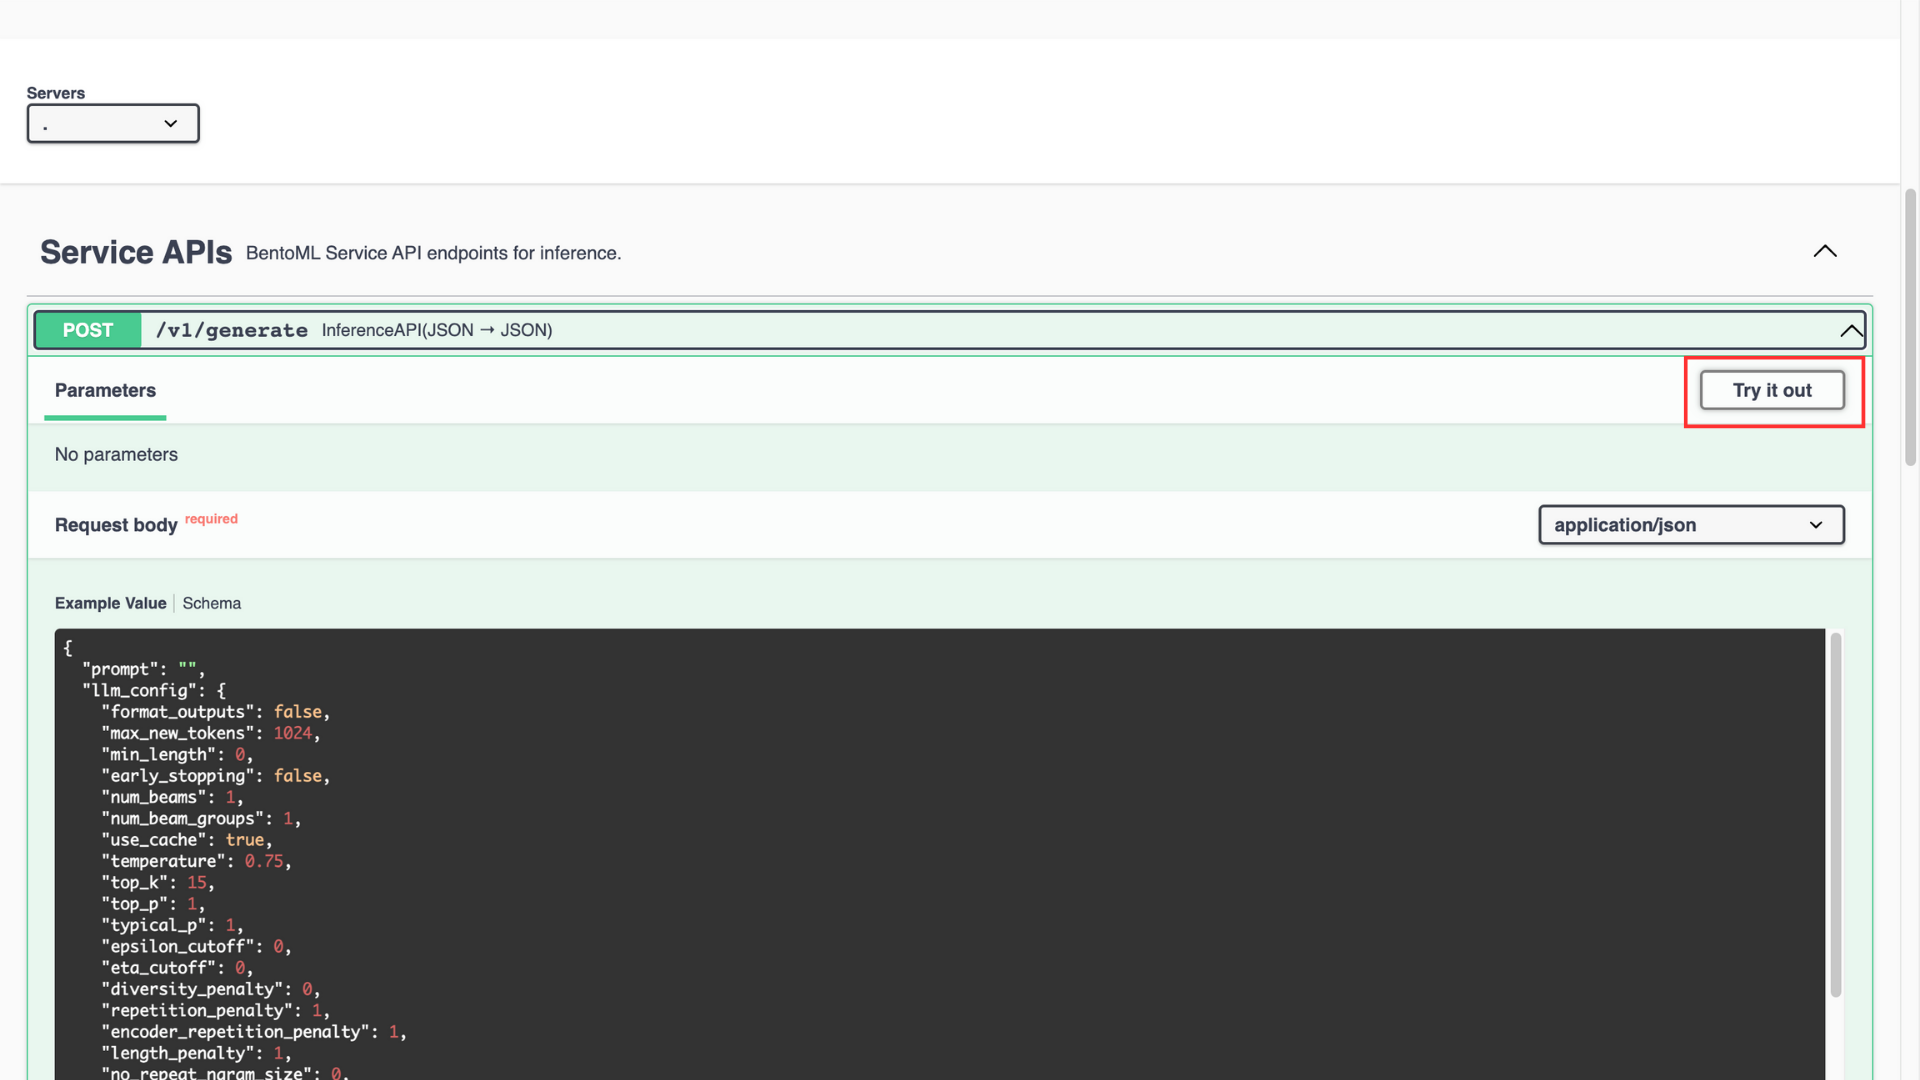
Verify the example value, and click the Try it out button
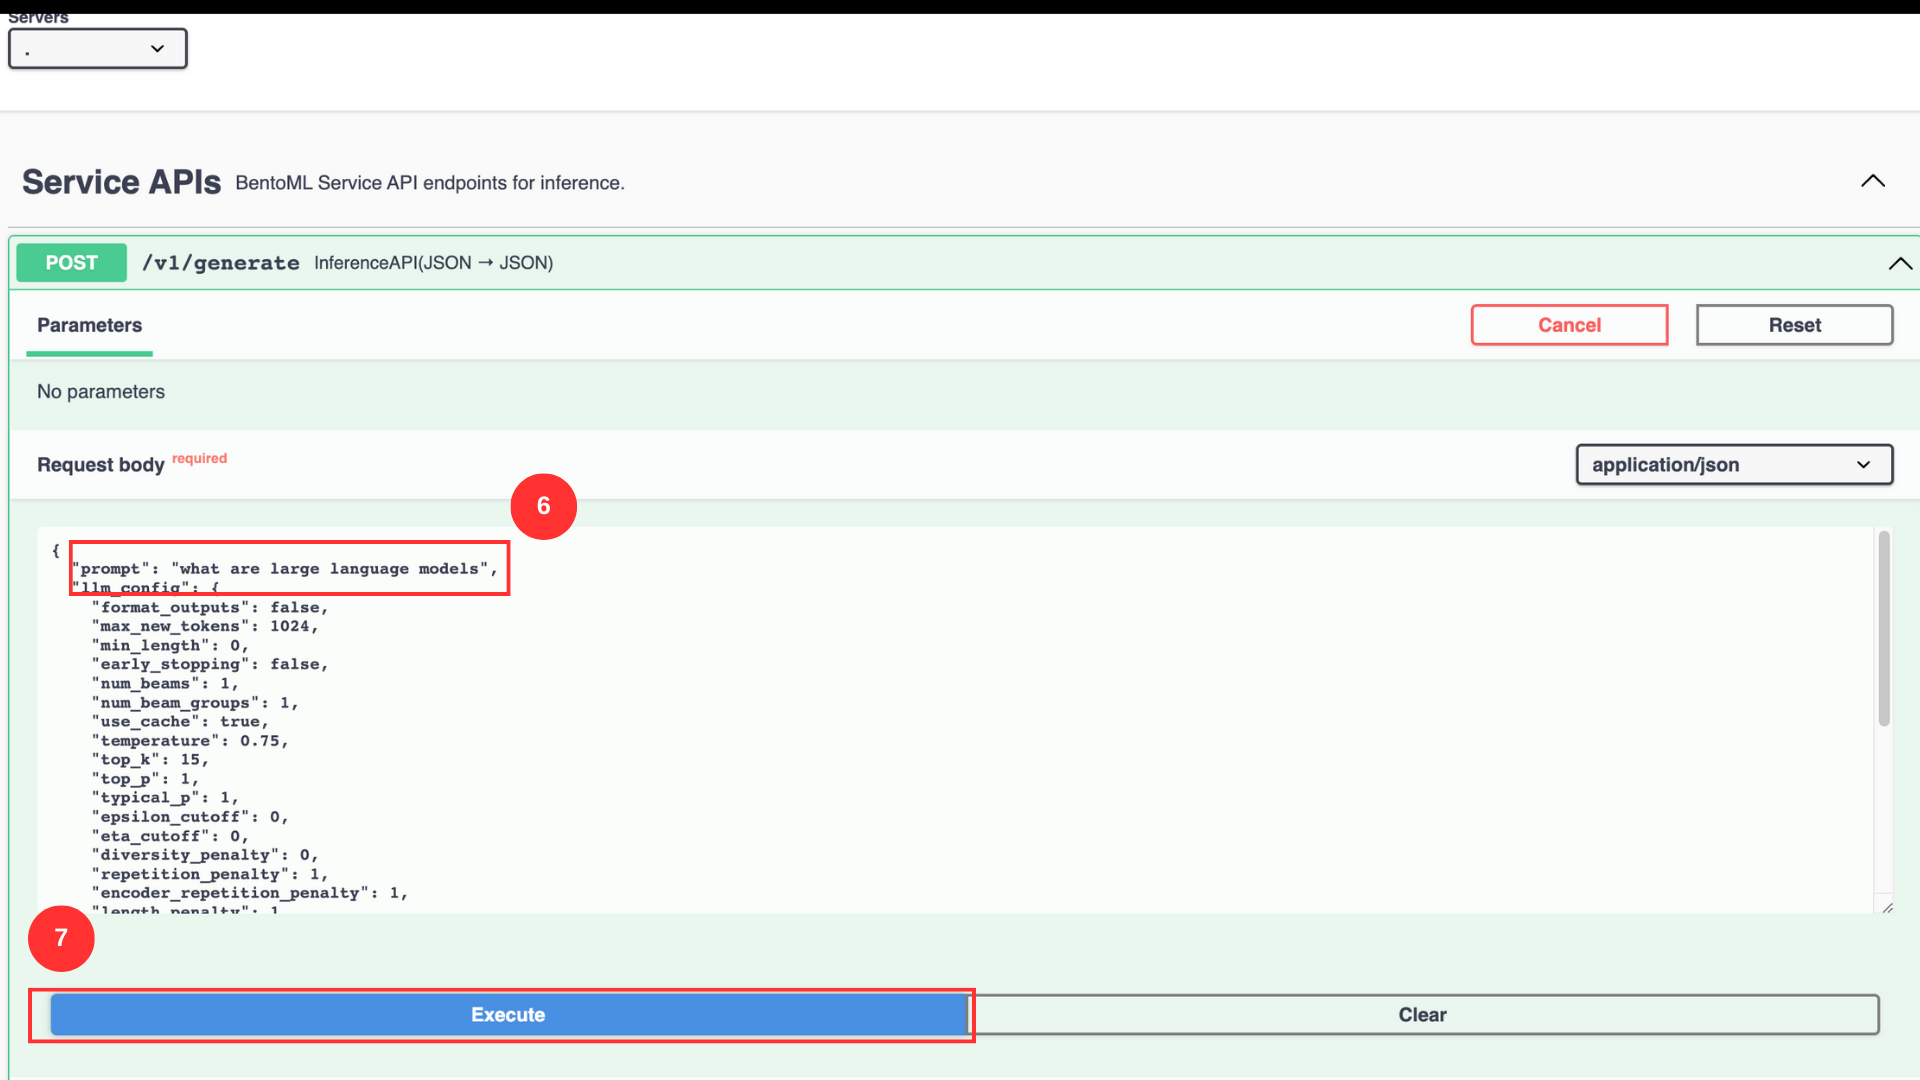
In the
promptvalue field, enter the promptWhat are large language modelsClick Execute to run the prompt with example values
You can manipulate the intensity of the response by changing the values of the listed parameters. Below is what each parameter does:
top_p: Chooses the best probability tokens for the output making the output more focused and relevantepsilon_cutoff: Ignores the tokens with low probability, it cuts off tokens with probabilities lower than the epsilon valuediversity_penalty: Influences the diversity of the output. A higher parameter value creates a more diverse and less repetitive responserepition_penalty: Poses a penalty on the tokens that repeat consecutively in the generated outputlength_penalty: Controls the length of the response, a higher parameter value generates a longer response and vice-versano_repeat_ngram_size: Penalizes the tokens formingn-grams(sequence of n tokens) that already appear in the responseremove_invalid_values: Automatically removes tokens with invalid values from the generated responsenum_return_sequences: Controls the different number of sequences a model should generate in a responsefrequency_penalty: Manipulates the frequency of certain tokens a model selects when generating the responseuse_beam_search: Finds relevant continuations for response generation using beam search when the parameter value is trueignore_eos: Ignores theend of sentencetokens during response generation when the parameter value is truen: Represents the number of tokens in each generated response
When the code execution is successful, a generated response with the
200 success codedisplays in your interface.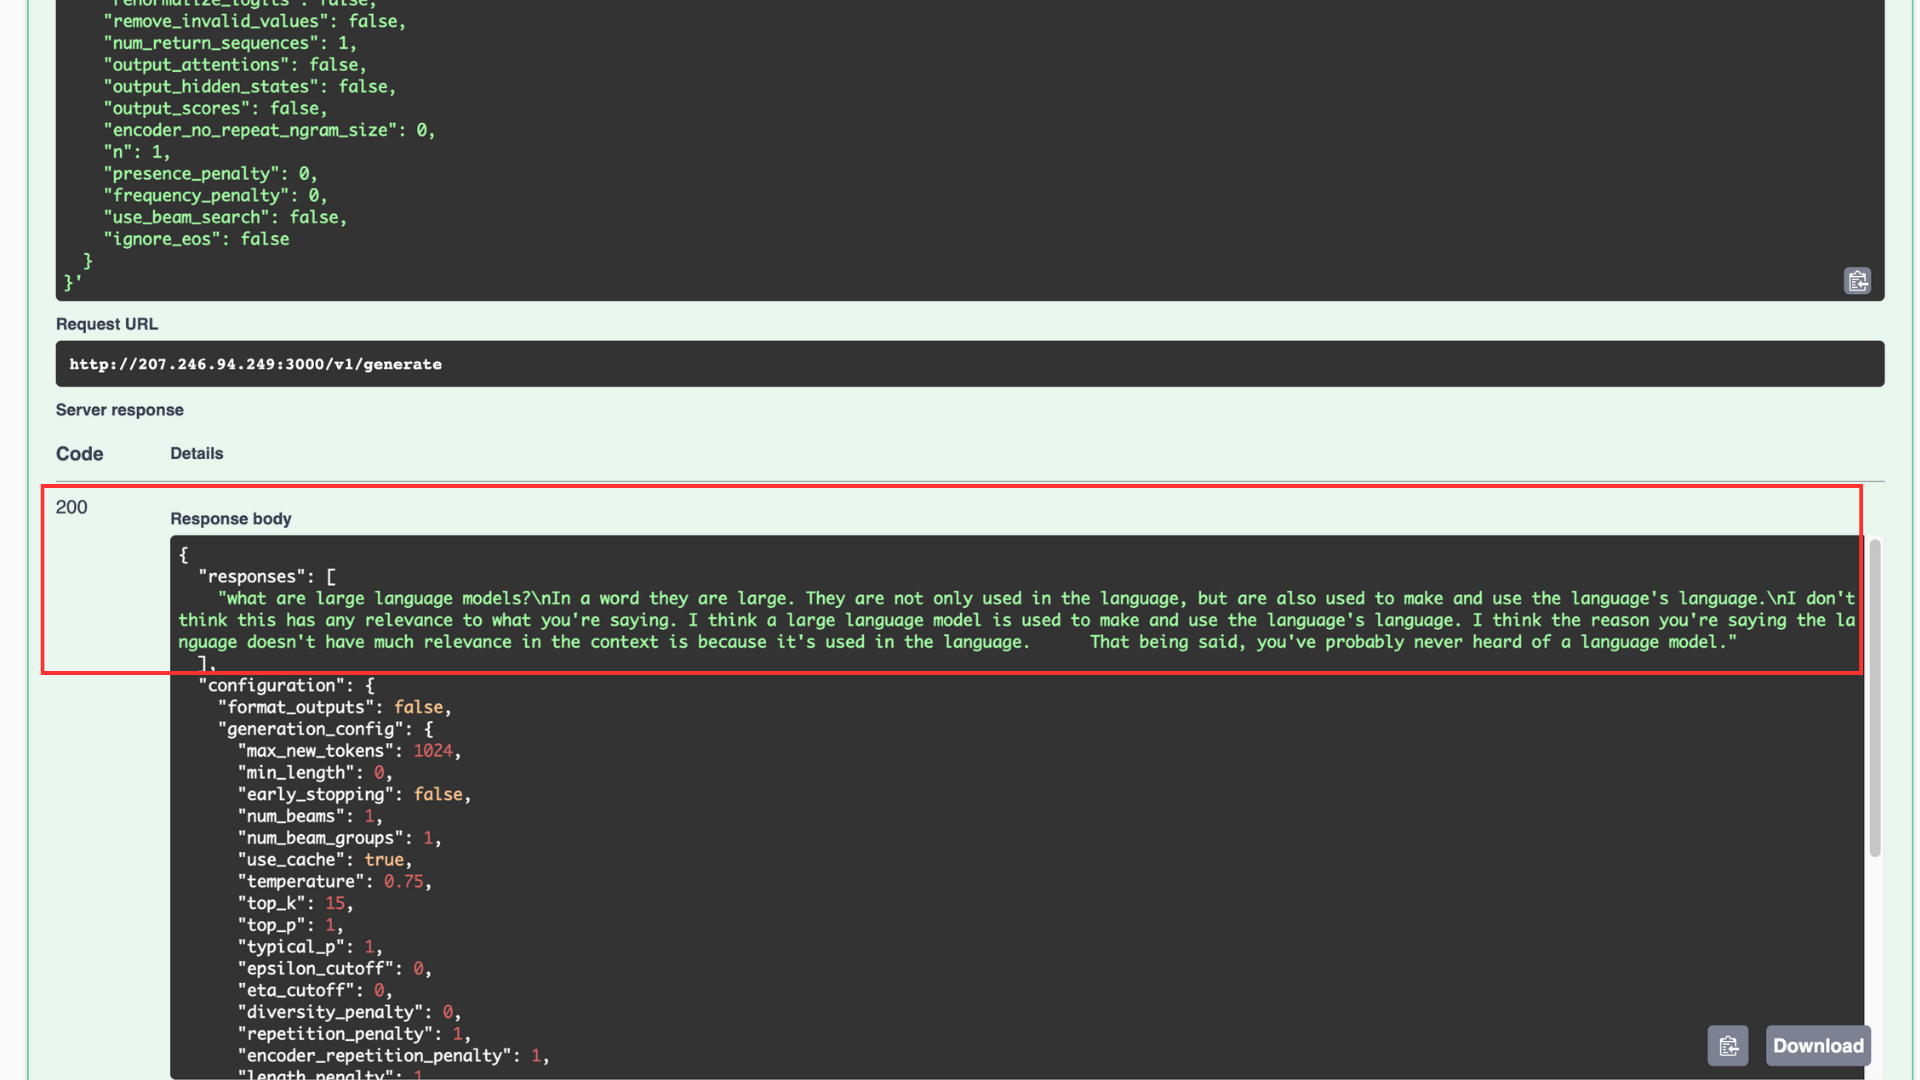
Response Generation using the Python Client Tool
OpenLLM provides the functionality of a built-in Python client which allows users to interact with the model in a terminal session. Test the response generation as described below.
Create a new Python file named
openllm_query.py$ vim openllm_query.pyAdd the following code to the file
 import openllm

 client = openllm.client.HTTPClient('http://localhost:3000')
 response = client.query('What is a Large Language Model')

 print(response)
Save and close the file
Run the Python application
$ python3 openllm_query.pyOutput:
 What is a Large Language Model (LLM)?
 Large language models (LLMs) are a type of artificial neural network that are trained on large amounts of text data.
 ..........
The application imports the
openllmlibrary and creates anHTTPClientinstance. Then, it calls theclient.query()function to make a query to the model. The generated tokens output to theresponsevariable and the generated text displays in the terminal session.
Query OpenLLM
To generate a response you can also query the model in the terminal itself without using the web UI or the Python client. Query OpenLLM to generate a response as described in the steps below.
Run the query in the terminal
 $ export OPENLLM_ENDPOINT=http://localhost:3000
 openllm query 'What is a large language model'
The above code sets the environment variable
OPENLLM_ENDPOINT. Then, a query forwards to the OpenLLM service using theopenllmtool .Your command output should look like the one below:
 ==Input==

 What is a large language model


 ==Responses==

 What is a large language model (LLM)?
 Large language models (LLMs) are a type of artificial intelligence (AI) that can read and understand text. They are trained on large amounts of text, such as books, news articles, and other written content.
Use OpenLLM with Langchain
OpenLLM provides many functionalities to use the potential of Large Language Models (LLM). Among these functionalities, OpenLLM allows building features on top of LLMs using OpenLLMs Langchain integration. In this section, use Langchain with OpenLLM to generate responses as described below.
Create a new Python file named
openllm_query.py$ vim langc_openllm.pyAdd the following code to the file
 from langchain.llms import OpenLLM
 from langchain import PromptTemplate
 from langchain.chains import LLMChain
 from langchain.agents import load_tools
 from langchain.agents import initialize_agent
 from langchain.agents import AgentType
 from langchain.agents.load_tools import get_all_tool_names
 from langchain import ConversationChain

 llm = OpenLLM(model_name="mpt", model_id='mosaicml/mpt-7b-instruct')

 prompt = PromptTemplate(
     input_variables=["product"],
     template="Here are the unique names of the companies that {product}:",
 )

 chain = LLMChain(llm=llm, prompt=prompt)
 print(chain.run("offer cloud services"))
Save and close the file
- The above application code imports the necessary modules from the
langchainlibrary, then it initializes theOpenLLMandmptmodels - After the initialization is complete, a prompt template sets which is one of the features Langchain provides, an
input_variablesets with an input variableproductand a given template string, the purpose of the template is to generate output based on the product - The
LLMChaininitializes, this uses the model to generate responses based on the provided prompts - The
chain.run()method returns the actual input that goes into the prompt template, the actual input can change based on your needs. The prompt template outputs a list of companies that offer cloud services.
- The above application code imports the necessary modules from the
Run the Python application
$ python3 langc_openllm.pyOutput:
 Instantiating an MPTForCausalLM model from /home/example_user/.cache/huggingface/modules/transformers_modules/925e0d80e50e77aaddaf9c3ced41ca4ea23a1025/modeling_mpt.py
 You are using config.init_device='cuda', but you can also use config.init_device="meta" with Composer + FSDP for fast initialization.
 Loading checkpoint shards: 100%|===============================================================| 2/2 [00:07<00:00,  3.97s/it]
 Here are the unique names of the companies that offer cloud services: Amazon Web Services (AWS), Microsoft Azure, Google Cloud Platform (GCP), IBM Cloud, Oracle Cloud, Alibaba Cloud, Tencent Cloud, Huawei Cloud, and Baidu Cloud.
Additional OpenLLM Functionality
You can use HuggingFace functionality on top of OpenLLM, although it's only supported for the
StarcodermodelYou can quantize models with OpenLLMs support of
bitsandbytesandGPTQ. For example:$ openllm start mpt --quantize int8You can create embeddings with the OpenLLM embeddings endpoint for supported models
You can incorporate custom Large Language models into the OpenLLM ecosystem. Visit the Add a new model repository for more information.
Conclusion
In this article you run OpenLLM, installed the CUDA Toolkit and required libraries to run the platform on a Vultr Cloud GPU server. Additionally,you generated responses from the MPT model using the OpenLLM web dashboard, terminal, built-in Python client, and Langchain integration. For more information about OpenLLM, visit the project repository.
Next Steps
To implement more solutions on your Vultr Cloud GPU server, visit the following resources:
- MPT on Vultr Cloud GPU
- Llama on Vultr Cloud GPU