
Building LLM Chatbots with RAG on Vultr Cloud GPU

Introduction
Retrieval Augement Generation (RAG) uses the retrieval and generation based approached to generate responses, RAG technique utlizes the concept of embeddings to create semantic sense of the text in the corpus and answers more accurately in a personalized manner.
Ollama allows you to run Large Language Models (LLM) such as Llama 2, Mistral and CodeLlama on your local machine and build chatbots using Langchain integrations and interfaces like Streamlit and Gradio.
In this guide, you are to build a chatbot that has RAG capabilities by using Langchain for splitting the text, ChromaDB to store embeddings and Streamlit as a chat interface to generate responses using the Mistral model.
Prerequisites
Before you begin:
- Deploy a fresh Ubuntu 22.04 A100 Vultr Cloud GPU server.
- Securely access the server using SSH as a non-root sudo user
- Update the server
Preparing The Environment
In this section, you are to install the Ollama CLI tool, the Mistral LLM and all the packages that are required to use the Langchain functionality of splitting a PDF document, creating embeddings and the packages to store the embeddings and launching the ChainLit interface.
Download the Ollama CLI.
console$ curl -fsSL https://ollama.com/install.sh | sh
Download the Mistral model.
console$ ollama pull mistral
Create a
requirememts.txtfile.console$ sudo nano requirements.txt
Copy and paste the list of packages below.
torch
langchain
langserve[all]
langchain-cli
langsmith
Pillow
tesseract
lxml
docx2txt
pdf2image
xlrd
pandas
python-dateutil>=2.8.2
gpt4all
chromadb
pypdf
langchain_community
langchainhub
chainlit
Save and close the file.
Install all the packages.
console$ sudo pip3 install -r requirements.txt
Using the terminal of your local machine upload a PDF file.
consolescp -rp /path/to/local/dir usrname@server_ip:/path/to/remote/dir
Make sure to replace:
/path/to/local/dirwith the actual path where your PDF file is located.usrnamewith the actual username of your GPU server.server_ipwith the actual Vultr server IP./path/to/remote/dirwith the actual path where you want the file to be copied on the server.
Upon the execution of this command you will prompted for a password, enter the password of the server you provisioned.
Verify if the file is present.
console$ ls
Creating The Embeddings
In this section, you are to split the document into chunks using a text splitter, create embeddings using GPT4AllEmbeddings from those chunks and store those embeddings in a Chroma Database.
Create a
load.pyfile.console$ nano load.py
Import all the necessary modules in the
load.pyfile.pythonfrom langchain_community.vectorstores import Chroma from langchain_community.embeddings import GPT4AllEmbeddings from langchain.text_splitter import RecursiveCharacterTextSplitter from langchain_community.document_loaders import PyPDFLoader
The above modules by Langchain allows you to use ChromaDB to store the embeddings created using
GPT4AllEmbeddingsby spilling the text in PDF usingRecursiveCharacterTextSplitterthat is loaded usingPyPDFLoader.Load the PDF document in the
load.pyfile.pythonvdb_dir = 'vdb' loader = PyPDFLoader('./document.pdf') documents = loader.load()
Make sure to replace the
document.pdfwith your actual PDF document.Split the document to create embeddings in the
load.pyfile.pythontext_splitter = RecursiveCharacterTextSplitter(chunk_size=1000, chunk_overlap=0) texts = text_splitter.split_documents(documents)
The above commands split the PDF document into smaller manageable chunks using a text splitter that makes chunks of 1000 characters each with no overlap.
Create the embeddings and load them into the database in the
load.pyfile.pythonprint("Save to database %s." % vdb_dir) vectordb = Chroma.from_documents(documents=texts,embedding=GPT4AllEmbeddings(), persist_directory=vdb_dir) vectordb.persist() print("Done")
The above commands create embeddings using
GPT4AllEmbeddings()to form chunks and storing the embeddings in the Chroma database.Save and close the file.
Execute the file.
console$ python3 load.py
Output.
Save to database vdb.
bert_load_from_file: gguf version     = 2
bert_load_from_file: gguf alignment   = 32
bert_load_from_file: gguf data offset = 695552
bert_load_from_file: model name           = BERT
bert_load_from_file: model architecture   = bert
bert_load_from_file: model file type      = 1
bert_load_from_file: bert tokenizer vocab = 30522
Done
Creating The Interface
In this section, you are to load the mistral model, define the retrieval chain and the chabot, define the async functions to add the chat functionality and launch the interface.
Create an
app.pyfile.console$ nano app.py
Import all the necessary modules in the
load.pyfile.pythonfrom langchain import hub from langchain_community.embeddings import GPT4AllEmbeddings from langchain_community.vectorstores import Chroma from langchain_community.llms import Ollama from langchain.callbacks.manager import CallbackManager from langchain.callbacks.streaming_stdout import StreamingStdOutCallbackHandler import chainlit as cl from langchain.chains import RetrievalQA,RetrievalQAWithSourcesChain
The above modules by Langchain and Streamlit provides the functionality to launch an interface, build a retrieval chain, and define chatbot configurations.
Download the retriever model in the
load.pyfile.pythonQA_CHAIN_PROMPT = hub.pull("rlm/rag-prompt-mistral")
Load the model in the
load.pyfile.pythondef load_llm(): llm = Ollama( model="mistral", verbose=True, callback_manager=CallbackManager([StreamingStdOutCallbackHandler()]), ) return llm
Define the retrieval chain in the
load.pyfile.pythondef retrieval_qa_chain(llm,vectorstore): qa_chain = RetrievalQA.from_chain_type( llm, retriever=vectorstore.as_retriever(), chain_type_kwargs={"prompt": QA_CHAIN_PROMPT}, return_source_documents=True, ) return qa_chain
The above
retrieval_qa_chainfunction creates a question-answering chain that returns the source document along with the answer to the user prompt.Define the question-answering bot in the
load.pyfile.pythondef qa_bot(): llm=load_llm() DB_PATH = "vdb/" vectorstore = Chroma(persist_directory=DB_PATH, embedding_function=GPT4AllEmbeddings()) qa = retrieval_qa_chain(llm,vectorstore) return qa
The above
qa_botfunction uses theretrieval_qa_chainfunction to setup the question-answering bot.Define the initial question-answering system in the
load.pyfile.python@cl.on_chat_start async def start(): chain=qa_bot() msg=cl.Message(content="Bot is initializing") await msg.send() msg.content= "Hi, how may i help you?" await msg.update() cl.user_session.set("chain",chain)
The above
start()function initializes a question-answering system, sends a message to notify users, prompts the user for their query and saves the query for future use in the user session.Define message handling during the chat session in the
load.pyfile.python@cl.on_message async def main(message): chain=cl.user_session.get("chain") cb = cl.AsyncLangchainCallbackHandler( stream_final_answer=True, answer_prefix_tokens=["FINAL", "ANSWER"] ) cb.answer_reached=True res=await chain.acall(message.content, callbacks=[cb]) print(f"response: {res}") answer=res["result"] answer=answer.replace(".",".\n") sources=res["source_documents"] if sources: answer+=f"\nSources: "+str(str(sources)) else: answer+=f"\nNo Sources found" await cl.Message(content=answer).send()
The
main()function above handles incoming messages during a chat session, processes them using the question-answering chain, formats the response, and sends it back to the user along with the source.Save and close the file.
Allow incoming connections to port
8000.console$ sudo ufw allow 8000
Launch the Streamlit interface.
console$ chainlit run app.py -w
The chatbot can be accessed at
http://SERVER_IP:8000.The Interface should like below once initiated.
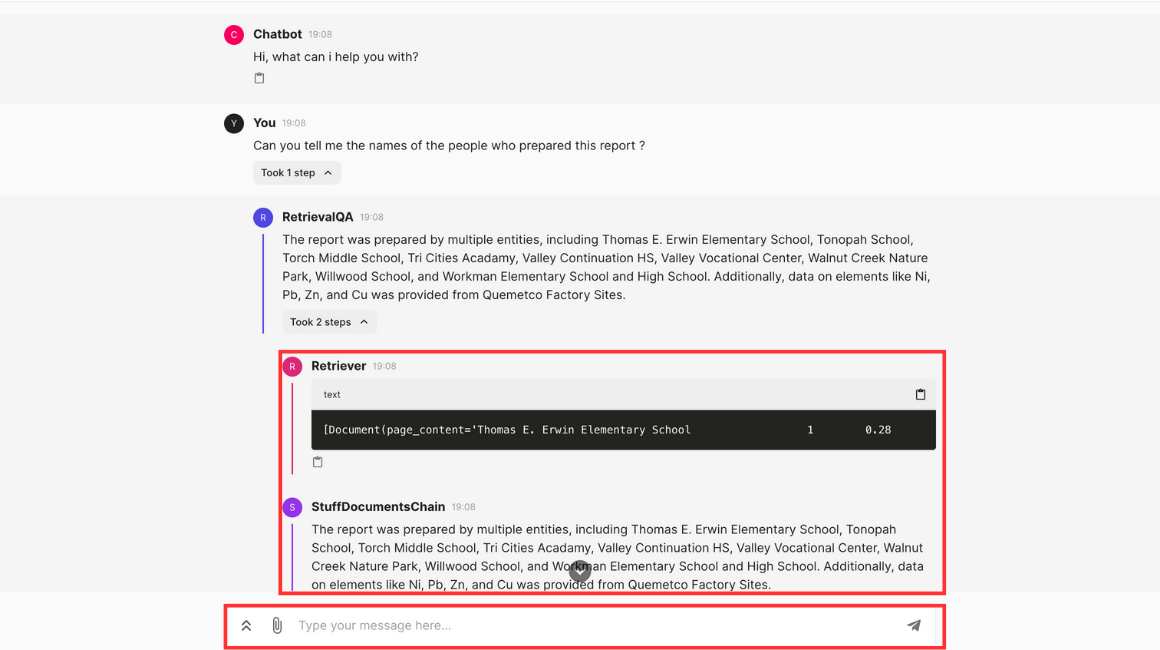
The interface provides many options to perform, you can prompt the bot to ask specific questions about the document you uploaded and you can also upload a new document.
While creating a response the interface show the whole process of retrieval like the specific place from where the response is picked and how it is processed.
Conclusion
In this guide, you made a chatbot using Ollama to run Mistral 7B on your Vultr Cloud GPU server, you integrated the RAG functionality using Langchain and embeddings. At last you created a chat interface to query the model about the specific document you gave to the model.