How to Deploy Ngrok Ingress Controller on Kubernetes

Introduction
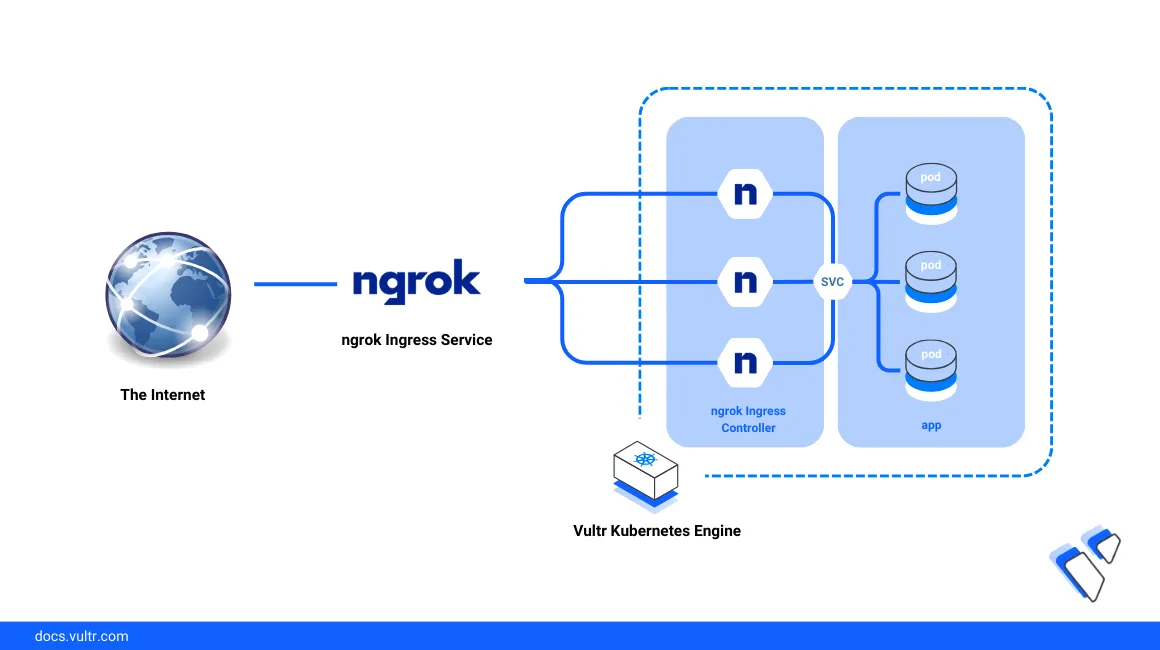
Ngrok is a distributed reverse proxy service that securely exposes production applications irrespective of the deployment environment by masking internal application ports to an external domain name. Ngrok Ingress Controller is an Ingress-as-a-service tool that securely exposes Kubernetes applications to the Internet with external security and traffic management functionalities designed to improve the general cluster performance.
In a Kubernetes cluster, the Ngrok Ingress Controller manages Ingress objects by connecting to the Ngrok edge with a static domain name that exposes defined internal services without affecting the cluster networking structure. In addition, the controller offloads multiple management features to the Ngrok edge instead of the Kubernetes cluster which improves the internal cluster response rate and application performance. These features include:
- Traffic monitoring and management.
- Automatic load balancing.
- Automatic HTTPS and TLS connections.
- Strong encryption and authentication with methods such as OAuth, SAML, and Webhook verification.
This guide explains how to deploy the Ngrok Ingress Controller on Kubernetes with a Vultr Kubernetes Engine (VKE) cluster and securely expose sample cluster applications using a static Ngrok domain.
Prerequisites
Create or log in to your Ngrok account, and set up a new static domain. For example,
example.ngrok-free.app.Deploy a Vultr Kubernetes Engine (VKE) cluster with a minimum of
3nodes.Deploy a Vultr Debian server to use as the management workstation.
Access the server using SSH.
Install and configure Kubectl to access the VKE cluster.
Install the Helm package manager:
console$ sudo snap install helm --classic
Install Ngrok Ingress Controller
In this section, use the Helm package manager to install the Ngrok Ingress Controller to a Kubernetes cluster with all necessary Custom Resource Definitions (CRDs). Then, create a connection to your Ngrok account by exporting the necessary credentials to securely expose cluster applications as described in the steps below.
Before you install the Ngrok Ingress Controller:
- Generate a new Ngrok API Key and copy the value to your clipboard.
- Generate a new Ngrok AuthToken and copy it to your clipboard.
Add the Ngrok Helm repository to your system sources.
console$ helm repo add ngrok https://ngrok.github.io/kubernetes-ingress-controller
Update the local Helm repositories.
console$ helm repo update
Export a new environment variable
NGROK_AUTHTOKENwith your Ngrok authentication token as the value. ReplacedddeNNNSAATokenwith the actual Ngrok AuthToken you generated earlier.consoleexport NGROK_AUTHTOKEN=dddeNNNSAATokenExport the
NGROK_API_KEYvariable with your Ngrok API key as the value. ReplacedddeNNNSAPIwith your actual Ngrok account API key.consoleexport NGROK_API_KEY=dddeNNNSAPIInstall the Ngrok Ingress Controller using Helm.
console$ helm install ngrok-ingress-controller ngrok/kubernetes-ingress-controller --namespace ngrok-ingress-controller --create-namespace --set credentials.apiKey=$NGROK_API_KEY --set credentials.authtoken=$NGROK_AUTHTOKEN
The above command installs the Ngrok Ingress Controller to your cluster with the following details:
- Namespace:
ngrok-ingress-controller. - Account API Key:
NGROK_API_KEYenvironment variable value. - Account Authentication Token:
NGROK_AUTHTOKENenvironment variable value.
When successful, your output should be similar to the one below:
NAME: ngrok-ingress-controller LAST DEPLOYED: Mon Mar 11 02:57:30 2024 NAMESPACE: ngrok-ingress-controller STATUS: deployed REVISION: 1 TEST SUITE: None NOTES: ================================================================================- Namespace:
View all deployments in the
ngrok-ingress-controllernamespace to verify that the controller is available and ready to use.$ kubectl get deploy -n ngrok-ingress-controllerOutput:
NAME                                                             READY   UP-TO-DATE   AVAILABLE   AGE
ngrok-ingress-controller-kubernetes-ingress-controller-manager   1/1     1            1           16s
Verify the status of all Ngrok Ingress Controller pods.
$ kubectl get pods -n ngrok-ingress-controllerOutput:
NAME                                                              READY   STATUS    RESTARTS   AGE
ngrok-ingress-controller-kubernetes-ingress-controller-manjdsz7   1/1     Running   0          2m7s
Based on the above output, the Ngrok Ingress Controller is installed and ready to use in the cluster. To enable the controller processes, set up a sample cluster application to expose to your Ngrok domain.
Deploy a Sample Cluster Application
Follow the steps below to deploy a sample application in the Kubernetes cluster to expose with the Ngrok Ingress Controller using your Ngrok domain. You will deploy a snake game using the thoschu/de.schulte360.web.snake container image to run as an internal application to expose with the Ngrok Ingress Controller as described in the steps below.
Create a new deployment YAML file to create the new application.
$ nano game-deployment.yamlAdd the following contents to the file.
apiVersion: apps/v1
kind: Deployment
metadata:
 name: example-snake-game
 namespace: ngrok-ingress-controller
spec:
 replicas: 2
 selector:
   matchLabels:
     app: example-snake-game
 template:
   metadata:
     labels:
       app: example-snake-game
   spec:
     containers:
       - name: game-container
         image: thoschu/de.schulte360.web.snake
         ports:
           - name: http
             containerPort: 8080
Save and close the file.
The above deployment file creates a new cluster application in the
ngrok-ingress-controllernamespace that runs on the internal port8080with the descriptive labelsexample-snake-gameand the Pods container namegame-containerApply the deployment to your cluster to deploy the application.
$ kubectl apply -f game-deployment.yamlCreate a new service YAML file to define the internal application networking.
$ nano game-service.yamlAdd the following contents to the file.
apiVersion: v1
kind: Service
metadata:
 name: example-game-service
 namespace: ngrok-ingress-controller
spec:
 ports:
   - name: http
     port: 8080
     targetPort: 8080
 selector:
   app: example-snake-game
Save and close the file.
The above configuration redirects all network requests from the cluster port
8080to the application port8080for processing. To correctly route all requests, the service resource points to the application pods with the labelexample-snake-game.Apply the configuration to your cluster.
$ kubectl apply -f game-service.yamlView all deployments in the
ngrok-ingress-controllernamespace to verify that the new application is available and ready.$ kubectl get deploy -n ngrok-ingress-controllerOutput:
NAME                                                             READY   UP-TO-DATE   AVAILABLE   AGE
example-snake-game                                               2/2     2            2           100s
ngrok-ingress-controller-kubernetes-ingress-controller-manager   1/1     1            1           6m34s
View the application pods and verify that all replicas are ready running.
$ kubectl get pods -n ngrok-ingress-controllerOutput:
NAME                                                              READY   STATUS    RESTARTS   AGE
example-snake-game-555f946b7-fkhrl                                1/1     Running   0          117s
example-snake-game-555f946b7-hrmw2                                1/1     Running   0          117s
ngrok-ingress-controller-kubernetes-ingress-controller-man9brp7   1/1     Running   0          6m51s
View all service resources in the
ngrok-ingress-controllernamespace and verify that the application service is available.$ kubectl get service -n ngrok-ingress-controllerOutput:
NAME                   TYPE        CLUSTER-IP       EXTERNAL-IP   PORT(S)   AGE
example-game-service   ClusterIP   10.103.172.198   <none>        80/TCP    41s
You have deployed a sample game application to your Kubernetes cluster. The Ngrok Ingress Controller communicates and routes traffic to the application using the application service resource to map the internal cluster endpoints for access using your external Ngrok domain.
Configure Ngrok Ingress
The Ngrok Ingress Controller exposes existing cluster service resources to an Ngrok domain based on the internal port. Follow the steps below to create a new Ingress resource to securely expose the sample application you created earlier and verify the Ngrok domain edge information as described in the steps below.
Create a new Ingress YAML file
app-ingress.yaml.console$ nano app-ingress.yaml
Add the following contents to the file. Replace
example.ngrok-free.appwith your actual Ngrok domain name.yamlapiVersion: networking.k8s.io/v1 kind: Ingress metadata: name: example-game-ingress namespace: ngrok-ingress-controller spec: ingressClassName: ngrok rules: - host: example.ngrok-free.app http: paths: - path: / pathType: Prefix backend: service: name: example-game-service port: number: 8080
Save and close the file.
Apply the Ingress resource to your cluster.
console$ kubectl apply -f app-ingress.yaml
View Ingress resources and verify that the new application hist value and external access port.
console$ kubectl get ingress -n ngrok-ingress-controller
Output:
NAME                   CLASS   HOSTS                                ADDRESS   PORTS   AGE
example-game-ingress   ngrok   example.ngrok-free.app                          80      19s
Verify that the your Ngrok domain correctly displays in the HOSTS column. For each Ingress resource, the Ngrok Ingress controller creates a new edge resource associated with your Ngrok domain and the cluster endpoints defined in your Ingress configuration.
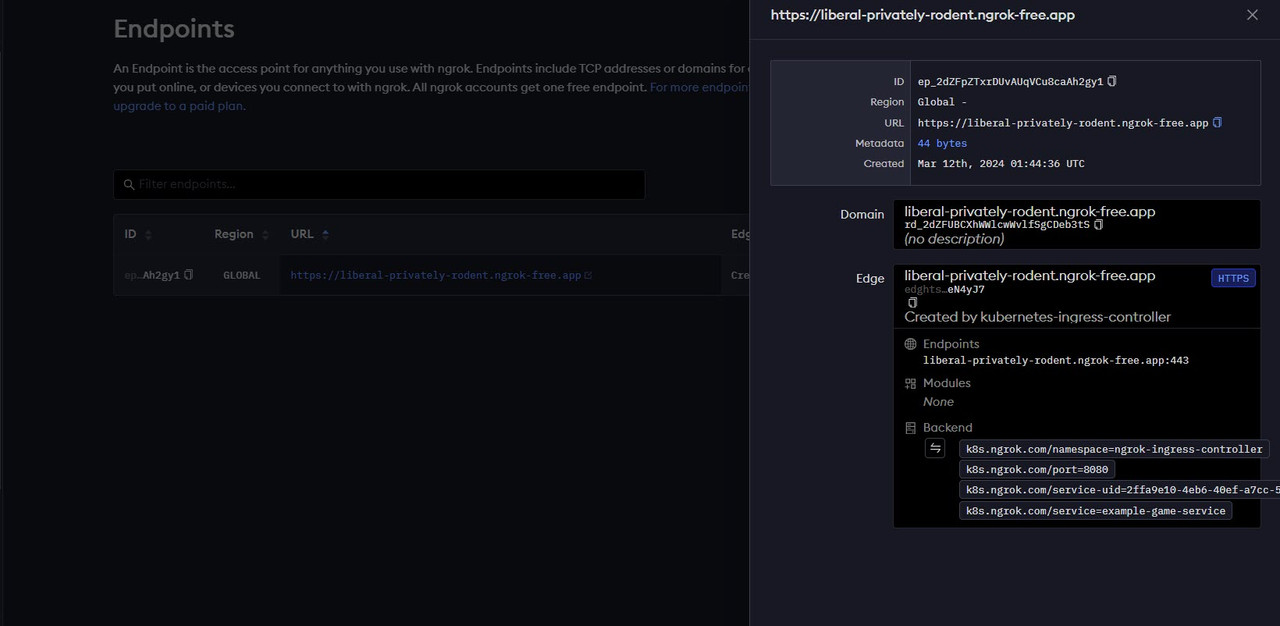
Access your Ngrok Dashboard and click Edge Configurations to view the new cluster endpoints.
Verify your Ngrok domain URL and the Edge prompt
Created by Kubernetes-Ingress-Controller.Click the GLOBAL region value to view the associated Backend Kubernetes endpoints.

Verify that all available endpoints match your Kubernetes cluster specifications. Based on your Ingress configurations, your Ngrok cluster resources information should be similar to the one below:
k8s.ngrok.com: Represents the unique Ngrok resource definition for communication with your cluster.k8s.ngrok.com/service=snake:The Kubernetes cluster service exposed by the Ngrok Ingress Controllerk8s.ngrok.com/port=8080: The service port exposed by the Ngrok controller to your domain ports80for HTTP and443for HTTPS.
In a new web browser tab, visit your Ngrok domain and verify that your cluster application loads correctly.
htps://example.ngrok-free.app
Secure Kubernetes Cluster Applications with the Ngrok Edge
Ngrok edge offers multiple authentication and security methods based on your Ingress configurations. All features act operate between your cluster and your Ngrok domain to enhance your cluster application security. Follow the steps below to secure yoru Kubernetes application with the Ngrok edge the available methods such as:
- Open Authorization (OAuth): Enables application users to log in and access the Kubernetes cluster application using information from trusted platforms such as Google, Facebook, GitHub, GitLab and Microsoft.
- OpenID Connect: Restricts access to the Kubernetes application to users authorized by an OpenID Identity provider.
- SAML: Enables Single Sign On (SSO) authentication that allows users to use a single set of login credentials to access the application. It involves communication with an Identity Provider (IdP) and your Ngrok domain as the Service Provider (SP).
- Mutual TLS: Enforces strict TLS connection requirements where each requesting client must present a valid certificate signed by a specific certificate authority enabled on your domain. In addition, only selected certificate authorities are permitted to access the application.
- IP Restrictions: Limits access to the Kubernetes application to specific IP addresses or ranges depending on your defined domain IP address policy.
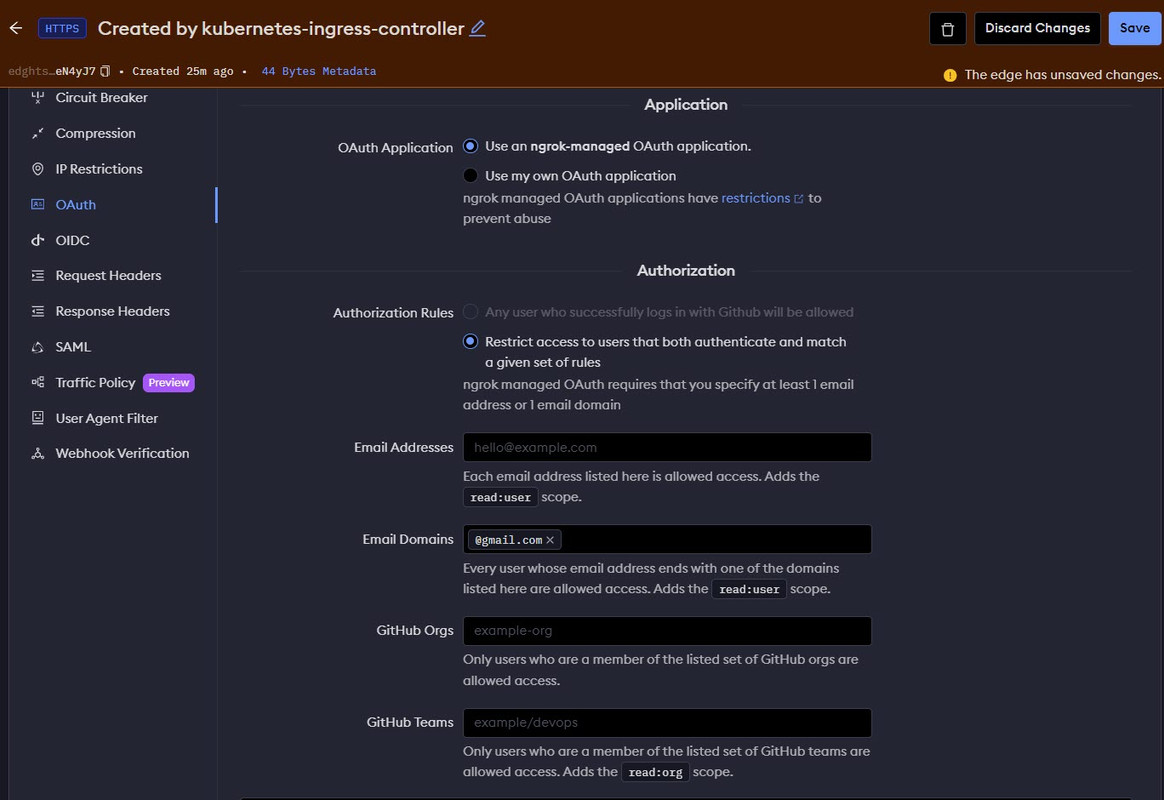
In this section, secure your Kubernetes cluster application with open authorization (OAuth) to authenticate all users to log in using a trusted platform such as GitHub. To tighten the application security, only authenticated users with a specific email domain class can access the application. In return, this improves the application security by limiting access to only a specific group of target users.
Open your Ngrok account dashboard.
Navigate to Edges under the Cloud Edge group.

Click the active Ngrok domain in use with your Kubernetes cluster to edit its Routes properties.
Click OAuth from the list of properties to launch the authentication options.
Click Begin setup to configure a new authentication option.
Click Identity Provider and select your target provider from the list of options. For example, select
GitHub.Keep Use an ngrok-managed OAuth application enabled in the Application section within the provider configuration options.
In the Authorization section, keep Restrict access to users that both authenticate and match a given set of rules selected.
Scroll to the Email Domains field and enter your target domain URL to associate with all successful GitHub logins. For example,
gmail.comenables all GitHub users with the email domain to successfully access the application. To further restrict access to the application, include each of the allowed email addresses in the Email Addresses field separated by a comma,.
Scroll and view any the additional options with enable your new GitHub authorization method.
Click Save at the top of the Ngrok session next to Created by kubernetes-ingress-controller to apply the new changes to your application.
Open a new web browser tab and visit your Ngrok domain.
https://exampledomain.ngrok.comVerify that a GitHub sign-in page displays as the authentication method to access the application. Click Authorize ngrok to test access to your application.
If your GitHub account matches any of the allowed email domains, verify that you can securely access your Kubernetes application.

Conclusion
You have deployed the Ngrok Ingress Controller to a Vultr Kubernetes Engine (VKE) cluster and securely exposed a sample cluster application for external access using an Ngrok domain. The controller improves your cluster performance by offloading several management features to your edge instead of your Kubernetes cluster. Unlike controllers such as Traefik, Nginx Ingress Controller, HAProxy, among others, Ngrok does not require a LoadBalancer service which keeps all cluster network requests internal. To use custom domains such as example.com instead of an Ngrok domain, visit the Ngrok documentation to upgrade your account plan.