
How to Deploy Plausible Analytics – Self-Hosted Web Analytics Platform

Plausible Analytics is an open-source, self-hosted web analytics tool that focuses on simplicity and privacy. It measures your website’s traffic and visitor activity without using cookies or tracking personal data. It’s a good option for developers and businesses that need website analytics while keeping user data private.
In this article, you deploy Plausible Analytics on a Linux server using Docker and Docker Compose. The setup includes installing required packages, configuring the Plausible environment, and running the application in containers. You also configure Nginx as a reverse proxy, enable HTTPS with Let's Encrypt, and secure the installation for production use.
Prerequisites
Before you begin, ensure you:
- Have access to a Linux server (such as Ubuntu, Debian, or Fedora) as a non-root user with sudo privileges.
- Install Docker and Docker Compose.
- Configure a domain name, such as
plausible.example.com, to point to your server's public IP address.
Configure Plausible Environment
Plausible uses environment variables to define the base URL, administrator account, and application settings. Follow the steps below to create the environment file and update the Docker Compose configuration.
Create a directory for Plausible.
console$ mkdir ~/plausible
Navigate to the Plausible directory.
console$ cd ~/plausible
Clone the Plausible Community Edition repository.
console$ git clone https://github.com/plausible/community-edition.git
Navigate to the project directory.
console$ cd community-edition
Generate a random secret key for Plausible.
console$ openssl rand -base64 64 | tr -d '\n'
Copy the generated value to use as the secret key in the environment file in the next step.
Create and open the environment configuration file.
console$ nano .env
Add the following configuration to the file.
iniADMIN_USER_EMAIL=admin@example.com ADMIN_USER_NAME=admin ADMIN_USER_PWD=ADMIN_PASSWORD BASE_URL=https://plausible.example.com SECRET_KEY_BASE=YOUR_SECRET_KEY_BASE DATABASE_URL=postgres://postgres:postgres@plausible_db:5432/plausible_db CLICKHOUSE_DATABASE_URL=http://plausible_events_db:8123/plausible_events_db
Replace:
admin@example.comwith your email address.ADMIN_PASSWORDwith a strong password.plausible.example.comwith the domain name that points to your server.YOUR_SECRET_KEY_BASEwith the random key you generated in the previous step.
Save the file and exit the editor.
Create a Docker Compose override file to expose the Plausible port.
console$ nano compose.override.yaml
Add the following configuration.
yamlservices: plausible: ports: - 127.0.0.1:8000:8000
Save the file and exit the editor. Docker Compose automatically merges this file with
compose.ymlwhen starting the containers.
Deploy Plausible Analytics
With the environment configured, the next step is to bring Plausible Analytics online. This section uses Docker Compose to launch the application, database, and event processing services and ensures they are running properly before enabling HTTPS.
Start the Plausible containers in detached mode.
console$ docker compose up -d
Verify that all containers are running.
console$ docker compose ps
For more information on managing a Docker Compose stack, see the How To Use Docker Compose article.Note
Set Up Nginx Reverse Proxy and HTTPS
To make Plausible accessible over the internet and secure all traffic with HTTPS, you need to place Nginx in front of the application as a reverse proxy. Nginx forwards incoming requests to Plausible’s internal service, while Certbot issues and manages TLS certificates from Let’s Encrypt.
Configure Nginx as a Reverse Proxy
Update the server’s package information index.
console$ sudo apt update
Install the Nginx web server.
console$ sudo apt install nginx -y
Create a new Nginx configuration file for Plausible.
console$ sudo nano /etc/nginx/sites-available/plausible.conf
Add the following configuration.
iniserver { listen 80; listen [::]:80; server_name plausible.example.com; access_log /var/log/nginx/plausible.access.log; error_log /var/log/nginx/plausible.error.log; location / { proxy_pass http://127.0.0.1:8000; proxy_set_header X-Forwarded-For $proxy_add_x_forwarded_for; proxy_http_version 1.1; proxy_set_header Upgrade $http_upgrade; proxy_set_header Connection "Upgrade"; } }
Replace
plausible.example.comwith your domain.Save the file and exit the editor.
Enable the configuration.
console$ sudo ln -s /etc/nginx/sites-available/plausible.conf /etc/nginx/sites-enabled/
Test the Nginx configuration.
console$ sudo nginx -t
You should see:
nginx: the configuration file /etc/nginx/nginx.conf syntax is ok
nginx: configuration file /etc/nginx/nginx.conf test is successful
Reload Nginx to apply the changes.
console$ sudo systemctl reload nginx
Install Certbot and Enable HTTPS
Install Certbot and the Nginx plugin.
console$ sudo apt install certbot python3-certbot-nginx -y
Allow traffic through your firewall to port 80 and 443. Port 80 is required for the ACME SSL challenge (used by Let's Encrypt), and port 443 is required to access the Plausible dashboard securely.
console$ sudo ufw allow 80,443/tcp
Request a TLS certificate and enable HTTPS with the command below. Replace
plausible.example.comwith your domain name, andadmin@example.comwith your email.console$ sudo certbot --nginx -d plausible.example.com -m admin@example.com --agree-tos --no-eff-email
This command requests a Let’s Encrypt TLS certificate and automatically configures Nginx to use HTTPS for the specified domain.
Test and Access Plausible
In this section, you verify the deployment by creating an administrator account, adding a website, and confirming that analytics data is collected correctly.
Open your browser and navigate to the Plausible registration page by appending
/registerto your domain name.https://plausible.example.com/registerReplace
plausible.example.comwith the domain name that points to your server.On the Register page, enter your full name, email address, and password. Click Create my account to set up the initial administrator account.
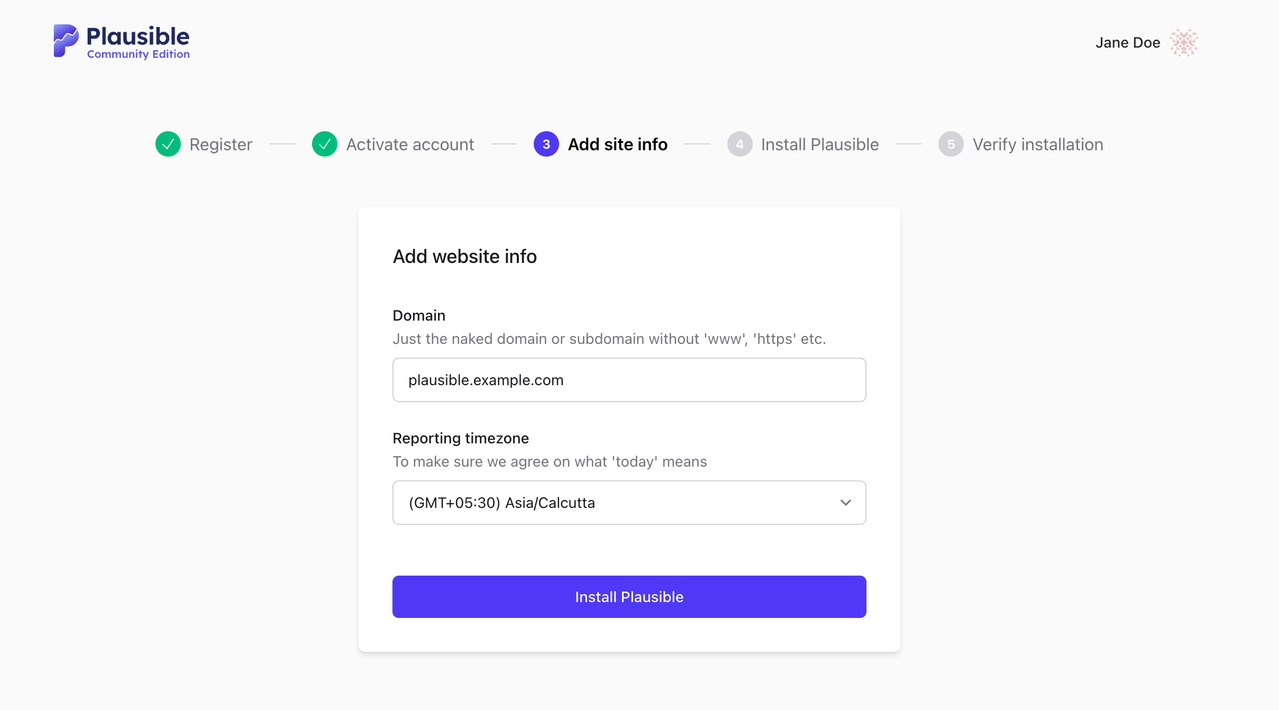
Enter the domain you want to track, choose your reporting time zone, and click Install Plausible to continue.
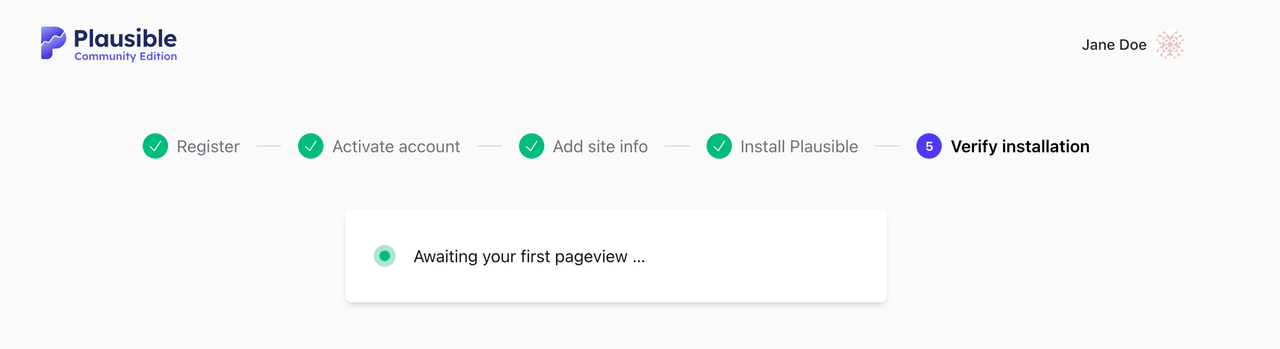
On the next screen, Plausible provides a JavaScript tracking snippet. Install this script in the
<head>section of your website. Refer to the Installation guide for more information. Then click Verify Script installation to confirm that Plausible detects the script.Refresh the page or open your Plausible dashboard in a new browser tab after the first page view appears to confirm that the setup is complete.
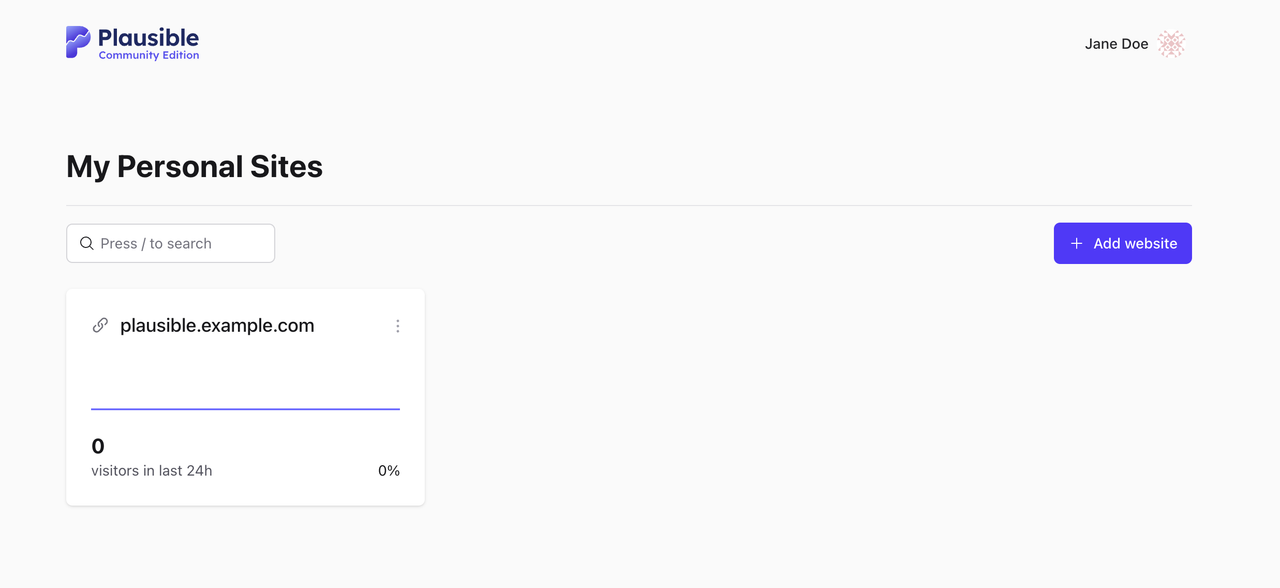
After verification, the Plausible dashboard opens and lists your website with traffic stats.
Conclusion
You deployed Plausible Analytics on a Linux server and configured it to run securely in Docker containers. You installed all required packages, set up the Plausible environment, and enabled HTTPS using Nginx and Certbot. For more information, refer to the official Plausible Analytics documentation.