
How to Deploy Qdrant Vector Database on Vultr Kubernetes Engine
Introduction
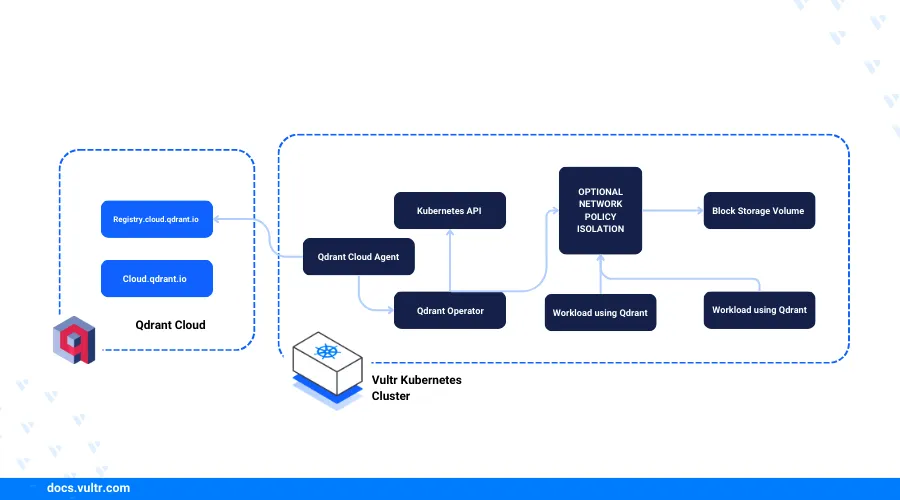
Qdrant is an open-source vector database designed to perform efficient similarity search operations on high-dimensional vector data. It allows users to store, search, and retrieve vector embeddings, which are numerical representations of text, images, audio, or other data types.
Qdrant Hybrid Cloud allows users to deploy Qdrant Clusters across user's self-hosted infrastructure, providing the feature of flexible deployment spanning multiple environments.
In this article, you are to create a Qdrant Hybrid Cloud Environment, deploy the Qdrant Cloud Agent in your Vultr Kubernetes Engine (VKE) Cluster. You will also be deploying a Qdrant Cluster along with installing the Nginx Ingress Controller and Cert Manager for requesting SSL certificate from Let's Encrypt in your VKE Cluster. At last, you will be applying custom API keys and scale your Qdrant Cluster.
Prerequisites
Deploy a Vultr Kubernetes Engine (VKE) Cluster.
Install Kubectl to access your VKE Cluster.
Install the Helm Package Manager.
Create a Qdrant Hybrid Cloud Environment
In this section, you are to create a Qdrant Hybrid Cloud Environment in your Qdrant dashboard, install Qdrant Cloud Agent in your VKE Cluster and deploy a Qdrant Cluster.
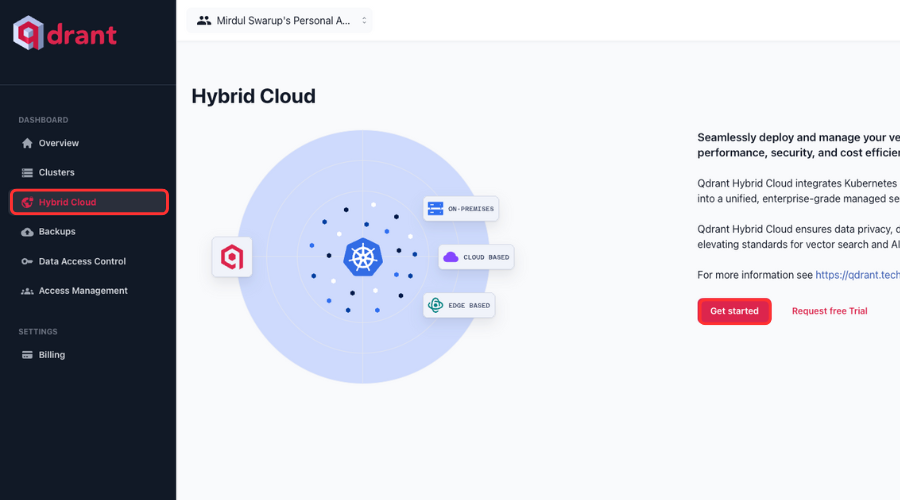
Select the Hybrid Cloud option from the left menu of your Qdrant dashboard.
Click on Get Started.
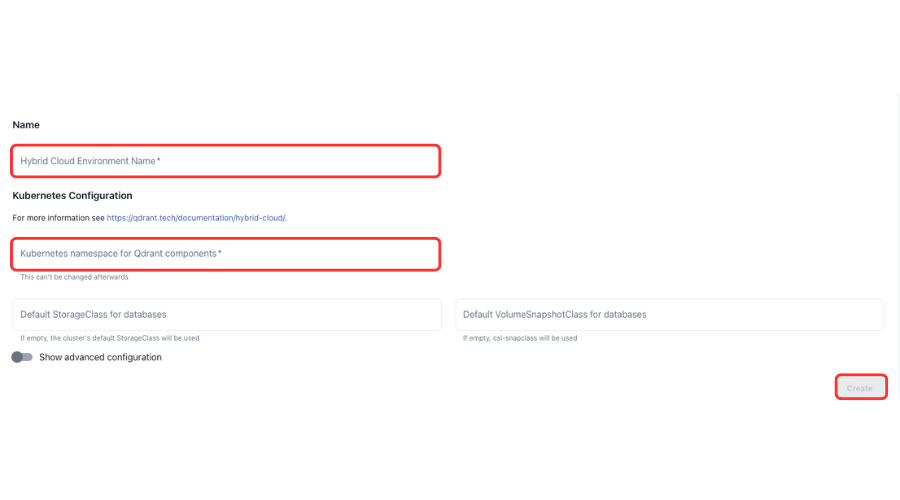
Enter a name for the Environment.
In the Kubernetes Configuration section, enter the name of the Kubernetes namespace for Qdrant components and leave other options on default.
Click on Create.
Once the Environment is created, generate single-use commands and copy them.
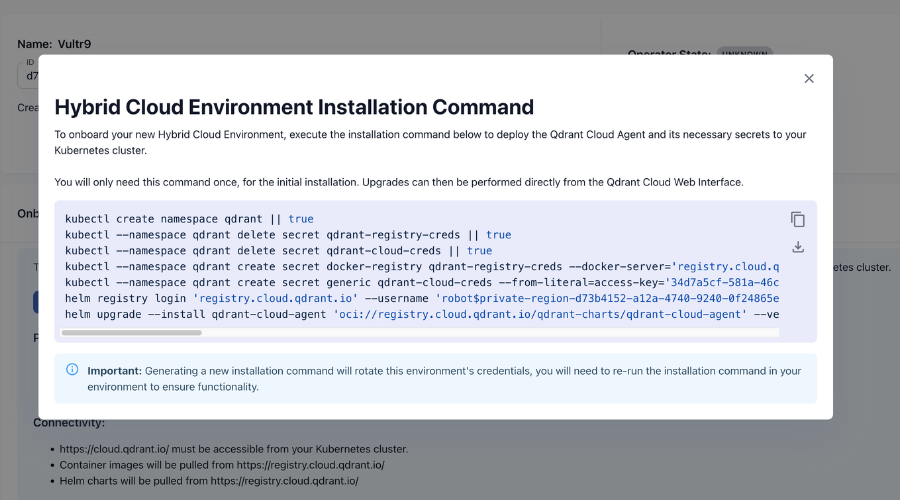
Execute these commands sequentially.
- The first command creates a namespace in the VKE Cluster similar to the Hybrid Cloud Environment.
- The next command deletes a Kubernetes secret
qdrant-registry-credsif it already exists. - The third command also deletes a Kubernetes secret
qdrant-cloud-credsif it already exists. - The fourth command creates a Docker Registry secret
qdrant-registry-credsin the earlier created namespace. - The fifth command creates a generic secret
qdrant-cloud-creds. - The second last command logs into a Helm Registry hosted at
registry.cloud.qdrant.iowith the credentials provided. - The last command installs a Helm chart named
qdrant-cloud-agentfrom the specified path.
Once these commands are executed, refresh your Qdrant dashboard. You will be able to see the real-time state of the operator, agent, and Prometheus. Your Qdrant Hybrid Cloud Environment is ready to use when the state of the operator, agent, and Prometheus is changed to ready.
Create a Qdrant Cluster
Qdrant Cluster is a distributed deployment of the Qdrant Vector Database, in a cluster multiple Qdrant instances are coordinated together for scalability and high availability. The cluster has Qdrant nodes in it that are the individual instances of the Qdrant Database.
In this section, you are to create a Qdrant Cluster connected to your Hybrid Cloud Environment from your Qdrant dashboard.
Select Clusters option from the left menu of your Qdrant dashboard.
Click Create to create a Qdrant Cluster.
Select the Standard Plan, and Hybrid Cloud in the provider section.
Select the Hybrid Cloud Environment you created earlier as the region.
Enter a name for the cluster.
In the Cluster settings section, choose RAM per node as required. Choose the number of nodes, ideally the number of nodes in a Qdrant Cluster should be the same as the VKE Cluster. For the Disk space at least 45 GB is required.
Review the cluster configuration and Click Create.
The current status of the cluster can be observed from the Qdrant dashboard.
To follow the status of nodes on your VKE Cluster.
console$ kubectl get nodes -n <qdrant-namespace>
Create an Ingress Resource and Apply SSL
The Nginx Ingress Controller and Ingress resource in a Kubernetes cluster work together to manage external traffic to services inside a cluster. The Controller receives external traffic and routes it based on Ingress rules, and the Ingress resource defines the routing rules to route traffic to the backend services in the cluster.
The Cert Manager automates the management and issuance of TLS certificates from certificate authorities like Let's Encrypt.
In this section, you are to install the Nginx Ingress Controller and the Cert Manager and you are also going to apply the Kubernetes manifest to request SSL certificates from Let's Encrypt and the Ingress resource manifest with the routing rules to manage external traffic.
Add the Nginx Ingress repository.
console$ helm repo add ingress-nginx https://kubernetes.github.io/ingress-nginx
Install the Nginx Ingress Controller.
console$ helm install ingress-nginx ingress-nginx/ingress-nginx
After successful installation, a Vultr Load Balancer is automatically added to your cluster. Verify that the assigned external IP Address matches your Load Balancer IP in the VKE dashboard.
console$ kubectl get services ingress-nginx-controller
Your output should look like the one below:
outputNAME TYPE CLUSTER-IP EXTERNAL-IP PORT(S) AGE ingress-nginx-controller LoadBalancer 10.108.201.180 192.0.2.1 80:31125/TCP,443:31287/TCP 39h
Copy the
EXTERNAL-IPand configure your domain'sArecord to this IP.Install the latest Cert Manager version.
console$ kubectl apply -f https://github.com/cert-manager/cert-manager/releases/download/v1.14.4/cert-manager.yaml
Once installed, check the status of the pods created.
console$ kubectl get pods --namespace cert-manager
Your output should look like the one below:
outputNAME READY STATUS RESTARTS AGE cert-manager-67c98b89c8-fd5w4 1/1 Running 0 4h12m cert-manager-cainjector-5c5695d979-xxffq 1/1 Running 0 4h12m cert-manager-webhook-7f9f8648b9-vsvwb 1/1 Running 0 4h12m
Create a Let's Encrypt YAML manifest.
console$ nano lets-encrypt.yaml
Copy and paste the below contents.
yamlapiVersion: cert-manager.io/v1 kind: ClusterIssuer metadata: name: letsencrypt-prod spec: acme: server: https://acme-v02.api.letsencrypt.org/directory email: <email-address> privateKeySecretRef: name: letsencrypt-prod solvers: - http01: ingress: class: nginx
Save and close the file.
The above configuration creates a
ClusterIssuerresource for issuing Let's Encrypt certificates. It uses the HTTP01 challenge solver to verify the ownership. Replaceemail-addresswith your actual email address.Get the name of the cluster's StatefulSet.
console$ kubectl get statefulset -n <qdrant-namespace>
Copy the name of the StatefulSet.
Create an Ingress Resource manifest.
console$ nano qdrant-ingress.yaml
Copy and paste the below contents.
yamlapiVersion: networking.k8s.io/v1 kind: Ingress metadata: name: qdrant-ingress namespace: qdrant annotations: kubernetes.io/ingress.class: nginx cert-manager.io/cluster-issuer: "letsencrypt-prod" spec: ingressClassName: nginx tls: - hosts: - <domain-name> secretName: qdrant-ingress-tls rules: - host: <domain-name> http: paths: - path: / pathType: Prefix backend: service: name: <stateful-set> port: number: 6333
Save and close the file.
The Ingress resource allows external access to the Qdrant Cluster's StatefulSet resource. It uses the
ClusterIssuerresourceletsencrypt-prodto issue a new SSL certificate fordomain-nameand store it as a secret resourceqdrant-ingress-tls. Replacedomain-namewith your actual domain name andstateful-setwith the actual name retrieved in the earlier step.Apply the issuer to the cluster.
console$ kubectl apply -f lets-encrypt.yaml
Verify the deployment.
console$ kubectl get clusterissuer letsencrypt-prod
Your output should look like the one below:
outputNAME READY AGE letsencrypt-prod True 4h13m
Apply the Ingress resource.
console$ kubectl apply -f qdrant-ingress.yaml
Verify the Ingress resource.
console$ kubectl get ingress -n <namespace>
Your output should look like the one below:
outputNAME CLASS HOSTS ADDRESS PORTS AGE qdrant-ingress nginx <domain-name> 104.156.231.67 80, 443 4h16m
In a web browser, visit the domain URL and verify that you can access it over HTTPS.
https://<domain-name>
Add Custom API Keys
In this section, you are to add custom API keys to access the Qdrant Databases. You are to create Kubernetes secret resources with the API key and also add them to your Qdrant Cluster configurations using the Qdrant dashboard.
Create a new Kubernetes secret.
console$ nano qdrant-api-key.yaml
Copy and paste the below contents.
yamlapiVersion: v1 kind: Secret metadata: name: qdrant-api-keys namespace: <namespace> type: Opaque stringData: apikey: <api-key>
Save and close the file.
The above configuration creates a Kubernetes secret resource to the API key that will be required to access and perform actions on the Qdrant Database. Replace
api-keywith an actual API key.Create another Kubernetes secret.
console$ nano qdrant-api-key-ro.yaml
Copy and paste the below contents.
yamlapiVersion: v1 kind: Secret metadata: name: qdrant-api-keys-ro namespace: <namespace> type: Opaque stringData: apikey: <api-key>
Save and close the file.
Apply the secret resources.
console$ kubectl apply -f qdrant-api-key.yaml $ kubectl apply -f qdrant-api-key-ro.yaml
Open the cluster details on your Qdrant dashboard by clicking on the cluster name.
Scroll down and select Configuration.
Enter qdrant-api-key as the secret name for the API Key and apikey as the secret key.
Next, Enter qdrant-api-key-ro as the secret name for the ReadOnly API Key and apikey as the secret key.
Click Save, after the newly added configurations are saved a rollout restart will be triggered for the Qdrant Cluster.
Once the cluster is healthy again, send a CURL request from your sessions terminal without the API key.
console$ curl -X GET https://<domain-name>/collections
Your output should look like the one below:
outputMust provide an API key or an Authorization bearerSend a CURL request with the API key.
console$ curl -X GET 'https://<domain-name>/collections' \ --header 'api-key: <api-key>'
Your output should look like the one below if you have not made collections previously:
output{"result":{"collections":[{"name":}]},"status":"ok","time":2.104e-6}To learn more Qdrant Database operations
Scale the Qdrant Cluster
Scaling a cluster is important for maintaining performance, ensuring high availability and efficiently utilizing resources in production environments.
In this section, you are to scale your Qdrant Cluster.
In your Qdrant dashboard, open the Cluster Details.
Select Scale Up on the top right corner.

Scale up vertically by increasing the RAM per node and disk space. Vertically scaling a cluster results in a rolling restart as all nodes are affected by the new cluster configuration.
Or, scale up horizontally by increasing the number of nodes.
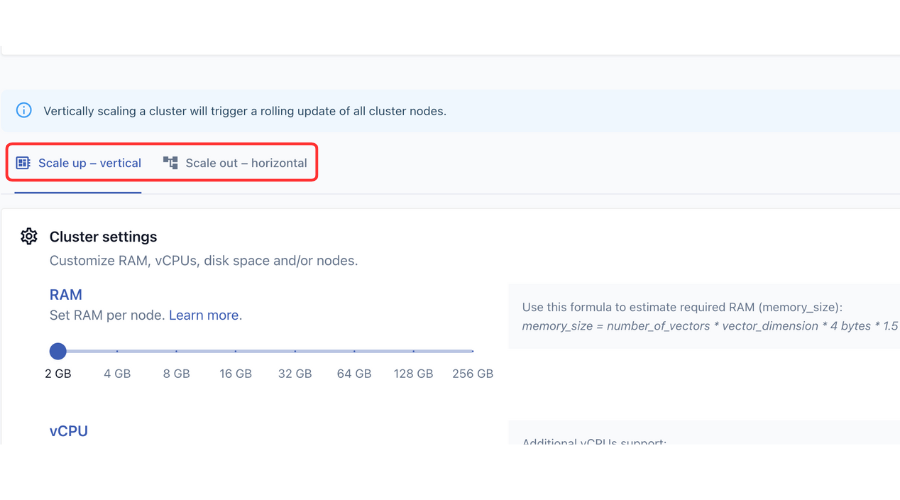
Review cluster configuration and click Scale up.
Conclusion
In this article, you created a Qdrant Hybrid Cloud Environment, deployed the Qdrant Cloud Agent in your VKE Cluster. You also deployed a Qdrant Cluster along with installation of the Nginx Ingress Controller and Cert Manager for requesting SSL certificate from Let's Encrypt in your VKE Cluster. At last, you applied custom API keys and scaled your Qdrant Cluster.