Introduction
FileRun is a self-hosted file management application that supports a wide range of file formats such as CSV, JPEG, Markdown, Text, MP3, and MP4. It also integrates the WebDav protocol, which supports various desktop applications, including Windows Explorer on Windows and Finder on macOS.
This article explains how to install FileRun on a Vultr Cloud Server running the LEMP (Linux, Nginx, MySQL, PHP) Stack. This article uses a One-Click Ubuntu 20.04 LEMP server instance, but these steps work on any other system running the same stack.
Prerequisites
- Deploy a One-Click LEMP instance from the Vultr Marketplace.
- Set up a subdomain pointing to the server.
- Use SSH to access the server as a non-root user with sudo privileges.
- Update the server.
Setup the FileRun Database
View the MySQL root password.
$ sudo cat /root/.my.cnfLog in to MySQL.
$ mysql -u root -pCreate a new database.
CREATE DATABASE filerun;Create a new database user with a strong password.
CREATE USER 'fileuser'@'localhost' IDENTIFIED BY 'your-strong-password-here';Grant the user full privileges to the FileRun database.
GRANT ALL ON filerun.* TO fileuser@localhost;Refresh MySQL privileges.
FLUSH PRIVILEGES;Exit the MySQL console.
EXIT
Install PHP Extensions
By default, the Vultr One-Click LEMP application runs PHP version 7.4. Verify the installed version using the following command.
$ php -vInstall PHP extensions required by FileRun.
$ sudo apt install php7.4-fpm php7.4-mysql php7.4-gd php7.4-cli php7.4-common php7.4-json php7.4-opcache php7.4-mbstring php7.4-xml php7.4-zip php7.4-gd php7.4-curl php7.4-ldap php7.4-imagick unzipTo install the ionCube PHP extension, download its latest release file.
$ wget https://downloads.ioncube.com/loader_downloads/ioncube_loaders_lin_x86-64.tar.gzExtract files to the
/usr/lib/phpdirectory.$ sudo tar -xvf ioncube_loaders_lin_x86-64.tar.gz -C /usr/lib/phpUsing a text editor of your choice, create a new
00-ioncube.iniPHP file to enable the extension.$ sudo nano /etc/php/7.4/fpm/conf.d/00-ioncube.iniAdd the following directive to the file.
zend_extension = /usr/lib/php/ioncube/ioncube_loader_lin_7.4.soSave and close the file.
Create the FileRun PHP configuration file.
$ sudo nano /etc/php/7.4/fpm/conf.d/filerun.iniAdd the following PHP Settings to the file.
  expose_php              = Off
  error_reporting         = E_ALL & ~E_NOTICE
  display_errors          = Off
  display_startup_errors  = Off
  log_errors              = On
  ignore_repeated_errors  = Off
  allow_url_fopen         = On
  allow_url_include       = Off
  variables_order         = "GPCS"
  allow_webdav_methods    = On
  memory_limit            = 256M
  max_execution_time      = 300
  output_buffering        = Off
  output_handler          = ""
  zlib.output_compression = Off
  zlib.output_handler     = ""
  safe_mode               = Off
  register_globals        = Off
  magic_quotes_gpc        = Off
  upload_max_filesize     = 25M
  post_max_size           = 25M
  enable_dl               = Off
  disable_functions       = ""
  disable_classes         = ""
  session.save_handler     = files
  session.use_cookies      = 1
  session.use_only_cookies = 1
  session.auto_start       = 0
  session.cookie_lifetime  = 0
  session.cookie_httponly  = 1
  date.timezone            = "UTC"
Save and close the file.
Restart PHP-FPM to save changes.
$ sudo systemctl restart php7.4-fpm
Install FileRun
Create a new FileRun web root directory.
$ sudo mkdir /usr/share/nginx/filerunDownload the latest FileRun release file.
$ wget -O FileRun.zip https://filerun.com/download-latest-ubuntu-nginxExtract files from the
FileRun.zipfile to the web root directory.$ sudo unzip -d /usr/share/nginx/filerun FileRun.zipCreate a
superuserhome folder within the directory.$ sudo mkdir /usr/share/nginx/filerun/example-homeGrant Nginx ownership permissions to the directory.
$ sudo chown -R www-data:www-data /usr/share/nginx/filerun
Configure Nginx
Create a new FileRun Nginx configuration file.
$ sudo touch /etc/nginx/conf.d/filerun.confOpen and edit the file.
$ sudo nano /etc/nginx/conf.d/filerun.confAdd the following contents. Replace
filerun.example.comwith your actual domain name.server { listen 80; listen [::]:80; server_name filerun.example.com; root /usr/share/nginx/filerun; index index.php index.html; location / { try_files $uri $uri/ /index.php; } location ~ [^/]\.php(/|$) { fastcgi_split_path_info ^(.+?\.php)(/.*)$; if (!-f $document_root$fastcgi_script_name) { return 404; } include fastcgi_params; fastcgi_param SCRIPT_FILENAME $document_root$fastcgi_script_name; fastcgi_param PATH_INFO $fastcgi_path_info; fastcgi_pass 127.0.0.1:9000; } location ~* \.(jpg|jpeg|gif|png|webp|svg|woff|woff2|ttf|css|js|ico|xml)$ { expires 360d; } location ~ /\.ht { deny all; } }Save and close the file.
Test the Nginx configuration for errors.
$ sudo nginx -tRestart Nginx to save changes.
$ sudo systemctl restart nginx
Security
FileRun does not require any special ports to run other than HTTP and HTTPS access. By default, UFW is active on the Vultr One-Click LEMP instance. Configure it to allow access to the FileRun web interface.
Verify the UFW firewall status.
$ sudo ufw statusIf inactive, run the following command to activate UFW.
$ sudo ufw enableAllow HTTP access on port
80.$ sudo ufw allow 80/tcpAllow HTTPS on port
443.$ sudo ufw allow 443/tcpRestart the firewall to save changes.
$ sudo ufw reload
Secure FileRun with a valid SSL Certificate
Verify that Snap is up to date.
$ sudo snap install core; sudo snap refresh coreInstall the Certbot Let's Encrypt application.
$ sudo snap install --classic certbotActivate the Certbot command.
$ sudo ln -s /snap/bin/certbot /usr/bin/certbotRequest for a free SSL certificate. Replace
filerun.example.comwith your actual domain name, and turn on automatic redirects when prompted.$ sudo certbot -d filerun.example.com --agree-tosTest certificate auto-renewal.
$ sudo certbot renew --dry-runRestart Nginx to save changes.
$ sudo systemctl restart nginx
Configure FileRun
Using a web browser of your choice, visit your server domain.
https://filerun.example.comOn the Welcome to FileRun wizard, click Next to check all minimum server requirements.
On the Database Setup page, keep
localhostas the MySQL hostname and3306as the port.Enter the database name, username, and password you created earlier.
Click Next to install all FileRun database tables.
Copy the default account username and password to your clipboard, then Next to access the FileRun login page.
Sign in using your
superuserusername and the default password.On the main FileRun dashboard, click Control Panel at the bottom left corner.
Change the administrator username from
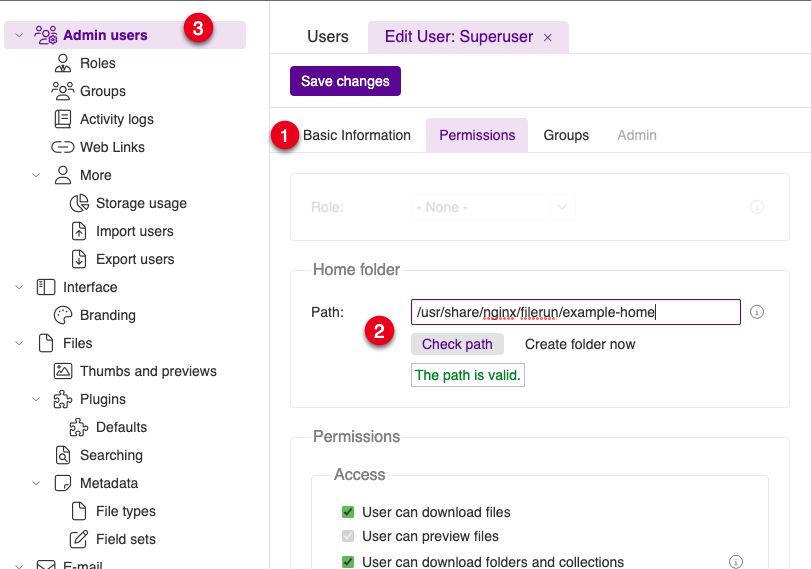
superuserto your custom username, and enter a new strong password in the Password: field.Navigate to the Permissions tab next to Basic Information.
Enter the full home directory path you created earlier in the Home folder section.
/usr/share/nginx/filerun/example-homeClick Check path to validate the directory, then click Save changes to load changes.

To create other users, click Admin users and set up new users by username and password.
Exit the control panel to start uploading and sharing files on your FileRun server.
More Information
You have installed FileRun on a Vultr Cloud Server running the LEMP stack. For more information, please refer to the following resources.
No comments yet.