
How to Install LEMP on Rocky Linux 8
Introduction
The Linux, Nginx (pronounced as Engine X), MySQL, and PHP (LEMP) stack is a collection of software installed to serve dynamic web applications on a server. Nginx works as the web server application, MySQL as the database server, and PHP as the dynamic scripting language that supports multiple frameworks for web applications. In this article, you'll install LEMP on Rocky Linux 8.
Prerequisites
- Create a new Rocky Linux 8 server on Vultr.
- Access the server as a non-root user with sudo privileges.
- Update the server.
- Set up a domain and point it to the server.
1. Install Nginx
Install Nginx.
$ sudo dnf install nginxEnable Nginx to start at boot time.
$ sudo systemctl enable nginxStart Nginx.
$ sudo systemctl start nginxAllow HTTP access through the firewall.
$ sudo firewall-cmd --zone=public --permanent --add-service=httpReload Firewall rules.
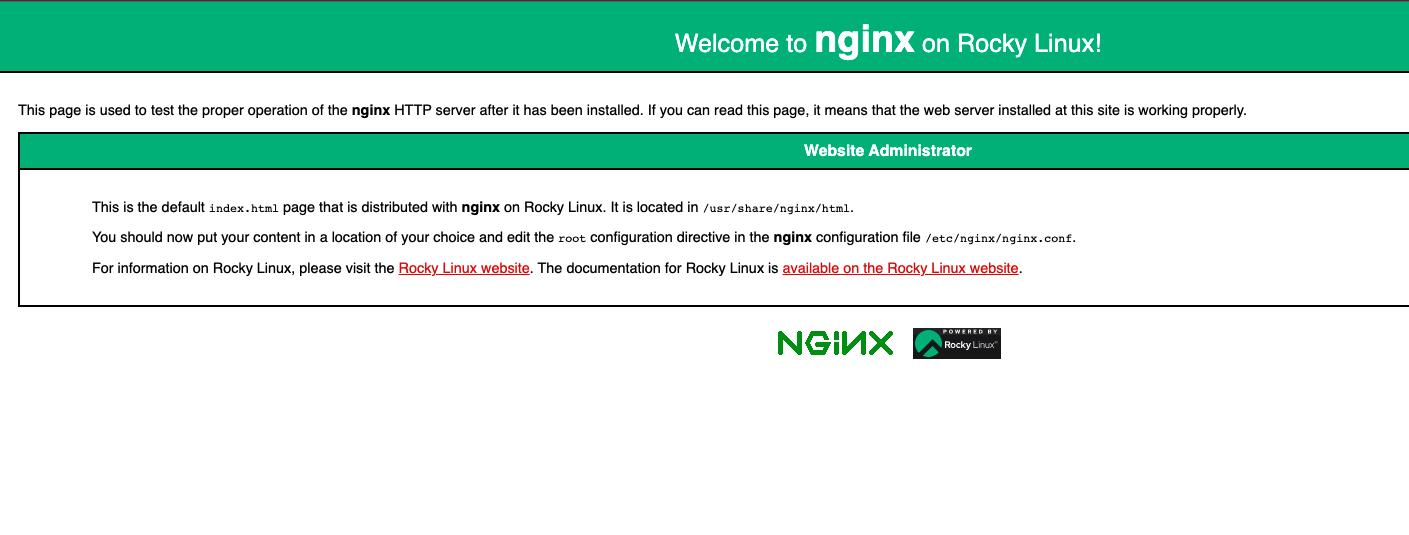
$ sudo firewall-cmd --reloadTest your Nginx installation by visiting your server IP.
http://1.2.3.4
2 Install MySQL/MariaDB
Install MariaDB.
$ sudo dnf install mariadb-serverEnable MariaDB to start at boot time.
$ sudo systemctl enable mariadbStart the MariaDB server.
$ sudo systemctl start mariadb
3. Install PHP
Install PHP and PHP-FPM.
$ sudo dnf install php php-fpmInstall common PHP extensions required by most web applications.
$ sudo dnf install php-mysqlnd php-cgi php-bcmath php-json php-xml php-gd php-zip php-intl php-mbstringEnable PHP-FPM to start at boot time.
$ sudo systemctl enable php-fpmStart PHP-FPM.
$ sudo systemctl start php-fpm
4. Configure MariaDB
Initialize MariaDB and set the root password.
$ sudo mysql_secure_installationPress enter when prompted for the root user password, reply with yes `y' to set a new root password, remove anonymous users, disallow remote root login, and remove the test database.
Log in to the MySQL console as root.
$ sudo mysql -u root -pCreate a sample database.
CREATE DATABASE sampledb;Create a sample database user assigned with a strong password.
CREATE USER 'example-user'@'localhost' IDENTIFIED BY 'ultra-strong-password';Grant the user full privileges to the sample database.
GRANT ALL PRIVILEGES ON sampledb.* TO 'example-user'@'localhost';Refresh MySQL privileges.
FLUSH PRIVILEGES;Exit the console.
EXITTest your MySQL login as the sample user.
mysql -u example-user -pShow available databases.
SHOW DATABASES;Exit the console.
EXIT
5. Configure Nginx
Create a new web files directory for your application.
$ sudo mkdir /usr/share/nginx/example.comUsing a text editor, create a simple HTML file in the directory.
$ sudo nano /usr/share/nginx/example.com/index.htmlAdd the following contents to the file.
  <html>
  <title> It Works!!! </title>
  <body>

  <h2> Hello World!! Your WebServer Works!</h2>

  </body>
  </html>
Save and exit the editor.
Grant Nginx read and write permissions to the directory.
$ sudo chown -R nginx.nginx /usr/share/nginx/example.comCreate a new Nginx configuration file.
$ sudo nano /etc/nginx/conf.d/example.com.confAdd the following configurations to the file.
  server {
     listen       80;
     listen       [::]:80;
     server_name  _;
     root         /usr/share/nginx/example.com;

     index index.php index.html index.htm;

     error_log /var/log/nginx/example.com.error;
     access_log /var/log/nginx/example.com.access;

     location ~ \.php$ {
     fastcgi_pass unix:/run/php/php-fpm.sock;
     fastcgi_split_path_info ^(.+\.php)(/.+)$;
     fastcgi_index index.php;
     fastcgi_param SCRIPT_FILENAME $document_root$fastcgi_script_name;
     }

     location ~ /\. {
     deny all;
     access_log off;
    }

    }
Save and exit the editor.
Test Nginx for configuration errors.
$ sudo nginx -tRestart Nginx to save changes.
$ sudo systemctl restart nginx
6. Security
Nginx serves web applications through HTTP and HTTPS Ports. Allow them through the firewall.
Allow HTTP connections.
$ sudo firewall-cmd --zone=public --permanent --add-service=httpAllow HTTPS connections.
$ sudo firewall-cmd --zone=public --permanent --add-service=httpReload Firewall rules to save changes.
$ sudo firewall-cmd --reload
7. Configure SSL
Install the Extra Packages for Enterprise Linux (EPEL) repository.
$ sudo dnf install epel-releaseEnable the PowerTools repository.
$ sudo dnf config-manager --set-enabled powertoolsInstall the snap library.
$ sudo dnf install snapd -yEnable the snap socket and enable classic snap support.
$ sudo systemctl enable --now snapd.socket && sudo ln -s /var/lib/snapd/snap /snapClose your SSH connection and Login again to complete snap integration.
Install the Certbot agent
$ sudo snap install --classic certbotRequest a free SSL certificate from Let's Encrypt.
$ sudo certbot --nginx -d example.comReplace
example.comwith your actual domain.Restart Nginx to load changes.
$ sudo systemctl restart nginx
8. Test
Through a web browser, visit your configured domain.
https://example.comYour HTML application should output Hello World headings.
To test database communication, set up a new
dbtest.phpfile in your domain's webroot directory.$ sudo nano /usr/share/nginx/example.com/dbtest.phpAdd the following contents to the file. Enter your database information created earlier.
  <?php
  $server = "localhost";
  $user = "example-user";
  $password = "ultra-strong-password";

  $connect = new mysqli($server, $user, $password);

  if ($connect->connect_error) {
  die("'<h2>'Connection failed: '</h2>'" . $connect->connect_error);
  }
  echo "'<h2>' Database Connected successfully '</h2>'";

  echo " '<h2>' '<br> Below is your Server PHP Information '</h2>' '<br>'";

  phpinfo();

  ?>
Save and exit the editor.
Visit your domain and load
dbtest.php.https://example.com/dbtest.php
A connection successful message should display together with your server PHP information.
Conclusion
You have successfully installed LEMP on a Rocky Linux 8 server, and tested communication between applications. With a working stack, you can perform extra steps to get your web applications up and running securely without errors.
Next Steps
Depending on your use case, you can install multiple applications on your server and set up extra features, visit the following articles for more information.
- How to Install WordPress on a Subdomain with Nginx.
- Manage WordPress with WordOps.
- How to Install OpenCart on a Vultr LEMP Server.
- Initial Steps to secure Rocky Linux 8.
- How to Set Up Load Balancing using Nginx.