How to Install NirvaShare on Ubuntu 20.04

NirvaShare is a file-sharing solution that lets you create and share files for collaboration with other users, employees, or customers. It integrates with Vultr Object Storage for easy file usage and sharing. The following steps explain installing NirvaShare on a Ubuntu 20.04 server.
Prerequisites
Before you start, you should:
- Create a new Ubuntu 20.04 cloud server.
- Point a fully-qualified domain name to the server's IP address. Use the instructions from your DNS host, or follow these instructions for Vultr DNS. This guide uses nirvashare.example.com as the domain name, which you should replace with your domain name.
- Log in to the server as root, then create a non-root user with sudo rights. You should switch to the non-root user for the rest of this guide.
- Install Docker.
- Install Nginx.
1. Setup Vultr Object Storage
NirvaShare works well with Vultr Object Storage. To create an Object Storage bucket for NirvaShare, follow the steps below.
- Log in to the Vultr customer portal
- Under Products, navigate to Objects
- Click Add storage
- Set the Object Storage label, and click Add to deploy.
- After installation is complete, click Edit.
- Copy the Secret and Access Keys listed under S3 Credentials.
- Navigate to Buckets and click Create Bucket.
- Assign the bucket a unique name, and click Create Bucket to deploy.
2. Install NirvaShare
Create the NirvaShare data directory and switch to it.
 $ sudo mkdir /opt/nirvashare
 $ cd /opt/nirvashare
Using a text editor, create a new docker-compose file.
$ sudo nano nirvashare.ymlAdd the following configuration to the file.
 version: "3"
 services:
   admin:
     image: 'nirvato/nirvashare-admin:latest'
     container_name: 'nirvashare_admin'
     restart: always
     ports:
       - '8080:8080'
     environment:
       ns_db_jdbc_url: "jdbc:postgresql://nirvashare_database:5432/postgres"
       ns_db_username: "nirvashare"
       ns_db_password: "__DB_PASS__"
     volumes:
       - /var/nirvashare:/var/nirvashare

     depends_on:
       - db

   userapp:
     image: 'nirvato/nirvashare-userapp:latest'
     container_name: 'nirvashare_userapp'
     restart: always
     ports:
       - '8081:8080'
     environment:
       ns_db_jdbc_url: "jdbc:postgresql://nirvashare_database:5432/postgres"
       ns_db_username: "nirvashare"
       ns_db_password: "__DB_PASS__"
     volumes:
       - /opt/nirvashare:/var/nirvashare
     depends_on:
       - admin

   db:
    image: 'postgres:13.2'
    container_name: 'nirvashare_database'
    restart: always
    ports:
      - '5432:5432'
    environment:
      POSTGRES_PASSWORD: '__DB_PASS__'
      POSTGRES_USER: 'nirvashare'
    volumes:
       - db_data:/var/lib/postgresql/data

 volumes:
    db_data:
Save the file.
Install NirvaShare.
$ sudo docker-compose -f nirvashare.yml up -dStart NirvaShare.
 $ docker start nirvashare_admin
 $ docker start nirvashare_userapp
Verify that NirvaShare is up and running.
$ docker ps
3. Configure Nginx as a Reverse Proxy
Create a new Nginx configuration file.
$ sudo nano /etc/nginx/conf.d/nirvashare.example.confAdd the following configuration lines to the file.
 server {
    listen 80;
    listen [::]:80;

    server_name nirvashare.example.com;

    location / {
    proxy_pass http://127.0.0.1:8080;
    proxy_set_header Host $host;
    proxy_set_header X-Real-IP $remote_addr;

    }
 }
Save the file.
Test the Nginx configuration for errors.
$ sudo nginx -tRestart Nginx.
$ sudo systemctl restart nginx
4. Security
By default, Uncomplicated firewall (UFW) is active on Ubuntu. Configure it to allow HTTP and HTTPS access on the server.
Allow HTTP.
$ sudo ufw allow httpAllow HTTPS.
$ sudo ufw allow httpsReload the firewall rules.
$ sudo ufw reload
5. Setup HTTPS Access
Install Certbot for Nginx.
$ sudo apt install certbot python3-certbot-nginxRequest a free SSL certificate.
$ sudo certbot --nginx -d nirvashare.example.comRestart Nginx to load changes.
$ sudo systemctl restart nginx
6. Configure NirvaShare
Using a web browser, visit your subdomain.
https://nirvashare.example.comLog in to Nirvashare with the following credentials:
Username:
adminPassword:adminNavigate to Settings.
Click Edit next to File Storage.
Toggle the Type of Storage drop-down and select Vultr Object Storage from the list.
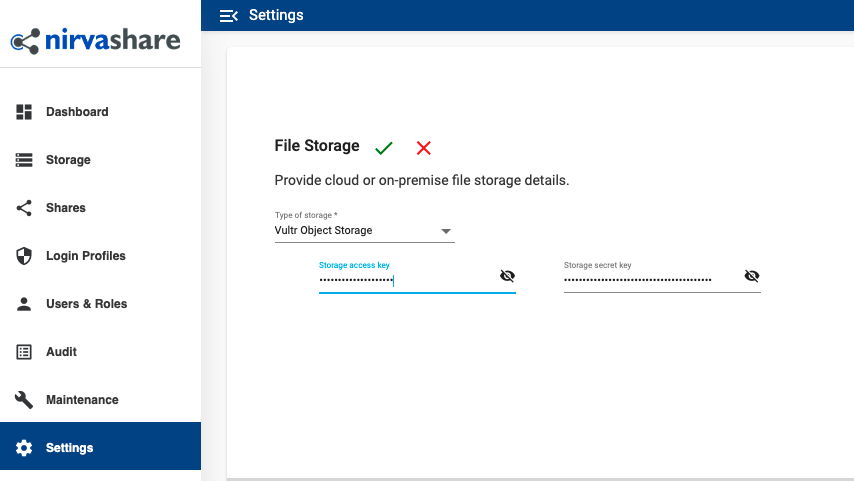
Enter the Vultr Object Storage keys created earlier, and click the green checkmark to save changes.
Navigate to Storage to access, create new, and share files on your block storage.
To secure your server, navigate to Users and Roles, and update the default administrator account with a new password. Navigate to Settings and change the default login profile for additional security.
Next Steps
You have successfully installed NirvaShare on a Ubuntu 20.04 server. For further configuration options, refer to the following articles.