How to Peer VPCs between Vultr Locations with Wireguard
Introduction
A virtual private cloud (VPC) is a private network where you can deploy cloud servers, cloud GPUs, load balancers, and other Vultr resources to protect their network traffic. A VPC exists in a single Vultr location and cannot communicate with the internet or other VPCs. However, you can use VPN gateways to create a VPC peering connection between different locations, allowing them to communicate securely with each other.
VPC peering can improve security and flexibility in your network architecture. Notably, it's possible to deploy servers in a VPC with no public IP address while allowing them to communicate securely over the peering connection. This guide includes a practical example of that scenario.
Overview
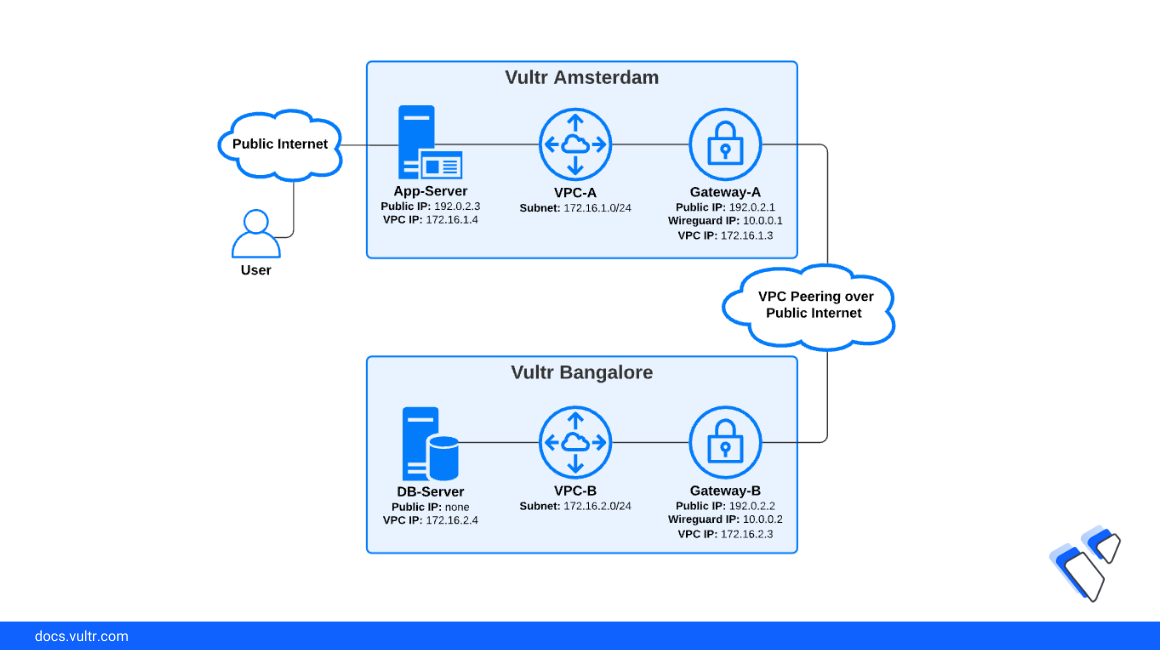
Before you begin, it's helpful to visualize the complete scenario. By following the steps in this guide, you'll create the following resources and connections:
- Two VPCs, one each in Amsterdam and Bangalore
- Two Wireguard gateways that peer the VPCs over a site-to-site VPN
- An application server in Amsterdam
- A database server in Bangalore without a public IP address
After you finish these steps, users can connect to App-Server, which in turn connects to DB-Server over the peering connection, even though the database is completely isolated from the public internet.
Getting Started
Please review these tutorial notes before following this guide.
Note the server names in the code examples. Because you'll make multiple SSH connections to different servers and run similar commands with different details for each, we've prefixed all commands in this guide with the server name for clarity.
You must change the public IPs with your servers' actual public IPs, which you'll find in the Vultr Console after you deploy them. The public IPs in this guide are documentation examples.
You don't need to change the VPC and Wireguard IPs; these are valid RFC1918 private addresses. If you prefer a different address scheme or these examples conflict with your existing infrastructure, choose your VPC and Wireguard IPs from the RFC1918 ranges.
Here's a summary table of the IPs used in this guide.
Section 1: Create the VPCs
In this step, you'll create the VPCs in each location.
Create VPC-A in Amsterdam
- Follow this link to add a VPC Network.
- Choose the Amsterdam location.
- In the Configure IP Range section, choose Manual - Advanced to open the Set IP Range section.
- Enter
172.16.1.0in Network Address. - Enter
24in Network Prefix. - In the Manage Routes section, choose No Routes.
- Enter
VPC-Afor the network name, then click Add Network.
Create VPC-B in Bangalore
These are the exact steps you did for VPC-A, except the network subnet and location are different.
- Follow this link to add a VPC Network.
- Choose the Bangalore location.
- In the Configure IP Range section, choose Manual - Advanced to open the Set IP Range section.
- Enter
172.16.2.0in Network Address. - Enter
24in Network Prefix. - In the Manage Routes section, choose No Routes.
- Enter
VPC-Bfor the network name, then click Add Network.
When finished, you'll have two VPCs, like this:
Section 2: Deploy Servers and Gateways
In this step, you'll deploy the servers and gateways.
Deploy the Amsterdam Servers
Follow these steps to deploy two identical servers in Amsterdam.
- Follow this link to deploy a new server.
- Select Optimized Cloud Compute - General Purpose.
- Choose the Amsterdam location.
- Choose the Ubuntu 22.04 LTS x64 operating system.
- Choose the 30 GB NVMe server size.
- In the Additional Features section, select Enable Virtual Private Clouds.
- You can choose an SSH key if you have one available. Or, you can use the root password you'll find on the server overview page after deployment.
- Choose
2in the Servers Qty field at the bottom of the screen. - Enter
Gateway-Ain the Server 1 Hostname & Label section. - Enter
App-Serverin the Server 2 Hostname & Label section. - Click Deploy Now.
Deploy the Bangalore Servers
For demonstration, DB-Server in Bangalore has no public IP address. Because it has a different configuration than Gateway-B, you'll deploy these servers simultaneously.
Deploy Gateway-B
- Follow this link to deploy a new server.
- Select Optimized Cloud Compute - General Purpose, unless you have different performance requirements.
- Choose the Bangalore location.
- Choose the Ubuntu 22.04 LTS x64 operating system.
- Choose the 30 GB NVMe server size.
- In the Additional Features section, select Enable Virtual Private Clouds.
- You can choose an SSH key if you have one.
- Enter
Gateway-Bin the Server Hostname & Label section. - Click Deploy Now.
Deploy DB-Server
DB-Server has no public IP address and is only reachable through the VPC, so the steps differ slightly from the previous three deployments.
Follow this link to deploy a new server.
Select Optimized Cloud Compute - General Purpose.
Choose the Bangalore location.
Choose the Ubuntu 22.04 LTS x64 operating system.
Choose the 30 GB NVMe server size.
In the Additional Features section:
- Select No Public IPv4 Address.
- Select Enable Virtual Private Clouds.
The Additional Features section looks like this after your selections:
Enter
DB-Serverin the Server Hostname & Label section.Click Deploy Now.
Confirm the Server Configuration
You should now have four servers deployed. The overview page shows the servers and their public IP addresses.
Make a note of the public addresses for the two gateways and App-Server.
Because you created the VPCs before deploying the servers, Vultr could automatically configure each server's private network adapter with cloud-init.
To confirm the VPC network configuration for each server:
- Click the server entry to view its overview page.
- Click the Settings tab.
- Click the IPv4 menu and scroll to the VPC Network section, which looks like this:
Verify all servers have their VPCs configured and note the addresses before proceeding.
Section 3: Install Wireguard
In this section, you'll install Wireguard on both gateways.
Follow these steps for Gateway-A, then repeat the same steps on Gateway-B before proceeding to the next section.
From your local workstation, open a terminal and SSH to the server as the root user.
Update the server.
Reboot the server to ensure all updates are applied, then reconnect with SSH.
Install Wireguard.
Create Wireguard's private key.
Create Wireguard's public key.
View the keys with
cat, and make a note of them. This guide uses example values for clarity.Repeat these steps on Gateway-B and make a note of its public and private keys before proceeding to the next section.
Section 4: Configure the VPN
In this section, you'll create a Wireguard interface on each machine and configure it with the remote gateway's address and public/private key information.
Configure Gateway-A
SSH to Gateway-A.
Create the Wireguard configuration file. The Wireguard interface takes its name from the filename, and the standard convention is to name the first Wireguard interface
wg0.Copy these settings into
wg0.conf.Change this example file:
- Under # Local Settings - Gateway-A:
- Change
PrivateKeyto Gateway-A's private key. - Verify
Addressis the correct Wireguard IP address for Gateway-A. If you've followed the Wireguard and VPC addressing scheme from this guide, you won't need to change this.
- Change
- Under # Remote Settings - Gateway-B:
- Change
PublicKeyto Gateway-B's public key. - Change
Endpointto Gateway-B's public IP address, followed by:51820to indicate the remote port. - Verify
AllowedIPsmatches Gateway-B's Wireguard IP and VPC-B subnet. If you've followed the Wireguard and VPC addressing scheme from this guide, you won't need to change these.
- Change
These other settings rarely need to be changed:
- Under
# Firewall Rules:PreUpcommands run before Wireguard brings up the tunnel. Here, it opens the firewall port51820/udp.PostDowncommands run after Wireguard brings down the tunnel. Here, it closes the firewall port.
- Under
# IP forwarding:- This
PreUpsetting enables IP forwarding, which allows packets from the VPN tunnel to be passed to the VPC interface.
- This
- Under # Local Settings - Gateway-A:
Save and exit the file.
Start the Wireguard service.
Enable the Wireguard service to restart after the server reboots.
Gateway-A is now waiting for Gateway-B to come online, which you'll do in the next step.
Configure Gateway-B
Next, you'll connect to Gateway-B to configure the other end of the tunnel. These steps are similar to the ones you did for Gateway-A, but the addresses and keys differ.
SSH to Gateway-B.
Create the
wg0.confconfiguration file.Copy these settings into
wg0.conf.Change this example file:
- Under # Local Settings - Gateway-B:
- Change
PrivateKeyto Gateway-B's private key. - Verify
Addressis the correct Wireguard IP address for Gateway-B. If you've followed the Wireguard and VPC addressing scheme from this guide, you won't need to change this.
- Change
- Under # Remote Settings - Gateway-A:
- Change
PublicKeyto Gateway-A's public key. - Change
Endpointto Gateway-A's public IP address, followed by:51820to indicate the remote port. - Verify
AllowedIPsmatches Gateway-A's VPN endpoint and VPC-A subnet. If you've followed the Wireguard and VPC addressing scheme from this guide, you won't need to change these.
- Change
Like Gateway-A's example, you usually won't need to change the
# Firewall Rulesor# IP forwardingsections.- Under # Local Settings - Gateway-B:
Start Wireguard on Gateway-B.
Enable the Wireguard service to restart after the server reboots.
This establishes the VPN tunnel. You should test the connection at this stage before proceeding.
Verify the
wg0interface was created:You'll see something similar to:
Ping Gateway-A's Wireguard address to test the VPN link.
If successful, you'll receive a reply:
Use the
wgcommand to get some statistics:You'll see something like this, except with your public keys and IPs:
If the output shows the latest handshake and transfer statistics at the bottom, the link is active, and you can proceed to the next section.
Section 5: Configure App-Server and DB-Server
In this section, you'll add routing information to App-Server and DB-Server.
Although we've designated these as App and DB servers, this guide only focuses on the network configuration and doesn't include the steps to install any application or database software. See our documentation library for instructions to install many popular applications.
Configure App-Server
Vultr uses cloud-init, which auto-configures the network interfaces when you deploy the servers. To ensure cloud-init doesn't overwrite your routing entries when the system restarts, you'll disable the networking portion of cloud-init before you add them.
To get started, SSH to App-Server.
Disable the cloud-init networking module.
Make a backup of cloud-init's network configuration.
Rename the original file to
wireguard_network_config.yaml.Open the file in an editor.
Add this
routes:section before the last line at the same indentation level.When finished, your file should look similar to this.
Save and close the file.
Apply the new network settings.
Test the route from App-Server to Gateway-B's VPC address:
If your ping is successful, proceed to the next step.
Configure DB-Server
In this step, you'll configure DB-Server in Bangalore and test the entire route. Because it has no public IP address, you'll connect through Gateway-B as a jump server.
First, SSH to Gateway-B from your local workstation.
Then, SSH to DB-Server.
Disable the cloud-init networking module.
Back up the cloud-init configuration.
Rename the file to
wireguard_network_config.yaml.Open the file in an editor.
Add this
routes:section before the last line at the same indentation level.When finished, your file should look similar to this.
Save and close the file.
Apply the new network settings.
Test the route from DB-Server to App-Server's VPC address:
Section 6: Final Tests
All the configuration is complete; it's time to test the entire route.
SSH to App-Server.
Test the connection to Gateway-A's VPC address in Amsterdam:
Notice the response time is less than 1 ms because both servers are in Amsterdam.
Test your connection to Gateway-B's VPC address in Bangalore.
Notice the latency is higher because the traffic traversed the VPN.
Test your connection to DB-Server's VPC address in Bangalore, which shows that the entire route is working.
Next Steps: Expanding the Network
Following this guide, you've created a VPC peering connection between Vultr locations and deployed application servers in the VPCs.
As a next step, you could expand this network by adding more servers at either location. For example, if you want to add a second server named Web-Server in Amsterdam, perform the exact steps you did for App-Server. Briefly, those steps are:
Create a new server in Amsterdam, ensuring to select Enable Virtual Private Clouds from the deploy page.
Disable the cloud-init networking module.
Back up and rename the config file.
Open the file in an editor.
Add the
routes:section.Save the file and apply the network settings.
More Information
Here are resources where you can learn more about Vultr VPCs and Wireguard:


0 Comments
Be the first to comment and share your perspective with the community.