
How to Provision Cloud Infrastructure on Vultr using Terraform
Introduction
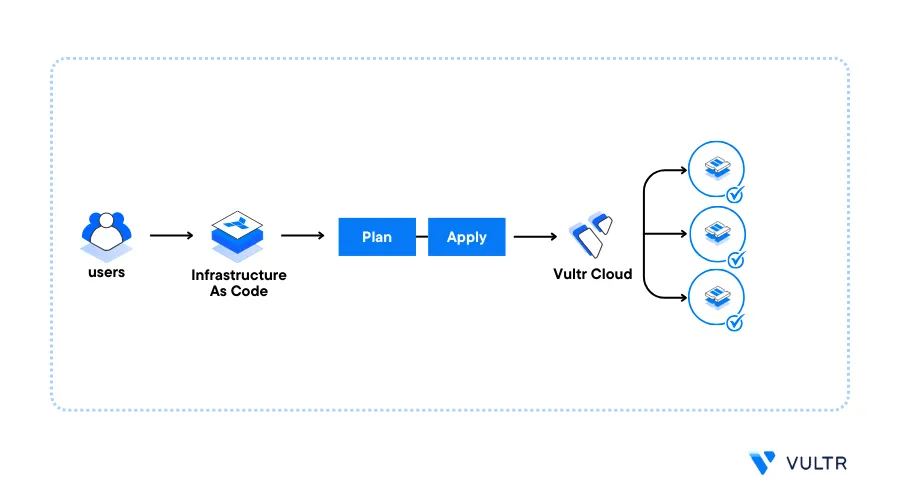
Terraform is an Infrastructure as Code (IaC) tool that lets you define, manage, and provision cloud infrastructure using declarative configuration files. You can use Terraform to define resources in code and ensure that your cloud infrastructure matches the desired state by creating or modifying resources efficiently.
Terraform uses two main components to manage infrastructure:
- Core: Reads configuration files, tracks the resource state, generates an execution plan, and applies changes to resources.
- Provider: Interacts with cloud platforms through APIs, handling tasks like authentication, authorization, and resource management. For example, the Vultr Terraform provider lets Terraform perform actions using your Vultr API key.
Follow this guide to provision cloud resources on Vultr using Terraform. You will install Terraform on Ubuntu 24.04 and use it to provision multiple resources including Cloud Compute instances, Vultr Kubernetes Engine (VKE) Clusters, and Vultr Managed Databases using your Vultr API key.
Prerequisites
Before you begin, you need to:
- Deploy an Ubuntu 24.04 instance on Vultr to use as the management workstation.
- Enable Vultr API Key access on your account and add your workstation's public IP address to the list of allowed hosts to use the API key.
- Access the instance using SSH as a non-root user with sudo privileges.
Install Terraform
Terraform is not available in the default package repositories on Ubuntu. Follow the steps below to add the Terraform repository to your APT sources, update the server's package information index, and install Terraform.
Add the Terraform repository GPG key to your server's keyrings.
console$ wget -O- https://apt.releases.hashicorp.com/gpg | sudo gpg --dearmor -o /usr/share/keyrings/hashicorp-archive-keyring.gpg
View the
hashicorp-archive-keyring.gpgfingerprint and verify that it matches the official Hashicorp repository fingerprint.console$ sudo gpg --no-default-keyring --keyring /usr/share/keyrings/hashicorp-archive-keyring.gpg --fingerprint
Your output should be similar to the one below.
/usr/share/keyrings/hashicorp-archive-keyring.gpg
-------------------------------------------------
pub   rsa4096 2023-01-10 [SC] [expires: 2028-01-09]
      798A EC65 4E5C 1542 8C8E  42EE AA16 FCBC A621 E701
uid           [ unknown] HashiCorp Security (HashiCorp Package Signing) <security+packaging@hashicorp.com>
sub   rsa4096 2023-01-10 [S] [expires: 2028-01-09]
Add the Terraform repository to your APT sources
console$ echo "deb [arch=$(dpkg --print-architecture) signed-by=/usr/share/keyrings/hashicorp-archive-keyring.gpg] https://apt.releases.hashicorp.com $(lsb_release -cs) main" | sudo tee /etc/apt/sources.list.d/hashicorp.list
Update the server's package index.
console$ sudo apt update
Install Terraform.
console$ sudo apt install terraform
View the installed Terraform version.
console$ terraform --version
Your output should be similar to the one below
Terraform v1.10.5
on linux_amd64
Set Up the Vultr Terraform Provider
The Vultr Terraform provider allows you to create infrastructure resources using your Vultr API key. Follow the steps below to set up the Vultr provider configuration in your Terraform project to provision cloud resources.
Switch to your user's home directory
console$ cd
Create a new Terraform project directory to store your configurations.
console$ mkdir vultr-terraform
Switch to the new
vultr-terraformdirectory.console$ cd vultr-terraform
Create a new
provider.tfconfiguration using a text editor such asnanoto store the Vultr provider informationconsole$ nano provider.tf
Add the following configurations to the file
tfterraform { required_providers { vultr = { source = "vultr/vultr" version = "2.23.1" } } } provider "vultr" { api_key = var.VULTR_API_KEY } variable "VULTR_API_KEY" {}
Save and close the file.
The above provider configuration allows Terraform to interact and authenticate with the Vultr provider version
2.23.1using your Vultr API key. Visit the Vultr Terraform Provider repository to verify the latest version to use in your configuration.Create a new
terraform.tfvarsfile to store your Vultr API key information.console$ nano terraform.tfvars
Add the following directive to the file. Replace
your_Vultr_api_keywith your actual Vultr API key.tfVULTR_API_KEY = "your_Vultr_api_key"
Save and close the file.
Initialize Terraform to apply the Vultr Terraform provider configuration.
console$ terraform init
Your output should be similar to the one below when successful.
Terraform has been successfully initialized!

You may now begin working with Terraform. Try running "terraform plan" to see
any changes that are required for your infrastructure. All Terraform commands
should now work.
You have enabled the Vultr Terraform provider configuration in your project. You can create Terraform configurations to provision resources using your Vultr API key.
Provision Cloud Resources on Vultr
Terraform uses a declarative approach that enables you to define cloud resource information in configurations files. It supports both the JSON and HCL (HarshiCorp Configuration Language) formats for configuration files. Follow the sections below to use the HCL format with the .tf file extension to provision cloud resources using your Vultr API key.
Provision Vultr Cloud Compute Instances
Follow the steps below to provision Vultr Cloud Compute instances using Terraform.
Print your working directory and verify that it's
vultr-terraform.console$ pwd
Your output should be similar to the one below.
/home/linuxuser/vultr-terraformCreate a new
vultr_instance.tfTerraform configuration.console$ nano vultr_instance.tf
Add the following configurations to the file.
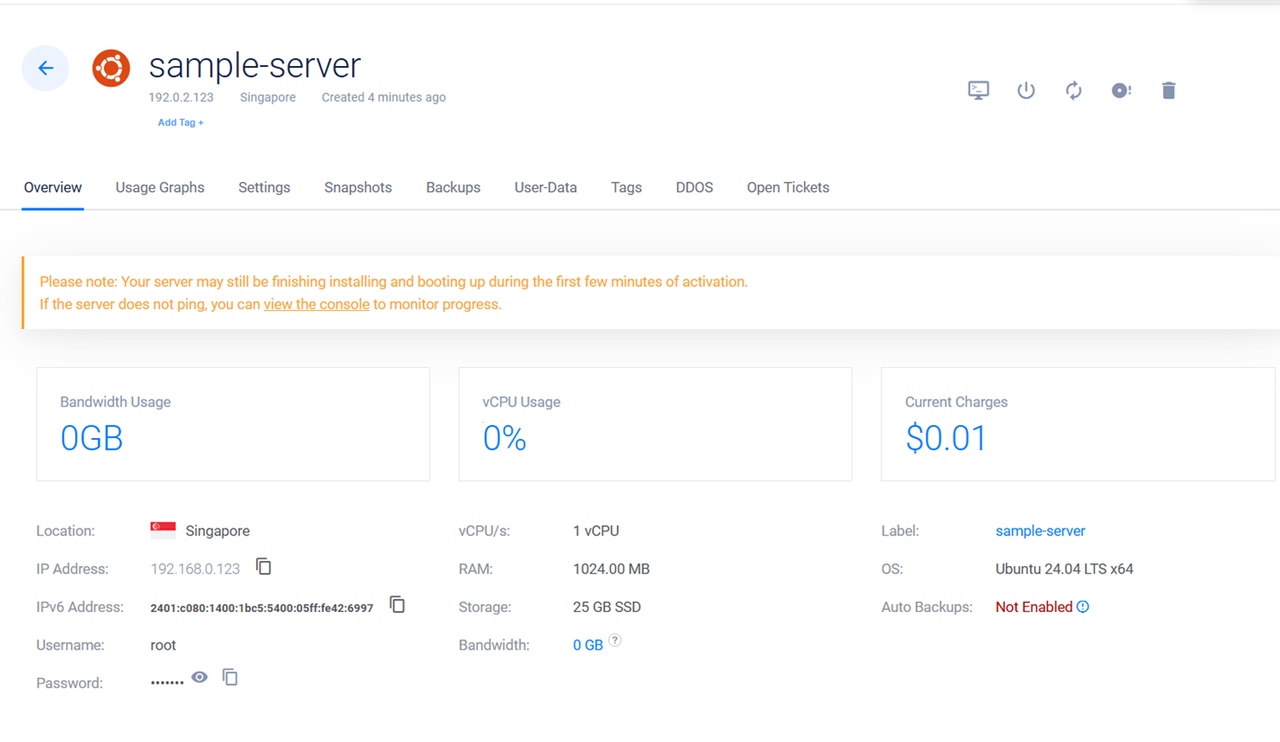
tfresource "vultr_instance" "my_instance" { label = "sample-server" plan = "vc2-1c-1gb" region = "sgp" os_id = "2284" enable_ipv6 = true }
Save and close the file.
The above Terraform configuration creates a Vultr Compute Instance with the following specifications:
- Instance Type: Vultr Cloud Compute (
VC2). - vCPUs:
1. - Memory:
1 GB. - Storage:
25 GB. - Operating System: Ubuntu 24.04 (
2284).
Within the configuration:
resource "vultr_instance" "my_instance": Creates a Vultr Cloud Compute instance.my_instanceidentifies the resource configuration within the Terraform project.label = "sample-server": Setssample-serveras the instance label.plan = "vc2-1c-1gb": Sets the instance plan and specifications. Thevc2-1c-1gbplan provisions a shared cpu Vultr Cloud Compute instance with1 vCPU,1 GB RAMand25 GB NVMe storage. Send aGETrequest to the List Plans endpoint to list all available instance plans.console$ curl "https://api.vultr.com/v2/plans" \ -X GET \ -H "Authorization: Bearer ${VULTR_API_KEY}"
region = "sgp": Sets the Vultr location to deploy the instance. Thesgpregion ID deploys the instance to the Singapore Vultr location. Send aGETrequest to the List Regions endpoint to list all available Vultr regions.console$ curl "https://api.vultr.com/v2/regions" \ -X GET \ -H "Authorization: Bearer ${VULTR_API_KEY}"
os_id = "2284": Specifies the operating system to install on the instance.2284installs Ubuntu 24.04. Send aGETrequest to the List OS endpoint to list all available operating systems you can install.console$ curl "https://api.vultr.com/v2/os" \ -X GET \ -H "Authorization: Bearer ${VULTR_API_KEY}"
enable_ipv6 = true: Enables IPV6 networking on the Vultr Cloud Compute instance.
- Instance Type: Vultr Cloud Compute (
View the Terraform configuration changes to apply to your Vultr account.
console$ terraform plan
Output:
      + os                = (known after apply)
      + os_id             = 2284
      + plan              = "vc2-1c-1gb"
      + power_status      = (known after apply)
      + ram               = (known after apply)
      + region            = "sgp"
...........................................

Plan: 1 to add, 0 to change, 0 to destroy.
Apply the Terraform configuration changes to provision the Vultr Cloud Compute instance
console$ terraform apply
Enter
yeswhen prompted to apply the changes.Do you want to perform these actions? Terraform will perform the actions described above. Only 'yes' will be accepted to approve. Enter a value:Your output should be similar to the one below when successful.
vultr_instance.my_instance: Creating...
vultr_instance.my_instance: Still creating... [10s elapsed]
.......................
vultr_instance.my_instance: Still creating... [1m20s elapsed]
vultr_instance.my_instance: Creation complete after 1m24s [id=2def5ac0-bc72-43ca-b5f6-a3423a2617a5]

Apply complete! Resources: 1 added, 0 changed, 0 destroyed.
You have provisioned an Ubuntu 24.04 Vultr Cloud Compute instance. Use the Vultr Console, Vultr API, or Vultr CLI to view the instance details including the default user credentials, usage statistics and manage additional settings.
Provision Vultr Kubernetes Engine (VKE) Clusters
Follow the steps below to provision Vultr Kubernete Engine (VKE) clusters using Terraform.
Create a new
kubernetes_cluster.tfTerraform configuration to store your Kubernetes resource information.console$ nano kubernetes_cluster.tf
Add the following configurations to the file. Replace
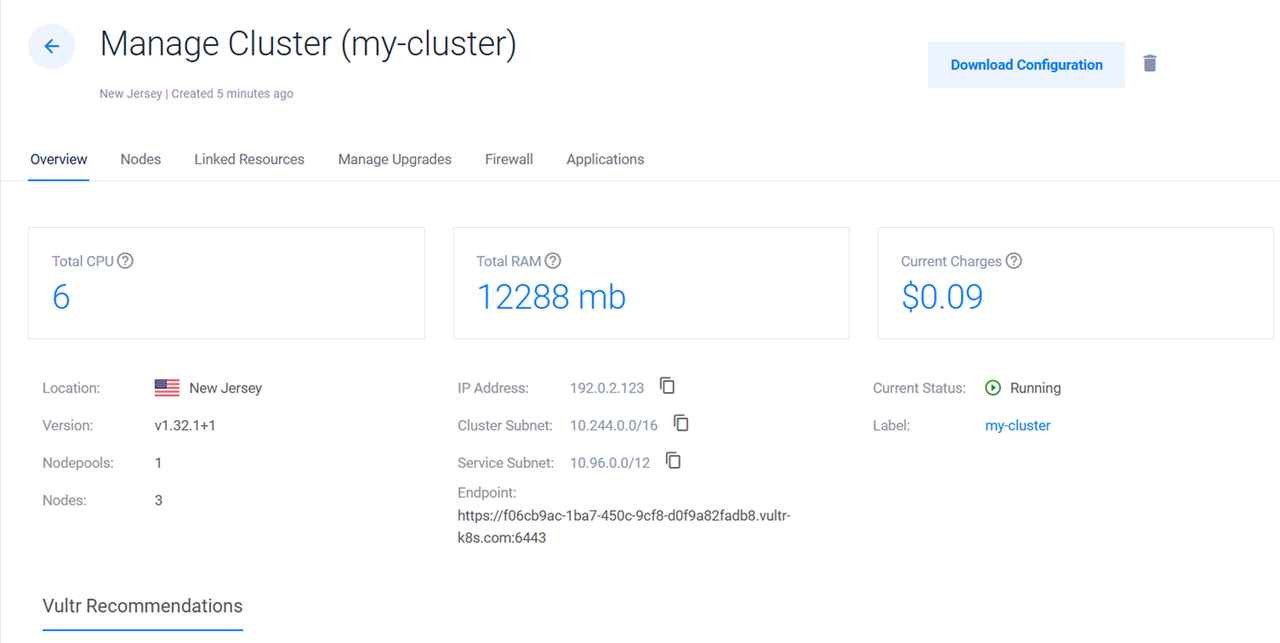
my-clusterwith your desired VKE cluster name.tfresource "vultr_kubernetes" "first_kubernetes_cluster" { region = "ewr" label = "my-cluster" version = "v1.32.1+1" node_pools { node_quantity = 3 plan = "vc2-2c-4gb" label = "my-app-nodes" auto_scaler = true min_nodes = 1 max_nodes = 4 } }
Save and close the file.
The above Terraform configuration creates a new Vultr Kubernetes Engine (VKE) cluster with the following cluster specifications:
- Kubernetes version:
v1.28.2+1 - Nodes:
3 - Node plan: Vultr Cloud Compute (
vc2) with2 vcPUs,4GB RAMper node. - Node label:
my-app-nodes - Automatic scaling:
enabled
Within the configuration:
resource "vultr_kubernetes" "first_kubernetes_cluster": Creates a Vultr Kubernetes Engine (VKE) cluster.first_kubernetes_clusteridentifies the VKE resource configuration within the Terraform project.region = "ewr": Specifies the Vultr location to deploy the VKE cluster.ewrdeploys the Vultr Kubernetes Engine cluster in the Vultr New Jersey (ewr) location. Send aGETrequest to the List Regions endpoint to list all available Vultr regions.console$ curl "https://api.vultr.com/v2/regions" \ -X GET \ -H "Authorization: Bearer ${VULTR_API_KEY}"
label = "my-cluster": Specifies the VKE cluster label for identification in your Vultr account.version = "v1.32.1+1": Specifies a Kubernetes version to install on the VKE cluster. Send aGETrequest to the Get Kubernetes Versions endpoint to list the available Kubernetes versions.console$ curl "https://api.vultr.com/v2/kubernetes/versions" \ -X GET \ -H "Authorization: Bearer ${VULTR_API_KEY}"
node_pools {: Creates a new VKE nodes pool configuration.node_quantity = 3: Specifies the number of nodes to add to the cluster.3adds three worker nodes to the VKE cluster.plan = "vc2-2c-4gb": Specifies the node instance plan.label = "my-app-nodes": Specifies the node labels for identification within the VKE cluster.auto_scaler = true: Enables automatic scaling. Setiing the value tofalsedisables automatic scaling.min_nodes = 1: Sets the minimum number of nodes the VKE cluster can downscale to.1limits downscaling to a single node.max_nodes = 4: Sets the maximum number of nodes the VKE cluster can upscale to.4allows the VKE cluster to scale up-to four nodes.
- Kubernetes version:
View the Terraform configuration changes.
console$ terraform plan
Apply the Terraform configuration to create the VKE cluster.
console$ terraform apply
Enter
yeswhen prompted to apply the Terraform configuration changes and create the VKE cluster. Your output should be similar to the one below when successful.vultr_kubernetes.first_kubernetes_cluster: Creating... vultr_kubernetes.first_kubernetes_cluster: Still creating... [10s elapsed] vultr_kubernetes.first_kubernetes_cluster: Still creating... [20s elapsed] ............................................................. vultr_kubernetes.first_kubernetes_cluster: Creation complete after 2m47s [id=f06cb9ac-1ba7-450c-9cf8-d0f9a82fadb8] Apply complete! Resources: 1 added, 0 changed, 0 destroyed.You have provisioned a Vultr Kubernetes Engine (VKE) cluster with 3 nodes. Use the Vultr Console or the Vultr API to download your VKE cluster configuration, manage nodes, upgrades and linked resources.
Add Node Pools to a Vultr Kubernetes Engine (VKE) Cluster using Terraform
Modifying a Terraform configuration applies the changes to your existing resource. Follow the steps below to modify the Vultr Kubernetes Engine (VKE) configuration to add more node pools to the cluster.
Open the
kubernetes_cluster.tffile.console$ nano kubernetes_cluster.tf
Add the following configurations at the end of the file to define a new linked resource.
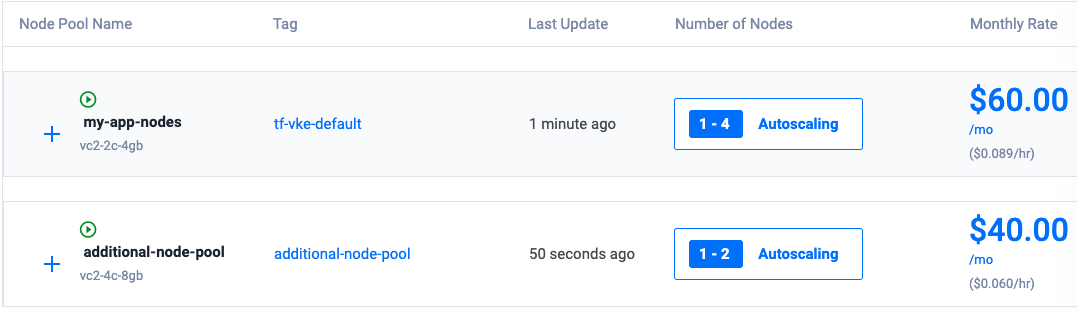
tfresource "vultr_kubernetes_node_pools" "additional_node_pools" { cluster_id = "${vultr_kubernetes.first_kubernetes_cluster.id}" node_quantity = 1 plan = "vc2-4c-8gb" label = "additional-node-pool" tag = "additional-node-pool" auto_scaler = true min_nodes = 1 max_nodes = 2 }
Save and close the file.
The above configuration creates a new VKE node pool with the following specifications per node:
- Number of nodes:
1. - Node specifications: Vultr Cloud Compute (
vc2) with4 vCPUs,8 GB RAM. - Automatic scaling:
enabled.
Within the configuration:
resource "vultr_kubernetes_node_pools" "additional_node_pools" {: Creates a new VKE cluster node pool configuration.additional_node_poolsidentifies the resource configuration within the Terraform project.cluster_id = "${vultr_kubernetes.first_kubernetes_cluster.id}": References the VKE cluster ID in your configuration to add the node pool.node_quantity = 1: Specifies the number of nodes to add to the cluster.plan = "vc2-4c-8gb": Specifies the node instance plan.label = "additional-node-pool": Specifies the nodes pool label.tag = "additional-node-pool": Specifies the node tag.auto_scaler = true: Enables automatic scaling.min_nodes = 1: Specifies the minimum number of nodes to downscale to.1limits downscaling to a single node.max_nodes = 2: Specifies the maximum number of nodes to upscale to.2enables upscaling to up to two nodes.
- Number of nodes:
Review the Terraform configuration changes to apply.
console$ terraform plan
Apply the Terraform configuration changes to your VKE cluster.
console$ terraform apply
Your output should be similar to the one below when successful.
vultr_kubernetes_node_pools.additional_node_pools: Creating...
vultr_kubernetes_node_pools.additional_node_pools: Still creating... [10s elapsed]
vultr_kubernetes_node_pools.additional_node_pools: Still creating... [20s elapsed]
vultr_kubernetes_node_pools.additional_node_pools: Creation complete after 29s [id=6614b3a5-0ba8-435b-8e47-4b49b99161f3]

Apply complete! Resources: 1 added, 0 changed, 0 destroyed.
You have added new nodes to an existing VKE cluster. You can use Terraform to modify the Vultr Kubernetes Engine (VKE) cluster configuration to add new nodes and resources. Use the Vultr Console, Vultr API, or Vultr CLI to verify the available node pools information.
Provision Vultr Managed Databases
Follow the steps below to provision Vultr Managed Databases using Terraform.
Create a new
database.tfTerraform configuration to store the Vultr Managed Databases resource information.console$ nano database.tf
Add the following configurations to the file.
tfresource "vultr_database" "prod_postgresql_database" { database_engine = "pg" database_engine_version = "15" region = "ams" plan = "vultr-dbaas-startup-cc-1-55-2" label = "my-production-db-label" }
Save and close the file.
The above Terraform configuration creates a Vultr Managed Databases for PostgreSQL cluster with the following specifications:
- Database Engine: PostgreSQL (
pg). - Database Engine Version:
15. - Cluster Plan:
vultr-dbaas-startup-cc-1-55-2- Vultr Cloud Compute (cc) with1 vCPU,2 GB RAM,55 GBstorage.
Within the configuration:
resource "vultr_database" "prod_postgresql_database": Creates a Vultr Managed Databases cluster. Theprod_postgresql_databaselabel indentifies the resource configuration within the Terraform project.database_engine = "pg": Specifies the Vultr Managed Databases engine.pgcreates a Vultr Managed Databases for PostgreSQL cluster.database_engine_version = "15": Specifies the Vultr Managed Databases engine version.region = "ams": Specifies the Vultr location to deploy the Vultr Managed Databases cluster.amsdeploys the Vultr Managed Databases cluster in the Amsterdam Vultr location.plan = "vultr-dbaas-startup-cc-1-55-2": Specifies the Vultr Managed Databases instance plan. Send aGETrequest to the List Managed Database Plans endpoint to list all available Vultr Managed Databases plans.$ curl "https://api.vultr.com/v2/databases/plans" \ -X GET \ -H "Authorization: Bearer ${VULTR_API_KEY}"label = "my-production-db-label": Specifies the Vultr Managed Databases label for identification in your Vultr account.
- Database Engine: PostgreSQL (
Review the Terraform configuration changes to apply.
console$ terraform plan
Apply the Terraform configuration changes to deploy the Vultr Managed Databases for PostgreSQL cluster.
console$ terraform apply
Your output should be similar to the one below when successful.
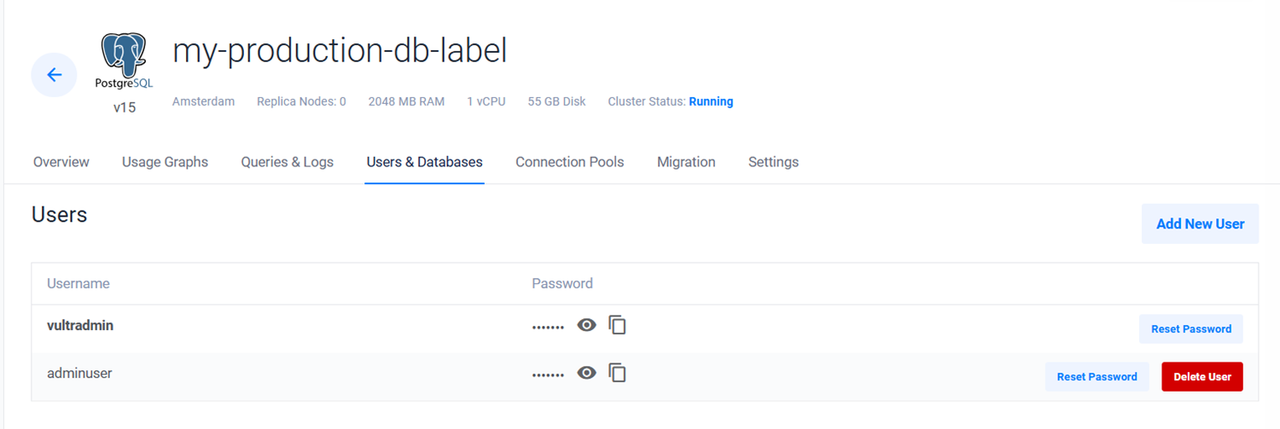
vultr_database.prod_postgresql_database: Creating...
vultr_database.prod_postgresql_database: Still creating... [10s elapsed]
.............................................................
vultr_database.prod_postgresql_database: Still creating... [5m40s elapsed]
vultr_database.prod_postgresql_database: Creation complete after 5m46s [id=ece4144d-9ef4-4ccb-9c39-b215e2326fee]

Apply complete! Resources: 1 added, 0 changed, 0 destroyed.
You have deployed a Vultr Managed Databases for PostgreSQL cluster. Use the Vultr Console, Vultr API, or Vultr CLI to manage the cluster.

Create a Vultr Managed Databases User
Follow the steps below to modify the Vultr Managed Databases configuration to create a new user in the cluster.
Open the
database.tfTerraform configuration file.console$ nano database.tf
Add the following configurations at the end of the file.
tfresource "vultr_database_user" "new_database_user" { database_id = "${vultr_database.prod_postgresql_database}" username = "adminuser" password = "strongassword" }
Save and close the file.
The above configuration creates a new Vultr Managed Databases for PostgreSQL user with the following information.
- Username:
adminuser - Password:
strongpassword
Within the configuration:
resource "vultr_database_user" "new_database_user": Creates a Vultr Managed Databases user configuration.new_database_useridentifies the resource within the Terraform project.database_id = "${vultr_database.prod_valkey_database.id}": Specifies the target Vultr Managed Databases ID to create the user.${vultr_database.prod_valkey_database.id}references the Vultr Managed Databases ID you created earlier using the Terraform configuration.username = "adminuser": Specifies the user's name.password = "strongassword": Specifies the user password.
- Username:
Review the Terraform configuration changes to apply.
console$ terraform plan
Apply the Terraform configuration changes to create the Vultr Managed Databases user.
console$ terraform apply
Output:
vultr_database_user.new_database_user: Creating...
vultr_database_user.new_database_user: Creation complete after 6s [id=adminuser]

Apply complete! Resources: 1 added, 0 changed, 0 destroyed.
You have created a Vultr Managed Databases user. Use the Vultr Console to manage all Vultr Managed Databases users and modify the user permissions in your cluster.
Provision Vultr Object Storage Subscriptions
Follow the steps below to provision Vultr Object Storage subscriptions using Terraform.
Create a new
object_storage.tfTerraform configuration file to store the Vultr Object Storage resource information.console$ nano object_storage.tf
Add the following configurations to the file.
tfresource "vultr_object_storage" "my_object_storage" { cluster_id = 4 label = "Example Object Storage" }
Save and close the file.
The above Terraform resource configuration creates a new Vultr Object Storage subscription with the following details:
- Vultr Location: Singapore (
4). - Label: Example Object Storage.
Within the configuration:
resource "vultr_object_storage" "my_object_storage": Creates a new Vultr Object Storage subscription resource.my_object_storageidentifies the resource configuration within the Terraform project.cluster_id = 4: Specifies the Vultr region ID to create the Vultr Object Storage subscription. Send aGETrequest to the Get All Clusters endpoint to list all Vultr locations where Vultr Object Storage is available.console$ curl "https://api.vultr.com/v2/object-storage/clusters" \ -X GET \ -H "Authorization: Bearer ${VULTR_API_KEY}"
label = "Example Object Storage": Specifies the Vultr Object Storage label.
- Vultr Location: Singapore (
Review the Terraform configuration changes to apply.
console$ terraform plan
Apply the Terraform resource configuration to create the Vultr Object Storage subscription.
console$ terraform apply
Output:
vultr_object_storage.my_object_storage: Creating...
vultr_object_storage.my_object_storage: Still creating... [10s elapsed]
....................................
vultr_object_storage.my_object_storage: Still creating... [1m0s elapsed]
vultr_object_storage.my_object_storage: Creation complete after 1m3s [id=7c1d5f46-a51e-437b-9ef4-5e5a310cee17]

Apply complete! Resources: 1 added, 0 changed, 0 destroyed.
You have provisioned a Vultr Object Storage subscription. Use the Vultr Console to manage the subscription and use S3-compatible tools such as
s3cmdto create buckets.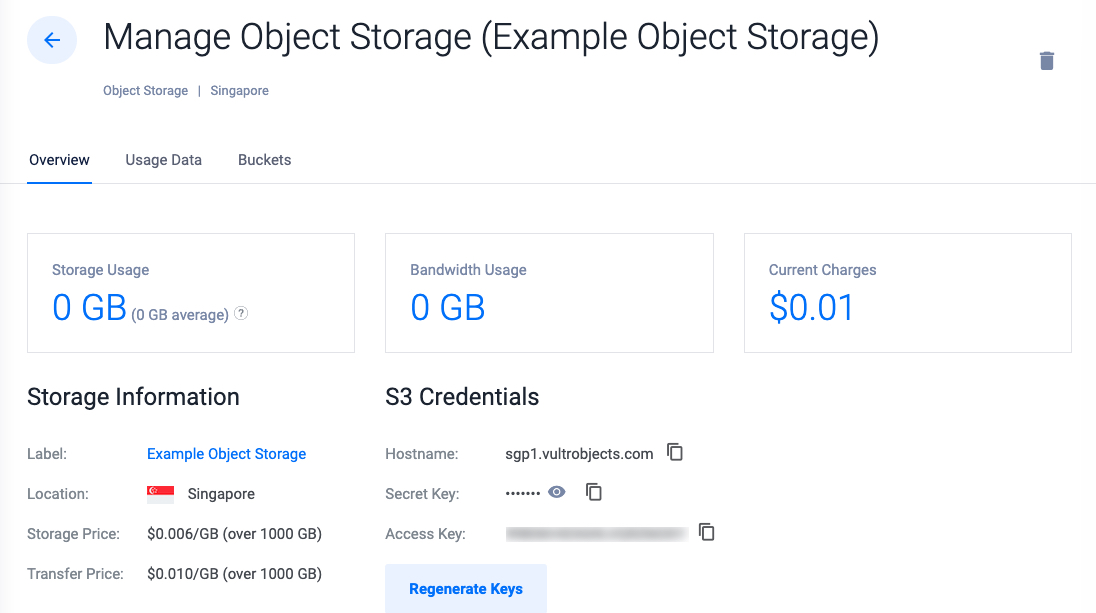
Provision Vultr Block Storage Volumes
Follow the steps below to provision Vultr Block Storage volumes using Terraform.
Create a new
block_storage.tfTerraform configuration to store the Vultr Block Storage resource information.console$ nano block_storage.tf
Add the following configurations to the file.
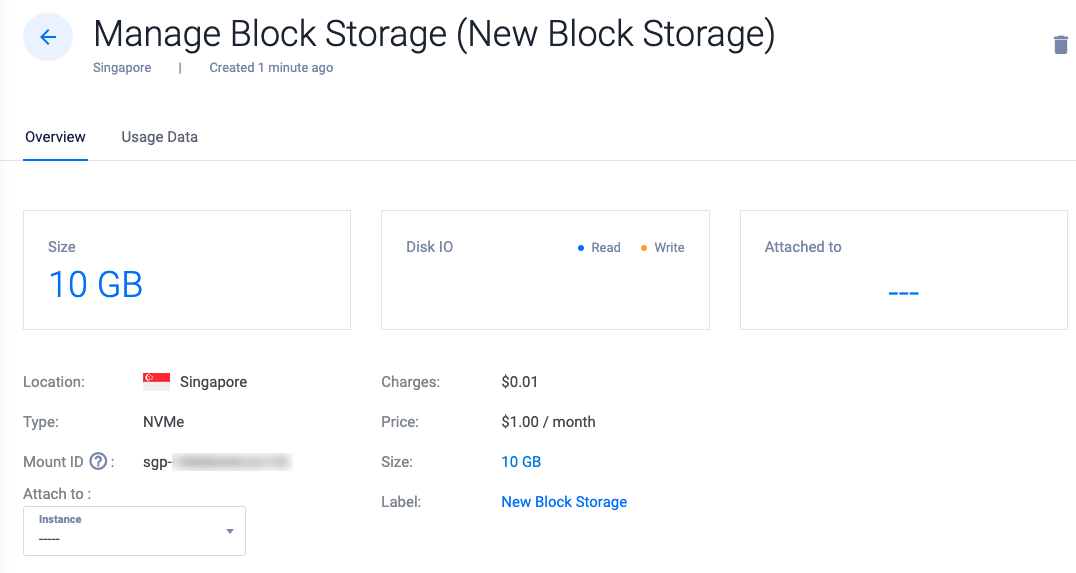
tfresource "vultr_block_storage" "my_block_storage" { size_gb = 10 region = "sgp" label = "New Block Storage" }
Save and close the file.
The above resource configuration creates a Vultr Block Storage volume with the following specifications:
- Size:
10 GB. - Vultr Location: Singapore (
sgp). - Label:
New Block Storage.
Within the configuration:
resource "vultr_block_storage" "my_block_storage": Creates a Vultr Block Storage resource configuration.my_block_storageidentifies the resource within the Terraform project.size_gb = 10: Specifies the Vultr Block Storage volume size.10creates a10 GBVultr Block Storage volume.region = "sgp": Specifies the Vultr region ID to deploy the Vultr Block Storage volume.sgpdeploys Vultr Block Storage in the Singapore Vultr Location.label = "New Block Storage": Specifies the Vultr Block Storage label.
- Size:
Review the Terraform configuration changes to apply.
console$ terraform plan
Apply the Terraform configuration to create the Vultr Block Storage volume.
console$ terraform apply
Output:
vultr_block_storage.my_block_storage: Creating...
.......................
vultr_block_storage.my_block_storage: Creation complete after 12s [id=d167d2f5-b8a7-4f41-9a3a-2ea8a2369fbb]
You have provisioned a Vultr Block Storage volume using Terraform. Use the Vultr Console, API or CLI to manage the volume.
Attach Vultr Block Storage to Vultr Cloud Compute Instances
Follow the steps below to modify the Vultr Block Storage configuration and attach the volume to a Vultr Cloud Compute Instance.
Open the
block_storage.tffile.console$ nano block_storage.tf
Add a new
attached_to_instancedirective to themy_block_storageresource. Replacemy_instance.idwith the actual Vultr Cloud Compute instance resource label you created earlier.tfresource "vultr_block_storage" "example_block_storage" { size_gb = 10 region = "sgp" attached_to_instance = "${vultr_instance.my_instance.id}" }
Save and close the file.
The above configuration references the Vultr Cloud Compute instance resource to attach the Vultr Block Storage volume. Within the configuration:
attached_to_instance = "${vultr_instance.my_instance.id}: Specifies the instance the Vultr Block Storage volume is attached to.vultr_instance.my_instance.idreferences themy_instanceVultr Cloud Compute instance ID you created earlier.
Apply the Terraform configuration changes to attach the Vultr Block Storage volume to the Vultr Cloud Compute instance.
console$ terraform apply
Your output should be similar to the one below.
vultr_block_storage.my_block_storage: Modifying... [id=d167d2f5-b8a7-4f41-9a3a-2ea8a2369fbb]
vultr_block_storage.my_block_storage: Modifications complete after 6s [id=d167d2f5-b8a7-4f41-9a3a-2ea8a2369fbb]

Apply complete! Resources: 0 added, 1 changed, 0 destroyed.
You have attached a Vultr Block Storage volume to a Vultr Cloud Compute instance. Use the Vultr Console to verify that the Vultr Block Storage volume is attached to the instance. Then, follow How to Mount Vultr Block Storage Volume on Linux to use the volume.

Destroy Cloud Resources using Terraform
Follow the steps below to destroy existing cloud resources using Terraform.
Use the following command to destoy a specific cloud resource on your Vultr account.
console$ terraform destroy -target=Vultr-resource_type.resource-name
- For example, run the following command to destroy the Vultr Cloud Instance you provisioned earlier.
console$ terraform destroy -target=vultr_instance.my_instance
Verify the resources to destroy, enter
yes, and press Enter to destroy the target resource when prompted in your output similar to the one below.vultr_block_storage.my_block_storage: Destroying... [id=d167d2f5-b8a7-4f41-9a3a-2ea8a2369fbb] vultr_block_storage.my_block_storage: Destruction complete after 5s vultr_instance.my_instance: Destroying... [id=58f419ad-6306-431b-b095-d28fe9fe5100] vultr_instance.my_instance: Destruction complete after 1s Destroy complete! Resources: 2 destroyed.Use the
destroycommand option to destroy all cloud resources in your Terraform project.console$ terraform destroy
Verify the cloud resources to destroy, enter
yesand press Enter to destroy the resources listed your output similar to the one below.vultr_database_user.new_database_user: Destroying... [id=adminuser] vultr_kubernetes_node_pools.additional_node_pools: Destroying... [id=6614b3a5-0ba8-435b-8e47-4b49b99161f3] vultr_object_storage.my_object_storage: Destroying... [id=7c1d5f46-a51e-437b-9ef4-5e5a310cee17] vultr_object_storage.my_object_storage: Destruction complete after 2s vultr_database_user.new_database_user: Destruction complete after 4s vultr_database.prod_postgresql_database: Destroying... [id=ece4144d-9ef4-4ccb-9c39-b215e2326fee] vultr_database.prod_postgresql_database: Destruction complete after 1s vultr_kubernetes_node_pools.additional_node_pools: Destruction complete after 9s vultr_kubernetes.first_kubernetes_cluster: Destroying... [id=f7f806d3-d93c-4a0a-a1b0-547edf225ae3] vultr_kubernetes.first_kubernetes_cluster: Destruction complete after 0s Destroy complete! Resources: 5 destroyed.Running theWarningterraform destroydestroys all resources provisioned through the Terraform project. Destroy specific resources by specifying the configuration resource and label to avoid losing existing instances instead.
Terraform Commands
Terraform supports multiple operation commands to initialize, validate, and apply cloud resources to your Vultr account. These include the following:
Init: Initializes the Terraform project directory and installs the defined provider plugins.Refresh: Reads the state of cloud resources, and updates the Terraform state file to match the resource status.Validate: Looks up for any syntax, formatting errors, or wrong configurations in Terraform resource files.Plan: Lists the Terraform changes made to configuration resources and ready to apply on your Vultr account.Apply: Applies the Terraform resource configurations.Destroy: Destroys existing cloud resources deployed using Terraform in the active project directory.
For more information and supported commands, visit the Terraform CLI documentation
Conclusion
You have installed Terraform and used the Vultr provider configuration to provision cloud resources using your Vultr API key. You can create multiple project directories to categorize and store Terraform configurations on your server. For more information, visit the Vultr Terraform registry