
How to Provision Persistent Volume Claims on Vultr Kubernetes Engine
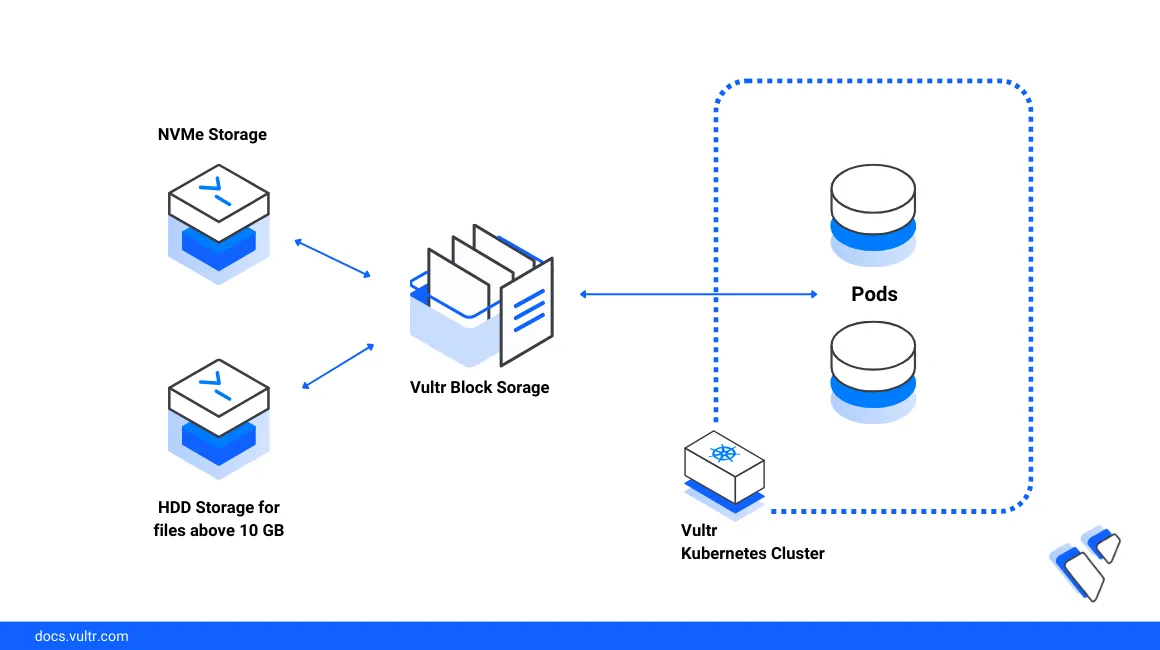
Vultr offers persistent storage options for Kubernetes through both Vultr Block Storage (VBS) and the Vultr File System (VFS). These storage solutions are integrated with the Vultr Kubernetes Engine (VKE) to support a wide range of application needs—from high-performance single-node volumes to shared, multi-node file systems. VKE includes a managed Kubernetes control plane that automatically installs the Vultr Container Storage Interface (CSI), enabling seamless access to these storage types and allowing your applications to scale with ease.
In this guide, you will provision persistent volumes using both Vultr Block Storage (VBS) and Vultr File System (VFS), and learn how to update the configuration to perform PVC expansion where supported.
Prerequisites
Before you begin:
- Deploy a Vultr Ubuntu server
- Deploy a Vultr Kubernetes Engine (VKE) cluster with at least 2 nodes.
- Access the workstation using SSH as a non-root user with sudo privileges.
- Install and configure Kubectl to access the cluster
- Vultr Container Storage Interface (CSI) Driver v0.14.0 or higher.
- Kubernetes Config (
KUBECONFIG) for cluster management.
Understanding Storage Classes
Vultr provides two types of persistent storage technologies for Kubernetes workloads, available in most global regions: Vultr Block Storage and Vultr File System (VFS). These options support a variety of performance, capacity, and access mode requirements.
Vultr Block Storage (VBS)
Vultr Block Storage supports ReadWriteOnce (RWO) access mode and is ideal for high-performance or large-capacity workloads where each volume is attached to a single node.
HDD Block Storage – A cost-effective solution using traditional spinning hard drives. Suitable for workloads that require large capacity over speed.
- CSI Storage Class:
vultr-block-storage-hdd - Minimum Volume Size: 40 GiB
- Maximum Volume Size: 40 TiB
- Technology: Rotational hard disk drive (HDD)
- Availability: Most Vultr regions
- Key Benefit: Affordable storage with support for very large volumes
- CSI Storage Class:
NVMe Block Storage – A high-performance option backed by solid-state NVMe drives. Best for latency-sensitive or IOPS-intensive applications.
- CSI Storage Class:
vultr-block-storage - Minimum Volume Size: 10 GiB
- Maximum Volume Size: 10 TiB
- Technology: Solid-state NVMe
- Availability: Many Vultr regions
- Key Benefit: Fastest I/O performance for demanding workloads
- CSI Storage Class:
Vultr File System (VFS)
The Vultr File System provides ReadWriteMany (RWX) access, allowing multiple pods across different nodes to read and write to the same volume simultaneously. It’s ideal for shared data use cases such as content management systems, collaborative apps, and distributed workloads.
- CSI Storage Class:
vultr-vfs-storage - Minimum Volume Size: 10 GiB
- Maximum Volume Size: 10 TiB
- Technology: Network-attached file system
- Availability: Selected Vultr regions
- Key Benefit: Shared storage for multi-pod and multi-node access (RWX)
To check availability in your region, use the /v2/regions API endpoint.
Look for the following flags in the response:
block_storage_storage_opt: Indicates HDD Block Storage availabilityblock_storage_high_perf: Indicates NVMe Block Storage availability
Some locations support both storage classes. If NVMe block storage is available in a location, our CSI uses that class by default.
Create Persistent Volume Claims (PVCs) with Vultr Block Storage (VBS)
In this section, you are to create a PVC using a YAML configuration file with ReadWriteOnce (RWO) access mode.
Create a configuration file.
console$ nano create_pvc.yaml
Copy and paste the below given configuration.
yamlapiVersion: v1 kind: PersistentVolumeClaim metadata: name: csi-pvc spec: accessModes: - ReadWriteOnce resources: requests: storage: 10Gi storageClassName: vultr-block-storage
Save and exit the file.
In the above configuration, you are requesting an NVMe block storage volume with a size of 10Gi using the
vultr-block-storagestorage class. This PVC uses the ReadWriteOnce access mode, meaning it can be mounted as read-write by a single node.Supported Vultr Block Storage types and minimum size requirements:
NVMe Block Storage
storageClassName:vultr-block-storage- Minimum size:
10Gi
HDD Block Storage
storageClassName:vultr-block-storage-hdd- Minimum size:
40Gi
To use HDD block storage, update the
storageClassNametovultr-block-storage-hddand set thestoragerequest to at least40Giin the above configuration.
Apply the configuration file.
console$ sudo kubectl apply -f create_pvc.yaml
Output
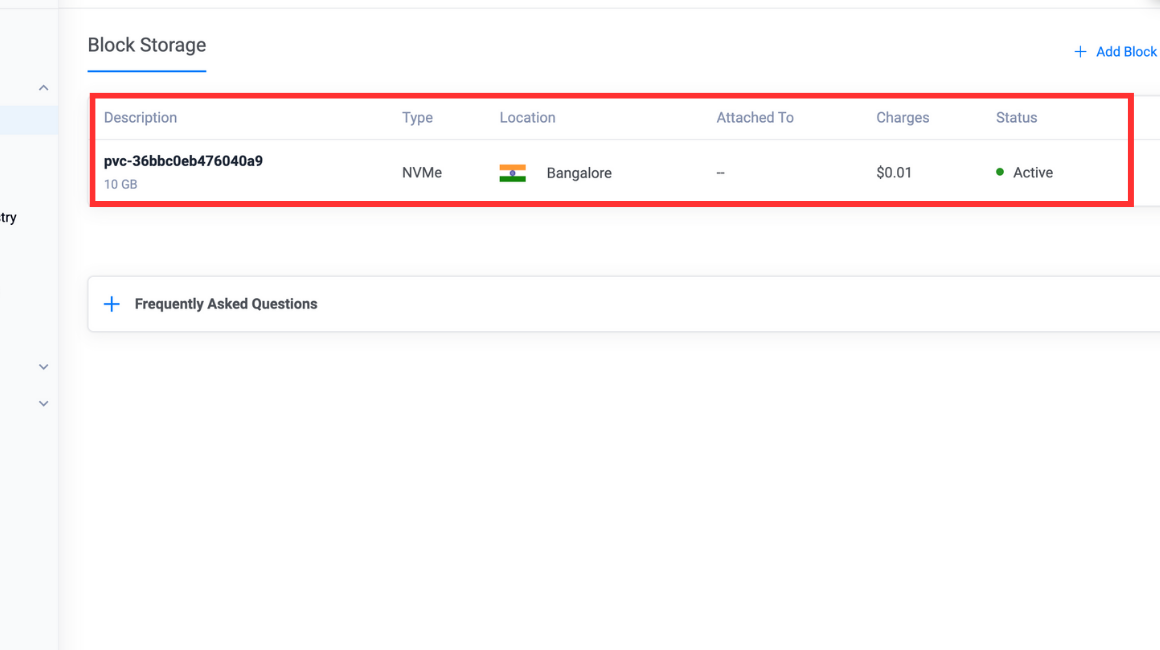
persistentvolumeclaim/csi-pvc createdVerify that a new Vultr Block Storage is provisioned.
console$ sudo kubectl get pvc
Output
NAME      STATUS   VOLUME                 CAPACITY   ACCESS MODES   STORAGECLASS          VOLUMEATTRIBUTESCLASS   AGE
csi-pvc   Bound    pvc-36bbc0eb476040a9   10Gi       RWO            vultr-block-storage   <unset>                 56s
You can verify the same by navigating to Cloud Storage then Block Storage on your Vultr Console.
PVC Expansion
In this section, you are to expand the storage capacity of an existing VBS attached to your instance.
Change the configuration file.
console$ nano create_pvc.yaml
Increase the storage capacity.
yamlapiVersion: v1 kind: PersistentVolumeClaim metadata: name: csi-pvc spec: accessModes: - ReadWriteOnce resources: requests: storage: 30Gi storageClassName: vultr-block-storage
Save and exit the file.
In the above configuration, you increased the storage capacity for an existing NVMe block storage to 30 GB from the original 10 GB.
Apple the configuration changes.
console$ sudo kubectl apply -f create_pvc.yaml
Output
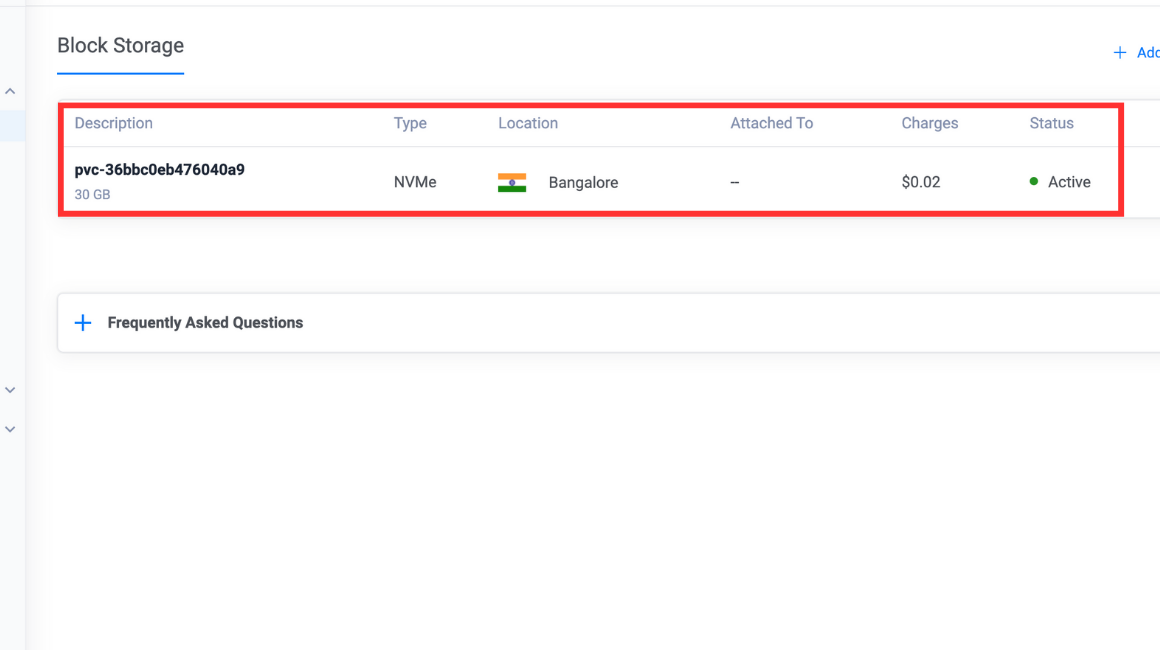
persistentvolumeclaim/csi-pvc configuredVerify the change.
console$ sudo kubectl get pvc
Output
NAME      STATUS   VOLUME                 CAPACITY   ACCESS MODES   STORAGECLASS          VOLUMEATTRIBUTESCLASS   AGE
csi-pvc   Bound    pvc-36bbc0eb476040a9   30Gi       RWO            vultr-block-storage   <unset>                 5m1s
You can verify the same by navigating to Cloud Storage then Block Storage on your Vultr portal.
It is not advised to reduce the storage capacity of the VBS as the action may result in significant data loss.
Create Persistent Volume Claims (PVCs) with Vultr File System (VFS)
Vultr File System volumes can be used as Persistent Volumes in Kubernetes using the vultr-vfs-storage storage class.
Create a new manifest for PVC resource.
yamlapiVersion: v1 kind: PersistentVolumeClaim metadata: name: test-rwx spec: accessModes: - ReadWriteMany resources: requests: storage: 10Gi storageClassName: vultr-vfs-storage
In this example, the PVC resource
test-rwxis created with a capacity of 10Gi and access modeReadWriteMany. The storage classvultr-vfs-storageis used to provision the VFS volume.Apply the PVC manifest.
console$ kubectl apply -f pvc.yaml
Output:
persistentvolumeclaim/test-rwx createdList the PVC resource.
console$ kubectl get pvc test-rwx
The PVC resource
test-rwxshould be listed with the statusBound.Output:
NAME          STATUS   VOLUME                 CAPACITY   ACCESS MODES   STORAGECLASS        VOLUMEATTRIBUTESCLASS   AGE
test-rwx      Bound    pvc-604cf0c549ad41e3   10Gi       RWX            vultr-vfs-storage   <unset>                 10m
Troubleshooting
If you are unable to reproduce the same behaviour as noted above, you can try troubleshooting to get more information.
Describe the PVC resource.
console$ kubectl describe pvc test-rwx
You can review the events for any issues related to provisioning of the VFS volume.
List all storage classes.
console$ kubectl get storageclass
The list must contain
vultr-vfs-storagein order to provision a VFS volume.Ensure sufficient quota allocation.
Monitor cluster events for storage issues.
Conclusion
In this guide, you learned about the different persistent storage types and classes available globally on Vultr, including both Vultr Block Storage (VBS) and Vultr File System (VFS). You provisioned an HDD block storage volume and also explored how to expand the storage of an existing volume attached to a Kubernetes cluster.