How to Securely Connect to Redis® with TLS/SSL in Go, NodeJS, PHP, Python, and redis-cli

Introduction
Vultr Managed Database for Caching requires TLS/SSL connections in your source code or CLI. This article has code samples demonstrating how to connect securely with TLS/SSL with redis-cli and popular programming languages.
How to Find your TLS/SSL Connection URL
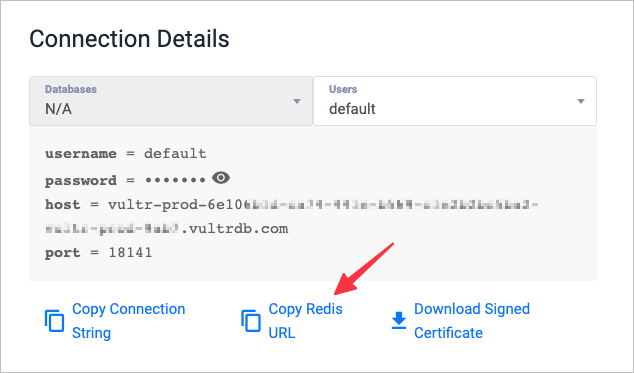
To locate your Redis® connection URL, navigate to the Overview section of your Vultr Managed Database for Caching, then click Copy Redis® URL, which places it on your clipboard.

The URL is assembled from the username, password, host, and port values.
All the code in this article uses this example URL, which you should replace with your real one:
rediss://USERNAME:YOUR_PASSWORD@YOUR_HOST:PORT_NUMBER
Important: Note the double ss in the protocol, rediss://, which shows that the connection uses TLS/SSL encryption.
Connect with Go
First, get the go-redis/redis library.
$ go get github.com/go-redis/redis/v8Next, open a file named main.go and paste the following. Replace the example Redis® URL with yours.
package main

import (
    "context"
    "fmt"

    "github.com/go-redis/redis/v8"
)

var ctx = context.Background()

func main() {
    redisURL := "rediss://USERNAME:YOUR_PASSWORD@YOUR_HOST:PORT_NUMBER"

    addr, err := redis.ParseURL(redisURL)
    if err != nil {
        panic(err)
    }

    rdb := redis.NewClient(addr)

    err = rdb.Set(ctx, "key", "Hello Vultr!", 0).Err()
    if err != nil {
        panic(err)
    }

    val, err := rdb.Get(ctx, "key").Result()
    if err != nil {
        panic(err)
    }
    fmt.Println("Value is:", val)
}
This creates a key named key, with the value Hello Vultr!. Then, it retrieves the key and prints its value.
To run this example:
$ go run main.goConnect with NodeJS
First, install the ioredis library.
$ npm install --save ioredisNext, open a file named index.php and paste the following. Replace the example Redis® URL with yours.
const Redis = require("ioredis");
const redisUrl = "rediss://USERNAME:YOUR_PASSWORD@YOUR_HOST:PORT_NUMBER"
const redis = new Redis(redisUrl);

redis.set("key", "Hello Vultr!");

redis.get("key").then(function (result) {
    console.log(`Value is: ${result}`);
    redis.disconnect();
});
This creates a key named key, with the value Hello Vultr!. Then, it retrieves the key and prints its value.
To run this example:
$ node index.jsConnect with PHP
First, install the predis library.
$ composer require predis/predisNext, open a file named index.php and paste the following. Replace the example Redis® URL with yours.
<?php

require 'vendor/autoload.php';
Predis\Autoloader::register();

$redis_url = 'rediss://USERNAME:YOUR_PASSWORD@YOUR_HOST:PORT_NUMBER';

$client = new Predis\Client($redis_url);

$client->set('key', 'Hello Vultr!');
$value = $client->get('key');

echo "Value is: {$value}";
This creates a key named key, with the value Hello Vultr!. Then, it retrieves the key and prints its value.
To run this example:
$ php index.phpConnect with Python
First, install the redis-py library.
$ pip install redisNext, open a file named main.py and paste the following. Replace the example Redis® URL with yours.
import redis

def main():
    redis_url = 'rediss://USERNAME:YOUR_PASSWORD@YOUR_HOST:PORT_NUMBER'
    redis_client = redis.from_url(redis_url)

    redis_client.set('key', 'Hello Vultr!')
    key = redis_client.get('key').decode('utf-8')

    print('Value is:', key)

if __name__ == '__main__':
    main()
This creates a key named key, with the value Hello Vultr!. Then, it retrieves the key and prints its value.
To run this example:
$ python main.pyConnect with redis-cli
First, you'll need to have redis-cli installed.
- Option 1: Install
redis-clias part of the Redis® package for your operating system. - Option 2: Install the NodeJS standalone version of
redis-cli.
Next, execute the following from a terminal window. Replace the example Redis® URL with yours.
$ redis-cli -u rediss://USERNAME:YOUR_PASSWORD@YOUR_HOST:PORT_NUMBERTo check the connection, run the INFO command, which returns all the Redis® parameters.
INFOMore Information
These are only a few of the launguages and clients available for Redis® that support TLS/SSL. You'll find even more in the official documentation.