
How to Set Up Argo CD on Kubernetes
Argo CD is a Kubernetes-native declarative GitOps tool for deploying large-scale applications on Kubernetes. It is lightweight, handy, and user-focused compared to other continuous delivery tools. In addition, it can pull application code directly from a Git repository and deploy it to a Kubernetes cluster. It supports different configuration management options, such as YAML, Kustomize, Jsonnet, Helm, and so on. Argo CD has a built-in web UI where you can monitor synchronizations and the application's state.
In this article, you will install Argo CD on your Kubernetes cluster, access its web UI, and deploy applications using Argo CD UI and Argo CD CLI.
Prerequisites
Before you start, you need to:
- Have access to a Kubernetes cluster with at least three nodes.
- Have access to a Linux-based local or remote instance to test the Argo CD CLI tool.
- Install and configure the
kubectlCLI on your local machine. - Install the Helm client on your local machine.
- A domain name to use with your Argo CD installation. For example,
argo.example.com.
Install Argo CD
Create a namespace for Argo CD.
console$ kubectl create namespace argocd
In your home directory, create a new directory for Argo CD.
console$ mkdir ~/argocd
Navigate to the
argocddirectory.console$ cd ~/argocd
Clone the Argo CD Helm repository.
console$ git clone https://github.com/argoproj/argo-helm.git
Navigate to the
argo-cddirectory of this repository.console$ cd argo-helm/charts/argo-cd/
Update Helm dependencies.
console$ helm dependency up
Using Helm, install Argo CD in the
argocdnamespace.console$ helm install argocd . -f values.yaml -n argocd
When successful, you get an output with metadata about your installation.
NAME: argocd
LAST DEPLOYED: Sun Jun 11 18:13:17 2023
NAMESPACE: argocd
STATUS: deployed
...
Verify that Argo CD is deployed to the
argocdnamespace.console$ kubectl get pods -n argocd
The output should display a list of pods with names starting with
argocd-, representing the various ArgoCD components.Use the following command to get information about all running services and ports.
console$ kubectl get services -n argocd
Output:
NAME                               TYPE        CLUSTER-IP       EXTERNAL-IP   PORT(S)             AGE
...
argocd-server                      ClusterIP   10.101.247.167   <none>        80/TCP,443/TCP      53s
The
argocd-serverservice serves the Argo CD UI.
Access the Argo CD UI
At this point, Argo CD is installed and running. However, the Argo CD UI is not accessible outside the Kubernetes cluster. You can use port forwarding to expose the argocd-server service port to a port on your localhost. This way, you can access Argo CD without exposing the service to the external network.
Extract the default
adminaccount password stored in a secret namedargocd-initial-admin-secret.console$ kubectl get secrets -n argocd argocd-initial-admin-secret -o yaml
The encrypted password should display in your output as below.
apiVersion: v1
data:
  password: TU1DaWRNQVJXNWJ3S1FBNA==
kind: Secret
...
In the above output,
TU1DaWRNQVJXNWJ3S1FBNA==is the admin account password. Copy the encrypted password to your clipboard for decoding.Decode the password.
console$ echo TU1DaWRNQVJXNWJ3S1FBNA== | base64 --decode
Copy the output.
Using kubectl, forward the port
443of theargocd-serverservice to port8080of your localhost.console$ kubectl port-forward svc/argocd-server -n argocd 8080:443
Your output should look like the one below.
Forwarding from 127.0.0.1:8080 -> 8080
Forwarding from [::1]:8080 -> 8080
This command will occupy your current terminal session.
Open the URL
http://127.0.0.1:8080on a web browser on your local machine to access the Argo CD UI.http://127.0.0.1:8080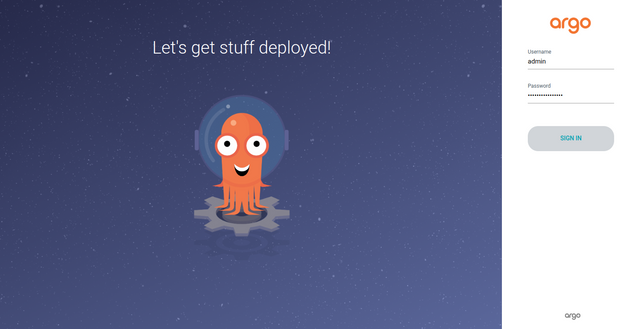
Enter
adminas the username, paste the password you decoded earlier, and click the Sign In button.You are redirected to the Argo CD dashboard if the credentials are correct.
Ctrl + C on your terminal to end the port forward command.
Optional: Access Argo CD using the CLI Tool
Argo CD also offers a CLI tool that lets you deploy the application and enables other tasks, including syncing, refreshing, and pausing the Argo CD application as described in this section. Keeping the port forward command from the last section active in one terminal, open a new terminal and follow the below steps:
Using the
wgetutility, download the latest Argo CD CLI tool.console$ wget https://github.com/argoproj/argo-cd/releases/download/v2.7.4/argocd-linux-amd64
This command installs the version
2.7.4. You can get the latest version from theAssetssection of the official GitHub repository page.Move the downloaded binary to the system-wide directory
/usr/local/bin/that stores executable binaries.console$ sudo mv argocd-linux-amd64 /usr/local/bin/argocd
Grant execute permissions on the Argo CD binary.
console$ sudo chmod +x /usr/local/bin/argocd
Use the
argocd logincommand to log in to the Argo CD server.console$ argocd login localhost:8080
Accept the server certificate, then enter the username
adminand the decoded password, as shown below.WARNING: server certificate had error: x509: certificate signed by unknown authority. Proceed insecurely (y/n)? y Username: admin Password:When logged in, your output should look like the one below.
'admin:login' logged in successfully
Context 'localhost:8080' updated
To tighten server security, change the default password of your Argo CD installation.
console$ argocd account update-password
It prompts you to enter your existing password, a new strong password, and confirm the new password.
Deploy Argo CD Applications
You can create and deploy Argo CD applications in multiple ways — using YAML files, the Argo CD UI, or the Argo CD CLI. In this section, you'll deploy two Argo CD applications to your cluster, one using a YAML file and the other via the Argo CD UI.
Creating and Deploying an Application Using YAML Manifest File
Create a YAML file for your application.
console$ nano argocd-app.yaml
Add the following configuration.
yamlapiVersion: argoproj.io/v1alpha1 kind: Application metadata: name: argo-application namespace: argocd spec: project: default source: repoURL: https://gitlab.com/jasmine.harit/argocd-app-config.git targetRevision: HEAD path: dev destination: server: https://kubernetes.default.svc namespace: myapp syncPolicy: syncOptions: - CreateNamespace=true automated: selfHeal: true prune: true
Save and close the file
Apply the YAML configuration.
console$ kubectl apply -f argocd-app.yaml
Verify the deployment status of the application.
console$ kubectl get app -n argocd
Output:
NAME               SYNC STATUS   HEALTH STATUS
argo-application   Synced        Healthy
You can also verify the deployment using the Argo CD CLI tool.
console$ argocd app list
Output:
NAME                     CLUSTER                         NAMESPACE  PROJECT  STATUS  HEALTH   SYNCPOLICY  CONDITIONS       REPO                                                    PATH  TARGET
argocd/argo-application  https://kubernetes.default.svc  myapp      default  Synced  Healthy  Auto-Prune  <none>      https://gitlab.com/jasmine.harit/argocd-app-config.git  dev   HEAD
To get detailed information on your application, run the following command.
console$ argocd app get argo-application
Output:
Name:               argocd/argo-application
Project:            default
Server:             https://kubernetes.default.svc
Namespace:          myapp
URL:                https://localhost:8080/applications/argo-application
Repo:               https://gitlab.com/jasmine.harit/argocd-app-config.git
Target:             HEAD
Path:               dev
SyncWindow:         Sync Allowed
Sync Policy:        Automated (Prune)
Sync Status:        Synced to HEAD (9c92bf8)
Health Status:      Healthy

GROUP  KIND        NAMESPACE  NAME           STATUS   HEALTH   HOOK  MESSAGE
       Namespace              myapp          Running  Synced         namespace/myapp created
       Service     myapp      myapp-service  Synced   Healthy        service/myapp-service created
apps   Deployment  myapp      myapp1         Synced   Healthy        deployment.apps/myapp1 created
In your web browser session, refresh the dashboard to view the deployed Argo CD application as below.
http://127.0.0.1:8080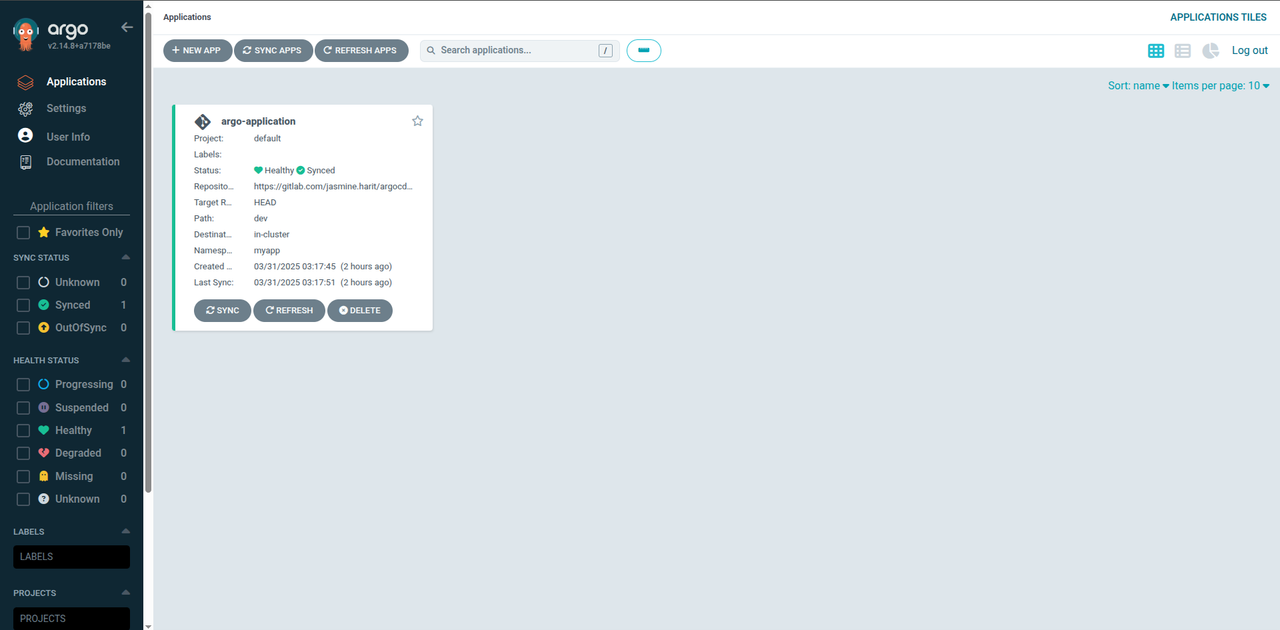
Create and Deploy Applications using the Argo CD Dashboard and CLI Tool
Load the Argo CD UI dashboard. Click the NEW APP to view the Application configuration screen.
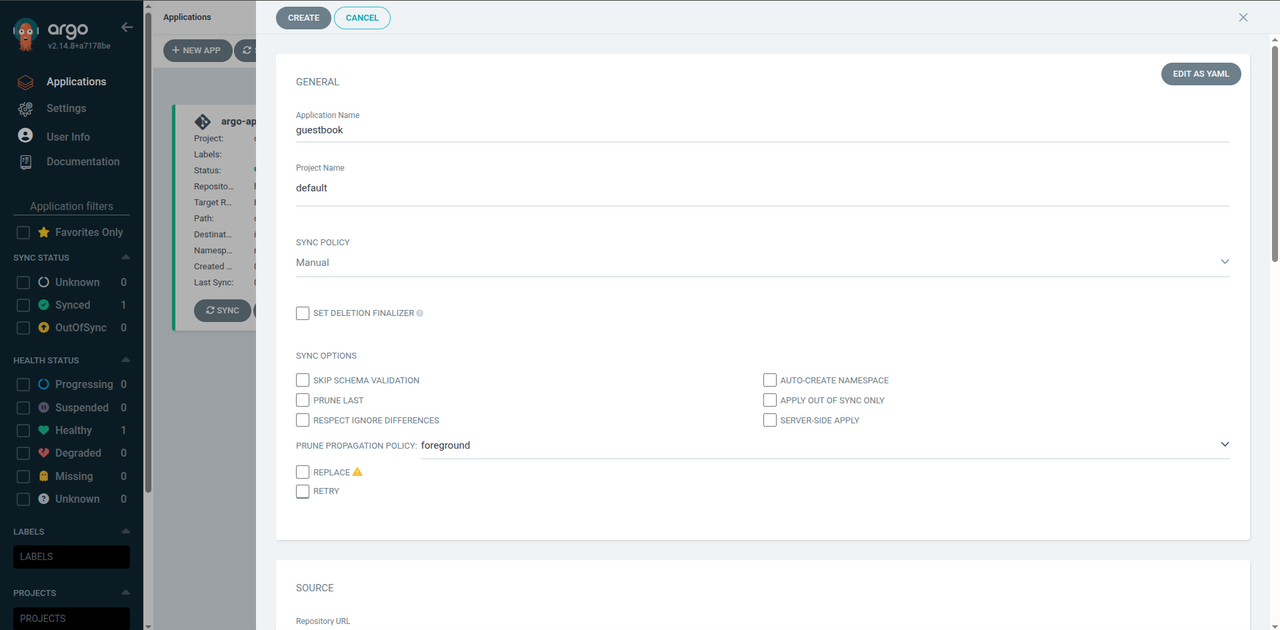
- In the GENERAL section, define your application name, project, and sync policy.
- Within the SOURCE section, enter the application repository's path, revision, and URL. For instance, you can use the argocd-example-apps repository as the Source and choose any of its applications in the Path option, such as the helm-guestbook application.
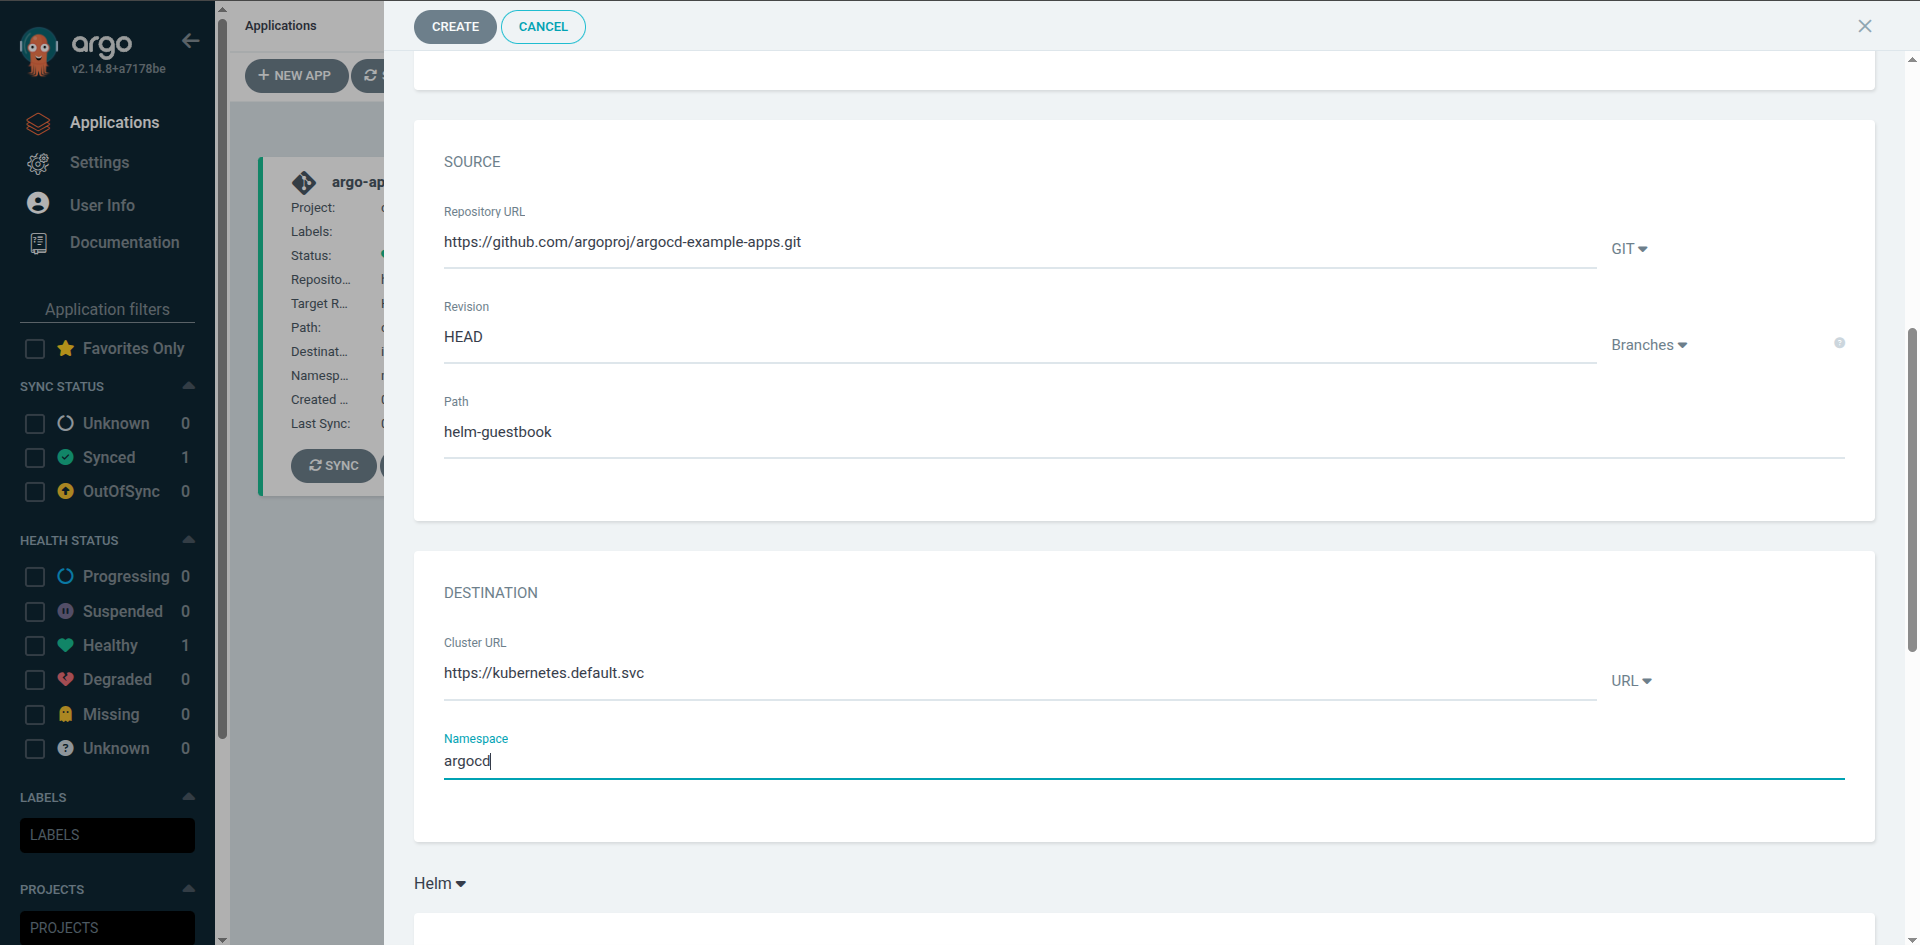
- In the DESTINATION section, enter your cluster URL and namespace.
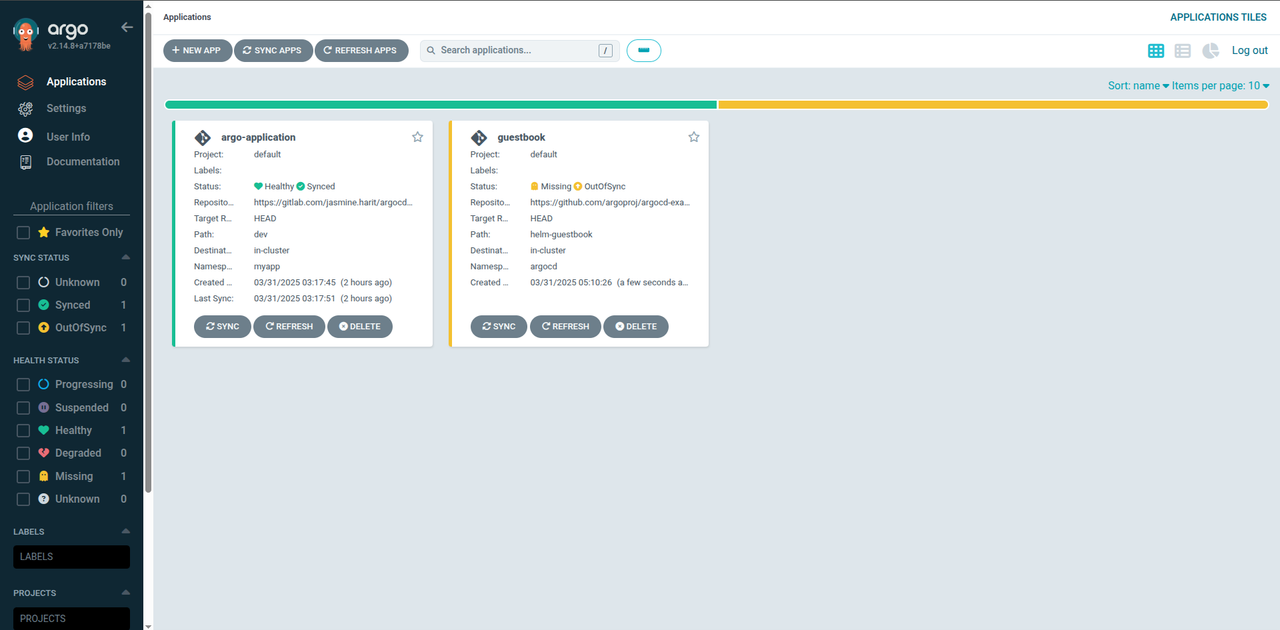
- Click CREATE to deploy the application. When the application deployment finishes, the following screen should display.
Using the Argo CD CLI, run the following command to check the status of your deployed application.
console$ argocd app get guestbook
Output:
Name:               argocd/guestbook
Project:            default
Server:             https://kubernetes.default.svc
Namespace:          argocd
URL:                https://argocd.example.com/applications/guestbook
Repo:               https://github.com/argoproj/argocd-example-apps.git
Target:             HEAD
Path:               helm-guestbook
SyncWindow:         Sync Allowed
Sync Policy:        <none>
Sync Status:        OutOfSync from HEAD (4773b9f)
Health Status:      Missing

GROUP  KIND        NAMESPACE  NAME                      STATUS     HEALTH   HOOK  MESSAGE
       Service     argocd     guestbook-helm-guestbook  OutOfSync  Missing
apps   Deployment  argocd     guestbook-helm-guestbook  OutOfSync  Missing
As displayed in the above output, the application is deployed but the status is
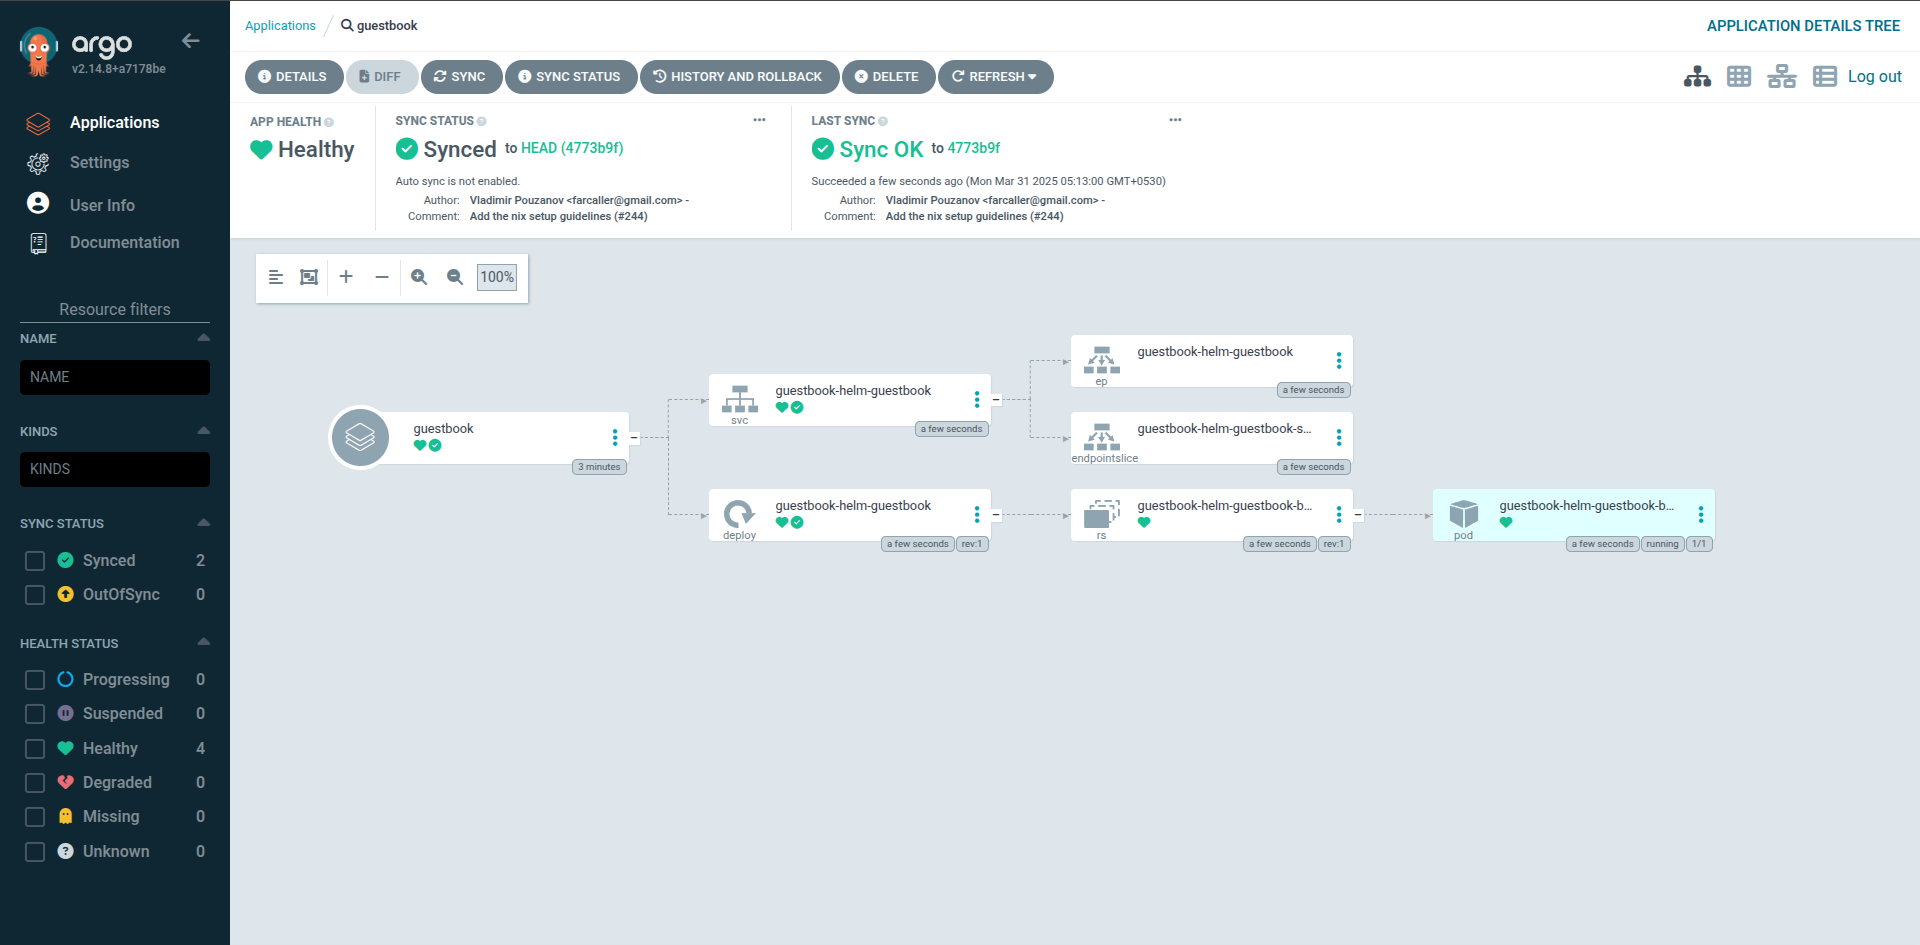
OutofSync. To sync it, run the following command.console$ argocd app sync guestbook
The above command fetches the necessary manifests from the application repository and uses
kubectlto configure it.On the Argo CD web dashboard, verify the health status of your application.
Click the application to view more information about it.
Secure Argo CD with TLS Encryption
This section covers the steps to expose your Argo CD server using Nginx Ingress controller, terminated using TLS encryption.
Install Nginx Ingress controller on your cluster.
console$ helm install my-ingress-nginx ingress-nginx \ --repo https://kubernetes.github.io/ingress-nginx \ --namespace ingress-nginx --create-namespace
This command installs the Nginx Ingress controller in a new Namespace
ingress-nginxand names its resources starting withmy-ingress-nginx-.Check the Ingress Services to get the Load balancer IP address.
console$ kubectl get services -n ingress-nginx
Output:
NAME                                    TYPE           CLUSTER-IP     EXTERNAL-IP    PORT(S)                      AGE
my-ingress-nginx-controller             LoadBalancer   10.97.77.219   192.0.2.10     80:31808/TCP,443:30834/TCP   5m50s
my-ingress-nginx-controller-admission   ClusterIP      10.108.64.48   <none>         443/TCP                      5m50s
Take note of the
EXTERNAL-IPvalue of themy-ingress-nginx-controllerservice, and create a domain A DNS record for your domain, such asargo.example.com.The serviceNotemy-ingress-nginx-controllermay take some time to get itsEXTERNAL-IPvalue. Until it gets it, its value is displayed as<pending>. Give it some time to get its value.Install cert-manager.
console$ kubectl apply -f https://github.com/cert-manager/cert-manager/releases/download/v1.17.2/cert-manager.yaml
This command installs the
v1.17.2version of cert-manager on your cluster incert-managernamespace. You can get the latest version of cert-manager from its official releases page.Create a manifest file to provision an Issuer resource.
console$ nano issuer.yaml
Add the following content to the file.
yamlapiVersion: cert-manager.io/v1 kind: Issuer metadata: name: tls-certificate-issuer namespace: default spec: acme: server: https://acme-v02.api.letsencrypt.org/directory email: admin@example.com privateKeySecretRef: name: letsencrypt-private-key solvers: - http01: ingress: class: nginx
Replace
admin@example.comwith your email address. Otherwise the Issuer will not work.Save and exit the file.
Create a manifest file to provision the Ingress resource for the
argocd-serverservice.console$ nano ingress.yaml
Add the following content to the file.
yamlapiVersion: networking.k8s.io/v1 kind: Ingress metadata: name: ingress-argocd namespace: argocd annotations: cert-manager.io/issuer: tls-certificate-issuer spec: ingressClassName: nginx rules: - host: argo.example.com http: paths: - pathType: Prefix path: "/" backend: service: name: argocd-server port: number: 80 tls: - hosts: - argo.example.com secretName: argocd-tls
Save and exit the file.
Check the tls certificate.
console$ kubectl get certificate -n argocd
Output:
NAME         READY   SECRET       AGE
argocd-tls   False   argocd-tls   5m43s
After sometime, the status of the certificate changes to
True.Verify the configuration by visiting your domain name
https://argo.example.comin a web browser.
Conclusion
You have installed Argo CD on a Kubernetes cluster and explored how to deploy applications using the Argo CD UI, Argo CD CLI, and using YAML configuration files. For more information about Argo CD, please visit the official documentation.