
How to Stash Changes in Git
Git stash lets you temporarily store uncommitted changes in your working directory. This is useful when you need to switch tasks or branches without committing incomplete work. When you run git stash, Git saves your staged and unstaged changes to a stack and removes them from your working copy so you can apply them later.
This article explains how to use git stash to save your progress, apply or drop stashes, include untracked files, and manage multiple stashed changes effectively.
Git Stash vs Git Commit
| Feature | Git Stash | Git Commit |
|---|---|---|
| Purpose | Temporarily saves changes without committing | Permanently records changes in the repository |
| Usage Scenario | When switching tasks or branches mid-work | When a change is complete and ready to be saved |
| Affects History | No | Yes - adds to project history |
| Includes Untracked Files | Optional (with flags like --include-untracked) |
Yes, if added with git add |
| Recovery | Can apply or drop later | Can revert or reset, but part of history |
| Typical Command | git stash |
git commit -m "message" |
The Short Answer Version
# Stash all changes (staged and unstaged)
$ git stash
# Stash changes with a custom message
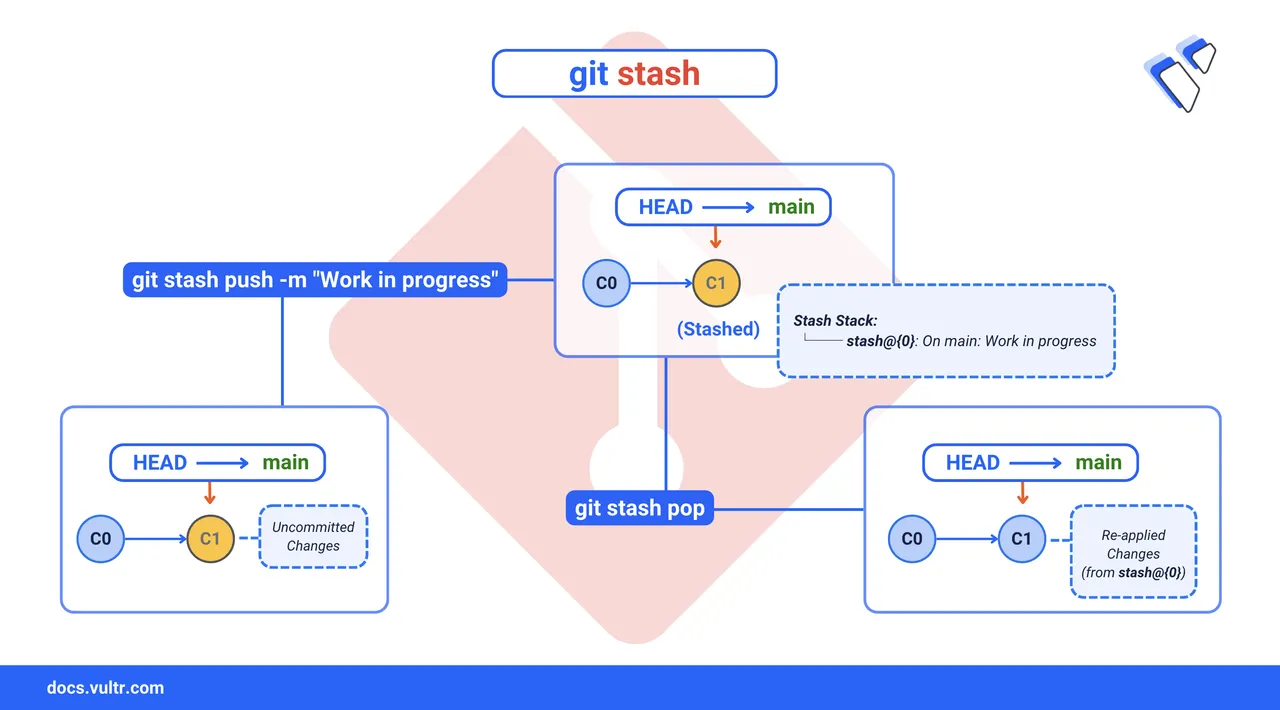
$ git stash push -m "Work in progress"
# List all stashes
$ git stash list
# Apply the most recent stash from the stack and remove it
$ git stash pop
# Drop a specific stash
$ git stash drop stash@{1}
# Clear all stashes
$ git stash clearCommand Syntax
git stash [OPTIONS]Where:
[OPTIONS]: These control how the stash command works. Options are explained in the sections below.save: This command saves your local changes (staged and unstaged) to the stash stack.pop: Applies the most recent stash and removes it from the stash stack.apply: Applies the most recent stash without removing it from the stack.list: Lists all the stashes saved in your repository.show: Shows the details of the most recent stash or a specific stash.drop: Deletes a specific stash from the list.
Git Stash Common Commands
Stash all changes (staged and unstaged).
console$ git stash
Saves all uncommitted changes and restores your working directory to the last commit.
Stash with a message.
console$ git stash push -m "message"
Saves your changes along with a descriptive message for identification later.
Include untracked files.
console$ git stash -u
Stashes both tracked and untracked files.
List all stashes.
console$ git stash list
Displays all the stashes saved in your working directory, with identifiers like stash@{0}.
Show the changes in the latest stash.
console$ git stash show
Displays a summary of the changes in the most recent stash.
Show the full diff of the latest stash.
console$ git stash show -p
Displays a detailed diff of the changes in the most recent stash.
Apply the most recent stash.
console$ git stash apply
Restores the changes from the most recent stash but keeps it in the stash list.
Apply and remove the most recent stash.
console$ git stash pop
Applies the most recent stash and removes it from the stash list.
Create a new branch from a stash.
console$ git stash branch <branch-name>
Creates a new branch, applies the stash, and removes it if successful.
Explanation of Flags
-uor--include-untracked: This flag allows you to stash untracked files in addition to changes to tracked files.-m: This option lets you add a custom message when saving a stash, making it easier to identify later.-p: Enables interactive mode, allowing you to choose specific changes (hunks) to stash. This is ideal when your working directory contains unrelated edits and you only want to stash a subset.
Manage Multiple Stashes
When working on multiple tasks or features, you may stash changes several times before returning to them. Git saves these entries in a stack-like structure, each assigned a unique reference in the format stash@{n}, where n is the index starting at 0 (most recent first). This section explains how to identify, apply, and remove specific stashes to streamline your workflow.
Command Usage
To view all saved stashes in your repository, run.
console$ git stash list
Displays all stashes, showing each stash's reference, description, and the branch where the stash was created.
To restore changes from a specific stash without removing it from the stack.
console$ git stash apply stash@{n}
This command applies the changes from
stash@{n}wherenis the stash number but retains it in your stash list for potential reuse or inspection.To drop a specific stash.
console$ git stash drop stash@{n}
Removes a specific stash from the stash list.
To permanently delete all stashed entries.
console$ git stash clear
This command removes all the stashes from the stash list.
Warninggit stash clearpermanently deletes all stash entries and cannot be undone. Always double-check your stash list before clearing.
Command Demonstration
Follow this workflow to create, apply, and clean up multiple stashes:
Modify multiple files in your working directory.
console$ echo "<h1>Header</h1>" > index.html $ echo "console.log('Debug');" > app.js
Stash the current changes with a description.
console$ git stash push -m "UI update: Header and debug script"
Output:
Saved working directory and index state On main: UI update: Header and debug scriptMake more changes and stash again.
console$ echo "<footer>Footer</footer>" >> index.html $ git stash push -m "Added footer component"
Output:
Saved working directory and index state On main: Added footer componentList all stashes to review saved changes.
console$ git stash list
Output:
stash@{0}: On main: Added footer component
stash@{1}: On main: UI update: Header and debug script
Apply the second stash (older one) without removing it.
console$ git stash apply stash@{1}
Output:
On branch main
Changes not staged for commit:
  (use "git add <file>..." to update what will be committed)
  (use "git restore <file>..." to discard changes in working directory)
        modified:   app.js
        modified:   index.html
The stash is applied, but remains in the stash list.
Manually remove the applied stash when no longer needed.
console$ git stash drop stash@{1}
Output:
Dropped stash@{1} (0b08178cfade68....)
Clean Your Stash
As you work on multiple tasks or features, your stash list can grow with changes you've saved for later. To avoid confusion and keep your development workflow organized, Git provides commands to drop individual stashes or clear the entire stash stack. This section explains how to clean up your stash history and demonstrates a safe, practical cleanup workflow.
Command Usage
To remove a specific stash.
console$ git stash drop stash@{n}
This above command removes the stash entry at the specified index
stash@{n}without affecting others.To remove the most recent stash (top of the stack).
console$ git stash drop
Omitting the index defaults to
stash@{0}.To remove all stashes from the stash list.
console$ git stash clear
Warninggit stash clearpermanently deletes all stash entries and cannot be undone. Always verify your list before clearing.
Command Demonstration
Follow this example to apply, commit, and clean up stash entries effectively:
List all the available stash entries.
console$ git stash list
Your output should be similar to the one below:
stash@{0}: On main: Recent component styling
stash@{1}: On main: API endpoint integration
stash@{2}: On dashboard-feature: Error handling fix
Apply and remove the third stash (older entry).
console$ git stash pop stash@{2}
This above command apply the
stash@{2}on index2and removes it from the stash list.Commit the Restored Changes.
console$ git commit -am "Fix error handling in authentication flow"
Delete another stash that's no longer needed.
console$ git stash drop stash@{1}
When you drop a stash, the remaining stashes are renumbered. For example, if you deleteNotestash@{1}, thenstash@{2}becomes the newstash@{1}.Remove all the stashes from the stash list.
console$ git stash clear
Stash Untracked or Ignored Files
By default, git stash only saves changes to tracked files. If you want to preserve new or ignored files as well, use the appropriate flags to include them in the stash.
Use the
-u(or--include-untracked) flag to stash both tracked changes and untracked files.console$ git stash push -u
Saves all changes, including files not yet staged or committed.
To stash everything, including files listed in
.gitignore, use the-a(or--all) flag.console$ git stash push -a
This will stash build artifacts, dependencies, and other ignored files. Use with caution.WarningTo inspect a stash that includes untracked content, use.
console$ git stash show -p -u stash@{0}
Displays the full patch, including untracked files stored in the specified stash.
Command Demonstration
Follow this example to stash and restore tracked and untracked files.
Check your status in the working directory.
console$ git status
Your output should be similar to the one below:
On branch main
Changes not staged for commit:
        ......
        modified:   user-profile.html
Untracked files:
        ......
        login-validation.js
Stash all changes, including untracked files.
console$ git stash push -u -m "WIP: Auth validation script"
Verify your working directory is clean.
console$ git status
Output:
On branch main
nothing to commit, working tree clean
Restore the changes from stash.
console$ git stash pop
Your output should be similar to the one below:
On branch main
Changes not staged for commit:
        ......
        modified:   user-profile.html

Untracked files:
    ......
        login-validation.js
Dropped refs/stash@{0} (17251bf54e3861fe6233d9450740f253ced4ac80)
With these flags, and by following the steps above, you can stash your full working state — including files Git doesn't track — and restore it later without losing any progress.
Conclusion
In this article, you learned how to use git stash to save uncommitted changes, manage multiple stashes, include untracked or ignored files, and resolve common stash-related issues. Whether you're switching tasks, cleaning your working directory, or pausing work in progress, stashing helps you stay organized without committing incomplete code.