
How to Use the SCP Command in Linux

Introduction
scp stands for Secure Copy Protocol. The scp command in Linux lets you securely transfer files between hosts using an encrypted SSH (Secure Shell) connection. Unlike regular copy commands such as cp, scp also ensures data integrity during transfers.
This article explains how to use the scp command to effectively transfer files and directories in Linux.
Prerequisites
Before you begin:
- Deploy two Ubuntu 24.04 instances on Vultr and enable the
limited user loginoption to use as yourlocalandremoteworkstations respectively. - Access both instances using SSH.
- Update the instances.
The scp Command Syntax
The following is a basic scp command syntax:
scp [options] [source] [destination]In the above scp command:
[options]: Accepts optional flags to modify the command's behavior[source]: Specifies the file or directory to copy.[destination]: Sets the target location where you want to place the files.
Use Most Common scp Command Options
The following are the most common scp command options:
| Option | Description |
|---|---|
-P |
Specifies the port to connect on the remote host. |
-p |
Preserves the original file's modification times, access times, and modes. |
-r |
Recursively copies entire directories. |
-q |
Quiet mode; suppresses non-error messages. |
-C |
Enables compression. |
-l |
Limits the bandwidth used during the transfer. |
-v |
Verbose mode; displays detailed debugging messages. |
-i |
Sets the private key location to use with a public key for authentication |
Create Sample Directories and Files
Follow the steps below to create sample directories and files to test the scp command in Linux.
Create three sample
.txtfiles on your local server.console$ touch file1.txt file2.txt file3.txt
Create a sample
dirdirectory on your local server.console$ mkdir dir
Create three sample
.txtfiles on the remote server.console$ touch file4.txt file5.txt file6.txt
Create
dir1anddir2sample directories on the remote server.console$ mkdir dir1 dir2
Transfer Files and Directories Using SCP
Follow the steps below to transfer files and directories using the scp command in Linux.
Copy the
file1.txtfile from your local server to the remote server.console$ scp file1.txt linuxuser2@remote_server:/home/linuxuser2
The above command securely copies
file1.txtfrom your local server to the remote server user's home directory. By default, the SCP command copies files to the user's home directory unless you specify another directory.Output:
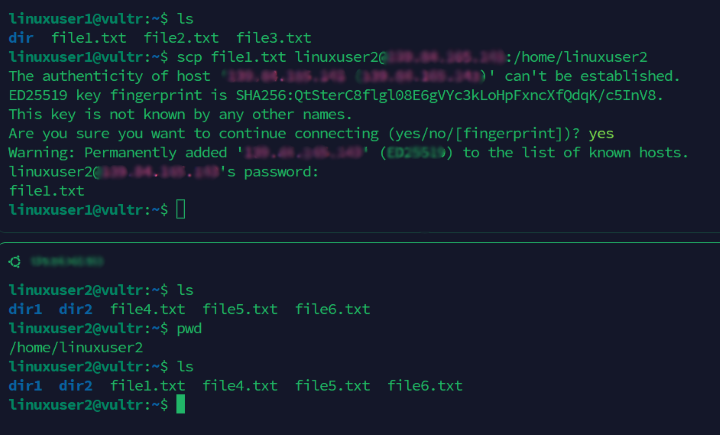
Enter
yesto accept the remote server's fingerprint key when prompted.Copy
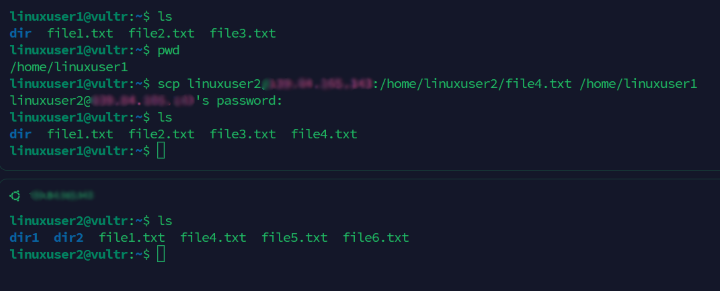
file4.txtfrom the remote server to your local server.console$ scp linuxuser2@remote_server:/home/linuxuser2/file4.txt /home/linuxuser1/
Output:
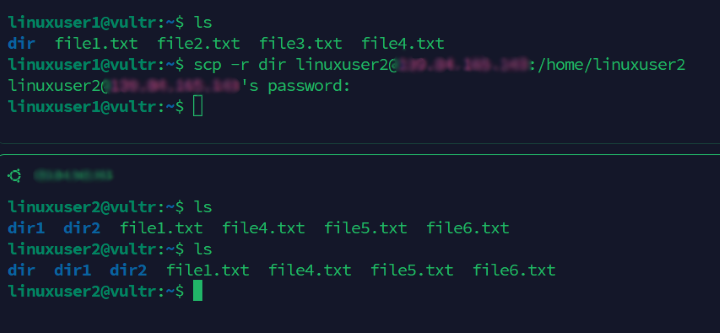
Copy the
dirdirectory from the local server to the remote server using the recursive-roption.console$ scp -r dir linuxuser2@remote_server:/home/linuxuser2/
The above command uses the
-roption to recursively copy thedirdirectory from the local server to thelinuxuser2home directory on your remote server including all files and subdirectories.Output:
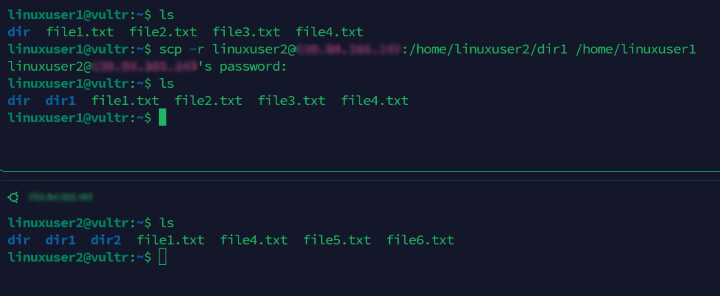
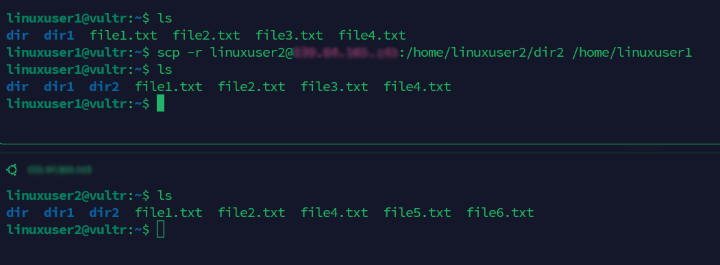
Copy the
dir1directory from the remote server to your local server user's home directory.console$ scp -r linuxuser2@remote_server:/home/linuxuser2/dir1 /home/linuxuser1/
Output:
You can explore the find command in Linux to quickly locate files on your system.
Enable Passwordless Authentication Using an SSH Key
The SCP command uses password authentication by default to copy and transfer files. SSH key-based authentication enables passwordless authentication when transferring files using the SCP command. Follow the steps below to generate a new SSH key to use with the SCP command.
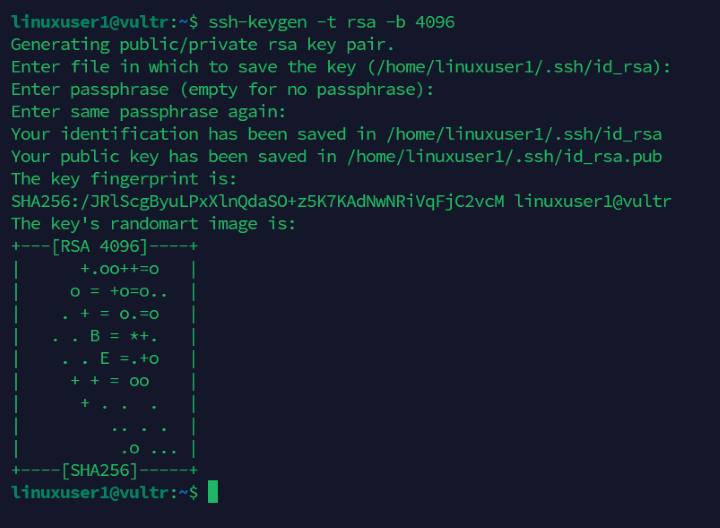
Generate a new SSH key pair on your local server.
console$ ssh-keygen -t rsa -b 4096
Press Enter to accept the default private key file location and set an optional passphrase when prompted.
Output:
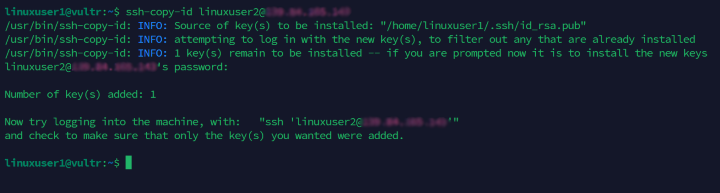
Copy your public key to the remote server.
console$ ssh-copy-id linuxuser2@remote_server
Enter your remote user password when prompted to copy the public key.
Output:
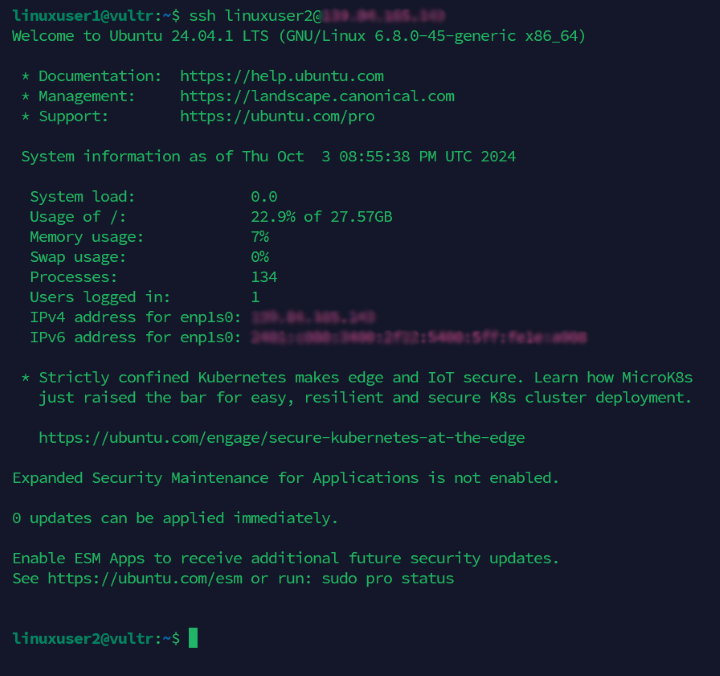
Access the remote server using SSH and verify that you're not prompted to enter a password.
console$ ssh linuxuser2@remote_server
Output:
Transfer Files Using SCP with SSH Key Authentication
Follow the steps below to transfer files using the scp command with SSH key authentication.
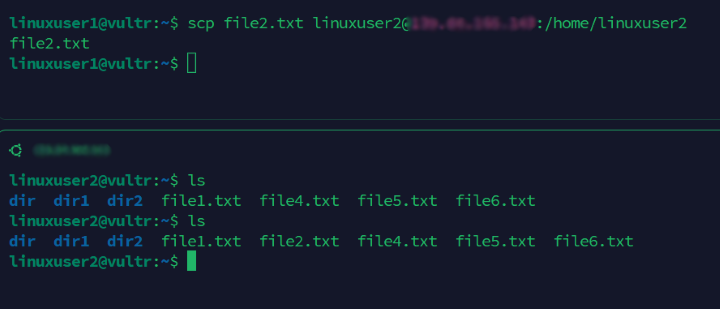
Copy
file2.txtfrom your local server to thedir2directory on the remote server.console$ scp file2.txt linuxuser2@remote_server:/home/linuxuser2/dir2/
The above command securely copies the
file2.txtfile from your local server todir2on the remote server.Output:
Copy the
dir2directory from the remote server to your local server.console$ scp -r linuxuser2@remote_server:/home/linuxuser2/dir2 /home/linuxuser1
Output:
Use the SCP Command in Linux with Advanced Options
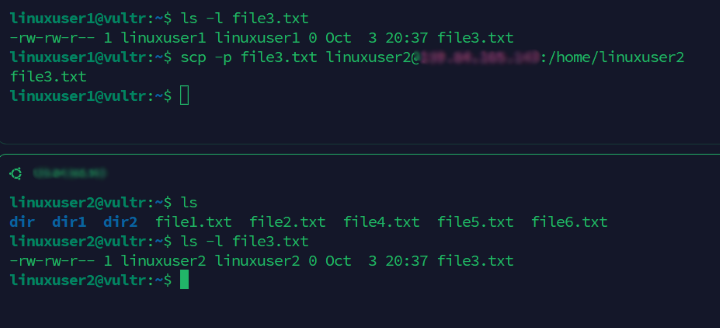
Copy
file3.txtto thedir2directory on the remote server and preserve the original file attributes using the-poption.console$ scp -p file3.txt linuxuser2@remote_server:/home/linuxuser2
The above command uses the
-poption to copyfile3.txtto thedir2directory while keeping the original file attributes including the original timestamps and file permissions.Output:
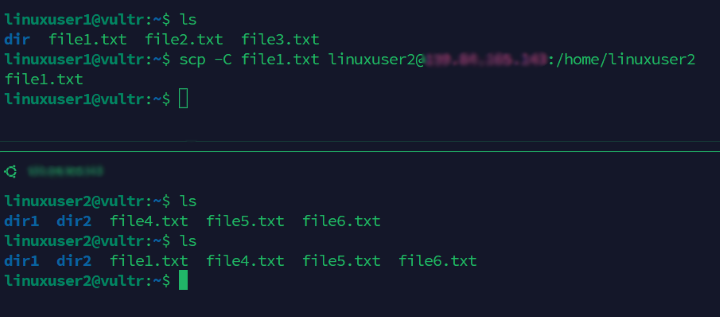
Copy
file1.txtto the remote server and enable compression using the-Coption.console$ scp -C file1.txt linuxuser2@remote_server:/home/linuxuser2/dir2/
The above command copies
file1.txtto thedir2directory and uses the-Coption to compress data during the transfer to speed up the process.Output:
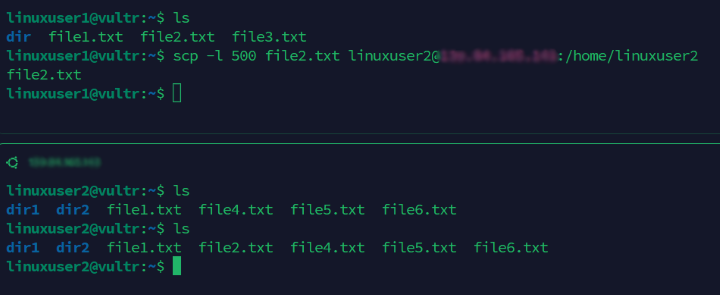
Copy
file2.txtand limit the bandwidth in kilobits per second (Kbps) using the-loption.console$ scp -l 500 file2.txt linuxuser2@remote_server:/home/linuxuser2
The above command uses the
-loption to limit the transfer speed to500Kbps and avoid overusing network resources while transferring the file to the remote server.Output:
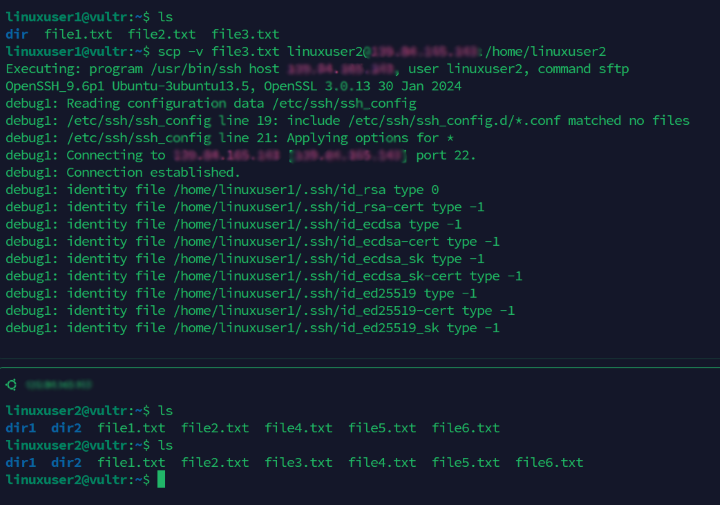
Display detailed debugging messages in verbose mode using the
-voption.console$ scp -v file3.txt linuxuser2@remote_server:/home/linuxuser2
Output:
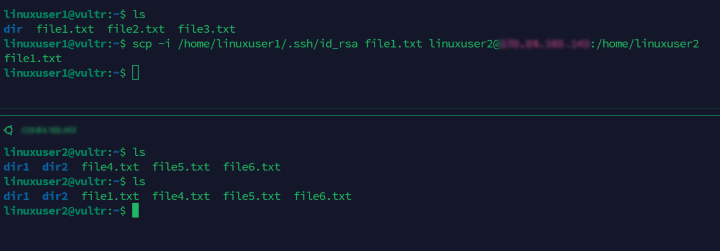
Specify a private key for authentication using the
-ioption. Replace/path/to/private_keywith your actual private key path.console$ scp -i /path/to/private_key file1.txt user@remote_server:/home/linuxuser2
The above command uses the
-ioption to specify a private key file for SSH authentication. This is useful when using multiple SSH keys and requires a specific key to establish a connection.Output:
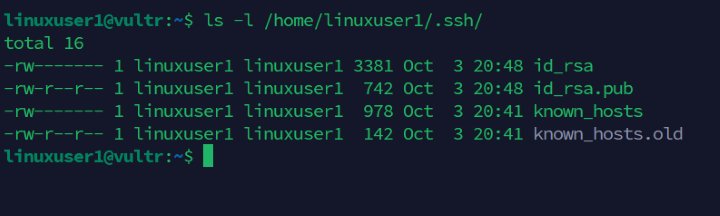
Run the following command in your user home directory to view the default SSH private key location.
console$ ls -l /.ssh/
Output:
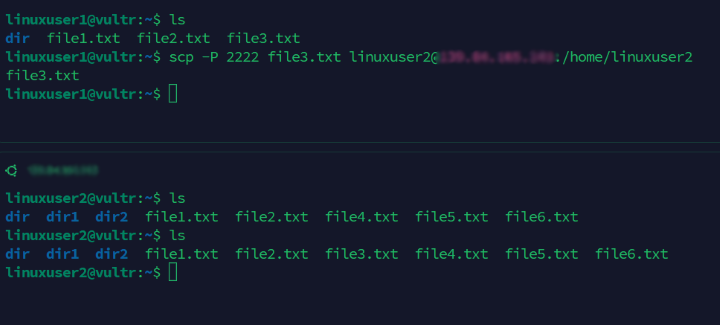
Copy
file3.txtto the/dir2remote server directory using a specific SSH port to transfer the files.console$ scp -P 22 file3.txt linuxuser2@remote_server:/home/linuxuser2
The above command uses the
-Poption to transfer files using the default SSH port22. This is important when the SSH daemon runs on a custom port on the remote server.Output:
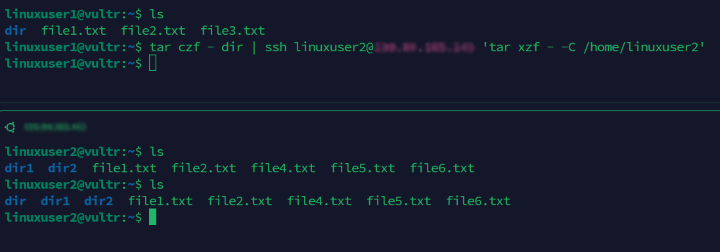
Transfer archived files using
tarand thescpcommands. For example, compress thedirdirectory and transfer the archived file to the remote server.console$ tar czf - dir | ssh linuxuser2@remote_server 'tar xzf - -C /home/linuxuser2/dir1'
The above command compresses the
dirdirectory and copies the data over SSH to the remote server. Thetar xzf - -Ccommand extracts the files into thedir1directory in the user home directory to enable advanced compression and efficient file transfers.Output:
Conclusion
You have used the scp command in Linux, its syntax, options, and practical examples. Additionally, you've set up SSH key-based authentication, allowing you to transfer files and directories more efficiently without a password. The scp command allows you to securely and efficiently transfer files between hosts by combining various command options in Linux.