Introduction
The Vultr Load Balancer is a fully-managed solution to distribute traffic across multiple back-end servers. In this guide, you'll learn how to distribute web traffic to multiple webservers via their private network interface.
If you are new to Vultr Load Balancers, we recommend reading the Load Balancer Quickstart Guide first.
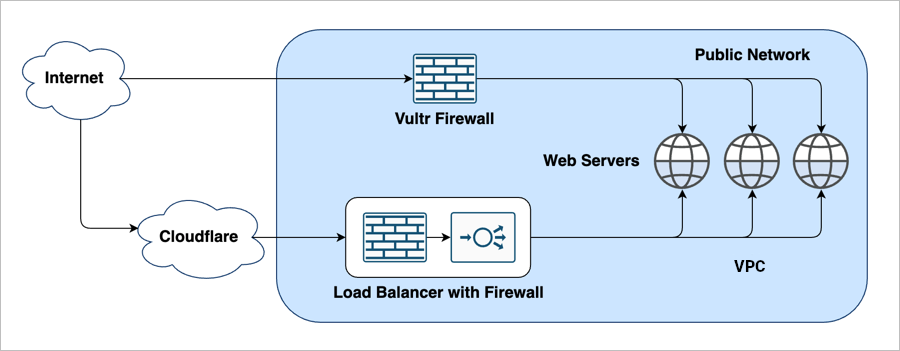
Vultr's advanced load balancer supports private networks and has its own integrated firewall, which means you can set up configurations like this:

- The Load Balancer Firewall only accepts traffic that originates from a Cloudflare IP.
- The Load Balancer distributes HTTP traffic to the private network.
Here's a step-by-step guide to creating the configuration shown above.
1. Deploy Web Servers
Deploy three web servers in the same location.
2. Deploy a Load Balancer
Navigate to the Load Balancers section of the Vultr Customer Portal.
Click the blue plus icon to deploy a load balancer.
Choose the same location as your web servers.
In Load Balancer Configuration, enter a label and leave the other options at default.

Leave the default Forwarding Rule for HTTP at port 80.
Choose Public in the Private Network section.
In the Firewall Rules section, enter Port 80, and set the Source to
cloudflare.
Choose HTTP and Port 80 for Health Checks.

Click Add Load Balancer.
Wait for the Load Balancer to deploy.
3. Link the Load Balancer to the Web Servers
Click your Load Balancer to edit its configuration.
Click Add Instance.
Choose an instance from the drop-down.
Click Attach Instance.

Repeat steps 1 – 3 for each web server instance.
5. Final Steps
The Vultr configuration is complete, but you'll still need to configure DNS and add the Load Balancer's IP address at Cloudflare. See the Cloudflare getting started guide to complete those steps.
After completing the Cloudflare setup, your webservers are secure and load-balanced. The Cloudflare CDN accelerates the delivery of your static assets, and the Vultr Load Balancer provides high availability.
Advanced Configuration
The Vultr Load Balancer is very flexible, and more advanced configurations are possible, such as combining the Vultr Firewall with the Load Balancer Firewall, like this.

Vultr Load Balancers also work with Private Networks, and you can combine multiple firewalls to create this configuration.

If you'd like to learn more, see our article How to Configure a Vultr Load Balancer with Private Networking.
More Information
- If you are new to load-balancing network concepts, see the Vultr Load Balancer Quickstart Guide.
- For comprehensive documentation about the Load Balancer features, see the Load Balancer Feature Reference.
- The Vultr Firewall can use a Load Balancer as an IP source. We explain more in How to Use the Vultr Firewall with a Vultr Load Balancer.
- Explore an advanced scenario with private networking and both types of firewalls in How to Configure a Vultr Load Balancer with Private Networking.
- Learn how to configure wildcard SSL on your load balancer in our guide Use a Wildcard Let's Encrypt Certificate with Vultr Load Balancer.
- See our Load Balancer Feature Reference to learn about limits to the number of forwarding rules.