
How to Use Vultr CDN with Nginx Webserver
Introduction
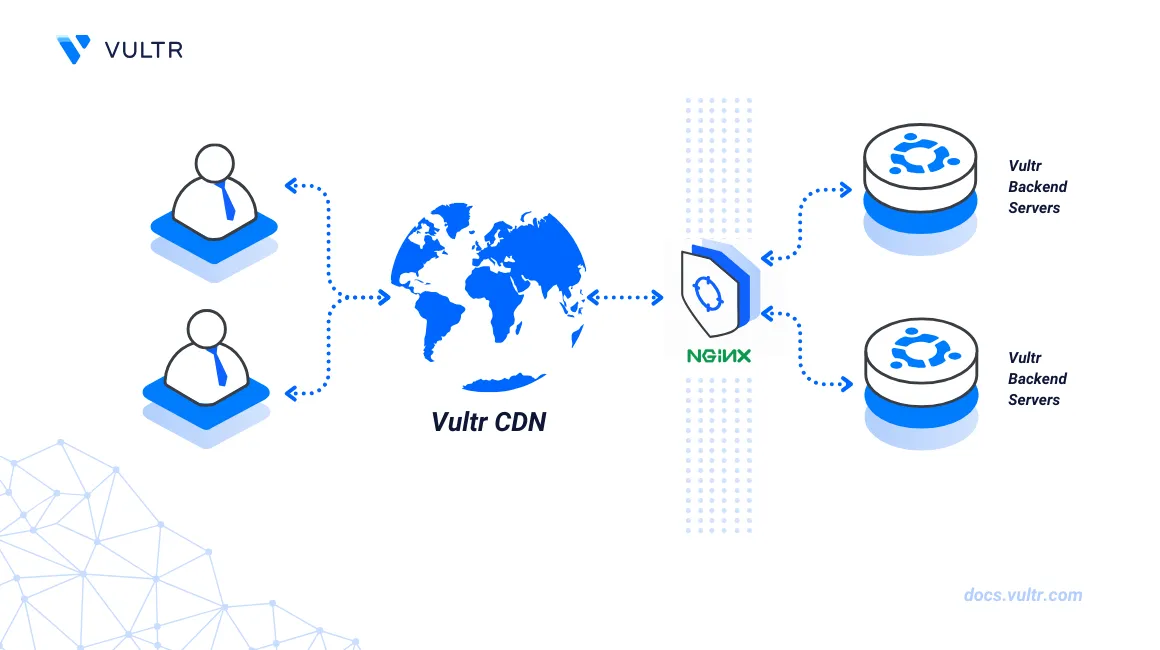
Nginx is a web server application that lets you host and deliver web applications using your domain. You can integrate Nginx with a CDN (Content Delivery Network) such as Vultr CDN to offload specific file assets for delivery in multiple regions instead of your origin server. Nginx delivers your Vultr CDN response data to all valid user requests instead of your original web application URL, improving the general server performance.
This article explains how to use Vultr CDN with the Nginx web server to cache specific asset requests for delivery using a Vultr CDN Zone's URL. You will modify the existing Nginx configuration with new request rules depending on your web application structure to serve static assets such as images using your Vultr CDN URL.
Prerequisites
Before you begin:
- Create a Vultr CDN Pull Zone or a Vultr CDN Push Zone to deliver cached assets.
- Deploy a OneClick LEMP instance using the Vultr Marketplace Application to use as the production server.
- Set up your domain A record pointing to the server IP address.
- Access the server using SSH as a non-root user with sudo privileges.
Locate the Nginx Virtual Host Configuration
To set up your Nginx web server and forward requests to your Vultr CDN URL, follow the steps below to verify your working virtual host configuration to modify with the CDN rules.
Switch to the Nginx data directory.
console$ cd /etc/nginx/
Search for all Nginx configurations that include your domain name. For example,
example.com.console$ grep -r "example.com" /etc/nginx/
Your output should look like the one below:
/etc/nginx/sites-available/example.com: server_name example.com;In the above output result, your domain uses the
/etc/nginx/sites-available/example.comvirtual host configuration. Usually, Nginx uses the default configuration file/etc/nginx/sites-available/defaultwhen no virtual host configuration is available.View the virtual host configuration file and verify the web root directory value.
console$ cat /etc/nginx/sites-available/example.com
Output:
root /var/www/example.com;Switch to the web root directory to set up a sample application structure.
console$ cd /var/www/example.com
Create a new sample
imagesdirectory to test your Nginx rules.console$ sudo mkdir images
Upload sample assets such as image files to the directory to cache and test with your Vultr CDN URL.
Method 1: Set Up Response Modification
Nginx response modification uses the sub_filter module to forward specific request types to your Vultr CDN URL. When a user creates a new request, Nginx modifies the request and translates it to your Vultr CDN URL instead of the origin server URL. Follow the steps below to set up response modification to match specific request patterns to your Vultr CDN URL.
By default, the Nginx
sub_filtermodule runs withhttp_sub_module. Verify that the module is available on your server.console$ nginx -V
Output:
........--with-http_gzip_static_module --with-http_sub_moduleOpen your Nginx virtual host configuration using a text editor such as Nano.
console$ sudo nano /etc/nginx/sites-available/example.com
Add the following
sub_filterconfigurations to the file.nginxsub_filter 'https://example.com/images/' 'https://cdn-example88.vultrcdn.com/images/'; sub_filter 'https://example.com/files/' 'https://cdn-example88.vultrcdn.com/files/'; proxy_set_header Accept-Encoding ""; sub_filter_once off;
Save and close the file.
The above configuration substitutes all matching request patterns with your Vultr CDN URL. Within the configuration:
sub_filter '' '';: Modifies the original request URL''to the destination URL''. For example, all requests that match the URL patternhttps://example.com/images/are modified to your Vultr CDN URLcdn-example88.vultrcdn.com/images/. File requests within the same URL scheme such asexample.com/images/image.pngmatch the request pattern to your Vultr CDN URL/cdn-example88.vultrcdn.com/images/image.png.proxy_set_header Accept-Encoding "";: Turns off Gzip compression in your Nginx requests to avoid compression conflicts with the Vultr CDN response data.sub_filter_once off;: Enables multiple content modification rules to consistently modify requests with your Vultr CDN URL.
Your modified Nginx configuration should look like the one below:
nginxserver { listen 80 default_server; listen [::]:80 default_server; server_name example.com; root /var/www/html; index index.php index.htm index.nginx-debian.html; location / { try_files $uri $uri/ =404; sub_filter 'https://example.com/images/' 'https://cdn-example88.vultrcdn.com/images/'; sub_filter 'https://example.com/files/' 'https://cdn-example88.vultrcdn.com/files/'; proxy_set_header Accept-Encoding ""; sub_filter_once off; } }
Test the Nginx configuration for errors.
console$ sudo nginx -t
Output:
nginx: the configuration file /etc/nginx/nginx.conf syntax is ok
nginx: configuration file /etc/nginx/nginx.conf test is successful
Restart Nginx to apply your configuration changes.
console$ sudo systemctl restart nginx
Method 2: Set Up Redirects
Redirecting forwards specific Nginx request types to your Vultr CDN URL. Instead of delivering a response from your original URL, a request is redirected to your Vultr CDN URL instead. Follow the steps below to redirect requests from your host URL to the Vultr CDN URL.
Open your Nginx virtual host configuration.
console$ sudo nano /etc/nginx/sites-available/example.com
Add a new
locationblock with your target request types to the file. Replacecdn-example88.vultrcdnwith your actual Vultr CDN URL.nginxlocation ~ ^(/images/|/files/|/css/|/js/)/.*\.(jpe?g|webp|gif|css|png|js|ico|pdf|m4a|mov|mp3)$ { rewrite ^ https://cdn-example88.vultrcdn.com$request_uri? permanent; access_log off; }
Save and close the file.
The above configuration redirects all requests that either match the
images/,files/,css/,js/directories or the file extensions.jpg,.jpeg,.png,.webp,.css,.jsto your Vultr CDN URL. Within the configuration:location ~ ^(/images/|/files/|/css/|/js/)/.*\.(jpe?g|webp|gif|css|png|js|ico|pdf|m4a|mov|mp3)$: Defines the request patterns to replace with your Vultr CDN URL.rewrite ^ https://cdn-example88.vultrcdn.com$request_uri?: Rewrites all matching request types with your Vultr CDN URL. The$request_uri?expression matches your request pattern to preserve the original host URL structure.permanent: Permanently redirects the request with a301 Moved Permanentlystatus code.access_log off: Turns off access logs for all redirect messages.
Your modified Nginx configuration should look like the one below:
nginxserver { listen 80 default_server; listen [::]:80 default_server; server_name example.com; root /var/www/html; index index.html index.htm index.nginx-debian.html; location / { try_files $uri $uri/ =404; } location ~ ^(/images/|/files/|/css/|/js/)/.*\.(jpe?g|webp|gif|css|png|js|ico|pdf|m4a|mov|mp3)$ { rewrite ^ https://cdn-example88.vultrcdn.com$request_uri? permanent; access_log off; } }
Test the Nginx configuration for errors.
console$ sudo nginx -t
Restart Nginx to apply the configuration changes.
console$ sudo systemctl restart nginx
Conclusion
You have configured your Nginx web server to forward web application requests to your Vultr CDN URL. Nginx forwards each valid request pattern to your Vultr CDN URL to deliver a response with the cached data to your site visitor. Depending on your Vultr CDN Zone and web application structure, modify your Nginx configuration to deliver static assets using your CDN to improve the general application performance.