How to Install a GUI Desktop for Ubuntu Server with XFCE and VNC

Introduction
When you deploy an Ubuntu server at Vultr, you'll need to perform system administration using the command line. In addition, sometimes, you'll want to install a Graphical User Environment (GUI) to use the cloud server as an Ubuntu desktop.
This guide describes how to install the XFCE GUI and connect to it securely with Virtual Network Computing (VNC). After installing, you'll have a desktop similar to the Xubuntu distribution.
What is VNC?
VNC is a desktop sharing system that allows you to remotely control another computer when you use Vultr cloud computing hosting.
What is Cloud Computing?
Cloud computing is the delivery of servers, storage, databases, and networking over the Internet (a.k.a. "cloud"). You only pay cloud services you use, with no up-font purchase required.
1. Prepare the System
Deploy a new Ubuntu 20.04 server at Vultr.
Connect to the Ubuntu server as root.
Update all packages.
# apt update & apt upgrade -yBecause it's not secure to connect to the GUI as root, create a new user with sudo access. Replace example_user with your desired username. Enter a strong user password when prompted. Then, fill in the other information as desired.
# adduser example_userAdd the new user to the sudo group.
# addgroup example_user sudo
2. Configure the Firewall
VNC listens on port 5901 by default, and the connection is not encrypted.
Option 1: Use an OS firewall and tunnel connections via SSH
One option for security is to block the VNC port in the server firewall and tunnel the connection via SSH. If you choose that option, please set up the firewall name before installing VNC.
These commands block all connections except SSH.
# ufw enable
# ufw default deny incoming
# ufw default allow outgoing
# ufw allow ssh
If you already have custom firewall rules and only need to add protections for VNC, run the following command to block port 5901.
# ufw deny 5901/tcpWith port 5901 blocked, you'll need to set up an SSH tunnel. See step 6 in this guide for more details.
Option 2: Use the Vultr Firewall
If you want to avoid the extra complexity of the SSH tunnel described in step 6, you could protect the server with the Vultr Firewall, blocking all traffic to port 5901 except your IP address. See the Vultr Firewall Quickstart Guide for more information.
3. Install the GUI
Install XFCE, TightVNC server, and Firefox web browser.
# apt install -y xfce4 xfce4-goodies tightvncserver firefoxChoose gdm3 when prompted by the installer.
4. Configure VNC
Change to the new user account for the rest of this guide. Do not run these steps as root.
# su - example_userRun VNC to set up the configuration.
$ vncserverEnter a password for VNC connections. VNC uses a maximum of 8 characters and automatically truncates longer passwords.
When asked to enter a view-only password, choose N.
Example output:
 example_user@vultr:~$ vncserver

 You will require a password to access your desktops.

 Password:
 Warning: password truncated to the length of 8.
 Verify:
 Would you like to enter a view-only password (y/n)? n
 xauth:  file /home/example_user/.Xauthority does not exist

 New 'X' desktop is vultr.guest:1

 Creating default startup script /home/example_user/.vnc/xstartup
 Starting applications specified in /home/example_user/.vnc/xstartup
 Log file is /home/example_user/.vnc/vultr.guest:1.log
Stop the VNC server.
$ vncserver -kill :1Make a backup of the default startup script.
$ cp ~/.vnc/xstartup ~/.vnc/xstartup.bakEdit the startup script.
$ nano ~/.vnc/xstartupAdd the following line to the end:
startxfce4 &Save and exit the file.
5. Configure TightVNC as a System Service
Create a new systemd service file.
$ sudo nano /etc/systemd/system/vncserver@.servicePaste the following service script in nano.
example_userappears in two places. Change those entries to the sudo user name you created.[Unit] Description=Remote desktop service (VNC) After=syslog.target network.target [Service] Type=forking User=example_user PIDFile=/home/example_user/.vnc/%H:%i.pid ExecStartPre=-/usr/bin/vncserver -kill :%i > /dev/null 2>&1 ExecStart=/usr/bin/vncserver -depth 24 -geometry 1280x800 :%i ExecStop=/usr/bin/vncserver -kill :%i [Install] WantedBy=multi-user.targetSave and exit the file.
Reload the systemd services and start VNC. You'll be prompted for your password.
$ systemctl daemon-reloadEnable the service to start at boot. You'll be prompted for your password three times as the system makes the updates.
$ systemctl enable --now vncserver@1.serviceReboot the system.
$ sudo reboot
6. Connect VNC Through an SSH Tunnel
VNC is listening on port 5901, and it's blocked in the OS firewall or with the Vultr Firewall if you've followed this guide.
- If you chose to use the OS firewall, follow these instructions to tunnel VNC port 5901 over SSH.
- If you used allowed your IP address sccess to port 5901 in the Vultr Firewall, you can skip to step 7.
Tunnel SSH on the Command Line
This method works on any platform that has a command-line SSH client.
Open a terminal on your local workstation.
Run this command on your local machine, not the server.
$ ssh -L 5901:127.0.0.1:5901 -N -f -l example_user 192.0.2.123* -L : Forward local port 5901 to remote port 5901 via SSH tunnel
- -N : Only forward ports, don't execute any commands
- -l : Specify the username to create the tunnel
- -f : Request ssh to go to the background
- 192.0.2.123 : An example IP address, substitute your server's address
Enter your SSH login password.
If you use SSH keys, you could also include the `-i' parameter and path to your key, like this:
$ ssh -i /path/to/ssh/key -L 5901:127.0.0.1:5901 -N -f -l example_user 192.0.2.123With the tunnel established, connect to your remote GUI at
127.0.0.1:5901. Then, see step 7, Connect with a VNC Client below.
How to Tunnel through SSH with PuTTY
PuTTY is a popular terminal program for Windows, and it can also forward ports over SSH tunnels.
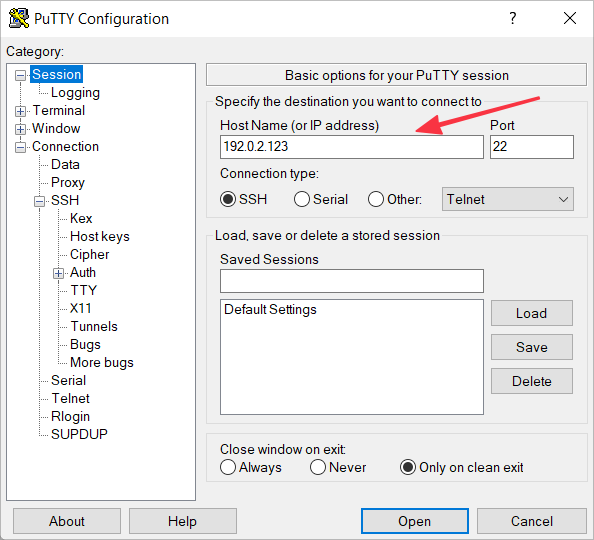
Open PuTTY to create a new connection.
Navigate to the Session category.
Enter the server's IP address and select port 22, SSH connection type.

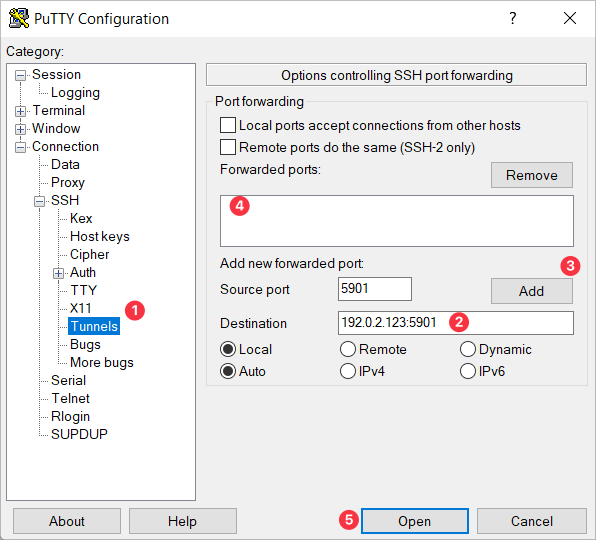
Navigate to Connection -> SSH -> Auth -> Tunnels.
Enter 5901 in Source Port and your server's IP address followed by :5901 in Destination.
Click Add.
The port forwarding information will appear in the Forward ports list.
Click Open to establish the tunnel.

7. Connect with a VNC Client
Your choice of VNC client depends on your platform and personal preferences; there are many options available.
Linux users have many options; see the Ubuntu Wiki for a list or popular options.
Windows users might choose TightVNC as a popular option, and there are many other clients available.
Mac users can use the built-in macOS Screen Sharing.app, or several commercial options. You can also launch it from the terminal:
$ open vnc://127.0.0.1:5901
There are many other VNC compatible options available online. Configuring the client is beyond the scope of this article, but in general terms:
- If you set up an SSH tunnel, connect the VNC client to IP address
127.0.0.1(the local loopback) and port5901. Your SSH tunnel will securely forward the connection from the local host to the remote server. - If you configured the Vultr firewall to allow your workstation's IP address to access port 5901 on the server, connect the VNC client to the server's IP address at port
5901.