Introduction
Lynis is a free, open-source system auditing tool that is used by many system administrators to verify the integrity and harden their systems. It can be operated as a standalone binary or it can be installed to perform checks at periodic intervals. In this article, you'll learn how to install and use the software as well as learn to read and identify the logs that Lynis outputs.
If you would like to perform the installation on CentOS 7, please see this article.
Installation
Note: Please make sure you are logged in as the root user.
Installation of Lynis is fairly simple. To begin, let's bring our system up to date.
apt-get update
apt-get upgrade
When prompted, enter 'y'. This can take anywhere between a couple of seconds to half an hour, depending on the number of packages that need to be updated and the system's available resources.
Lynis is open source software. As such, the software's presence is on GitHub. To download a repository, we need to clone it with the git utility, which we can install with the following command:
apt-get install gitJust as before, accept the installation prompt with 'y'. We also need to install certain DNS tools so that Lynis can audit our network:
apt-get install dnsutilsNow that we have the prerequisites installed, we can clone the repository:
cd ~
git clone https://github.com/CISOfy/lynis
Give it a few moments, then once it is complete, continue by entering the directory:
cd ~/lynisWe'll do a preliminary audit to ensure it is working properly on your system:
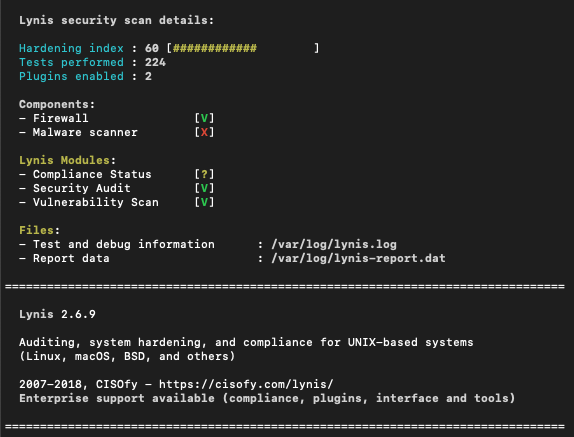
./lynis audit systemThis will perform a quick system check for any security issues that may be present on your system as well as list some recommendations. Lynis is working properly if it finishes with a result similar to the following:

Configuration
Configuring Lynis is more difficult, however. You will need to tailor it according to your system, based on the services you are running as well as the network configuration you employed on your instance. In this article, we'll cover commonly used network configurations as well as web servers and general system security.
Let's start by copying the default Lynis configuration file and making our changes to it:
cp default.prf custom.prfThen, using your preferred text editor, open custom.prf:
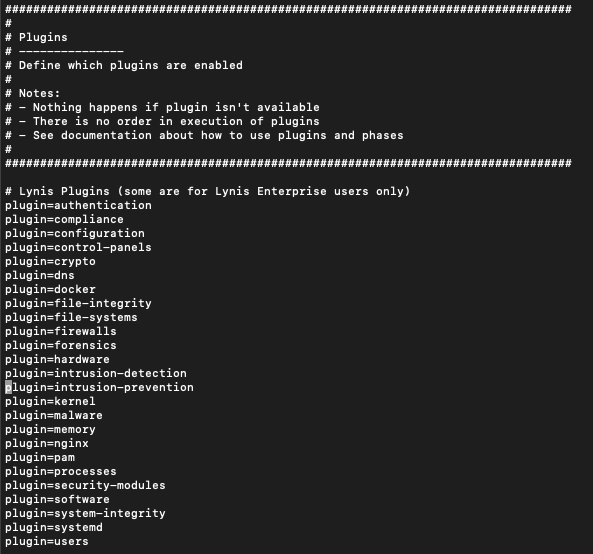
nano custom.prfScroll to the section where the plugins are listed. We'll remove the services that do not pertain to us, to speed up testing:

If you are not using the Nginx webserver, remove "plugin=nginx". Chances are, your system isn't running bind9 or dnsmasq, so you can remove them as well. If you are running them, do not remove the plugin from the audit and continue checking each item until you have removed any unnecessary checks. Once you're done, save and exit with Ctrl + X and then Y to save.
Now, let's re-run Lynis to see the issues we need to correct in our system with the following:
./lynis --profile custom.prfAllow a minute or two, and when it finishes, it should appear as it had in step one, but with the unnecessary scans removed.
Interpreting and hardening your system
Let's have a look at the suggestions that Lynis provides on our base Vultr Debian 8 system:

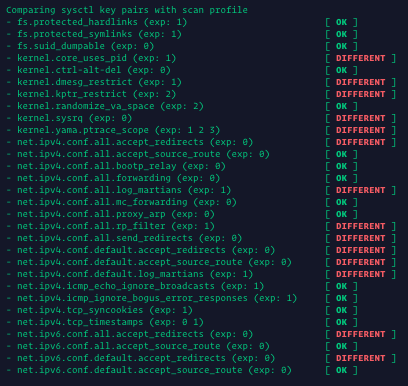
As you can tell, Lynis has found some potential issues present on our instance. Some nodes mention that we've left packet forwarding on for both IPv4 and IPv6 stacks -- if you plan on using Docker or a similar container technology on a Vultr system, do not change these. If you have no need for them, you can change them temporarily on your system with the following:
sysctl -w <kernel_node>Do this before entering your values into /etc/sysctl.conf to make sure your system functions properly with the changes. If something malfunctions, you can restart to remove such temporary changes.
In the screenshot, you'll notice that there are other issues as well, but they are out of the scope for this article, so we'll skip them.
Note: Make sure to do your due diligence to prevent any issues with your system.
Now, scroll down to the suggestions section, and you'll find a good deal of configuration changes that can be made. For example, Lynis suggests changes for the permission mask of certain files. In our instance, we find a hardening suggestion:
Default umask in /etc/init.d/rc could be stricter like 027 [AUTH-9328]Such a change can easily be accomplished by using a text editor, opening /etc/init.d/rc and finding the line umask and changing its value to 027. This value would limit newly created files to full permissions by its owner, read permissions by the group and no access for all other users except system/root.
Making Lynis run on a regular basis
This is relatively easy to do and can be accomplished by first installing crontab, and then adding a job for Lynis:
apt-get install crontabThen, execute crontab -e, and input the following:
MAILTO="youremail@address.com"
0 0 * * * cd /root/lynis && ./lynis --profile custom.prf --cronjob
Save it, then exit. This will run a Lynis audit every day at midnight on your instance and send you an email with the results.
Conclusion
In this article, we covered the basics of Lynis configuration and how you can make use of it for system auditing as well as regular checks on your system.
No comments yet.