Introduction
Unifi Cloud Controller, also known as Unifi Network Application, is a cloud service that allows you to manage Ubiquiti network devices through a single web interface. The application allows you to plan, scale, map, and manage multiple network topologies for your linked devices. This article describes how you can install Unifi Cloud Controller on a Debian Cloud server hosted on Vultr.
Prerequisites
Before you begin, be sure to:
- Deploy a fresh Debian 11 Server at Vultr.
- Point a domain name to the server.
- Access the server using SSH, and log in as a non-root user with sudo rights.
- Update the server.
Installation
SSH and Login to your Debian server. Replace
192.0.2.2with your actual Server IP.$ ssh example-user@192.0.2.2Add the MongoDB repository for version 3.6 or below to your sources list because Unifi Controller supports versions below 4.0 for now.
$ echo "deb http://repo.mongodb.org/apt/debian stretch/mongodb-org/3.6 main" | sudo tee /etc/apt/sources.list.d/mongodb-org-3.6.listDownload the MongoDB 3.6 repository verification key.
$ sudo wget -O /etc/apt/trusted.gpg.d/mongodb-3.6.asc https://www.mongodb.org/static/pgp/server-3.6.ascAdd the Java 8 repository to your sources list.
$ echo "deb https://adoptopenjdk.jfrog.io/adoptopenjdk/deb bullseye main" | sudo tee /etc/apt/sources.list.d/java8.listDownload the Java GPG key.
$ wget -qO - https://adoptopenjdk.jfrog.io/adoptopenjdk/api/gpg/key/public | sudo apt-key add -Update the server.
$ sudo apt updateInstall the Java development kit (JDK).
$ sudo apt install adoptopenjdk-8-hotspotAdd the Unifi Controller Debian repository to the sources list.
$ echo 'deb http://www.ui.com/downloads/unifi/debian stable ubiquiti' | sudo tee /etc/apt/sources.list.d/unifi.listDownload the repository GPG verification key.
$ sudo wget -O /etc/apt/trusted.gpg.d/unifi.gpg https://dl.ubnt.com/unifi/unifi-repo.gpgUpdate the server.
$ sudo apt updateInstall Unifi Controller on your server.
$ sudo apt install unifi -yEnable Unifi Controller to start at boot time.
$ sudo systemctl enable unifiEnable MongoDB to start at boot time.
$ sudo systemctl enable mongodVerify the Unifi Controller status.
$ sudo service unifi statusYour Output should look like the one below.
 ● unifi.service - unifi
   Loaded: loaded (/lib/systemd/system/unifi.service; enabled; vendor preset:>
   Active: active (running) since Mon 2022-09-19 22:22:05 UTC; 13min ago
   Process: 17948 ExecStartPre=/usr/sbin/unifi-network-service-helper init (co>
   Process: 17964 ExecStartPre=/usr/sbin/unifi-network-service-helper init-uos>
   Process: 17970 ExecStartPost=/usr/sbin/unifi-network-service-helper healthc>
   Main PID: 17969 (java)
      Tasks: 88 (limit: 2340)
   Memory: 586.5M
      CPU: 30.008s
   CGroup: /system.slice/unifi.service
       ├─17969 /usr/bin/java -Dfile.encoding=UTF-8 -Djava.awt.headless=tr>
       └─18019 bin/mongod --dbpath /usr/lib/unifi/data/db --port 27117 -->
Security
Unifi Cloud Controller requires the following ports open on your server:
- 8443: Controller dashboard access.
- 3478: UDP STUN port.
- 8080: Inform port for device and application communications.
Verify that the default UFW firewall is active on your server.
$ sudo ufw statusAllow each of the Unifi Cloud Controller ports through the firewall.
  $ sudo ufw allow 8443/tcp

  $ sudo ufw allow 3478/udp

  $ sudo ufw allow 8080/tcp
Open the HTTP port
80to allow Let's Encrypt verifications.$ sudo ufw allow 80/tcpRestart the firewall.
$ sudo ufw reload
Setup SSL Certificates
Install the Certbot Let's Encrypt client on your server.
$ sudo apt install certbot -yRequest a new SSL certificate for your domain name in standalone mode. Replace
unifi.example.comwith your actual domain name.$ sudo certbot certonly -d unifi.example.com --agree-tosTo import your Let's Encrypt SSL Certificates to the Unifi Cloud Controller, create a new bash script using a text editor such as Nano.
$ nano unifi.shAdd the following contents to the file. Replace
unifi.example.comwith your actual domain name. This MIT-licensed example from Steve Jenkins is available at https://github.com/stevejenkins/unifi-linux-utils.#!/usr/bin/env bash # UniFi Controller SSL Certificate Import Script for Unix/Linux Systems # by Steve Jenkins <http://www.stevejenkins.com/> # CONFIGURATION OPTIONS UNIFI_HOSTNAME=unifi.example.com UNIFI_SERVICE=unifi UNIFI_DIR=/var/lib/unifi JAVA_DIR=/usr/lib/unifi KEYSTORE=${UNIFI_DIR}/keystore LE_MODE=true LE_LIVE_DIR=/etc/letsencrypt/live # CONFIGURATION OPTIONS YOU PROBABLY SHOULDN'T CHANGE ALIAS=unifi PASSWORD=aircontrolenterprise #### SHOULDN'T HAVE TO TOUCH ANYTHING PAST THIS POINT #### printf "\nStarting UniFi Controller SSL Import...\n" # Check to see whether Let's Encrypt Mode (LE_MODE) is enabled if [[ ${LE_MODE} == "YES" || ${LE_MODE} == "yes" || ${LE_MODE} == "Y" || ${LE_MODE} == "y" || ${LE_MODE} == "TRUE" || ${LE_MODE} == "true" || ${LE_MODE} == "ENABLED" || ${LE_MODE} == "enabled" || ${LE_MODE} == 1 ]] ; then LE_MODE=true printf "\nRunning in Let's Encrypt Mode...\n" PRIV_KEY=${LE_LIVE_DIR}/${UNIFI_HOSTNAME}/privkey.pem CHAIN_FILE=${LE_LIVE_DIR}/${UNIFI_HOSTNAME}/fullchain.pem else LE_MODE=false printf "\nRunning in Standard Mode...\n" fi if [[ ${LE_MODE} == "true" ]]; then # Check to see whether LE certificate has changed printf "\nInspecting current SSL certificate...\n" if md5sum -c "${LE_LIVE_DIR}/${UNIFI_HOSTNAME}/privkey.pem.md5" &>/dev/null; then # MD5 remains unchanged, exit the script printf "\nCertificate is unchanged, no update is necessary.\n" exit 0 else # MD5 is different, so it's time to get busy! printf "\nUpdated SSL certificate available. Proceeding with import...\n" fi fi # Verify required files exist if [[ ! -f ${PRIV_KEY} ]] || [[ ! -f ${CHAIN_FILE} ]]; then printf "\nMissing one or more required files. Check your settings.\n" exit 1 else # Everything looks OK to proceed printf "\nImporting the following files:\n" printf "Private Key: %s\n" "$PRIV_KEY" printf "CA File: %s\n" "$CHAIN_FILE" fi # Create temp files P12_TEMP=$(mktemp) # Stop the UniFi Controller printf "\nStopping UniFi Controller...\n" service "${UNIFI_SERVICE}" stop if [[ ${LE_MODE} == "true" ]]; then # Write a new MD5 checksum based on the updated certificate printf "\nUpdating certificate MD5 checksum...\n" md5sum "${PRIV_KEY}" > "${LE_LIVE_DIR}/${UNIFI_HOSTNAME}/privkey.pem.md5" fi # Create double-safe keystore backup if [[ -s "${KEYSTORE}.orig" ]]; then printf "\nBackup of original keystore exists!\n" printf "\nCreating non-destructive backup as keystore.bak...\n" cp "${KEYSTORE}" "${KEYSTORE}.bak" else cp "${KEYSTORE}" "${KEYSTORE}.orig" printf "\nNo original keystore backup found.\n" printf "\nCreating backup as keystore.orig...\n" fi # Export your existing SSL key, cert, and CA data to a PKCS12 file printf "\nExporting SSL certificate and key data into temporary PKCS12 file...\n" #If there is a signed crt we should include this in the export if [[ -f ${SIGNED_CRT} ]]; then openssl pkcs12 -export \ -in "${CHAIN_FILE}" \ -in "${SIGNED_CRT}" \ -inkey "${PRIV_KEY}" \ -out "${P12_TEMP}" -passout pass:"${PASSWORD}" \ -name "${ALIAS}" else openssl pkcs12 -export \ -in "${CHAIN_FILE}" \ -inkey "${PRIV_KEY}" \ -out "${P12_TEMP}" -passout pass:"${PASSWORD}" \ -name "${ALIAS}" fi # Delete the previous certificate data from keystore to avoid "already exists" message printf "\nRemoving previous certificate data from UniFi keystore...\n" keytool -delete -alias "${ALIAS}" -keystore "${KEYSTORE}" -deststorepass "${PASSWORD}" # Import the temp PKCS12 file into the UniFi keystore printf "\nImporting SSL certificate into UniFi keystore...\n" keytool -importkeystore \ -srckeystore "${P12_TEMP}" -srcstoretype PKCS12 \ -srcstorepass "${PASSWORD}" \ -destkeystore "${KEYSTORE}" \ -deststorepass "${PASSWORD}" \ -destkeypass "${PASSWORD}" \ -alias "${ALIAS}" -trustcacerts # Clean up temp files printf "\nRemoving temporary files...\n" rm -f "${P12_TEMP}" # Restart the UniFi Controller to pick up the updated keystore printf "\nRestarting UniFi Controller to apply new Let's Encrypt SSL certificate...\n" service "${UNIFI_SERVICE}" start # That's all, folks! printf "\nDone!\n" exit 0Save the file.
Make the script executable.
$ sudo chmod +x unifi.shRun the script.
$ sudo ./unifi.sh
The script converts and imports the Let's Encrypt certificated to your Unifi Cloud Controller.
Setup the Unifi Cloud Controller
Visit your domain name through a web browser of your choice.
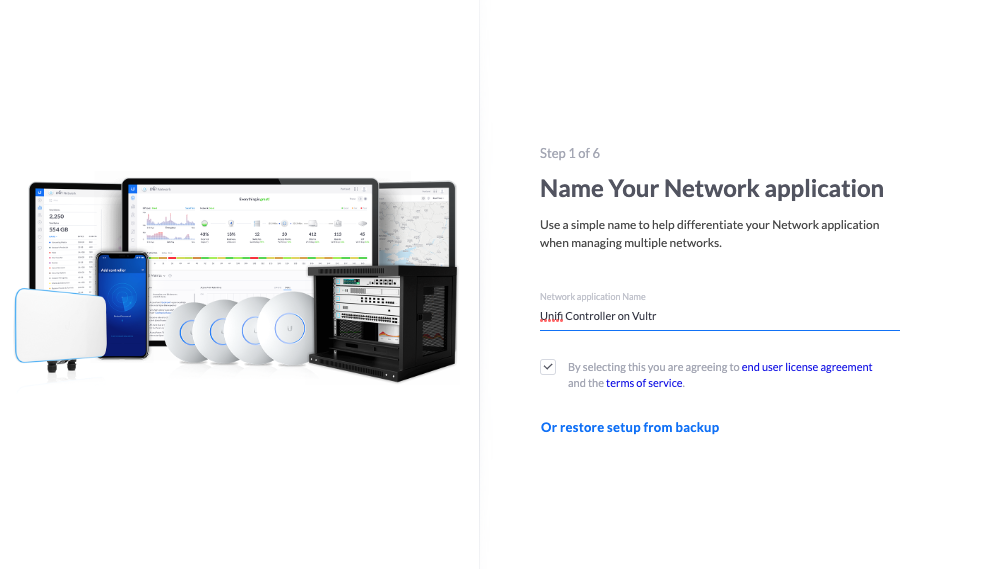
https://unifi.example.comEnter a name for your Network Application profile, check the agree to the product terms of service box, and click Next to proceed.

Enter your active Ubiquiti Account username and password to sync your account.
Keep Auto Backup ON to enable automatic backups for your controller.
On the Devices Setup page, click Next to set up your devices later.
Set up your Wi-Fi network SSID and Password, or click Skip to set it up later.
Review your Unifi Cloud Controller configurations and click Finish to configure the controller.
When complete, the Unifi Cloud Controller dashboard displays. Use the left navigation menu to adopt Ubiquiti network devices and tweak your controller settings
To connect Ubiquiti devices to your controller, log in to each device and set the Inform address to your domain name as below.
set-inform https://unifi.example.com:8080/inform
Conclusion
You have installed Unifi Cloud Controller on a Debian 11 Server. You can use the controller to harness the power of your connected network devices with multiple features, optimization, user control, and captive portal settings.
No comments yet.