
TP-Link Omada SDN Controller is a centralized remote network control application used to manage multiple network devices that may consist of wireless access points, security gateways, switches. This article describes how you can securely install a TP-Link Omada Controller on a Vultr Cloud Server and link devices to the controller.
Prerequisites
Before you start, make sure you:
- Deploy a fresh Vultr Cloud Linux Server.
This article uses a Ubuntu 20.04 server, but the described instructions work on any Linux distribution. This article uses the example IP Address
192.168.0.2as the server IP Address in this article. Please replace all occurrences with your actual Server IP Address. - Setup a subdomain A record pointing to the server.
- Use SSH to access the server as a non-root user with sudo privileges.
- Update the server.
Installation
To successfully install TP-Link Omada Controller, the following software dependencies must be available on your server:
- Open Java Development Kit 8.0.
- Java Service
JSVC. - MongoDB v4 or above.
Install the Open JDK 8.0.
$ sudo apt install openjdk-8-jdkInstall JSVC.
$ apt install jsvcTo Install MongoDB, import the community edition public GPG key from the official website.
$ wget -qO - https://www.mongodb.org/static/pgp/server-6.0.asc | sudo apt-key add -Add the MongoDB repository to your sources list.
$ echo "deb [ arch=amd64,arm64 ] https://repo.mongodb.org/apt/ubuntu focal/mongodb-org/6.0 multiverse" | sudo tee /etc/apt/sources.list.d/mongodb-org-6.0.listUpdate the server.
$ sudo apt updateInstall MongoDB.
$ apt install mongodb-orgTo install MongoDB on a non-Ubuntu Linux server, please follow the official installation instructions for your distribution.
Switch to your user home directory.
$ cd ~/Using the
wgetutility, download the latest Omada SDN Controller release file from the official TP-Link Website.$ wget https://static.tp-link.com/upload/software/2022/202211/20221121/Omada_SDN_Controller_v5.7.4_Linux_x64.tar.gzExtract files from the tarball.
$ tar xvf Omada_SDN_Controller_v5.7.4_Linux_x64.tar.gzVerify that a new Omada SDN Controller directory is available.
$ lsSwitch to the directory.
$ cd Omada_SDN_Controller_v5.7.4_Linux_x64/Run the
install.shscript to start Installing the TP-Link Omada Controller.$ ./install.shOutput:
Omada Controller will be installed in [/opt/tp-link/EAPController] (y/n):Enter
yto start the installation process. When complete, you should receive the following output:========================== Omada Controller will start up with system boot. You can also control it by [/usr/bin/tpeap]. Starting Omada Controller. Please wait...................................... Started successfully. You can visit http://localhost:8088 on this host to manage the wireless network. ========================Run the following command to verify that the controller status is running.
$ tpeap statusTo save server space, delete the controller tarball and extracted files.
$ rm -r Omada_SDN_Controller_v5.7.4_Linux_x64/ && rm Omada_SDN_Controller_v5.7.4_Linux_x64.tar.gz
Security
By default, Uncomplicated Firewall (UFW) for Debian and Ubuntu, Firewalld for CentOS/Rocky Linux/AlmaLinux are activate on Vultr servers. Setup the firewall to allow the following TP-Link Omada Controller Ports:
- TCP
8088– Manages the Omada Controller using an HTTP connection. 8043– Manages the Controller over HTTPS.8843– Users authenticate over HTTPS when the captive portal is on.29811,29812– Manages devices on the controller.29814– Adopts devices to the controller.27217– Grants the application access to the database.- UDP
29810– Discovers devices pointed to the server.
Allow the Omada Controller TCP ports through the UFW firewall.
$ sudo ufw allow 8088,8043,8843,29811,29812,29814,27217/tcp comment "Omada Controller Ports"Allow the controller's UDP port through the firewall.
$ sudo ufw allow 29810/udp comment "Omada Controller UDP"To successfully generate SSL certificates, allow the HTTP port 80.
$ sudo ufw allow 80/tcpRestart the firewall to activate changes.
$ sudo ufw reload
If you are using the Vultr Firewall, please allow all ports to access the controller services. To tighten server security, limit access to the
8088and8043management ports to only your IP Address.
Install Trusted SSL Certificates on the Server
If you access the Omada Controller HTTPS port, you may receive the untrusted connection prompt as a self-signed certificate is pre-installed with the controller. To secure your server, install trusted SSL certificates from Let's Encrypt as described below.
Install the Certbot Let's encrypt client application.
$ sudo snap install --classic certbotActivate the system-wide Certbot command.
$ sudo ln -s /snap/bin/certbot /usr/bin/certbotRequest a free SSL certificate. Replace
controller.example.comwith your actual domain name.$ sudo certbot certonly --standalone -d controller.example.comEnter your active email address and agree to the Let's Encrypt certificate terms when prompted.
When successful, switch to your home directory.
$ cd ~/Create a new directory named
SSL.$ mkdir SSLCopy your
cert.pemSSL certificate file from the/etc/letsencrypt/live/directory to yourSSLdirectory.$ sudo cp /etc/letsencrypt/live/controller.example.com/cert.pem ~/SSL/Copy the private key
privkey.pemfile.$ sudo cp /etc/letsencrypt/live/controller.example.com/privkey.pem ~/SSL/Verify that the files exist in your
SSLdirectory.$ ls ~/SSL/Change ownership of the files to your non-root user account.
$ sudo chown -R example-user:example-user SSL/In a new terminal window, use a secure transfer protocol such as
sftp, orscpto download the certificate files from your server. For this article, usesftpwhich follows the syntax below.sftp user@host remoteFile localFileTo download the
cert.pemSSL certificate file to your current directory, run the following command.$ sftp example-user@192.168.0.2:SSL/cert.pem .Download the
privkey.pemSSL certificate private key.$ sftp example-user@192.168.0.2:SSL/privkey.pem .Verify that the files are available in your computer's terminal directory.
$ ls *.pem
Windows
> dir *.pemConfigure the TP-Link Omada Controller
Using a web browser such as Chrome, visit your Server IP Address on port
8088.If redirected to the
8043port, click Advanced, and continue to 192.168.0.2(unsafe)Click Let's Get Started to start the controller setup wizard.
Enter your desired controller name.
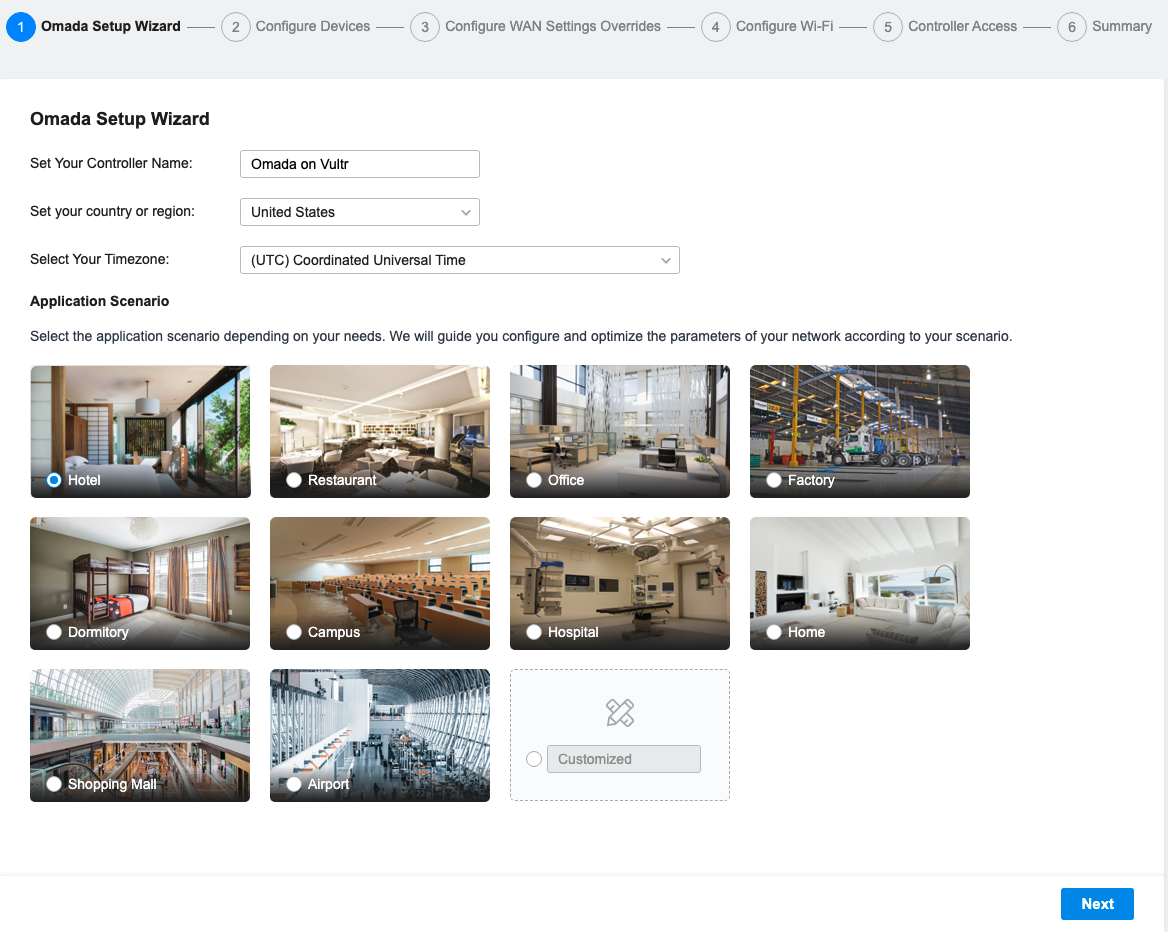
Click the region dropdown and set the value to your country.
Click the Timezone dropdown and select your region's timezone.
Select your desired application scenario to use its preset, click Customized to proceed without a template, then click Next.
On the configure devices page, click Skip to discover devices later.
Skip configure WAN settings overrides.
On the Configure Wi-Fi page, enter your desired Wi-Fi name in the Network Name (SSID) field, set a password and click Next to proceed.
Fill in the Controller Main Administrator fields to create a new Omada Controller administrator on your server.
In the Device Account section, enter a Username,Password different from your administrator details to assign to devices when adopted by your controller.
Enter your TP-Link ID and password to associate it with your new Omada controller. Toggle Cloud Access to OFF if you don't have an existing TP-LINK ID.
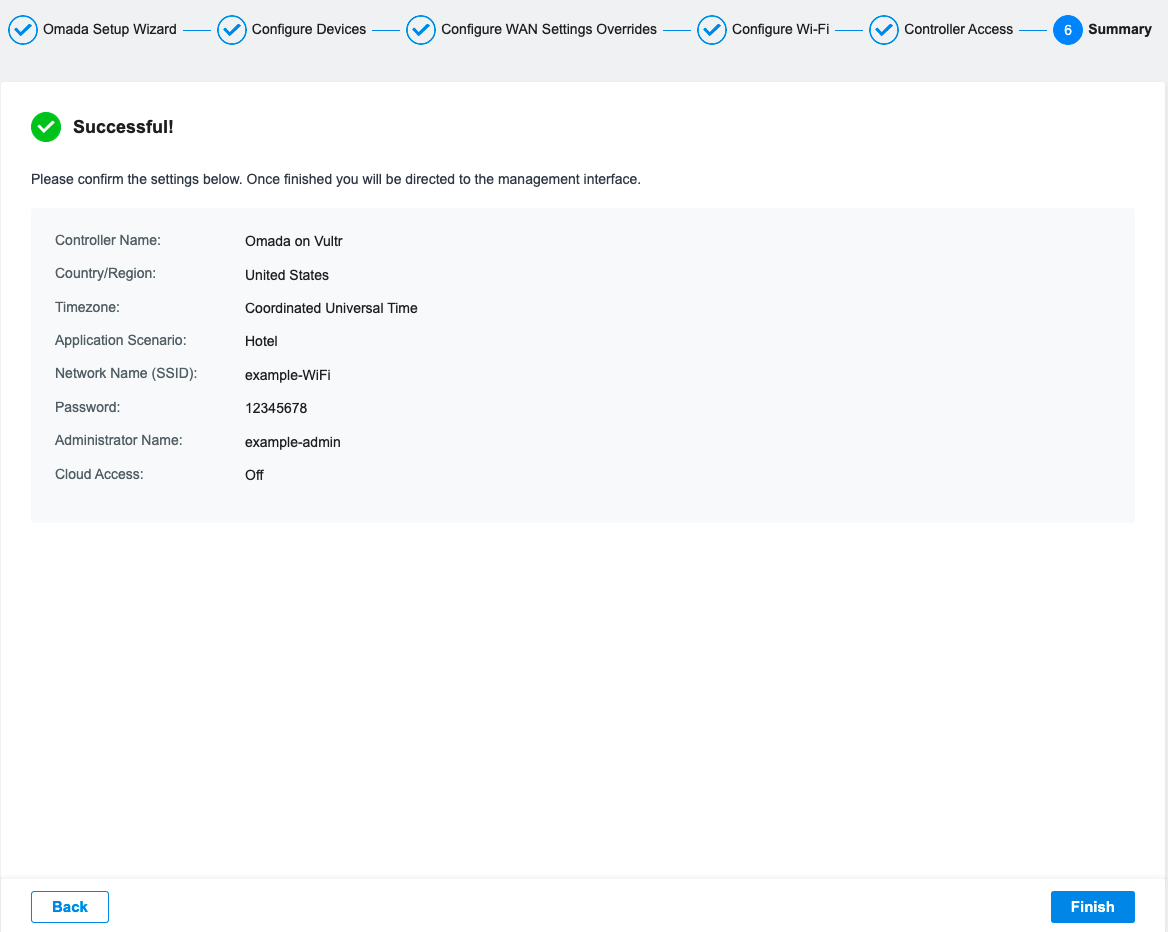
Click Next to view a summary of your setup.
Click Finish to save your configuration choices.
On the Omada SDN Controller login page, enter your administrator Username, Password created in the setup wizard, and click Log in to access the management panel.
Toggle through the controller tutorial or click the X symbol to close.
Within the main Omada controller dashboard, click the Settings symbol in the bottom left corner.
In the Controller Settings section, and click Controller.
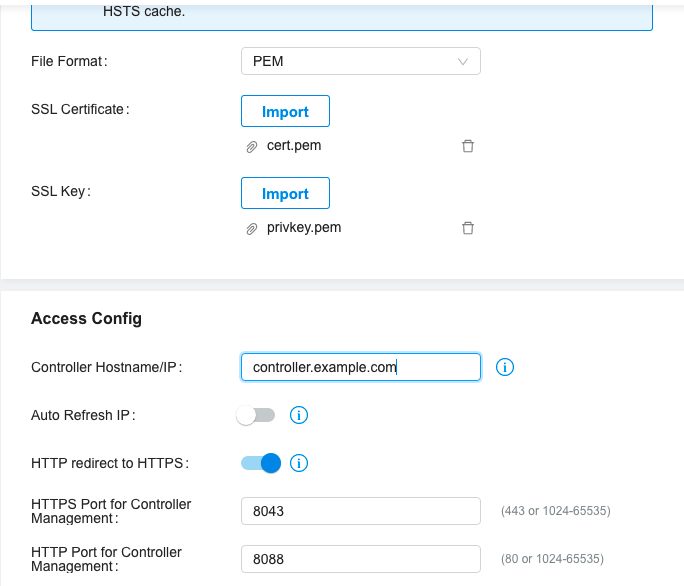
Scroll to the HTTPS Certificate section, and click the File Format: drop down option.
Select PEM from the list of options, then, click Import next to SSL Certificate:¬.
In the file selector window, navigate to the directory where you stored your
cert.pemfile and open it.Click Import next to SSL Key:, and open the
privkey.pemfile in the pop-up window.When uploaded successfully, scroll to the Access Config section.
Enter your domain name in the Controller Hostname/IP field.
Scroll to the bottom of the page and click Save to load changes.
In a terminal window, use SSH to re-access your Vultr server.
$ ssh example-user@192.168.0.2Stop the Omada Controller.
$ sudo tpeap stopStart the Omada Controller.
$ sudo tpeap startVerify the controller status that it's up and running.
$ sudo tpeap statusYour Output should look like the one below:
Omada Controller is running. You can visit http://localhost:8088 on this host to manage the wireless network.In a web browser, visit your domain name on port
8043and verify that your browser HTTPS connection warning is secure.https://controller.example.com:8043
Test and Point TP-Link devices to the Omada Controller
To manage devices in the Omada Controller. Access your TP-Link devices management URL, for example:
http://192.168.0.1Log in to the device using the administrator username and password.
Navigate to System.
Click Controller Settings.
In the Inform Address field, enter your Omada controller domain name.
Click Save to load changes.
In a web browser, log in to your Omada Controller.
https://controller.example.com:8043Navigate to Devices on the main navigation menu.
Verify that your TP-Link Omada device displays on the list with the status Requesting Adoption.
Click the ✓ symbol to adopt the device.
Enter the local device administrator username and password to start the adoption process.
When complete, your device status changes to Connected, and now managed by the controller.
If the device does not display in your devices list, verify that all necessary Omada Controller ports are open in your server firewall table.
Conclusion
In this article, you have installed the TP-Link Omada Controller on a Vultr Cloud Server and protected it with SSL certificates. You can associate hundreds of devices in multiple locations to the controller and manage them remotely through the Omada controller interface without any need to connect to the device's local network.
For more information, please visit the official Omada SDN Controller User Guide.
No comments yet.