
Introduction
Windows Active Directory is a computer management service that lets you control your resources, services, and users and share files in a single private local area network. In the cloud, you can deploy Windows Active Directory on a Vultr Virtual Private Cloud and control computers connected to the domain.
Windows Active Directory consists of groups and organizational structures stored as objects. An Active Directory Domain Controller (AD DC) is the main server running all domain services in the directory structure. Depending on your organization's size, you may need to set up two or more AD DCs in a single network.
This article explains how you can install Windows Active Directory service in a private Vultr Virtual Private Cloud (VPC) and connect clients to the domain.
Prerequisites
Deploy two Windows Server instances in the same Vultr location.
This article uses Windows Server 2022, but all included steps work on any Windows Server version.
- 1 Windows Server works as the Active Directory Domain Controller (AD DC) in the Vultr VPC.
- 1 Windows Server works as an Active Directory Client.
- Attach both servers to the same Virtual Private Cloud (VPC).
- Access both Windows Servers using Remote Desktop Protocol (RDP).
Configure the Windows Vultr Virtual Private Cloud (VPC) Interface
By default, your Vultr Windows Server may come with the VPC interface auto-configured or set to DHCP. Usually, it's set to DHCP, and you need to manually configure the interface with a static IP address before using it to send and receive network packets on the server, as illustrated in the steps below.
To find the VPC network address assigned to your server, log in to your Vultr account, open the server dashboard, click Settings, and navigate to IPV4.
Open the Windows start menu, find, and open Settings.
Navigate to the Network & Internet group.
Click Ethernet on the left navigation menu.
Select the Unidentified Network interface, scroll to IP Settings section, and click Edit just below IP assignment.
Click the Automatic (DHCP) drop-down, and select Manual.
Toggle IPV4 to ON.
Enter your static VPC IP address, subnet mask, in the respective fields, and keep the Gateway field empty.
In the DNS Settings section, click Edit.
Change Automatic (DHCP) to Manual, and toggle IPV4 to ON.
Enter your Active Directory Domain Controller (AD DC) VPC network address in the Preferred DNS field.
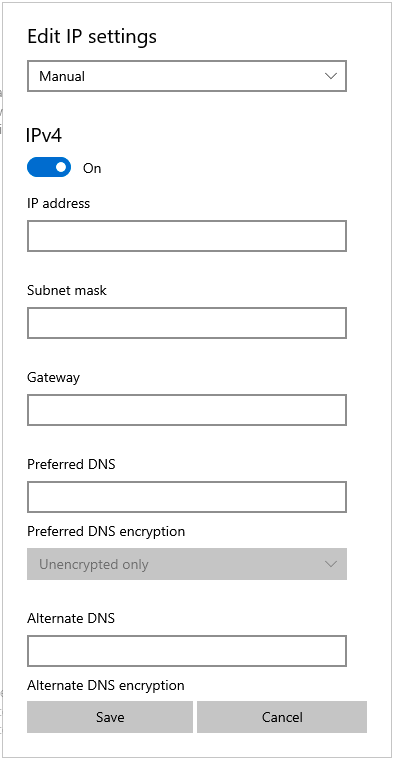
Active Directory requires proper DNS settings pointed to a domain controller. If you intend to run a second DC in your VPC network, enter its IP Address in the Alternate DNS field.
Click Save to apply changes.
To test the connection between servers, open Windows PowerShell or Command Prompt from the start menu.
Enter the following command to test your second Windows server's connectivity in the VPC network. Replace the example IP
192.0.2.1with your actual client address.ping 192.0.2.1
Your output should look like the one below.
     Pinging 192.0.2.1 with 32 bytes of data:
     Reply from 192.0.2.1: bytes=32 time=1ms TTL=128
     Reply from 192.0.2.1: bytes=32 time<1ms TTL=128
     Reply from 192.0.2.1: bytes=32 time<1ms TTL=128
     Reply from 192.0.2.1: bytes=32 time<1ms TTL=128

     Ping statistics for 192.0.2.1:
       Packets: Sent = 4, Received = 4, Lost = 0 (0% loss),
     Approximate round trip times in milli-seconds:
       Minimum = 0ms, Maximum = 1ms, Average = 0ms
Install Active Directory
Access the main Windows Server in your VPC, and log in using the Administrator user account.
Open the Windows Start Menu, find, and open Server Manager.
In the Welcome to Server Manager section, click Add roles and features. OR, click Manage and select
Add roles and featuresfrom the drop-down list.Click Next to start the Add roles and features wizard.
Keep Role-based or feature-based installation selected, and click Next.
Select your local server as the destination server, and click Next.
Click the selection box next to Active Directory Domain Services.
In the features prompt, click Add Features to select the Active Directory role.
Next, keep all pre-selected options active on the features page, and click Next.
On the Active Directory Domain Services page, click Next to proceed.
On the Confirmation page, click Install to start the Active Directory installation.
Monitor the Installation Progress. When complete, close the wizard.
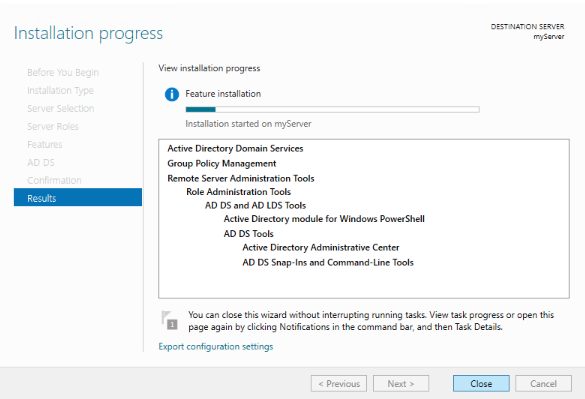
A new Active Directory Domain Services (AD DS) option is now available on the Server Manager left navigation menu.
Configure Windows Active Directory
Within the Server Manager dashboard. Click AD DS on the left navigation menu.
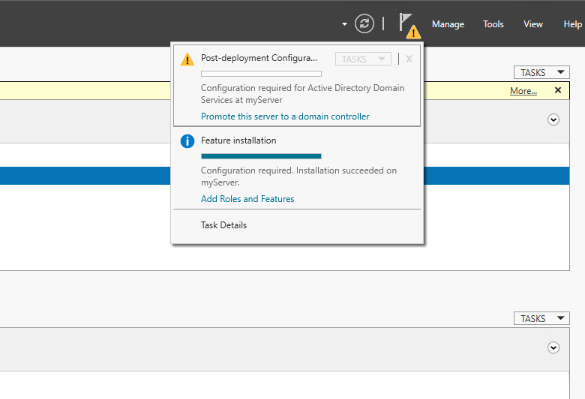
Find and click the orange warning notification next to Manage on the top right menu.
On the Post-deployment Configuration warning, click Promote this server to a domain controller.
Choose Add a forest in the deployment configuration wizard
Enter your desired Active Directory domain in the Root domain name field, then click Next.
Set your desired minimum Windows Server edition in the Forest and Domain functional level fields.
Enter a strong Directory Services Restore Mode (DSRM) password in the respective fields to use in cases of Active Directory restore operations.
Next, on the DNS Options page, click Next to proceed without DNS delegation.
Keep the pre-filled NetBIOS name, and click Next.
On the Paths page, keep the pre-filled directory choices or change them to your desired folder paths.
Next, review your selected domain services options, then click Next to run the server requirements check.
Click Install to start the Active Directory Domain Services installation.
When the installation is complete, the server performs an automatic restart to save the Active Directory domain changes.
Re-access your server using RDP.
Open Server Manager, and navigate to Local Server on the left navigation menu.
Verify that your Active Directory Domain appears next to Domain within the server properties section.
Setup a new Domain Administrative User
On the Server Manager dashboard, click Tools on the top right menu.
Select Active Directory Users and Computers from the list of drop-down options.
In the open window, expand your domain name, just below the Saved Queries group,
Right-click the Users group, select New, then click User.
In the New Object-User pop-up window, enter the user's first name and login name (username) and click Next.
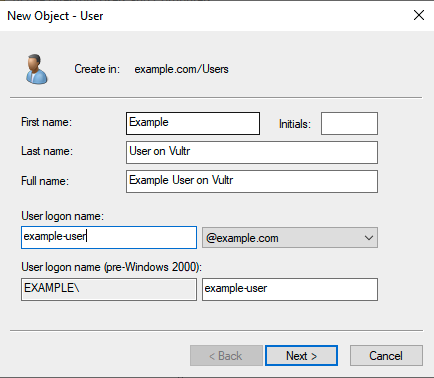
Assign the user a strong password that meets the Active Directory password requirements.
Click to deselect the User must change password at next logon as the account is for use in joining the domain before a normal login.
Click Next, review your choices, then click Finish to set up the user account.
To assign the user administrative privileges in the AD, click Users to reveal a list of all users and groups.
Find and double-click Domain Admins.
In the properties pop-up window, navigate to Members.
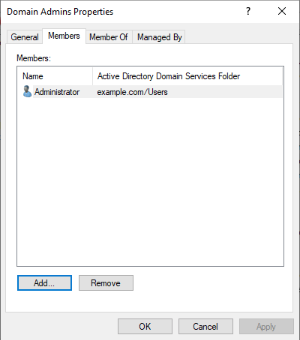
Click Add, enter the target user account name, then click Check Names.
Click OK to save changes, and the user is now included on the Members list.
Click Apply, then OK to save changes and grant the user administrative privileges in the domain.
Configure DNS
Open Server Manager, click *Tools, and select **DNS from the list of options.
In the DNS Manager window, expand your server group.
Click Reverse Lookup Zones, right-click the group, and select New Zone.
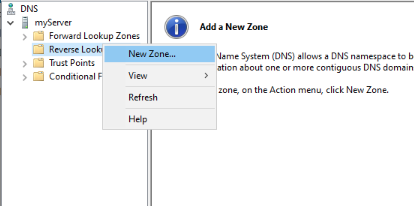
In the New Zone wizard, click Next to get started.
Select Primary zone and click Next.
Keep To all DNS servers running on domain controllers in this domain: selected, and click Next.
Keep IPV4 Reverse Lookup Zone selected, and click Next.
In the Network ID: field, enter your VPC network address (without the host bit). For example,
192.0.2, then click Next.Keep Allow only secure updates selected and click Next.
Review your settings and click Finish to create the zone.
Join a Windows Server to the Active Directory
Access your second Windows Server using RDP.
Open Server Manager from the Windows start menu.
Navigate to Local Server on the left navigation bar.
Next to the WorkGroup option, click
WORKGROUP.In the System Properties pop-up window, click Change next to
rename this computer or change its domain or workgroup.Keep your Computer Name entry, or change it if you wish.
In the Member of section, select Domain.
Enter your Active Directory Domain Name or NetBIOS name.
Enter the administrative username in the format
example.com\usernameand the password you created earlier.When you receive the welcome to domain prompt, your Windows Server successfully joined the Active Directory domain.
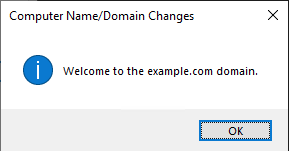
If you receive the Active Directory Domain Controller (AD DC) cannot be contacted error, please set the AD DC VPC network address as your preferred DNS server, as described earlier.
Conclusion
You successfully installed Windows Active Directory on the main domain controller (AD DC) in a single Vultr Virtual Private Cloud (VPC). You can configure multiple users, groups, and group policies for all client machines.
To connect your organization's computers to the cloud Active Directory. You need to create a VPN connection on any of the Windows Servers to securely connect to the Vultr Virtual Private Cloud (VPC), and share resources with other computers on the network. For more information, please visit the following articles.
- Getting Started with Active Directory.
- How to Set Up a VPN on Windows Server 2019 using Remote Access.
- Joining an Active Directory Domain for Windows Clients.
- Fixing An Identical SID While Joining An Active Directory Domain.