How to Join Azure Active Directory with a Vultr Windows Server

Introduction
Azure Active Directory (AAD) is a managed cloud-based, multi-tenant, and identity management service that is part of Microsoft's cloud computing platform. It's mainly used to manage access, rights, identity protection, and access management, complementing the Windows Active Directory service.
While the Windows Active Directory service works for user and computer management in a private network and consists of components like organizational units, group policy objects (GPOs) domains, and forests, AAD mainly integrates cloud applications and does not support organizational units or group policy objects.
Given its flat directory structure consisting of users and groups, AAD instances are Tenants and Representational State Transfer (REST) APIs that work on communication to external web applications and other APIs. For authentication, it uses SAML, OpenID, and OAuth2 protocols for authentication and authorization instead of Kerberos and NT LAN Manager (NTLM) used by Windows AD.
Among the key advantages of joining your Vultr Windows Server to an AAD include:
- Easy user account creation and password reset.
- Ability to manage mobile devices.
- Support for Single Sign ON (SSO).
- Improved user access to Office 365 applications.
This article describes how you can join a Windows Server hosted on Vultr to an Azure Active Directory (AAD) Domain.
Prerequisites
Before you begin, make sure you:
Deploy a Windows Server on Vultr.
This article uses a Windows Server 2022 instance.
- Attach the server to your Windows Virtual Private Network (VPC)
- Create or Join an Active Directory on the server.
- Have an active Office 365 or Azure cloud platform account.
- Set up an AAD with the same domain name as your Vultr Windows Active Directory.
- Create a Privileged AAD user to use for joining the Vultr Windows Server AD.
Join the Vultr Windows Server to the Azure Active Directory
To join your Vultr Windows Server Active Directory to the active AAD, access your main Active Directory Domain Controller ( AD DC) server, and follow the steps below.
- Access the Vultr windows server using the Remote Desktop Protocol (RDP).
- Log in using the Administrator username and random password listed on your Vultr instance dashboard.
Open Microsoft Edge or your preferred web browser on the Windows server.
Visit the official Azure AD Connect download page.
Select your desired language (English by default), and click Download to start downloading the file.
Open the downloaded
AzureADConnect.msifile to start the installer window.On the Express Settings, click Use Express Settings.
If the Use Express Settings option does not appear on your installer, your Windows Server is probably not connected to any VPC Active Directory domain. Please join it to a domain before proceeding.
In the Connect to Azure AD section, enter your privileged user USERNAME, and PASSWORD.
Click Next to authenticate your AAD credentials.

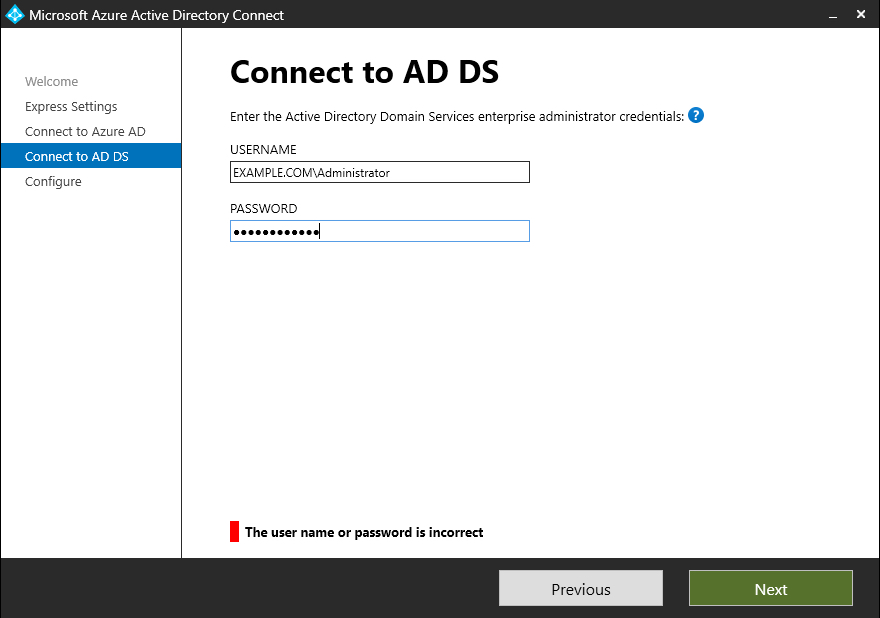
On the Connect to AD DS step, enter your Windows Active Directory privileged user USERNAME, PASSWORD, and click Next to validate.
The installer authenticates with your local Active Directory. If you enter a non-administrative user account, an invalid username or password error appears. If your AAD domain name does not match your local Active Directory domain name, the AD sign-in configuration prompt appears. Click the
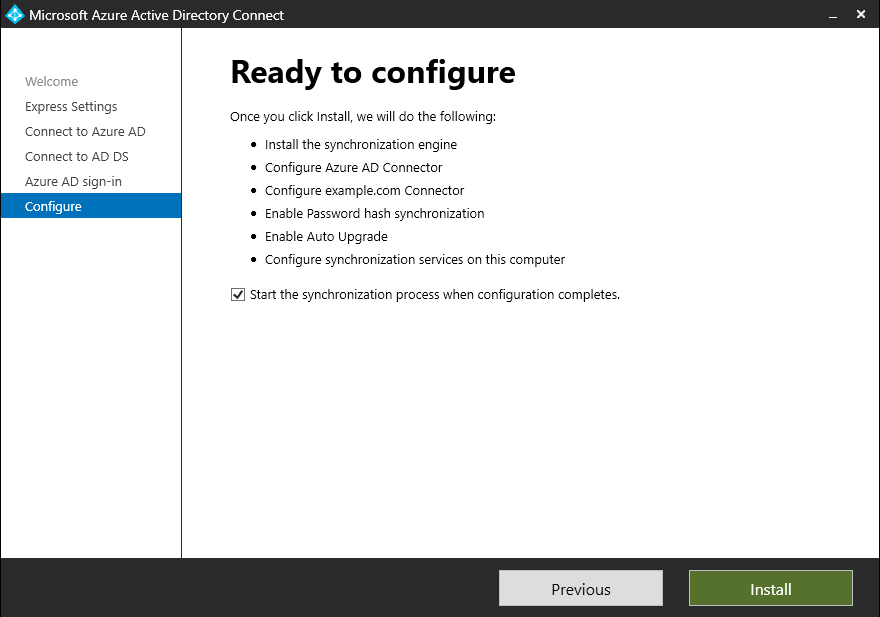
Continue without matching all UPN suffixes to verified domainsto proceed with a mismatch, but local AD users may not be able to sign in to the AAD using your local Active Directory domain as the two prefixes don't match.On the Configure step, a summary of your options should be below Ready to Configure.

Click Install to start joining your Vultr Windows server to the AAD domain.
When the installation is complete, all services and features configured on your Windows Active Directory are in sync with the AAD service. Any changes to the local AD are automatically synchronized.
More Information
You have successfully joined a Vultr Windows Server to an Azure Active Directory Domain. Please refer to the following Microsoft resources for more information on how to use the AAD services.