Vultr's One-Click Plesk is a quick way to launch a web hosting platform. The application has everything you need to get started, and you'll have a running server in about a minute.
This guide uses 192.0.2.123 as an example IP address and plesk.example.com as the domain name.
Basic Setup
This basic setup is for those familiarizing themselves with Plesk. The official website has extensive documentation on the product. Read more about Plesk on the official documentation portal. If you have just deployed One-Click Plesk, please be patient. The server will reboot one time during installation, which may take several minutes.
Connect to https://192.0.2.123:8443/login with a web browser. Replace the example IP address with your server's IP, or click the access link on the server information page.
- You can proceed past the SSL warning. See our instructions to bypass the HTTPS warning for self-signed SSL/TLS certificates.
- Log in with the root account for your instance.
Log in as root. The password is on the server information page and in your activation email.
Select an admin username, email address, and password. Click Enter Plesk.
Wait for Plesk to initialize. This process will take several minutes. When complete, you'll see the main Plesk dashboard.
Install Let's Encrypt SSL Certificate
Plesk fully supports free Let's Encrypt SSL certificates. You can install and manage SSL from the Plesk dashboard.
Register the name and create a DNS record for the server's IP address. Consult your DNS provider for instructions, or see our guide if using Vultr's DNS.
Verify the DNS has finished propagation, and the name is visible throughout the internet before proceeding. Propagation usually happens quickly, but could take up to 48 hours in some cases.
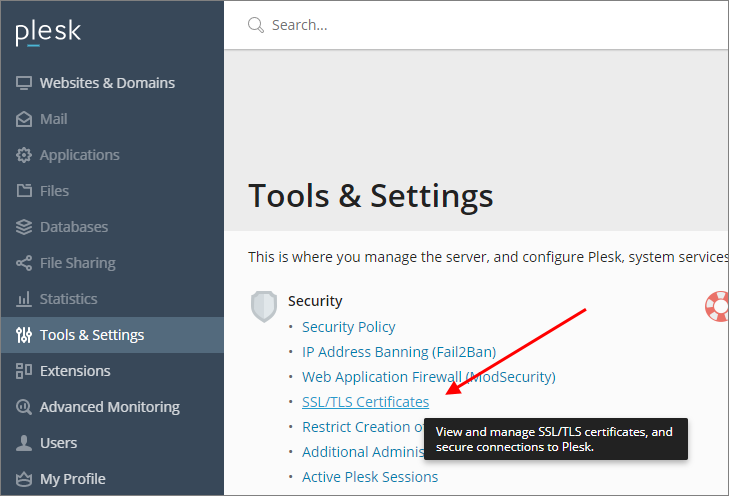
Click Tools & Settings.
Click SSL/TLS Certificates.

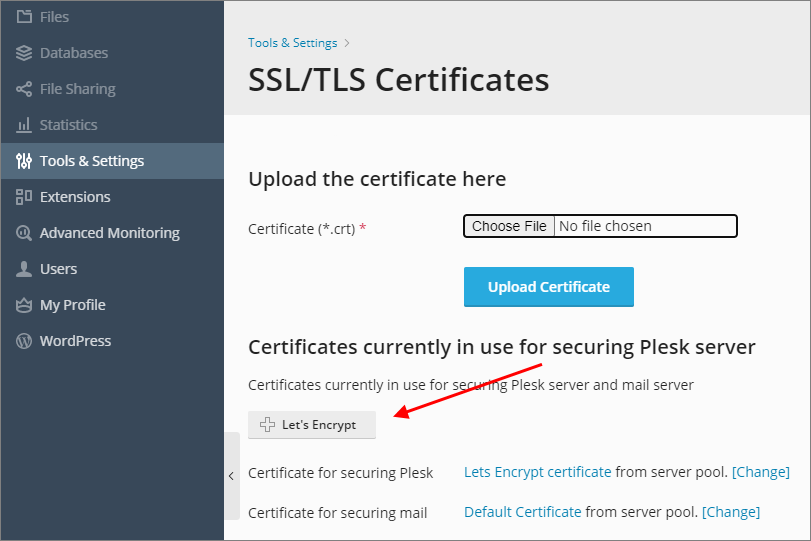
Click the Let's Encrypt button.

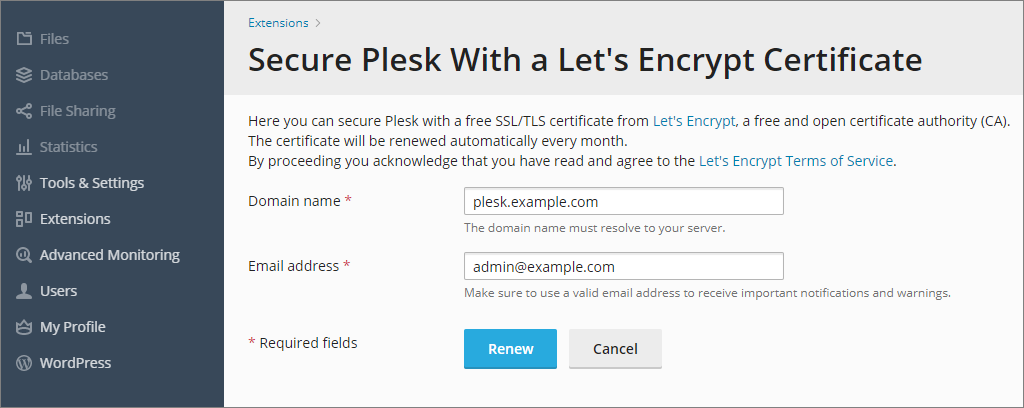
Enter your domain name and email address. Click Install.

Plesk will install the certificate.
Because the server is now using the correct certificate and the browser is connected at the IP address, you'll receive another SSL security warning page when the page reloads.
Log in to the Plesk server using the domain name. For example:
https://plesk.example.com:8443/loginVerify the server SSL certificate is correct in your browser.
Set Server Hostname
To change the domain name (hostname), use Server Settings on the Tools & Settings page.
- Click Tools & Settings.
- Click Server Settings.
- Enter the Full Hostname, then click OK.
Security and Firewall
For security purposes, SQL database ports are not open to the public. If you plan on using Plesk to manage your database, you may need to allow access to the following ports:
- MySQL server, TCP 3306
- MS SQL server, TCP 1433
- PostgreSQL server, TCP 5432
License Information
We offer several flavors of Plesk, including Web Admin Edition SE, Web Pro Edition, and Web Host Edition. The edition installed to your server is chosen at the time of deployment and persists for the lifetime of the server. Currently, a new server must be deployed to begin using a different edition of Plesk. You can view the different license features on the Vultr app page for Plesk.
Other Information
Plesk has many features and is highly customizable. See the Administrator Guide for more details.
To access the MySQL database running on your Plesk server, use the following command.
mysql -uadmin -p`cat /etc/psa/.psa.shadow`Plesk allows you to create a one-time login URL with the plesk login command line utility.
 [root@plesk ~]# plesk login admin
 https://plesk.example.com:8443/login?secret=1234567890ABCDEF1234567890ABCDEF
Passive FTP
By default, Plesk allows only active FTP connections. To enable passive FTP mode, please see this article at plesk.com.
About One-Click Apps
One-Click apps are updated regularly without notice. When launching a One-Click app, you'll receive our latest version. We do not update deployed instances, and you are responsible for keeping the instance up-to-date. If you design an infrastructure based on One-Click apps and need to ensure the same app version in the future, take a snapshot of the initial deployment and create new instances from the snapshot.