
Introduction
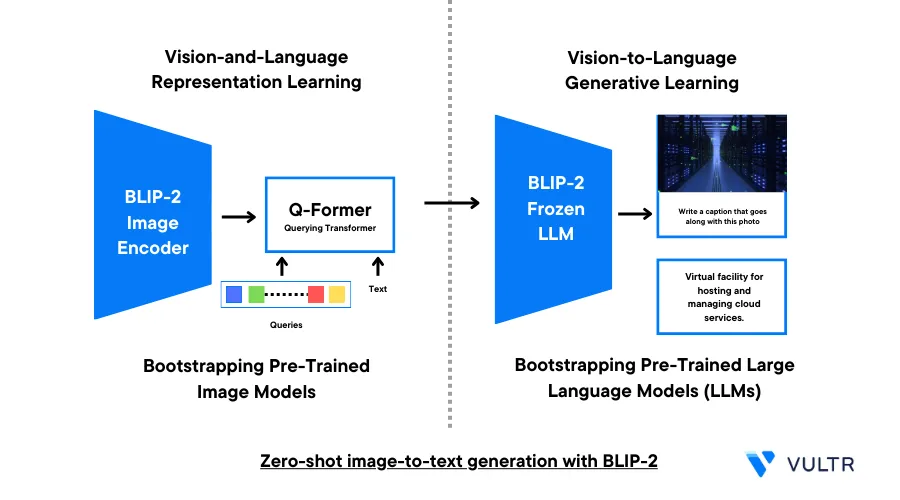
Bootstrapping Language-Image Pre-training (BLIP-2) is a pre-training framework that uses the development of trained vision models and large language models (LLMs) for zero-shot image-to-text generation. It delivers good results based on a wide range of vision-language tasks. BLIP-2 uses three models, an image encoder, a Querying Transformer (Q-Former), and a large language model which allow the model to perform tasks such as:
- Image captioning
- Visual question answering (VQA)
- Chat-like conversations by retaining the previous conversation using prompts.
This article explains how to carry out AI Image Captioning With BLIP-2 on a Vultr Cloud GPU server. You are to use the BLIP-2 model to perform zero-shot image-to-text generation tasks using an imported image.
Prerequisites
Before you begin:
Deploy a Ubuntu A100 Cloud GPU server with at least:
- 1/3 GPU
- 20 GB VRAM.
- 3 vCPUs
- 30 GB Memory
Use SSH to access the server as a non-root user with sudo privileges.
Switch to the new user account
# su example_user
Set Up the Server
In this section, set up the server to run the BLIP-2 model with all necessary dependency packages as described in the steps below.
Install PyTorch
$ pip3 install torch torchvision --index-url https://download.pytorch.org/whl/cu118The above command installs PyTorch with pre-built CUDA 11.8 libraries. To use the latest version, refer to the PyTorch Documentation.
Install Jupyter Notebook
$ pip3 install notebookBy default, UFW is active on Vultr servers. Therefore, allow the Jupyter Notebook port
8888through the firewall to accept connections$ sudo ufw allow 8888Restart the firewall to apply changes
$ sudo ufw reloadStart Jupyter Notebook
$ jupyter notebook --ip=0.0.0.0The above command starts a Jupyter Notebook instance that listens for incoming connections on all Server interfaces. If the command returns an error, exit your SSH session and start it again to activate the Jupyter library on your server.
Using a web browser such as Chrome, access Jupyter Notebook with the token generated in your command output
http://SERVER-IP:8888/tree?token=XXXXXXWithin the Jupyter Notebook interface, click New, select Notebook and create a
Python3Kernel file to start working on the model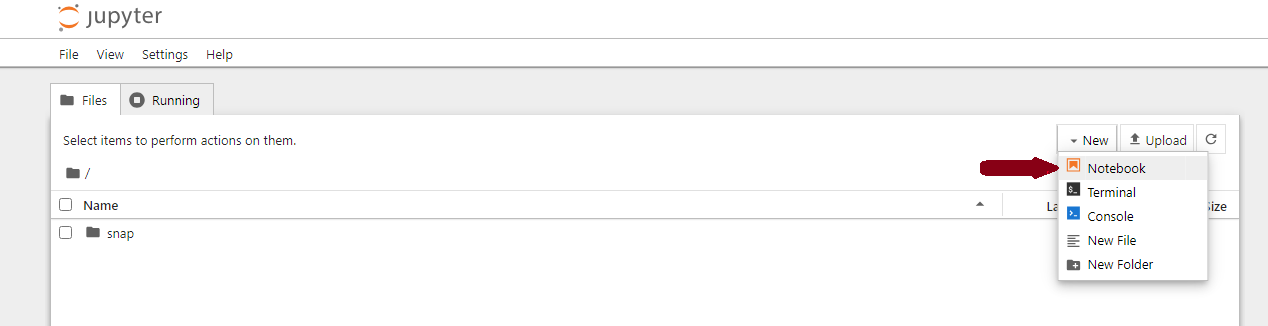
Set Up the Model
In this section, use Jupyter Notebook to import the required model libraries, load the pre-trained or fine-tuned BLIP-2 captioning model, and run it on the server as described in the steps below.
Install the
salesforce-lavispackage!pip3 install salesforce-lavisLAVIS is a Python deep learning library used for Language-and-Vision research and applications in tasks like retrieval, captioning, visual question answering, and multi-modal classification. It's used along with BLIP-2 for Visual Question Answering (VQA) related tasks.
Upgrade Jupyter Notebook and
ipywidgets!pip3 install --upgrade jupyter ipywidgetsImport the required libraries
 import torch
 from PIL import Image
 import requests
 from lavis.models import load_model_and_preprocess
Below is what the libraries do:
torch: It's used to build and train neural networksImage: It's imported fromPILwhich provides image processing capabilities such as opening an image and image processingrequests: Downloads an image from a specified URLload_model_and_preprocess: Loads a pre-trained image captioning model along with the reprocessing steps
Import the base image. Replace
https://example.com/image.jpgwith your actual image URLimg_url = 'https://example.com/image.jpg'Process the image
raw_image = Image.open(requests.get(img_url, stream=True).raw).convert('RGB')Below is what the function does:
Image.open(): Opens the raw image data. In the above code, it opens the raw image data from the HTTP responserequests.get(img_url, stream=True).raw: Uses the requests library to send an HTTP GET request to the URL specified inimg_url. Thestream=Trueargument ensures that the response gets streamed instead of getting downloaded in full. Streaming is useful when working with large files like images because it allows data download in chunks to conserve memory. The.rawattribute provides access to the raw content of the response, which is the image data.convert('RGB'): Converts the image to a specified mode. In this case, 'RGB' (Red, Green, Blue) which is commonly used for image processing tasks applies to the image. This is necessary because the original input image can be in a different color mode, and converting it toRGBensures consistent processing.
To view the generated RGB image, run the following command:
display(raw_image)Move the computations to the GPU memory
device = torch.device("cuda")The above command creates a
torch.deviceobject that represents the CUDA device. CUDA allows you to use NVIDIA GPUs to speed up computations in machine learning and other tasks.Load the Pre-trained BLIP-2 Model
 model, vis_processors, _ = load_model_and_preprocess(
  name="blip2_t5",
  model_type="caption_coco_flant5xl",
  is_eval=True,
  device=device
 )
Below is what the function does:
model: Holds the loaded pre-trained image captioning modelvis_processors: Holds the visualization processors. These processors are responsible for any pre-processing or post-processing steps required to visualize the results or outputs of the modelload_model_and_preprocess: Consists of several arguments to load the model and preprocess the data. These include:name: Specifies a name or identifier for a specific modelmodel_type: Specifies the type or variant of the pre-trained model to loadis_eval: Verifies whether the model is in use for evaluation or notdevice: Specifies the device on which the model loads and runs. In this case,cudawhich means the model uses available GPU memory
Several other models can replace the above-used code block. These include the following:
pretrain_opt2.7bmodel, vis_processors, _ = load_model_and_preprocess( name="blip2_opt", model_type="pretrain_opt2.7b", is_eval=True, device=device )pretrain_opt6.7bmodel, vis_processors, _ = load_model_and_preprocess( name="blip2_opt", model_type="pretrain_opt6.7b", is_eval=True, device=device )caption_coco_opt2.7bmodel, vis_processors, _ = load_model_and_preprocess( name="blip2_opt", model_type="caption_coco_opt2.7b", is_eval=True, device=device )caption_coco_opt6.7bmodel, vis_processors, _ = load_model_and_preprocess( name="blip2_opt", model_type="caption_coco_opt6.7b", is_eval=True, device=device )pretrain_flant5xlmodel, vis_processors, _ = load_model_and_preprocess( name="blip2_t5", model_type="pretrain_flant5xl", is_eval=True, device=device )You can use any of the above models to load and set up the model.
You do not need to run more than one model at a time to generate an output. Make sure only one model is in use at a time.
Load the processor
vis_processors.keys()Prepare the image as input Using the associated processors
image = vis_processors["eval"](raw_image).unsqueeze(0).to(device)Below is what the code does:
vis_processors["eval"]:vis_processorscontains various processors, and"eval"refers to a processor designed specifically for evaluation.unsqueeze(0): Adds a new dimension of size 1 to the tensor. In this case, it's converting the processed image tensor from a 3-dimensional tensor to a 4-dimensional tensorto(device): Moves the tensor to the GPU for processing
When the above model steps are complete, the model is ready to generate a caption for any given image, visual question answering, and chat-like conversations.
Caption Generation
BLIP-2 allows two types of caption generation: Single Caption generation and Multiple Caption generation. In this section, generate captions on any given image as described in the steps below.
Single Caption: Generates one caption for an image. To view the single generated caption for the imported image, run the following code
model.generate({"image": image})Below is what the code does:
model: Refers to the language model used to perform the image captioning task{"image": image}: Refers to a dictionary where the keyimagecorresponds to the input image to generate captions. Theimagevariable contains the actual image data.
Multiple Caption: Generates multiple independent captions for an image
model.generate({"image": image}, use_nucleus_sampling=True, num_captions=3)Below is what the code does:
use_nucleus_sampling=True: Defines that the nucleus sampling applies in the generation process. Nucleus sampling is also known astop-k sampling. In nucleus sampling, the model considers a subset of the most likely words instead of sampling from a fixed number (k) of top options. This leads to more diverse text generation. To disable nucleus sampling, set the value toFalsenum_captions: Specifies the number of captions you intend to generate for the input image. It's set to3but you can change the number to generate more or less captions
Visual Question Answering (VQA)
Zero-Shot Vision-to-Language Generation refers to the ability of a model to generate captions or descriptions for images it has never seen during training. Therefore the model is capable of understanding the content of an image. In this section, ask the model a question based on the image as described below.
To ask a specific question, run the following command with a question prompt
model.generate({
    "image": image,
    "prompt": "Question: YOUR_QUESTION_HERE? Answer:"})
In the above code, "image": image specifies the input image that you want to generate text about. This produces the answer based on the asked question. Some prompt examples include, How many dogs are there in the picture?, Which city is this?, Where is this monument located?, among others
It's important to note that the model is fine-tuned on keywords like Question. This means that the generated descriptions or captions are more precise when they follow a prompt template. For example, declare a question using the Question: keyword to get more precise responses
Context Based Visual Question Answering for Chat-Like Conversations
The BLIP-2 model is capable of answering more than one question based on the same image by using the context of the previous image. To generate answers based on a specific context, run the following code:
context = [
    ("PREVIOUS_QUESION1?", "PREVIOUS_ANSWER1"),
    ("PREVIOUS_QUESION2?", "PREVIOUS_ANSWER2"),
]

question = "NEW_QUESTION_HERE?"
template = "Question: {} Answer: {}."
prompt = " ".join([template.format(context[i][0], context[i][1]) for i in range(len(context))]) + " Question: " + question + " Answer:"
print(prompt)

model.generate(
    {
    "image": image,
    "prompt": prompt
    },
    use_nucleus_sampling=False,
)
Below is what the code does:
context: Initializes a list where each element is a tuple consisting of a previous question and its corresponding answer. This context applies as a history of the conversation for the model to refer to. You can add more previous questions and answers depending on the total number of answers returned by the model. Below is an example of the context field:context = [ ("which city is this?", "new york city"), ("is it day or night?", "night"), ]question: Sets up a new question to ask the model in the conversation. ReplaceNEW_QUESTION_HERE?with your actual question to asktemplate: Defines a template string that’s used to create the conversation history. The curly braces{}are placeholders filled by the previous question and answer pairsprompt: Takes the entire prompt provided to the model, formats the context tuples and adds a new question to create a comprehensive view for generating an answermodel.generate: Generates an answer based on the provided prompt and image. Theuse_nucleus_samplingparameter value isFalse, this means nucleus sampling is not used for this generation process. You can setuse_nucleus_sampling parametertoTrueto apply nucleus sampling in your output
Conclusion
In this article, you implemented AI image captioning with the BLIP-2 model on a Vultr Cloud GPU server. You prepared the server, installed libraries, and executed the model functions to generate output based on the input image. Additionally, you explored various use cases such as image captioning, VQA, and chat-like conversations based on context. For more information about the model, visit the BLIP-2 Hugging Face Space.
Next Steps
To leverage the power of your Vultr Cloud GPU server, visit the following resources to implement more solutions:
No comments yet.