

Introduction
The emergence of image-generative solutions has revolutionized the way of perceiving and interacting with visual content. It harnesses the power of artificial intelligence to create stunning, lifelike images that span a spectrum of artistic styles and creative visions. Stable Diffusion, as one of the main players in this field, offers open-sourced solutions for new forms of image expression and design.
When using Stable Diffusion on a GPU-powered server, it's possible to create stunning logo or banner designs without any graphic design skills. In this article, create stylish logos on a Vultr Cloud GPU instance, export, and share them for offline usage on your local computer.
Prerequisites
Before you begin:
Deploy a Debian Vultr Cloud GPU Serverwith at least:
- 1/7 GPU
- 10 GB GPU RAM
- 2 vCPUs
If you deploy an instance with less than 10 GB of GPU RAM, you may encounter errors like
RuntimeError: CUDA error: out of memorywhen loading the models in this article.Using SSH, access the server
Create a non-root user with sudo privileges
Switch to the user
# su user_example
Install Python Libraries
To generate visual content, install necessary Python libraries required by the Stable Diffusion model, and a development environment such as Jupyter Notebook to execute Python code. Install all required model dependencies as described in the steps below.
Update the Pip package manager
$ pip install --upgrade pipUsing
pip, install thePyTorchpackage$ pip install torchInstall
diffusers,opencv,accelerate,transformers, andxformerspackages$ pip install diffusers opencv-python accelerate transformers xformersBelow is the function of each package:
opencv: Allows you to perform image processing and computer vision tasks. In this article,cannyinsideopencvdetects logo edgesaccelerate: Provides faster and less memory-intense model loadingtransformers,xformers: Enable the creation of aStableDiffusionControlNetPipeline
Install Jupyter Notebook
$ pip install notebookAllow the Jupyter Notebook port
8888through the default UFW firewall$ sudo ufw allow 8888/tcpStart Jupyter Notebook
$ jupyter notebook --ip=0.0.0.0The above command starts Jupyter Notebook listening for incoming connections on all server interfaces as declared with
0.0.0.0. If the above command fails to run, stop your SSH session, and re-establish a connection to the server.When successful, an access token displays in your output as below:
 [I 2023-08-16 20:42:14.446 ServerApp] http://HOSTNAME:8888/tree?token=c70592882983e614515ee7ed3fbbcfc87b6a8d88d4a79a4e
 [I 2023-08-16 20:42:14.446 ServerApp]     http://127.0.0.1:8888/tree?token=c70592882983e614515ee7ed3fbbcfc87b6a8d88d4a79a4e
 [I 2023-08-16 20:42:14.446 ServerApp] Use Control-C to stop this server and shut down all kernels (twice to skip confirmation).
 [W 2023-08-16 20:42:14.449 ServerApp] No web browser found: Error('could not locate runnable browser').
 [C 2023-08-16 20:42:14.449 ServerApp]

     To access the server, open this file in a browser:
         file:///home/user/.local/share/jupyter/runtime/jpserver-65474-open.html
     Or copy and paste one of these URLs:
         http://HOSTNAME:8888/tree?token=c70592882983e614515ee7ed3fbbcfc87b6a8d88d4a79a4e
         http://127.0.0.1:8888/tree?token=c70592882983e614515ee7ed3fbbcfc87b6a8d88d4a79a4e
Start the Logo Generation Process
Using a web browser such as Chrome, access your Jupyter Notebook interface using the generated access token
http://192.0.2.100:8888/tree?token=Within the Jupyter interface, click New, and select Notebook from the dropdown list to create a new
Python3Kernel fileIn the new Notebook code cell, update Jupyter and Ipywidgets
pip install --upgrade jupyter ipywidgetsPress Ctrl + Enter to run the command and other code in the file
Import required libraries as below
 import torch
 import cv2
 import numpy as np
 from PIL import Image
 from diffusers import StableDiffusionControlNetPipeline, ControlNetModel, UniPCMultistepScheduler
 from diffusers.utils import load_image
To load a base image to the model, define a new
img_urlvariable with your target image URL, and use the Stable Diffusionload_imageutility to load the image as belowimg_url = "https://www.vultr.com/media/media_card_1200x630.png" image = load_image(img_url)In the above code, the variable uses a Vultr logo. Replace the link with the actual original logo URL you intend to style.
Apply the OpenCV Canny Algorithm
Load the image into an OpenCV-compatible input in a NumPy array
image = np.array(image)Apply canny to detect and highlight the edges of the base logo image
 low_threshold, high_threshold = 100, 200
 image = cv2.Canny(image, low_threshold, high_threshold)[:, :, None]
 image = np.concatenate([image, image, image], axis=2)
 image = Image.fromarray(image)
Save and view canny processing output
image.save("canny.png")When successful, your base logo image should display with highlighted edges
Create a Stable Diffusion Pipeline using ControlNet
Declare the base Stable Diffusion model path
sd_model_path = "danbrown/RevAnimated-v1-2-2"The example in this article uses the HuggingFace Rev Animated model. Different models generate images in different styles, it's recommended to explore other models to generate different results.
Declare the ControlNet model path
controlnet_model_path = "lllyasviel/sd-controlnet-canny"Load the model in half precision
controlnet = ControlNetModel.from_pretrained(controlnet_model_path, torch_dtype=torch.float16)Create the Stable Diffusion pipeline
 pipe = StableDiffusionControlNetPipeline.from_pretrained(
    sd_model_path,
     controlnet=controlnet,
     torch_dtype=torch.float16,
 )
 pipe = pipe.to("cuda")
Setup the Pipeline parameters
Enable
xFormersmemory efficient attention to lower GPU memory usage and speed up the inference processpipe.enable_xformers_memory_efficient_attention() pipe.enable_attention_slicing()Offload all models to the CPU to reduce GPU memory usage with a low impact on the image generation process
pipe.enable_model_cpu_offload()Declare the pipeline scheduler
pipe.scheduler = UniPCMultistepScheduler.from_config(pipe.scheduler.config)The above code defines the method to update a sample image based on model outputs. The UniPC scheduler is fast and enables a reasonable generation performance.
Generate the Stylish Logo
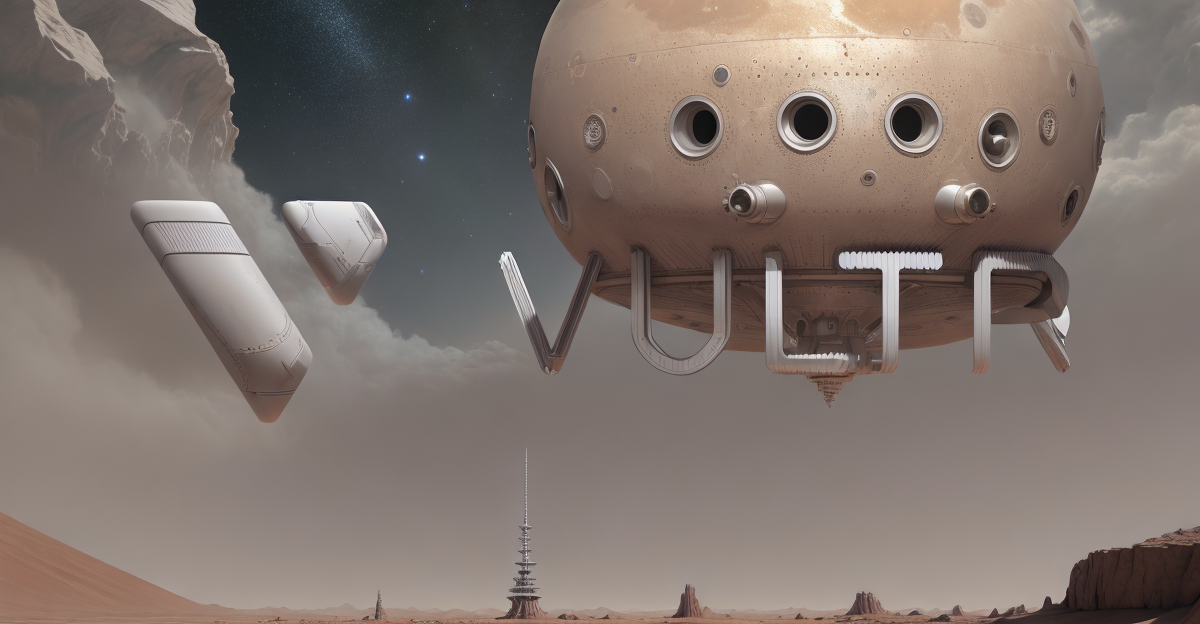
Define the prompt and the negative prompt. The more detailed the prompt is, the better the generated image becomes
 prompt = "best quality, masterpiece, sharp silver constructions, spaceship, Mars, crater, universe background"
 negative_prompt = "lowres, cropped, worst quality, low quality, watermark, blurry, EasyNegative"
Generate the stylish logo image with proper parameters.
num_inference_steps,guidance_scale, andcontrolnet_conditioning_scaleare the most important among many others.output = pipe( prompt=prompt, negative_prompt=negative_prompt, image=image, num_inference_steps=30, guidance_scale=7.0, controlnet_conditioning_scale=0.8, ).images[0]Below is what the above code parameters do:
num_inference_steps: Defines the number of inference steps during the diffusion process. The value cannot be too small as the diffusion process requires enough steps to generate the image. As a result, 30 steps balance the image quality and the computational resource used.guidance_scale: Controls how strict the diffusion process needs to follow the given prompts. The value7.0offers a good balance between creative freedom and your defined direction.controlnet_conditioning_scale: Determines how obvious the control image appears in the generated image. A small value makes the control image more invisible and merged into the whole image.0.8is an experimental value, it's recommended to try different values to test the generation differences.
The generated styled logo image should look look like if not fully match your text prompt
Save the Generated Image
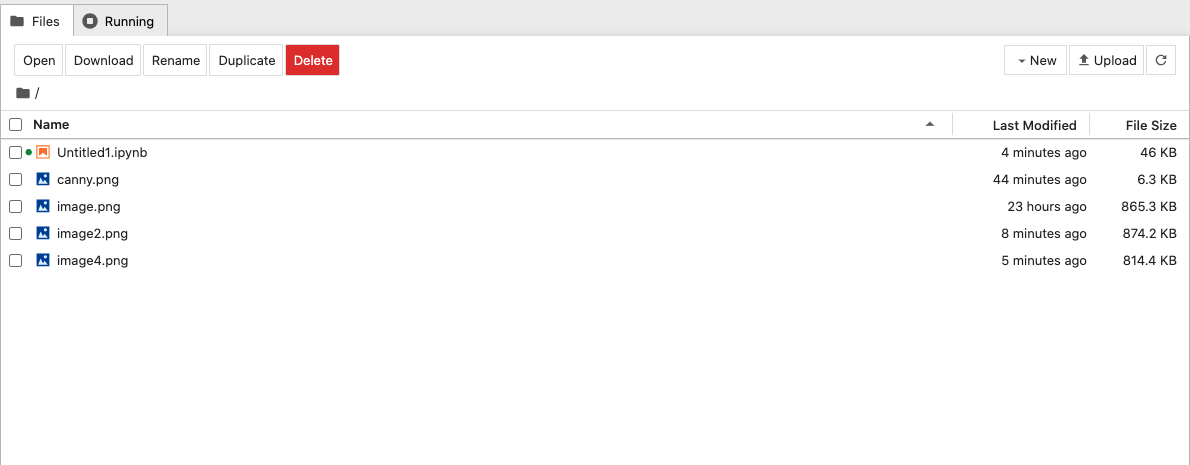
Save the generated Stylish Logo Image to an existing server directory
output.save("/home/user/image.png")The above code exports the generated image to your user's home directory. To define a custom directory, verify that it exists before running the code
To view the saved images, navigate to your main Jupyter interface, double-click the file to open and view the exported image
To download the generated images from your server to your local machine, use a secure file transfer protocol such as SFTP, SCP, or Rsync to save a copy of the files locally.
Refine the Generated Logo Images
When running the seed, the pipeline is not fixed, as such you can try different prompts and parameters to refine your generated stylish logo image. For example, change the prompt as below
prompt = "best quality, masterpiece, tropical islands spread in blue ocean, blue sky and white cloud, soft sunshine"The above prompt generates a different image based on the same input image. You can apply more prompts to refine your output and style your logo image even further

Conclusion
In this article, you created a stylish logo using Stable Diffusion on a Vultr cloud GPU instance. Using Stable Diffusion allows you to generate stunning logo or banner images in minutes which improves work efficiency. For more information on how to use Stable Diffusion, visit the model FAQ page.
Next Steps
To implement more solutions on your Vultr Cloud GPU Server, visit the following resources:
No comments yet.