

Introduction
Developing and deploying modern Kubernetes native applications is a process that involves many steps. Software developers spend a long time building, updating Kubernetes manifests, deploying, and managing container images. In some cases, a dedicated professional is hired to manage the whole platform, and this is where Skaffold comes into play.
Skaffold is an open-source CI/CD tool that simplifies workflow for developers by gathering all these processes in one place. It continuously scans the local file system to monitor source code changes, creates a CI/CD pipeline to build code into the container image, pushes the image update to the DockerHub registry, and deploys it to the target Kubernetes cluster. In addition, Skaffold enables developers to focus on writing code locally while it continuously deploys application code to local or remote Kubernetes clusters.
Skaffold Features
- Support multiple tools including, kubectl, helm, and kustomize.
- Integrates with other CI/CD tools such as GitHub Actions or ArgoCD.
- Highly extensible and supports build profiles.
- Supports multiple applications written in Java, Go, Python, and Node.js.
In this guide, you will continuously develop and monitor an Express Application using Skaffold and Octant on a Vultr Kubernetes Engine (VKE) cluster. You will create an Express application, and use Skaffold to test and debug your Express application in a cluster. In addition, you'll install Octant to monitor your cluster and workloads in real-time using a web-based dashboard.
Prerequisites
Before you begin:
- Deploy a Vultr Kubernetes Engine (VKE) cluster with at least three nodes.
- Install Kubectl on your computer to access the cluster.
- Install Docker.
- Add your current user to the sudo and Docker groups.
Install Skaffold
Download the Skaffold binary file.
$ curl -Lo skaffold https://storage.googleapis.com/skaffold/releases/latest/skaffold-linux-amd64Install Skaffold as a systemwide application.
$ sudo install skaffold /usr/local/bin/Verify the installed Skaffold version.
$ skaffold versionOutput.
v2.6.0
Create an Express Application
In this section, install Node.js on your local system and use it to create an Express application as described below.
Import the Node source repository.
$ curl -sL https://deb.nodesource.com/setup_18.x -o nodesource_setup.sh && sudo bash nodesource_setup.shInstall Node.js.
$ sudo apt install nodejs -yVerify the installed Node.js version.
$ node -vOutput.
v18.16.0Create a new directory for the Express application.
$ mkdir appChange to the
appdirectory.$ cd appUsing a text editor such as
Nano, create apackage.jsonfile to define the project dependencies.$ nano package.jsonAdd the following configurations to the file.
 {
   "name": "my-express-app",
   "version": "1.0.0",
   "description": "Express Hello World Application",
   "main": "app.js",
   "scripts": {
     "start": "node app.js"
   },
   "dependencies": {
     "express": "4.17.1"
   }
 }
Save and close the file.
Create an
app.jsExpress application file.$ nano app.jsAdd the following configurations to the file.
 'use strict';
 const express = require('express');
 const PORT = process.env.PORT || 8080;
 const app = express();
 app.get('/', function (req, res) {
   res.send('Express Hello World Application!\n');
 });
 app.listen(PORT);
 console.log('Running on http://localhost:' + PORT);
Save and close the file.
Install the application dependencies.
$ npm installStart the Express application in the background.
$ npm startOutput:
> my-express-app@1.0.0 start
> node app.js

Running on http://localhost:8080
In a different SSH session, test that you can access the Express application.
$ curl 127.0.0.1:8080Output:
Express Hello World Application!Stop the running application by pressing Ctrl + C.
Create a Dockerfile
Skaffold uses Docker and the Dockerfile to build a container image from the application source code before pushing it into the DockerHub registry. Set up a new Dockerfile as described in this section.
Create the Dockerfile.
$ nano DockerfileAdd the following configurations to the file.
 FROM node:14-alpine as builder
 ENV NODE_ENV="production"

 # Copy app's source code to the /app directory
 COPY . /app

 # The application's directory will be the working directory
 WORKDIR /app

 # Install Node.js dependencies defined in '/app/package.json'
 RUN npm install
 FROM node:14-alpine
 ENV NODE_ENV="production"
 COPY --from=builder /app /app
 WORKDIR /app
 ENV PORT 8080
 EXPOSE 8080

 # Start the application
 CMD ["npm", "start"]
Save and close the file.
To grant Skaffold access to the DockerHub registry. Log in to your Dockerhub account by running the command below.
$ docker loginWhen prompted, enter your DockerHub credentials to build and push the image. Your output should look like the one below.
 Login with your Docker ID to push and pull images from Docker Hub. If you don't have a Docker ID, head over to https://hub.docker.com to create one.
 Username: example-user
 Password:
 WARNING! Your password will be stored unencrypted in /home/example-user/.docker/config.json.
 Configure a credential helper to remove this warning. See
 https://docs.docker.com/engine/reference/commandline/login/#credentials-store

 Login Succeeded
Create Kubernetes Manifest Files
Skaffold requires a Dockerfile and Kubernetes Manifest files present in your directory to create containers. Set up the necessary manifest files as described in the steps below.
Create a
deployment.yamlfile.$ nano deployment.yamlAdd the following configurations to the file. Replace
example-userwith your actual DockerHub username.apiVersion: apps/v1 kind: Deployment metadata: name: my-express-app spec: replicas: 1 selector: matchLabels: app: my-express-app template: metadata: labels: app: my-express-app spec: containers: - name: my-express-app image: example-user/my-express-app resources: limits: memory: 128Mi cpu: 500m ports: - containerPort: 8080Save and close the file.
The above configuration file references an Express image name and defines your application port.
Create a new
service.yamlfile.$ nano service.yamlAdd the following configurations to the file.
 apiVersion: v1
 kind: Service
 metadata:
   name: my-express-app-svc
 spec:
   selector:
     app: my-express-app
   type: LoadBalancer
   ports:
   - protocol: TCP
     port: 8080
     targetPort: 8080
Save and close the file.
The above configuration defines the
Serviceresource to expose your application to the outside world.
Initialize Skaffold
Initialize your Skaffold project.
$ skaffold initThe above command scans for the Dockerfile and Kubernetes Manifests. It prompts you with a series of questions and creates a Skaffold configuration file
skaffold.yamlin your app directory. Reply to the prompts as below.? Choose the builder to build image example-user/my-express-app [Use arrows to move, type to filter] Buildpacks (package.json) > Docker (Dockerfile) ? Choose the builder to build image example-user/my-express-app Docker (Dockerfile) ? Which builders would you like to create kubernetes resources for? apiVersion: skaffold/v4beta6 kind: Config metadata: name: app build: artifacts: - image: example-user/my-express-app docker: dockerfile: Dockerfile manifests: rawYaml: - deployment.yaml - service.yaml ? Do you want to write this configuration to skaffold.yaml? (y/N) y Configuration skaffold.yaml was written You can now run [skaffold build] to build the artifacts or [skaffold run] to build and deploy or [skaffold dev] to enter development mode, with auto-redeployWhen successful, your Skaffold project is initialized and ready to run in continuous development mode.
Continuously Build and Test an Express Application
In continuous development mode, Skaffold continuously monitors your application files for any changes. After detecting changes, Skaffold rebuilds the Express application image, pushes it to the DockerHub container registry,and deploys your application to the Kubernetes cluster.
Run the Skaffold in development mode in the background.
$ skaffold dev &Your output should look like the below:
 - deployment.apps/my-express-app configured
 - service/my-express-app-svc configured
 Waiting for deployments to stabilize...
 - deployment/my-express-app is ready.
 Deployments stabilized in 5.393 seconds
 Press Ctrl+C to exit
 [my-express-app]
 [my-express-app] > my-express-app@1.0.0 start /app
 [my-express-app] > node app.js
 [my-express-app]
 [my-express-app] Running on http://localhost:8080
When successful, query the pod status.
$ kubectl get podsYour output should look like the one below:
 NAME                              READY   STATUS    RESTARTS   AGE
 my-express-app-75d5c8c6b4-g49hp   1/1     Running   0          67s
Run the following command to get the IP Address of the new Load Balancer created for the Express application.
$ kubectl get svcYour output should look like the one below.
 NAME                 TYPE           CLUSTER-IP      EXTERNAL-IP    PORT(S)          AGE
 kubernetes           ClusterIP      10.96.0.1       <none>         443/TCP          22m
 my-express-app-svc   LoadBalancer   10.104.199.14   192.0.2.1   8080:31883/TCP   2m48s
Verify that the Load Balancer has a public IP address as displayed in the above EXTERNAL-IP
192.0.2.1output.In your web browser, access the application on the localhost port
8080as displayed in the Skaffold output, or visit your cluster external IP.https://192.0.2.1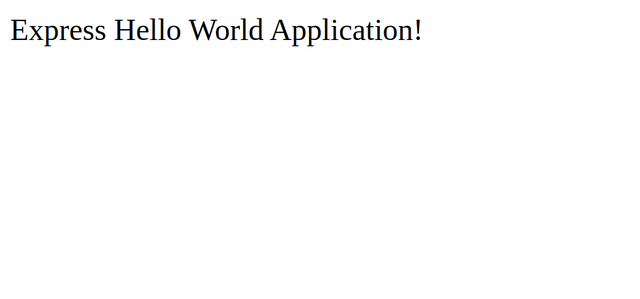
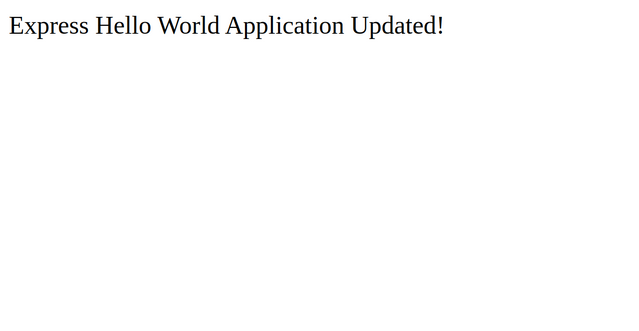
When successful, modify the source code of your Express application in the
app.jsfile fromExpress Hello World Application!toExpress Hello World Application Updated!as below.$ sed -i 's/Express Hello World Application!/Express twice Hello World Application Updated!/g' app.jsWhen successful, Skaffold automatically triggers a rebuild and deploys the updated image to your Kubernetes cluster.
Refresh your web browser tab to view the updated Express application.
Monitor the Express Application with Octant
Octant is an open-source and web-based tool used to monitor cluster applications in real time. With Octant, you can debug and inspect Kubernetes objects and container logs faster. In this section, monitor the Express application using Octant as described below.
Download Octant from the official GitHub repository.
$ wget https://github.com/vmware-archive/octant/releases/download/v0.25.1/octant_0.25.1_Linux-64bit.tar.gzExtract the downloaded file.
$ tar -xvzf octant_0.25.1_Linux-64bit.tar.gzTo activate the Octant command, move it to the
/usr/bindirectory.$ sudo mv octant_0.25.1_Linux-64bit/octant /usr/bin/Grant execute permissions on the Octant binary.
$ sudo chmod +x /usr/bin/octantVerify the installed Octant version.
$ octant versionOutput:
 Version:  0.25.1
 Git commit:  f16cbb951905f1f8549469dfc116ca16cf679d46
 Built:  2022-02-24T23:02:15Z
Start the Octant server in the background.
$ octant --listener-addr 0.0.0.0:7777In your web browser, visit the Octant web interface to start monitoring your Express application in the Kubernetes cluster.
http://192.0.2.1:7777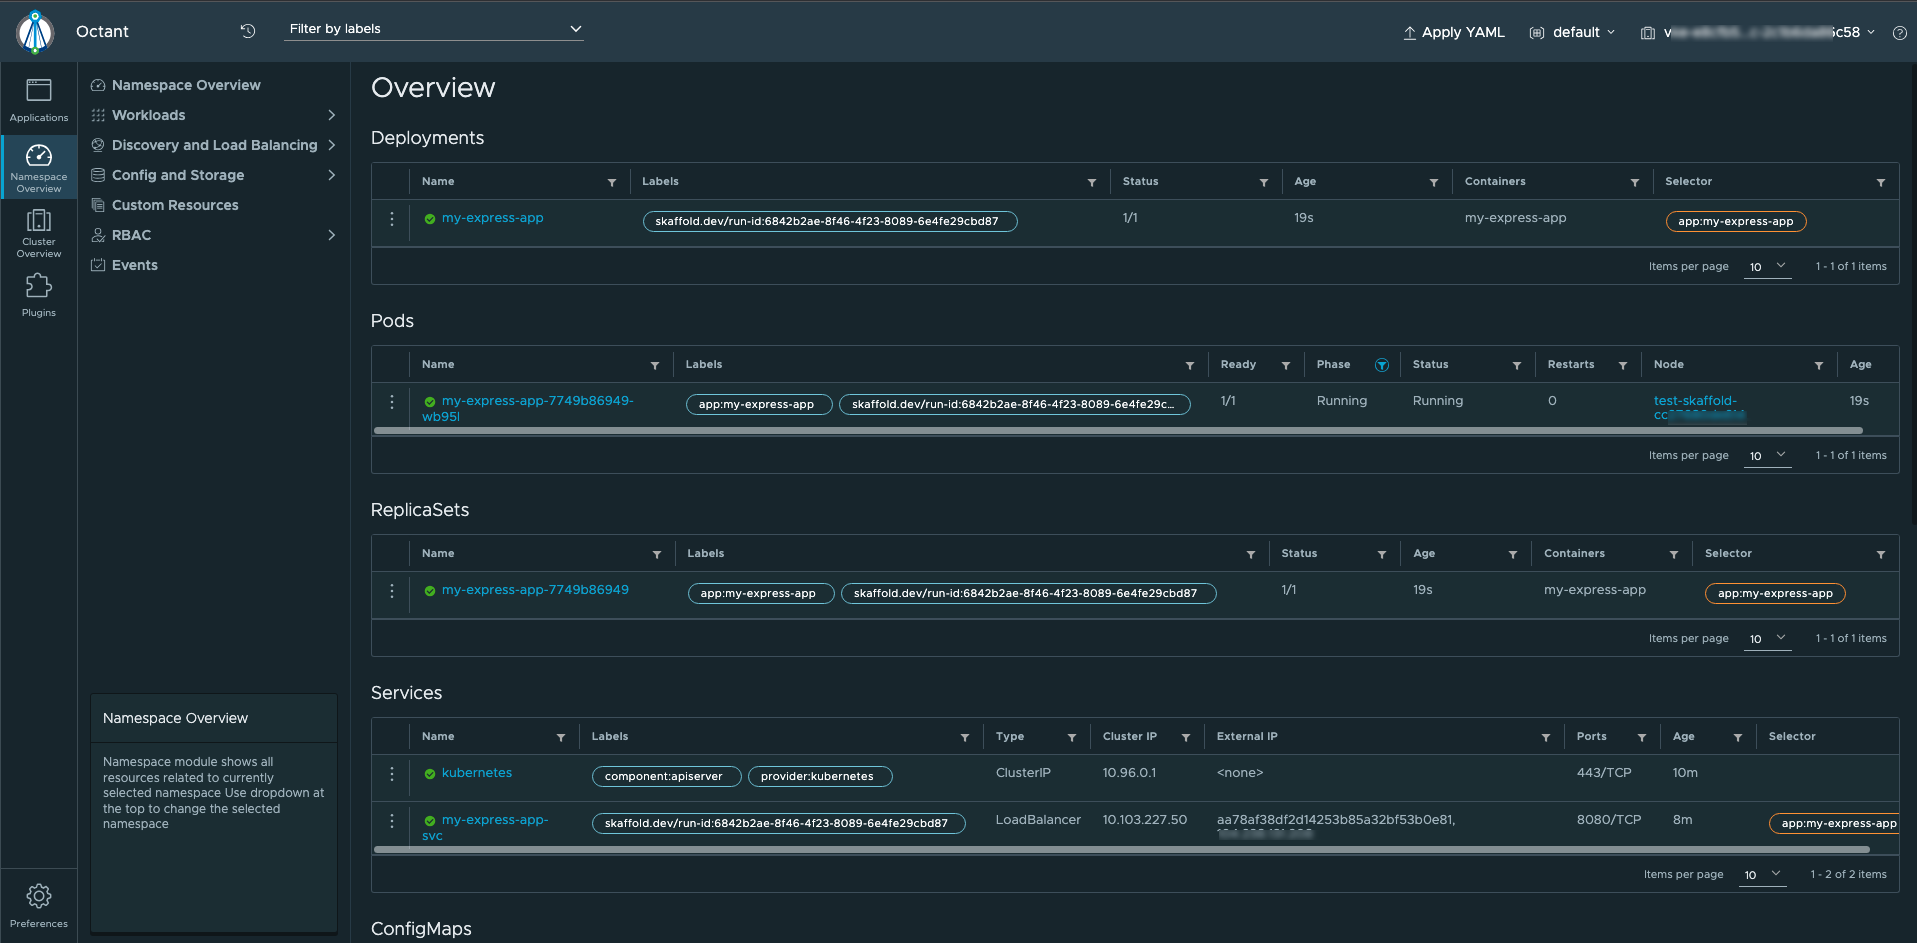
Optional: Working with the Skaffold CLI
The Skaffold command-line tool offers options that allow you to run, deploy, debug, and delete a pipeline. Below are the most commonly used Skaffold commands.
skaffold help- prints help information.skaffold init- generates a Skaffold configuration file for application deployment.skaffold debug- run a pipeline in debug mode.skaffold run- build and deploy a pipeline.skaffold build- Build a container image.skaffold deploy- Deploy a built image to the cluster.skaffold dev- run a pipeline in development mode with auto-redeploy.skaffold delete- delete a deployed application.skaffold diagnose- diagnose whether Skaffold works on the cluster.skaffold render- build all images and print rendered Kubernetes manifests.skaffold config- defines the Skaffold configuration file location.
Conclusion
In this article, you installed Skaffold on a Vultr Kubernetes Engine (VKE) cluster, and created a sample Express application for monitoring using Octant. For more information, visit the following documentation pages:
No comments yet.