
Deploy Applications using Flux on Vultr Kubernetes Engine
Introduction
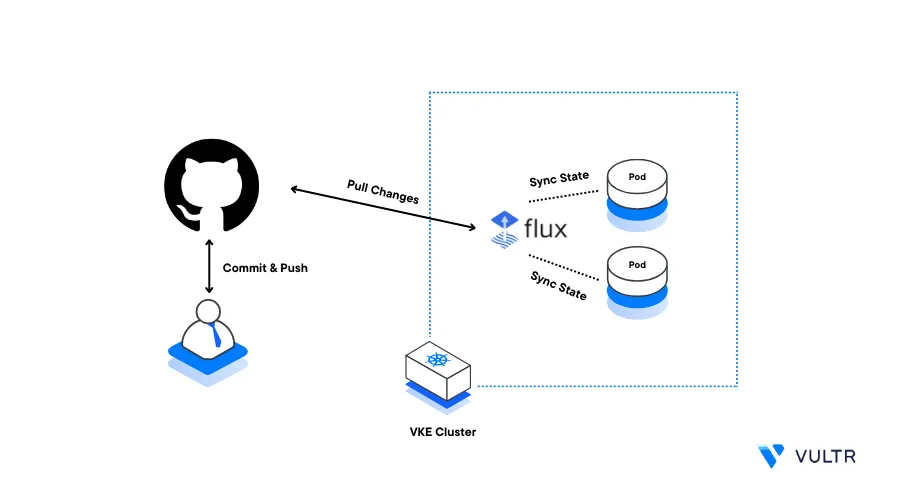
Flux is an open-source continuous delivery (CD) tool used for automating application delivery pipelines to Kubernetes clusters. Flux uses the GitOps principle to automatically synchronize changes in a Git repository to a Kubernetes cluster. It updates your application depending on your Git repository state.
To deploy applications to a Kubernetes cluster, Flux uses a declarative configuration file. Additionally, all the configuration files are stored in your application repository. This makes it easier to manage all application code and configurations.
Flux offers a range of features that make it an ideal choice for implementing GitOps workflows in Kubernetes environments. These include:
- GitOps Workflow
- Declarative Configuration
- Automated Synchronization
- Rollback and Recovery
- Multi-Environment Support
- Notifications and Alerts
- Cluster State Monitoring
This article explains how you can deploy applications in a Vultr Kubernetes Engine (VKE) cluster using Flux.
Prerequisites
Before you begin:
- Deploy a Vultr Kubernetes Engine (VKE) cluster with at least three nodes
- Deploy a Debian server instance on Vultr to use as the management system
- Install Kubectl on your local machine to access the cluster
- Create a new GitHub Personal Access Token
- Create a new private GitHub repository to integrate with your Flux installation. For example
flux-example
Install Flux CLI
To interact with Flux installations on your server, install the Flux CLI tool. The command line tool allows you to manage and configure Flux together with its resources in your Kubernetes cluster. Install Flux CLI on your management server as described in the steps below.
Download the Flux CLI installation script
$ wget https://toolkit.Fluxcd.io/install.shRun the script to install the Flux CLI tool
$ sudo bash install.shWhen successful, your output should look like the one below
 [INFO]  Downloading metadata https://api.github.com/repos/fluxcd/flux2/releases/latest
 [INFO]  Using 2.1.2 as release
 [INFO]  Downloading hash https://github.com/fluxcd/flux2/releases/download/v2.1.2/flux_2.1.2_checksums.txt
 [INFO]  Downloading binary https://github.com/fluxcd/flux2/releases/download/v2.1.2/flux_2.1.2_linux_amd64.tar.gz
 [INFO]  Verifying binary download
 [INFO]  Installing flux to /usr/local/bin/flux
Verify the installed Flux CLI version
$ flux --versionOutput:
flux version 2.1.2
Configure GIT
Verify that Git is available on your server
$ git --versionThe git version should display in your output like the one below:
git version 2.39.2Configure Git with your email address
$ git config --global user.email "example-user@gmail.com"Set up your Git user name
$ git config --global user.name "Example User"Verify your Git information
$ git config --list --show-originOutput.
 file:/home/user/.gitconfig      user.email=example-user@gmail.com
 file:/home/user/.gitconfig      user.name=example user
Export your active GitHub username as an environment variable on your server
$ export GITHUB_USER="example-user"The environment variable value allows Flux to connect to your private GitHub repository and the perform necessary operations
Export your GitHub personal access token as an environment variable
$ export GITHUB_TOKEN="example-token"The
GITHUB_TOKENvalue allows Flux to authenticate and write files to your GitHub repository
Bootstrapping FluxCD Toolkit Components
Flux uses these toolkit components to add a CD pipeline to the cluster. During the bootstrapping process, Flux automatically creates the GitHub repository if it does not exist and uploads the Flux toolkit components. Bootstrap the flux toolkit to your Kubernetes cluster as described below.
View cluster nodes and verify that Kubectl has access to your Kubernetes cluster
$ kubectl get nodesVerify that Flux is compatible with your Kubernetes cluster
$ flux check --preOutput:
 ► checking prerequisites
 ✔ Kubernetes 1.28.2 >=1.25.0-0
 ✔ prerequisites checks passed
Bootstrap Flux to your Kubernetes cluster using a GitHub repository. Replace
flux-examplewith your actual private repository name$ flux bootstrap github --owner=$GITHUB_USER --repository=flux-example --path=clusters/lab --personalThe above command creates the
flux-systemnamespace, the necessary configuration files, and installs flux to your cluster. When successful, your log output should look like the one below.► connecting to github.com ✔ repository "https://github.com/example-user/flux-example" created ► cloning branch "main" from Git repository "https://github.com/example-user/flux-example.git" ✔ cloned repository ► applying sync manifests ✔ reconciled sync configuration ◎ waiting for Kustomization "flux-system/flux-system" to be reconciled ✔ Kustomization reconciled successfully ► confirming components are healthy ✔ helm-controller: deployment ready ✔ kustomize-controller: deployment ready ✔ notification-controller: deployment ready ✔ source-controller: deployment ready ✔ all components are healthyVerify that new resources are available in the
flux-systemnamespace$ kubectl get pods -n flux-systemOutput:
 NAME                                      READY   STATUS    RESTARTS   AGE
 helm-controller-674b78f654-7mhrt          1/1     Running   0          58s
 kustomize-controller-6d95f95b78-5t2xz     1/1     Running   0          58s
 notification-controller-76dc5d768-g7pkp   1/1     Running   0          58s
 source-controller-86d9c8fd4f-lkfdb        1/1     Running   0          58s
Visit your GitHub repository and verify that new configuration manifest files are available in the
clustersdirectory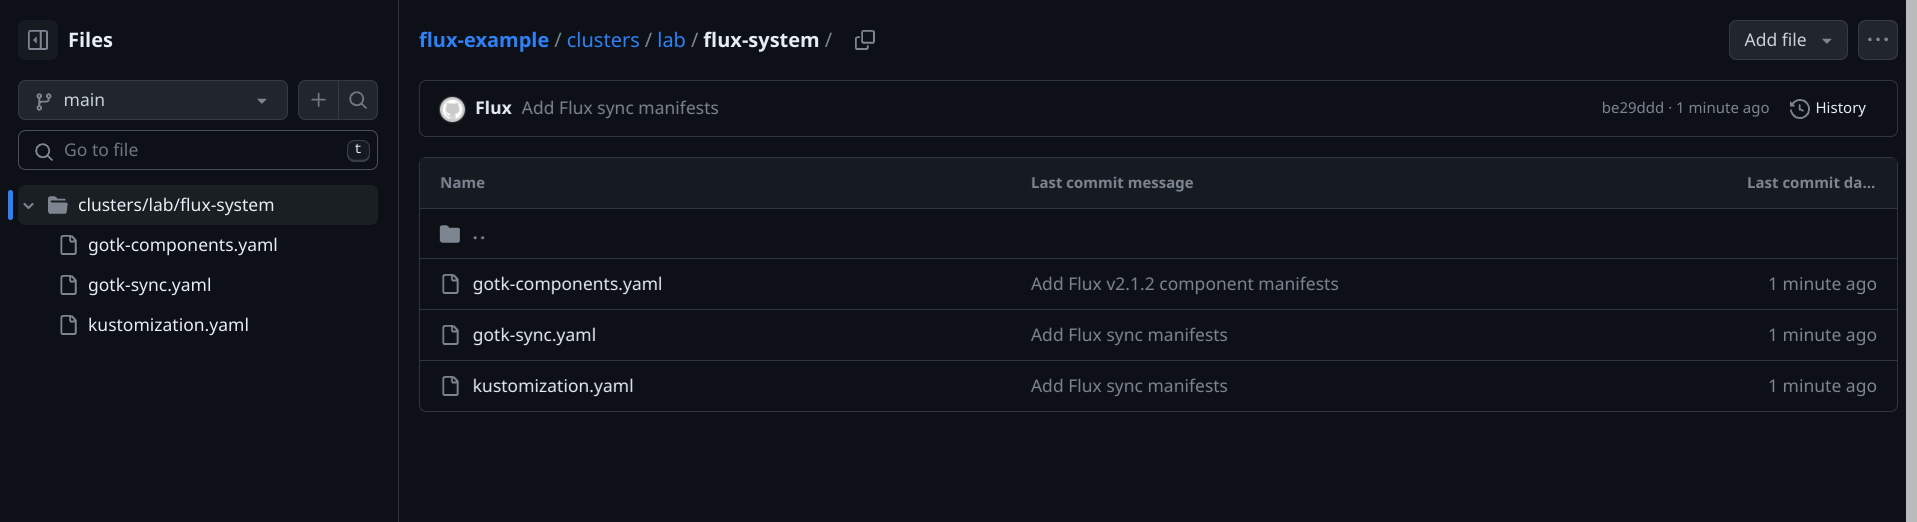
Deploy a Sample Application
Flux stores your application and all configuration files in your GitHub repository flux-example. Each time you make changes in your application, Flux automatically applies the changes to your Kubernetes cluster. Deploy a sample-app application to your cluster using Flux to test the tool operations.
Clone your GitHub repository
flux-example$ git clone https://github.com/example-user/flux-example.gitWhen prompted enter your GitHub username and the Personal Access Token as your password to successfully clone the repository.
Navigate to the
flux-exampledirectory$ cd flux-exampleCreate a new kustomization configuration file that directs flux where to find your Git application definition
$ flux create kustomization sample-app --target-namespace=sample-app --source=flux-system --path="./clusters/lab/kustomize" --prune=true --interval=7m --export > ./clusters/lab/static-kustomization.yamlCreate a new
kustomizesub-directory in thecluster/labdirectory$ mkdir -p clusters/lab/kustomizeUsing a text editor such as Nano, create a namespace manifest file for your application
$ nano clusters/lab/kustomize/namespace.yamlAdd the following configurations to the file.
 apiVersion: v1
 kind: Namespace
 metadata:
   name: sample-app
Save and close the file.
Create a new
kustomization.yamlfile to define your namespace$ nano clusters/lab/kustomize/kustomization.yamlAdd the following configurations to the file
 apiVersion: kustomize.config.k8s.io/v1beta1
 kind: Kustomization
 resources:
   - namespace.yaml
Save and close the file.
Add the new files to your local repository
$ git add .Commit changes to your repository
$ git commit -m "first commit"Output:
[main 7bd053b] first commit
3 files changed, 22 insertions(+)
create mode 100644 clusters/lab/kustomize/kustomization.yaml
create mode 100644 clusters/lab/kustomize/namespace.yaml
create mode 100644 clusters/lab/static-kustomization.yaml
Push changes to the
flux-exampleGitHub repository$ git pushOutput:
Enumerating objects: 11, done.
Counting objects: 100% (11/11), done.
Delta compression using up to 4 threads
Compressing objects: 100% (6/6), done.
Writing objects: 100% (8/8), 841 bytes | 841.00 KiB/s, done.
Total 8 (delta 0), reused 0 (delta 0), pack-reused 0
To https://github.com/example-user/flux-example.git
   e48763f..7bd053b  main -> main
Flux now detects the changes in the
flux-examplerepository and applies every change to your cluster. View cluster namespaces to verify the operations$ kubectl get nsVerify that the
sample-appnamespace is available in your cluster as created in your repository:NAME STATUS AGE default Active 6m19s flux-system Active 4m59s kube-node-lease Active 6m19s kube-public Active 6m19s kube-system Active 6m19s sample-app Active 10sCreate a new
deployment.yamlfile to deploy thesample-appapplication$ nano clusters/lab/kustomize/deployment.yamlAdd the following configurations to the file.
apiVersion: apps/v1
kind: Deployment
metadata:
  name: sample-app
  namespace: sample-app
spec:
  replicas: 1
  selector:
    matchLabels:
      app: sample-app
  template:
    metadata:
      labels:
        app: sample-app
    spec:
      containers:
        - image: mstruebing/static-sample:1666603774
          imagePullPolicy: IfNotPresent
          name: sample-app
Save and close the file.
Create a new
service.yamlfile to expose your application on port80$ nano clusters/lab/kustomize/service.yamlAdd the following configurations to the file
apiVersion: v1
kind: Service
metadata:
  name: sample-app
  namespace: sample-app
spec:
  ports:
    - name: http
      port: 80
      protocol: TCP
      targetPort: 80
  selector:
    app: sample-app
Save and close the file.
Edit the
kustomization.yamlconfiguration file and define your new manifest files$ nano clusters/lab/kustomize/kustomization.yamlAdd new
- deployment.yamland- service.yamldirectives to the file within theresources:groupapiVersion: kustomize.config.k8s.io/v1beta1 kind: Kustomization resources: - namespace.yaml - deployment.yaml - service.yamlSave and close the file.
Apply the changes to your local repository
$ git add .Commit the changes
$ git commit -m "second commit"Output:
[main 0dd5888] second commit
4 files changed, 53 insertions(+)
create mode 100644 clusters/lab/kustomize/deployment.yaml
create mode 100644 clusters/lab/kustomize/ingress.yaml
create mode 100644 clusters/lab/kustomize/service.yaml
Push all changes to the
flux-exampleGitHub repository$ git pushOutput:
Enumerating objects: 14, done.
Counting objects: 100% (14/14), done.
Delta compression using up to 4 threads
Compressing objects: 100% (7/7), done.
Writing objects: 100% (9/9), 1.19 KiB | 1.19 MiB/s, done.
Total 9 (delta 0), reused 0 (delta 0), pack-reused 0
To https://github.com/example-user/flux-example.git
   7bd053b..0dd5888  main -> main
View the newly deployed resources in your cluster to verify that Flux synchronizes all changes
$ kubectl get pods,service,deployment -n sample-appYour output should look like the one below:
NAME                              READY   STATUS    RESTARTS   AGE
pod/sample-app-75f89b9785-ndg9l   1/1     Running   0          28s

NAME                 TYPE        CLUSTER-IP      EXTERNAL-IP   PORT(S)   AGE
service/sample-app   ClusterIP   10.108.93.122   <none>        80/TCP    28s

NAME                         READY   UP-TO-DATE   AVAILABLE   AGE
deployment.apps/sample-app   1/1     1            1           28s
View the cluster pod and verify that your application is ready and running
$ kubectl get pods -n sample-appOutput:
NAME                          READY   STATUS    RESTARTS   AGE
sample-app-75f89b9785-ndg9l   1/1     Running   0          6m48s
Verify the Application Deployment
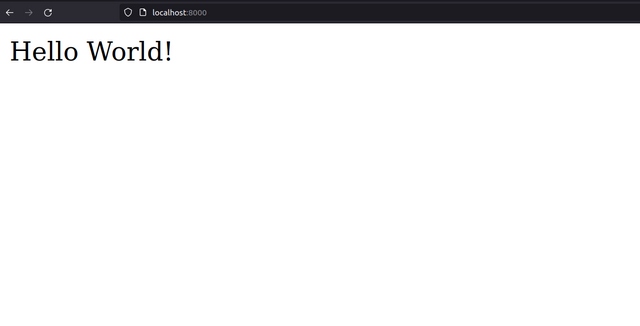
Your sample application is now deployed on the Kubernetes using Flux. To verify that the application is running correctly, test access to the service port 80 as described below.
Verify that the application service is available
$ kubectl get svc -n sample-appOutput:
 NAME         TYPE        CLUSTER-IP      EXTERNAL-IP   PORT(S)   AGE
 sample-app   ClusterIP   10.108.93.122   <none>        80/TCP    48s
Using port forwarding, redirect the service port
80to your host port8000$ kubectl port-forward svc/sample-app 8000:80 -n sample-app --address 0.0.0.0The above command forwards the cluster port
80to your host port8000and accepts connections from all server interfacesOutput:
 Forwarding from 127.0.0.1:8000 -> 80
 Forwarding from [::1]:8000 -> 80
Using a web browser of your choice, access your host port
8000using your Server IPhttp://SERVER-IP:8000Verify that your sample application displays correctly in your browser
Conclusion
You have deployed a sample application using Flux on a Vultr Kubernetes Engine cluster. Every time you add new manifest files to your integrated repository, Flux writes the changes to your cluster. You can now use Flux to automate your application deployment processes to achieve a more efficient, and version-controlled application deployment process.