
Introduction
Deploy Flux 1-schnell to harness the power of open-source generative AI for creating images from text prompts. This streamlined version of the original Flux-pro model offers faster performance while retaining text embedding capabilities for enhanced image generation. Built on a transformer architecture with 12 billion parameters, Flux 1-schnell supports LoRA (Low-Rank Adaptations) to produce highly realistic images efficiently.
This article explains how to deploy the FLUX.1-schnell image generation model on a Vultr Cloud GPU server. You will use the ComfyUI web interface to create an image generation workflow and set up LoRAs to enhance the quality of the generated images.
Prerequisites
Before you begin:
- Deploy an NVIDIA A100 Vultr Cloud GPU instance running Ubuntu with at least
20 GBGPU memory and enable the Limited User Login feature. - Access the instance using SSH.
- Install ComfyUI on the instance.
- Sign up or Log in to your Hugging Face account.
Download the Flux-schnell Model
The huggingface_hub Python library includes a special function for downloading the Flux-schnell model. Follow the steps below to install the huggingface_hub library and create a new Python script to download the Flux-schnell model.
Switch to your user's home directory.
console$ cd /home/linuxuser/
Create a new directory, such as
fluxto store the model files.console$ mkdir flux
Switch to the new
fluxdirectory.console$ cd flux
Use Pip to install the
huggingface_hubPython library.console$ pip install huggingface_hub
Create a new
schnell_model_downloader.pyfile.console$ nano schnell_model_downloader.py
Add the following Python script to the
schnell_model_downloader.pyfile. Replace/home/linuxuser/fluxwith your actual model directory.pythonfrom huggingface_hub import snapshot_download snapshot_download(repo_id="black-forest-labs/FLUX.1-schnell", local_dir="/home/linuxuser/flux")
Save and close the file.
The above Python script imports the
huggingface_hublibrary for downloading the Flux-schnell model files. Thesnapshot_downloadfunction downloads the model from theblack-forest-labs/FLUX.1-schnellHuggingface repository to the/home/linuxuser/fluxdirectory.Run the script using Python to download the Flux-schnell model files and wait at least 10 minutes for the model to download.
console$ python3 schnell_model_downloader.py
Output:
...
model-00002-of-00002.safetensors: 100%|███████████████████████████████████████████████████████████████| 4.53G/4.53G [01:50<00:00, 40.9MB/s]
(...)model-00001-of-00002.safetensors: 100%|███████████████████████████████████████████████████████████████| 4.99G/4.99G [02:00<00:00, 41.4MB/s]
(...)pytorch_model-00002-of-00003.safetensors: 100%|████████████████████████████████████████████████████| 9.95G/9.95G [03:59<00:00, 41.6MB/s]
pytorch_model-00001-of-00003.safetensors: 100%|████████████████████████████████████████████████████| 9.96G/9.96G [04:02<00:00, 41.1MB/s]
flux1-schnell.safetensors: 100%|██████████████████████████████████████████████████████████████████████| 23.8G/23.8G [09:30<00:00, 41.7MB/s]
Fetching 28 files: 100%|███████████████████████████████████████████████████████████████████████████████████| 28/28 [09:31<00:00, 20.40s/it]
Move the
flux1-schnell.safetensorsfile to themodels/unetdirectory in your ComfyUI project.console$ sudo mv flux1-schnell.safetensors /opt/ComfyUI/models/unet/
Move the
ae.safetensorsfile to themodels/vaedirectory in your ComfyUI project.console$ sudo mv ae.safetensors /opt/ComfyUI/models/vae
The above command moves the
ae.safetensorsvariational encoder file required by the model to enhance the visual quality of generated images.
Set up the Flux-schnell Model in ComfyUI
ComfyUI requires multiple files to run models on a server. Follow the steps below to download the required Flux-schnell model files to your ComfyUI project directory.
Switch to the
models/clipdirectory in your ComfyUI project.console$ cd /opt/ComfyUI/models/clip
Download the Flux-schnell
clip_l.safetensorsfile.console$ sudo wget https://huggingface.co/comfyanonymous/flux_text_encoders/resolve/main/clip_l.safetensors
The above command downloads the clip model used by the Flux-schnell model during the image generation process to support text inputs.
Download the Flux-schnell
t5xxl_fp16.safetensorsfile.console$ sudo wget https://huggingface.co/comfyanonymous/flux_text_encoders/resolve/main/t5xxl_fp16.safetensors
The above command takes between 2 and 5 minutes to download the FP16 model file used by Flux-schnell to encode text inputs. The model uses the FP16 precision standard to balance the model's image generation quality and performance.
Generate Images Using the Flux-schnell Model in ComfyUI
ComfyUI generates images using workflows in the form of interconnected nodes. Workflows connect multiple AI image generation components to produce a final image. ComfyUI loads workflows from sources such as configuration or image files. Follow the steps below to load the Flux-schnell image generation workflow and generate images using ComfyUI.
Access your ComfyUI domain using a web browser such as Chrome.
https://comfyui.example.comDownload the following image to your workstation to load the Flux-schnell workflow in ComfyUI.

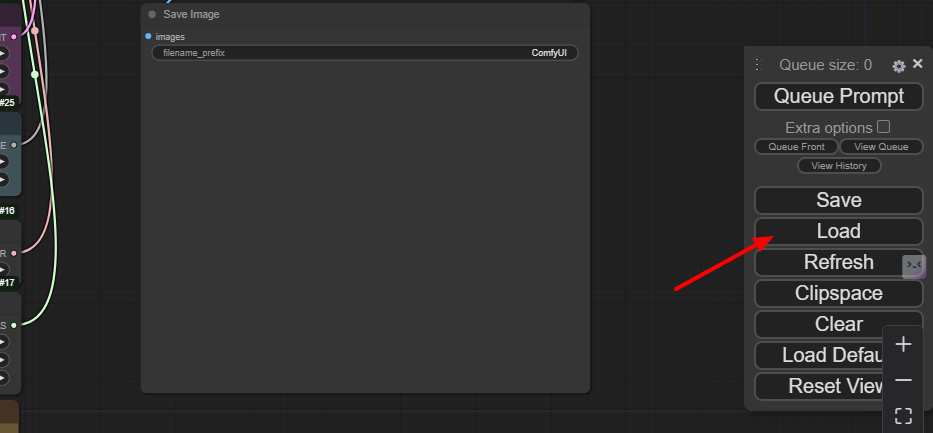
Click Load in the floating ComfyUI menu to browse and open the workflow image on your workstation.
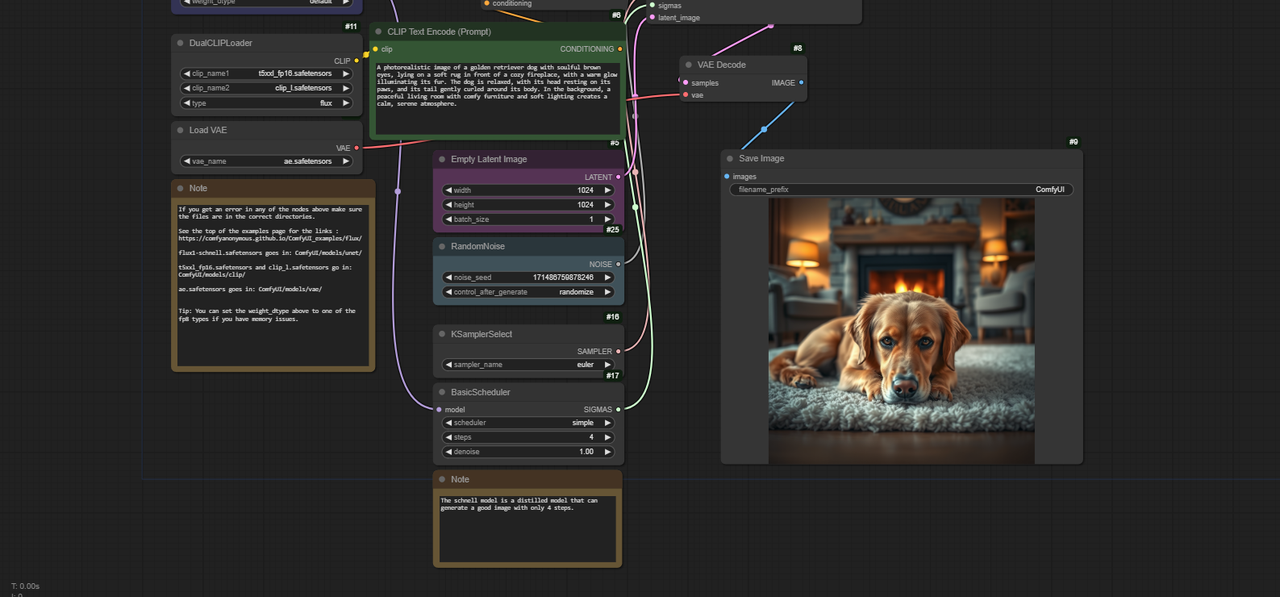
Find the Prompt node and enter a new text prompt to generate images. For example,
A photorealistic image of a golden retriever dog with soulful brown eyes, lying on a soft rug in front of a cozy fireplace, with a warm glow illuminating its fur. The dog is relaxed, with its head resting on its paws, and its tail gently curled around its body. In the background, a peaceful living room with comfy furniture and soft lighting creates a calm, serene atmosphere..Click Queue Prompt to generate the image using the Flux-schnell model.

Wait at least 30 seconds for the image generation process to complete and verify the image in the Save Image node.
Download the Flux-dev Model
The Flux-schnell development (Flux-dev) model generates higher-quality images at a slower generation speed as compared to the main Flux-schnell model. LoRas also require the Flux-dev model in order to generate higher-quality images. Follow the steps below to generate a new Hugging Face access token and download the Flux-dev model on your server.
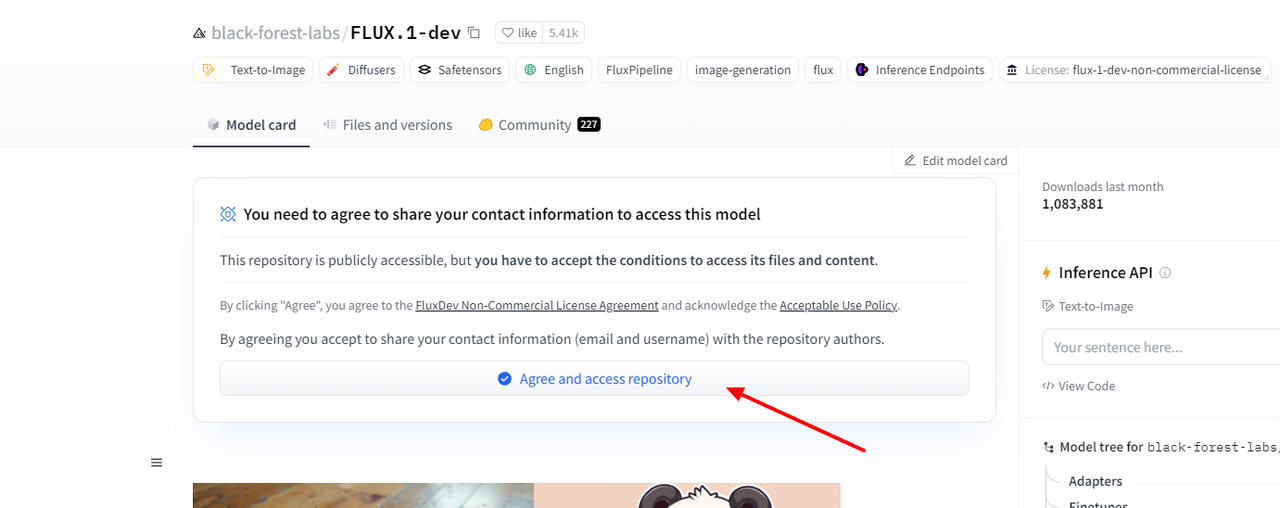
Visit the Flux-dev model page on Hugging Face.
Click Agree to accept the model's terms and conditions.
Visit the Tokens page in your Hugging Face account settings.
Click Create new token.

Enter your desired token name and description in the respective fields.
Check the
Read access to contents of all public gated repos you can accesswithin the User Permissions section to access the Flux-dev repository using the token.
Scroll and click Create token to apply the new token to your Hugging Face account.

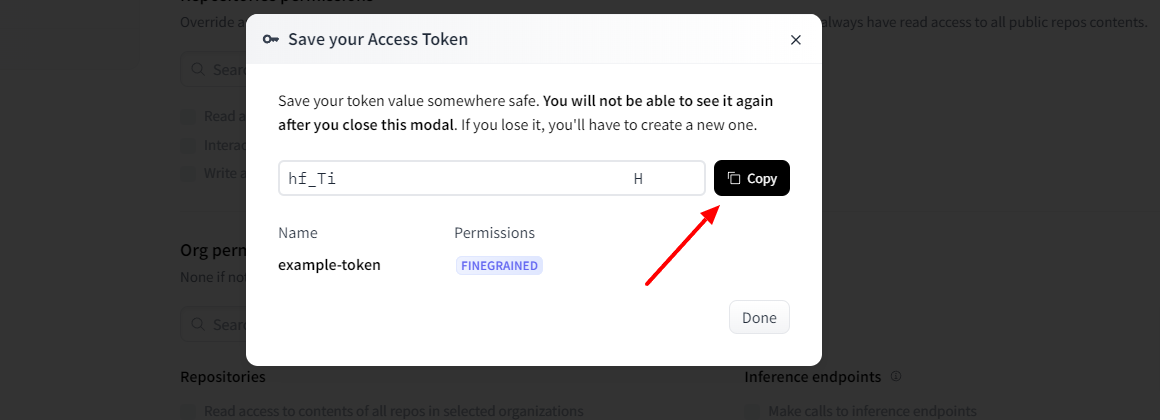
Click Copy to save the token to your clipboard.
Switch to the
fluxdirectory you created earlier in your user's home directory. Replace/home/linuxuser/fluxwith your actual path.console$ cd /home/linuxuser/flux
Create a new
dev_model_downloader.pyfile.console$ nano dev_model_downloader.py
Add the following Python script to the
dev_model_downloader.pyfile. ReplaceYOUR_ACCESS_TOKENwith your Hugging Face token and/home/linuxuser/fluxwith your actual path.pythonfrom huggingface_hub import snapshot_download from huggingface_hub import login login(token="YOUR_ACCESS_TOKEN") snapshot_download(repo_id="black-forest-labs/FLUX.1-dev", local_dir="/home/linuxuser/flux")
Save and close the file.
The above Python script runs the
login(...)function from thehuggingface_hublibrary to download the Flux-dev model using thesnapshot_download(...)function and your Hugging Face token.Run the
dev_model_downloader.pyscript using Python.console$ python3 dev_model_downloader.py
Wait at least 10 minutes for the model to finish downloading and verify that your output is similar to the one below when successful.
(…) pytorch_model-00003-of-00003.safetensors: 100%|███████████████████████████████████████████████████████████████████████████████████████████████████████████████████████████| 3.87G/3.87G [01:35<00:00, 40.5MB/s]
(…) pytorch_model-00002-of-00003.safetensors: 100%|███████████████████████████████████████████████████████████████████████████████████████████████████████████████████████████| 9.95G/9.95G [03:57<00:00, 41.9MB/s]
(…) pytorch_model-00001-of-00003.safetensors: 100%|███████████████████████████████████████████████████████████████████████████████████████████████████████████████████████████| 9.98G/9.98G [03:58<00:00, 41.9MB/s]
flux1-dev.safetensors: 100%|█████████████████████████████████████████████████████████████████████████████████████████████████████████████████████████████████████████████████| 23.8G/23.8G [09:29<00:00, 41.8MB/s]
Fetching 29 files: 100%|██████████████████████████████████████████████████████████████████████████████████████████████████████████████████████████████████████████████████████████| 29/29 [09:29<00:00, 19.65s/it]
Move the
flux-devmodel files to themodels/unetdirectory in your ComfyUI project.console$ sudo mv flux1-dev.safetensors /opt/ComfyUI/models/unet/
Access the ComfyUI interface using your domain in a new web browser window.
https://comfyui.example.comDownload the following image to your workstation to load a new Flux-dev workflow in ComfyUI.

The Flux-dev workflow allows you to generate images with the Flux-dev model and contains all necessary paths required by the model.
Click Load in ComfyUI to browse the image from your workstation and load the Flux-dev workflow.

Enter a new text prompt in the Prompt node. For example, enter the prompt
A photorealistic image of a golden retriever dog with soulful brown eyes, lying on a soft rug in front of a cozy fireplace, with a warm glow illuminating its fur. The dog is relaxed, with its head resting on its paws, and its tail gently curled around its body. In the background, a peaceful living room with comfy furniture and soft lighting creates a calm, serene atmosphere..Click Queue Prompt to generate the image using the Flux-dev model.

Wait at least 30 seconds for the image generation process to complete and verify the image in the Save Image node.

Set up LoRAs to Generate More Realistic Images
LoRAs are additional model files that increase the realism of generated images including faces. Follow the steps below to set up LoRAs developed by XLabs AI to increase the quality of images generated by the Flux-dev model.
Switch to the
models/lorasdirectory in your ComfyUI project.console$ cd /opt/ComfyUI/models/loras
Download the LoRAs file for the Flux-dev model.
console$ sudo wget https://huggingface.co/comfyanonymous/flux_RealismLora_converted_comfyui/resolve/main/flux_realism_lora.safetensors
Download the following image to your workstation to load the Flux-dev image generation workflow with LoRAs in ComfyUI.

Click Load in ComfyUI to browse the image and open the LoRAs workflow.

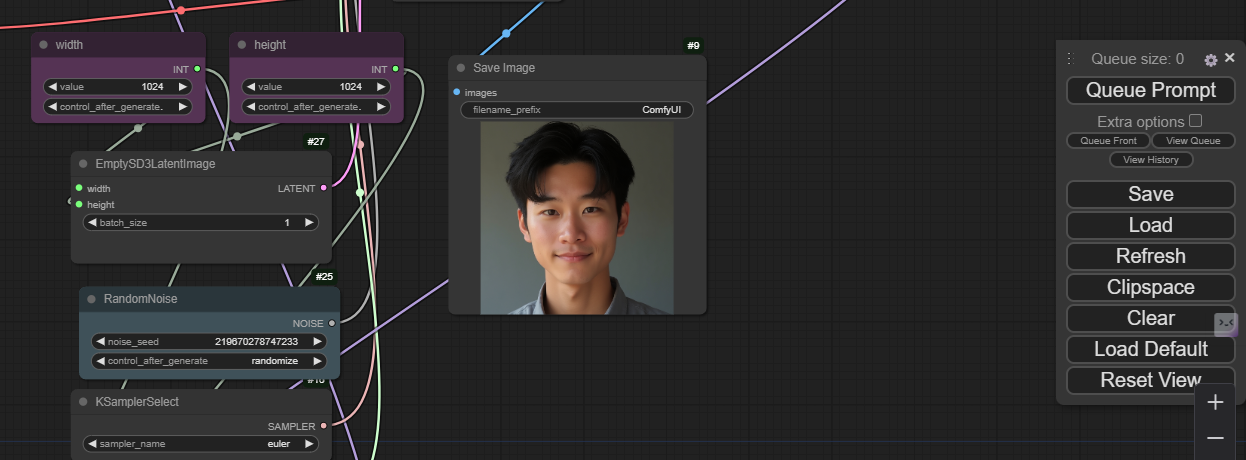
Enter a new text prompt in the Prompt that contains a face to test the LoRAs output. For example, enter the prompt,
A photorealistic image of a young man's face with short, dark hair and smooth skin. He has a focused, thoughtful expression, with relaxed eyes and a slight, confident smile. Soft lighting from one side highlights his sharp cheekbones and well-defined jawline, bringing out the natural contours of his face. The background is simple and blurred, emphasizing his facial features and calm demeanor..Click Queue Prompt to generate a new image using the model.

Wait at least 30 seconds for the image generation process to complete and view the image in the Save Image node.
Troubleshooting
ComfyUI may display some errors while generating images using the Flux-schnell model. Use the following solutions to fix any errors on your server.
torch.cuda.OutOfMemoryError: Upgrade your GPU server plan or clear the GPU memory to generate images using the Flux-schnell model.Numpy is not available: Verify the latest supported ComfyUI Numpy version and install it on your server. For example, Install thenumpy<2package using Pip as required by most ComfyUI versions.
Conclusion
You have deployed the Flux-schnell model on a Vultr Cloud GPU server and generated images using ComfyUI. In addition, you deployed the Flux-dev model to increase the generated image output quality and set up LoRAs to enable the model to produce more realistic images. For more information, workflow, and model options, please visit the official Flux-schnell Hugging Face page.