
Introduction
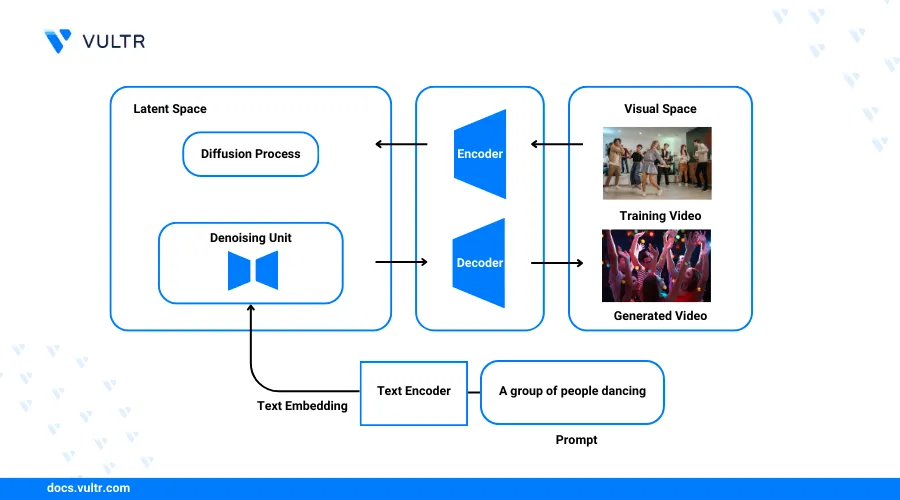
ModelScope is an open-source platform that offers a range of machine learning models and datasets for use in AI applications. The ModelScope text-to-video model allows you to generate short videos from text prompts and customize the generation parameters. The text-to-video model is trained on public datasets with around 1.7 billion parameters and can be used with the WebUI open-source web interface. WebUI is primarily used with StableDiffusion models and supports the ModelScope text-to-video model to generate videos from prompts.
This article explains how to generate videos with the HuggingFace ModelScope text2video diffusion model on a Vultr GPU server. You will set up the model environment and generate videos from text prompts, existing images or videos. Additionally, you will upscale the generated videos to improve the resolution and quality to match your needs.
Prerequisites
Before you begin:
- Deploy a fresh NVIDIA A100 Vultr Cloud GPU instance running Ubuntu 22.04 with at least
20 GBGPU memory. - Set up a new domain A record pointing to the server IP address.
- Access the server using SSH as a non-root user with sudo access.
- Update the server packages.
- Install Nginx.
Install WebUI and ModelScope
Install the Git LFS (Large File Storage) dependency package.
console$ sudo apt install git-lfs -y
Initialize Git LFS to use the WebUI and ModelScope repositories.
console$ git lfs install
Install the FastAPI framework using the Python Pip package manager.
console$ pip3 install fastapi
Switch to your user home directory.
console$ cd
Clone the WebUI repository using Git.
console$ git clone https://github.com/AUTOMATIC1111/stable-diffusion-webui.git
Navigate to the new WebUI directory.
console$ cd stable-diffusion-webui
Set the WebUI version to
1.7.0compatible with ModelScope.console$ git reset --hard cf2772f
Output:
HEAD is now at cf2772fa Merge branch 'release_candidate'ModelScope is not compatible with some WebUI versions, test the latest versions later in this article or use version
1.7.0to avoid compatibility errors.Switch to the
modelsdirectory to set up ModelScope files.console$ cd models
Create a new directory named
ModelScope.console$ mkdir ModelScope
Switch to the directory.
console$ cd ModelScope
Create another directory named
t2v.console$ mkdir t2v
Switch to the
t2vdirectory.console$ cd t2v
Download the latest ModelScope text-to-video model.
console$ git clone https://huggingface.co/ali-vilab/modelscope-damo-text-to-video-synthesis .
The above command takes between
5to15minutes to complete.
Configure Nginx as a Reverse Proxy to Access WebUI
WebUI is accessible on the localhost port 7860 and only accepts local connection requests. To enable external access to the WebUI interface, configure the Nginx web server as a reverse proxy to forward all requests using your domain name to the backend WebUI port. Follow the steps below to create a new Nginx host configuration and forward external requests to the WebUI port.
Create a new Nginx host configuration file
webui.confusing a text editor such as Nano.console$ sudo nano /etc/nginx/sites-available/webui.conf
Add the following configurations to the file. Replace
webui.example.comwith your actual domain name.nginxupstream webui { server 127.0.0.1:7860; } server { listen 80; listen [::]:80; server_name example.com; proxy_set_header Host $host; proxy_http_version 1.1; proxy_set_header X-Real-IP $remote_addr; proxy_set_header X-Forwarded-For $proxy_add_x_forwarded_for; proxy_set_header X-Forwarded-Proto $scheme; proxy_set_header Sec-WebSocket-Extensions $http_sec_websocket_extensions; proxy_set_header Sec-WebSocket-Key $http_sec_websocket_key; proxy_set_header Sec-WebSocket-Version $http_sec_websocket_version; proxy_set_header Upgrade $http_upgrade; proxy_set_header Connection "Upgrade"; location / { proxy_pass http://webui; } }
Save and close the file.
The above Nginx configuration forwards all incoming HTTP connections on port
80using your domain namewebui.example.comto the backend WebUI port7860.Enable the new WebUI Nginx configuration file.
console$ sudo ln -s /etc/nginx/sites-available/webui.conf /etc/nginx/sites-enabled/
Test the Nginx configuration for errors.
console$ sudo nginx -t
Output:
nginx: the configuration file /etc/nginx/nginx.conf syntax is ok
nginx: configuration file /etc/nginx/nginx.conf test is successful
Restart Nginx to apply the configuration changes.
console$ sudo systemctl restart nginx
Allow the HTTP port
80through the default UFW application to enable HTTP connections on the server.console$ sudo ufw allow 80/tcp
Reload the UFW firewall rules to apply changes.
console$ sudo ufw reload
Secure WebUI with Trusted Let's Encrypt SSL Certificates
WebUI is accessible on the HTTP port 80 handled by the Nginx reverse proxy connection. Generate trusted Let's Encrypt SSL certificates to secure access to the WebUI interface and encrypt all traffic while generating videos with ModelScope. Follow the steps below to install the Certbot Let's Encrypt client and generate trusted SSL certificates on your WebUI domain webui.example.com.
Install Certbot using the Snap package manager.
console$ sudo snap install certbot --classic
Create a symbolic link to enable the system-wide Certbot command.
console$ sudo ln -s /snap/bin/certbot/ /usr/bin/certbot
Request a new Let's Encrypt SSL certificate using the WebUI domain in your Nginx configuration. Replace
webui.example.comanduser@example.comwith your actual details.console$ sudo certbot --nginx -d webui.example.com -m user@example.com --agree-tos
Output:
Successfully received certificate.
Certificate is saved at: /etc/letsencrypt/live/webui.example.com/fullchain.pem
Key is saved at:         /etc/letsencrypt/live/webui.example.com/privkey.pem
This certificate expires on 2024-08-04.
These files will be updated when the certificate renews.
Certbot has set up a scheduled task to automatically renew this certificate in the background.

Deploying certificate
Successfully deployed certificate for webui.example.com to /etc/nginx/sites-enabled/webui.conf
Congratulations! You have successfully enabled HTTPS on https://webui.example.com
Test the Certbot automatic renewal process and verify that the SSL certificate auto-renews upon expiry.
console$ sudo certbot renew --dry-run
Output:
Account registered.
Simulating renewal of an existing certificate for webui.example.com

- - - - - - - - - - - - - - - - - - - - - - - - - - - - - - - - - - - - - - - -
Congratulations, all simulated renewals succeeded:
  /etc/letsencrypt/live/webui.example.com/fullchain.pem (success)
- - - - - - - - - - - - - - - - - - - - - - - - - - - - - - - - - - - - - - - -
Allow the HTTPS port
443through the UFW firewall to enable secure access to your server.console$ sudo ufw allow 443/tcp
Reload UFW to apply the firewall changes.
console$ sudo ufw reload
Create a New System Service for WebUI
WebUI is available on the server and runs on the localhost port 7860 if the main application file launch.py executes. To control the WebUI application processes on your server, set up a new system service to run and manage the application. In addition, output the process errors and warnings to a standalone log file as described in the following steps.
Create a new system service file
webui.serviceconsole$ sudo nano /etc/systemd/system/sdwebui.service
Add the following configurations to the file. Replace
exampleuserwith your user and/home/user/stable-diffusion-webuiwith your actual WebUI application files path.systemd[Unit] Description=Stable Diffusion AUTOMATIC1111 Web UI service After=network.target StartLimitIntervalSec=0 [Service] Type=simple Restart=always RestartSec=1 User=exampleuser ExecStart=/usr/bin/env python3 /home/exampleuser/stable-diffusion-webui/launch.py StandardOutput=append:/var/log/sdwebui.log StandardError=append:/var/log/sdwebui.log WorkingDirectory=/home/exampleuser/stable-diffusion-webui [Install] WantedBy=multi-user.target
Save and close the file.
The above configuration runs WebUI as a system service that automatically restarts when the application fails and logs all output to the
/var/log/sdwebui.logfile.Reload the systemd daemon to apply the system service.
console$ sudo systemctl daemon-reload
Enable the WebUI service to start at boot time.
console$ sudo systemctl enable sdwebui
Output:
Created symlink /etc/systemd/system/multi-user.target.wants/sdwebui.service → /etc/systemd/system/sdwebui.service.Start the WebUI service.
console$ sudo systemctl start sdwebui
View the WebUI service status and verify that the application is running.
console$ sudo systemctl status sdwebui
Output:
● sdwebui.service - Stable Diffusion AUTOMATIC1111 Web UI service
     Loaded: loaded (/etc/systemd/system/sdwebui.service; disabled; vendor preset: enabled)
     Active: active (running) since Sun 2024-04-28 18:07:19 UTC; 14s ago
   Main PID: 29672 (python3)
      Tasks: 3 (limit: 77017)
     Memory: 4.3G
        CPU: 13.483s
     CGroup: /system.slice/sdwebui.service
             ├─29672 python3 /home/user/stable-diffusion-webui/launch.py
             ├─29675 /bin/sh -c "\"/usr/bin/python3\" -m pip install torch==2.0.1 torchvision==0.15.2 --extra-index-url https://download.pytorch.org/whl/cu118"
             └─29676 /usr/bin/python3 -m pip install torch==2.0.1 torchvision==0.15.2 --extra-index-url https://download.pytorch.org/whl/cu118
Wait for at least 15 minutes for the ModelScope installation process to complete, then view the application logs to verify the WebUI application status.
console$ tail -f /var/log/sdwebui.log
Your output should be similar to the one below.
Downloading: "https://huggingface.co/runwayml/stable-diffusion-v1-5/resolve/main/v1-5-pruned-emaonly.safetensors" to /home/exampleuser/stable-diffusion-webui/models/Stable-diffusion/v1-5-pruned-emaonly.safetensors

100%|██████████| 3.97G/3.97G [00:51<00:00, 83.2MB/s]
Calculating sha256 for /home/exampleuser/stable-diffusion-webui/models/Stable-diffusion/v1-5-pruned-emaonly.safetensors: Running on local URL:  http://127.0.0.1:7860

To create a public link, set `share=True` in `launch()`.
Startup time: 341.6s (prepare environment: 282.4s, import torch: 3.1s, import gradio: 0.7s, setup paths: 0.8s, initialize shared: 0.2s, other imports: 0.8s, setup codeformer: 0.1s, list SD models: 52.1s, load scripts: 0.6s, create ui: 0.7s, gradio launch: 0.1s).
6ce0161689b3853acaa03779ec93eafe75a02f4ced659bee03f50797806fa2fa
Loading weights [6ce0161689] from /home/exampleuser/stable-diffusion-webui/models/Stable-diffusion/v1-5-pruned-emaonly.safetensors
Creating model from config: /home/exampleuser/stable-diffusion-webui/configs/v1-inference.yaml
/home/exampleuser/.local/lib/python3.10/site-packages/huggingface_hub/file_download.py:1132: FutureWarning: `resume_download` is deprecated and will be removed in version 1.0.0. Downloads always resume when possible. If you want to force a new download, use `force_download=True`.
  warnings.warn(
Applying attention optimization: Doggettx... done.
Model loaded in 18.8s (calculate hash: 10.7s, load weights from disk: 0.2s, create model: 4.6s, apply weights to model: 3.0s, calculate empty prompt: 0.1s).
Press Ctrl + C to stop the WebUI logs output.
Update the
tqdmmodule required by the WebUI interface to run models.console$ pip3 install --upgrade tqdm
Access WebUI and Generate Videos using ModelScope
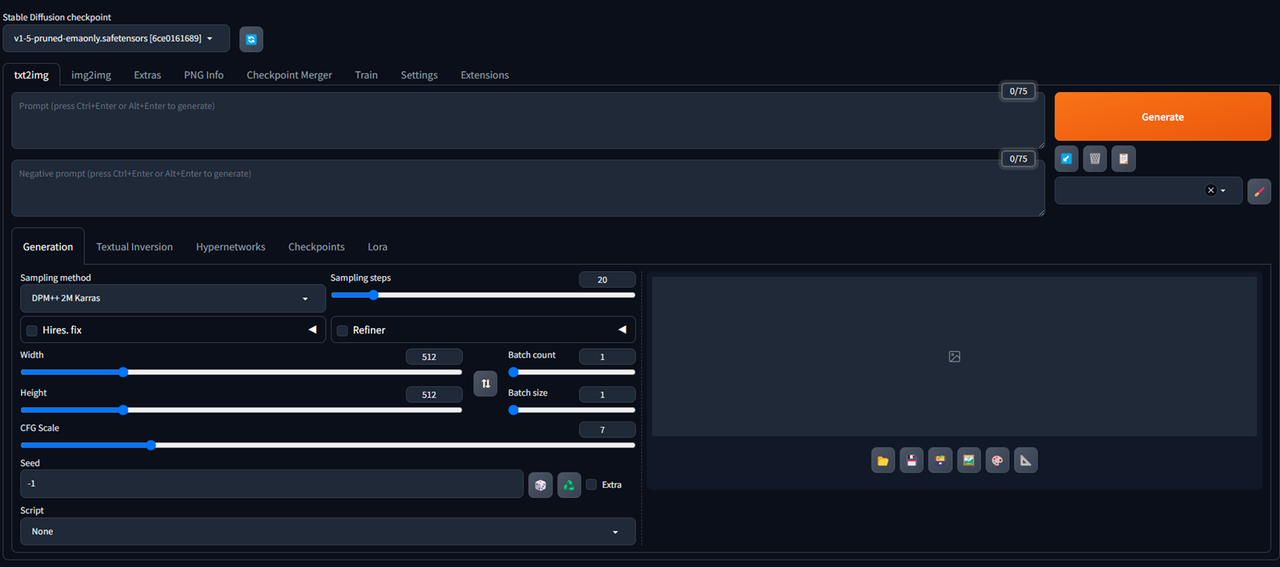
Access your WebUI domain using a web browser such as Chrome.
https://webui.example.comVerify that the WebUI interface displays in your browser session.
Install ModelScope Extensions
Click Extensions on the main WebUI navigation menu.
Navigate to the Available tab and click Load from: to load all available models in the WebUI repository.
Enter
modelscopein the search field and press Space to run a new search.Click Install in the
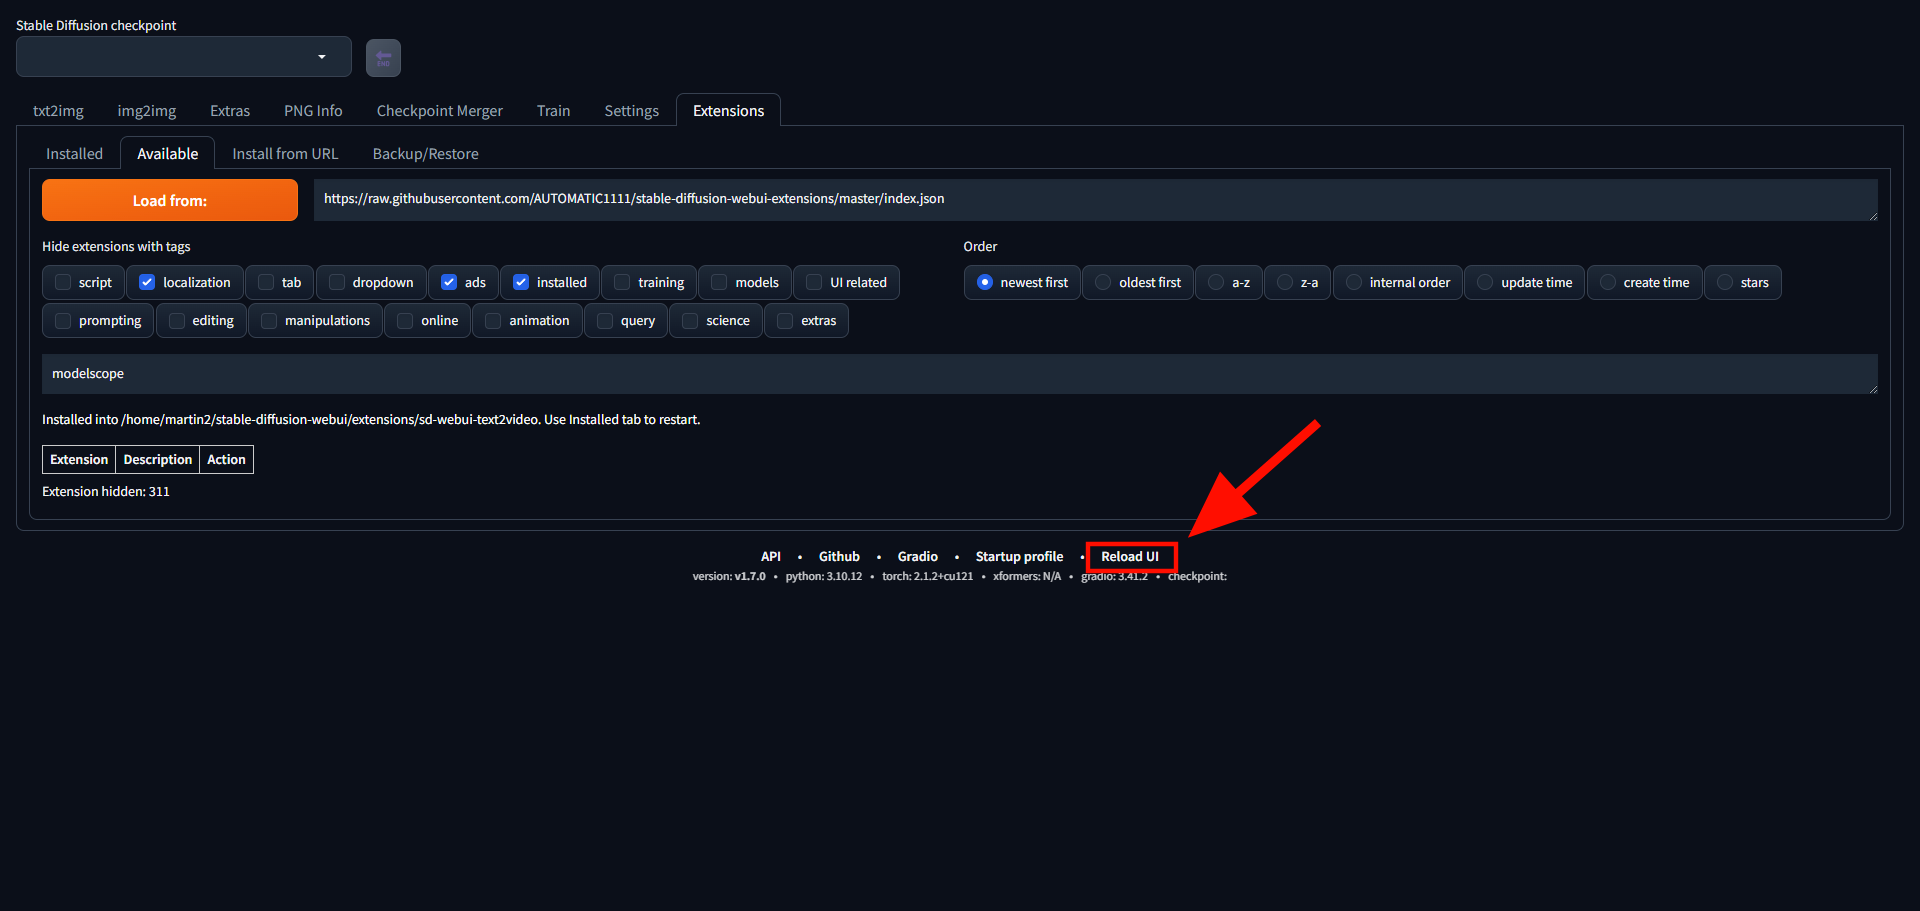
text2videoresult action tab to install the ModelScope extension. Wait for the extension installation process to complete and verify that it's installed in your project directory similar to the following output.Installed into /home/exampleuser/stable-diffusion-webui/extensions/sd-webui-text2video. Use Installed tab to restart.Remove the existing
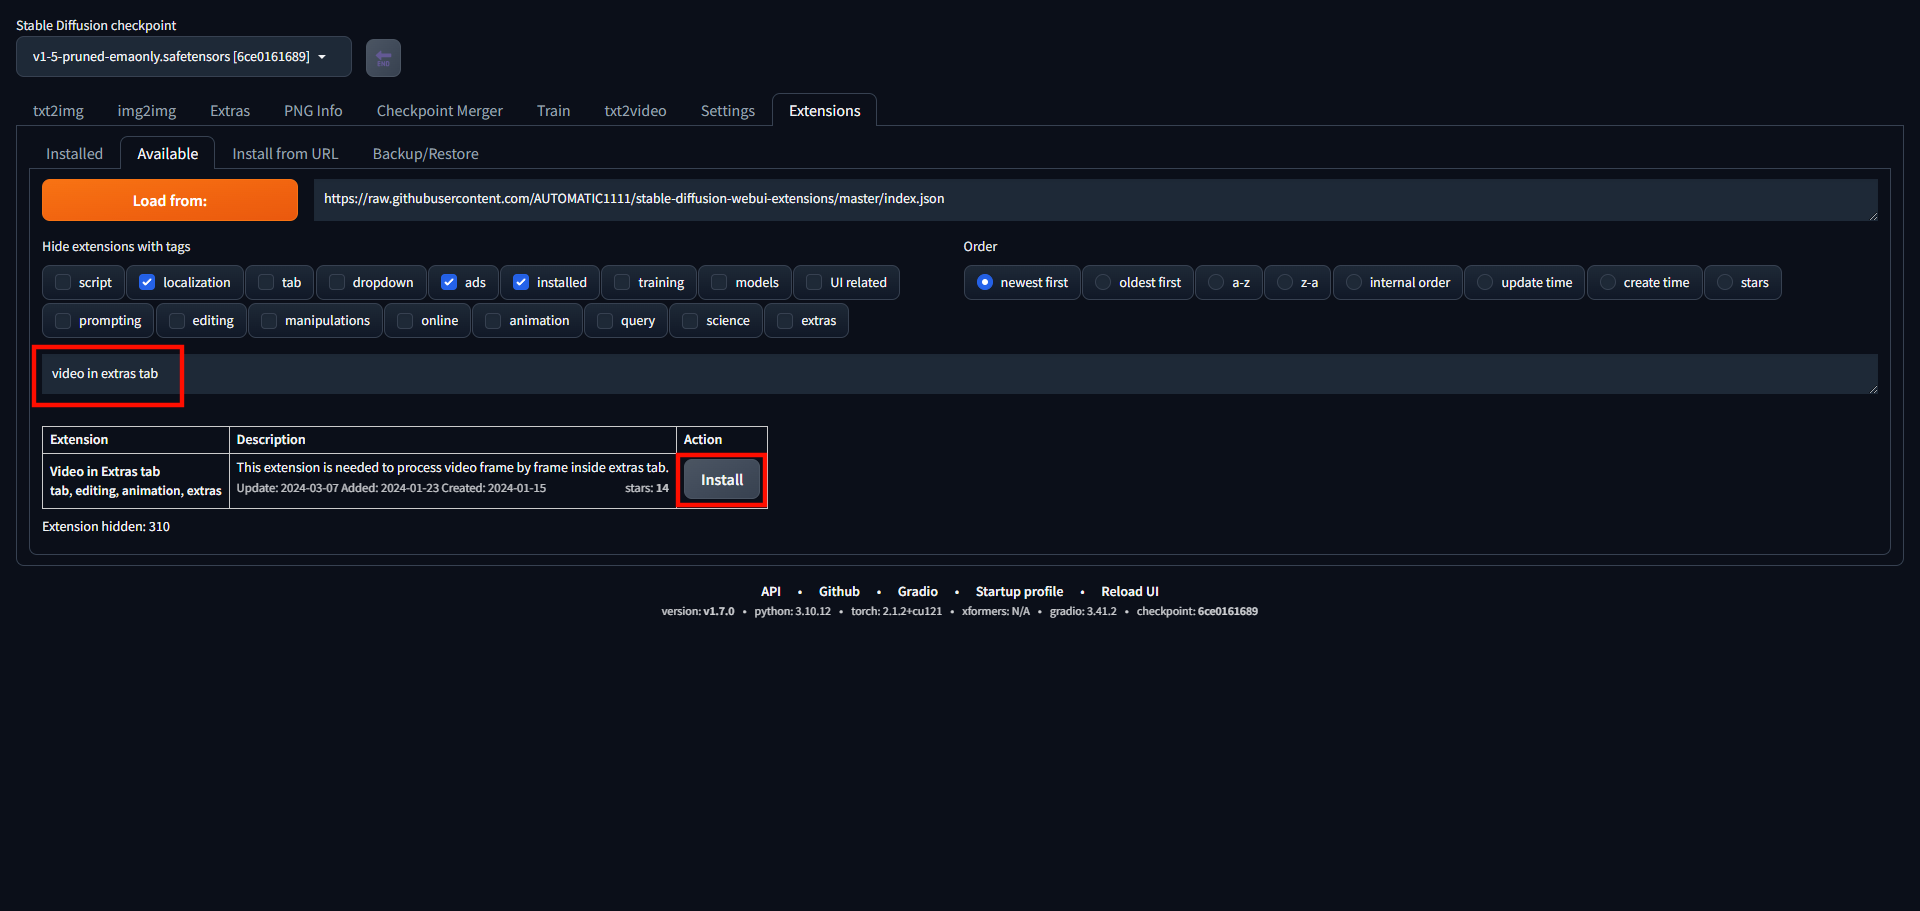
modelscopekeyword in your search field and entervideo in extras tabto browse new additional extensions.Click Install next to the Video in Extras tab result to install the new extension.
Wait for the extension installation to complete and click Reload UI at the bottom of the web page to reload WebUI.
Wait at least 2 minutes for WebUI to restart and load all installed extensions on your server.
Generate Videos From Text Prompts using ModelScope
Navigate to the txt2video tab within the WebUI interface.
Verify that
ModelScopeis selected as the Model type.Enter your desired text prompt in the Prompt field to define your generated video. For example,
an astronaut driving on the moon in a photorealistic way.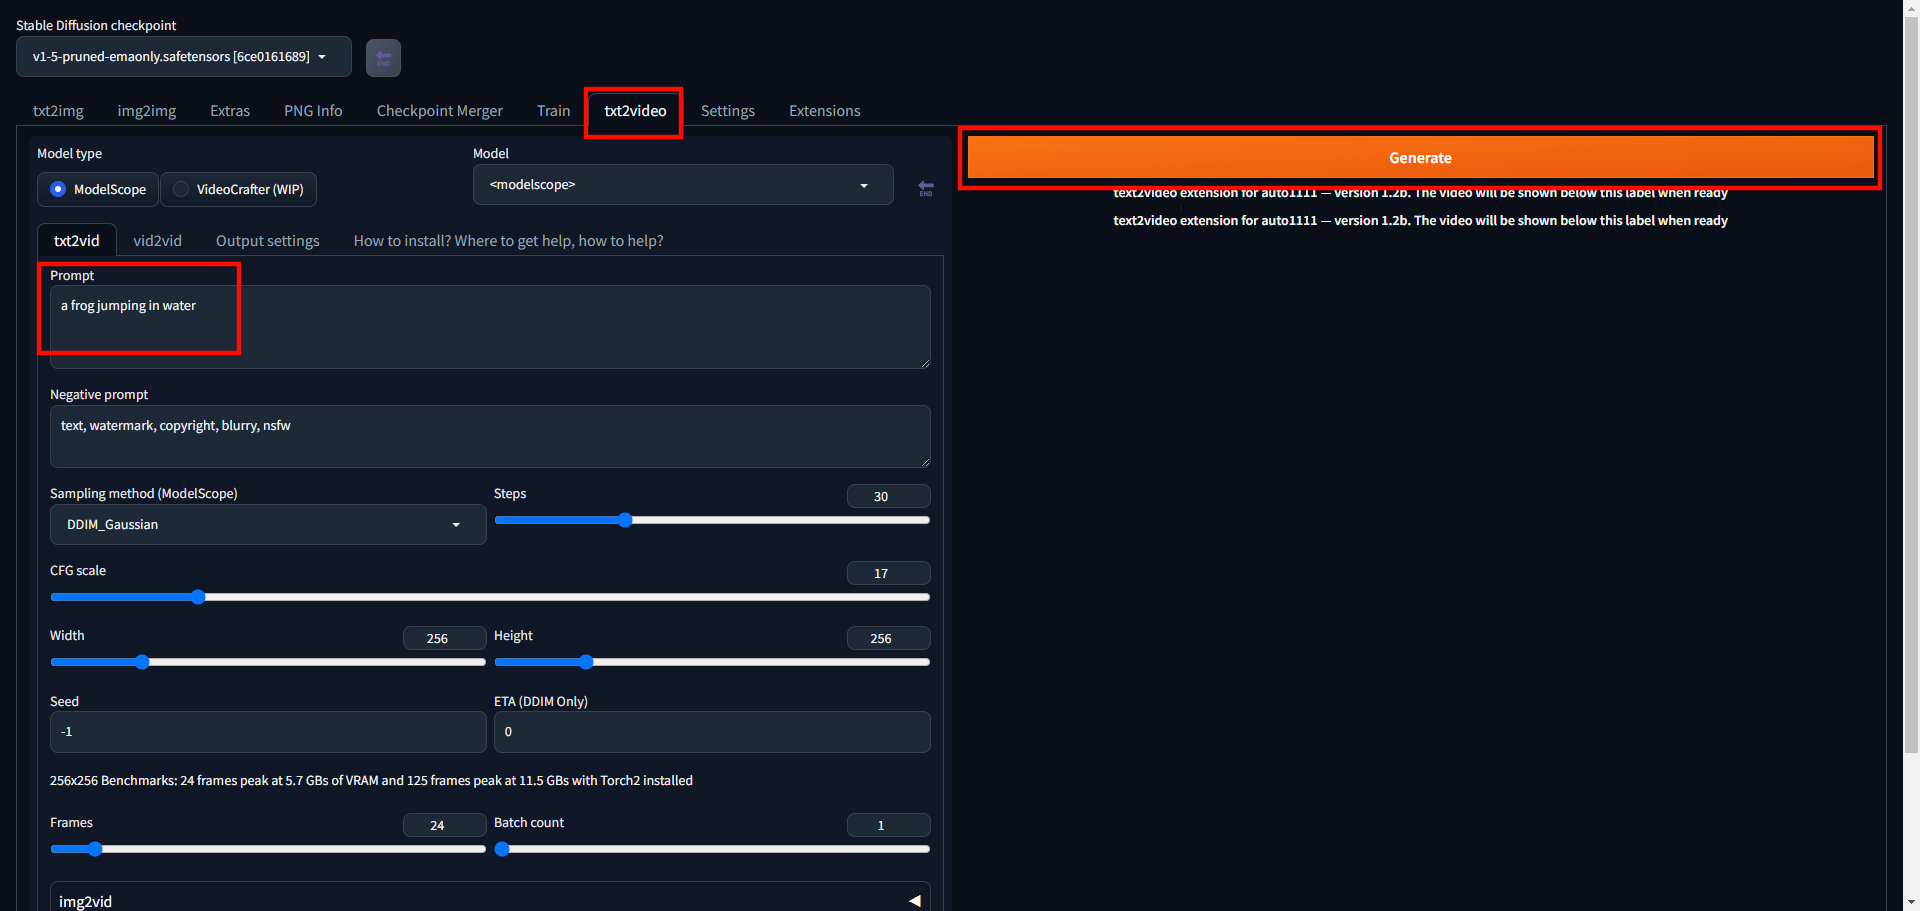
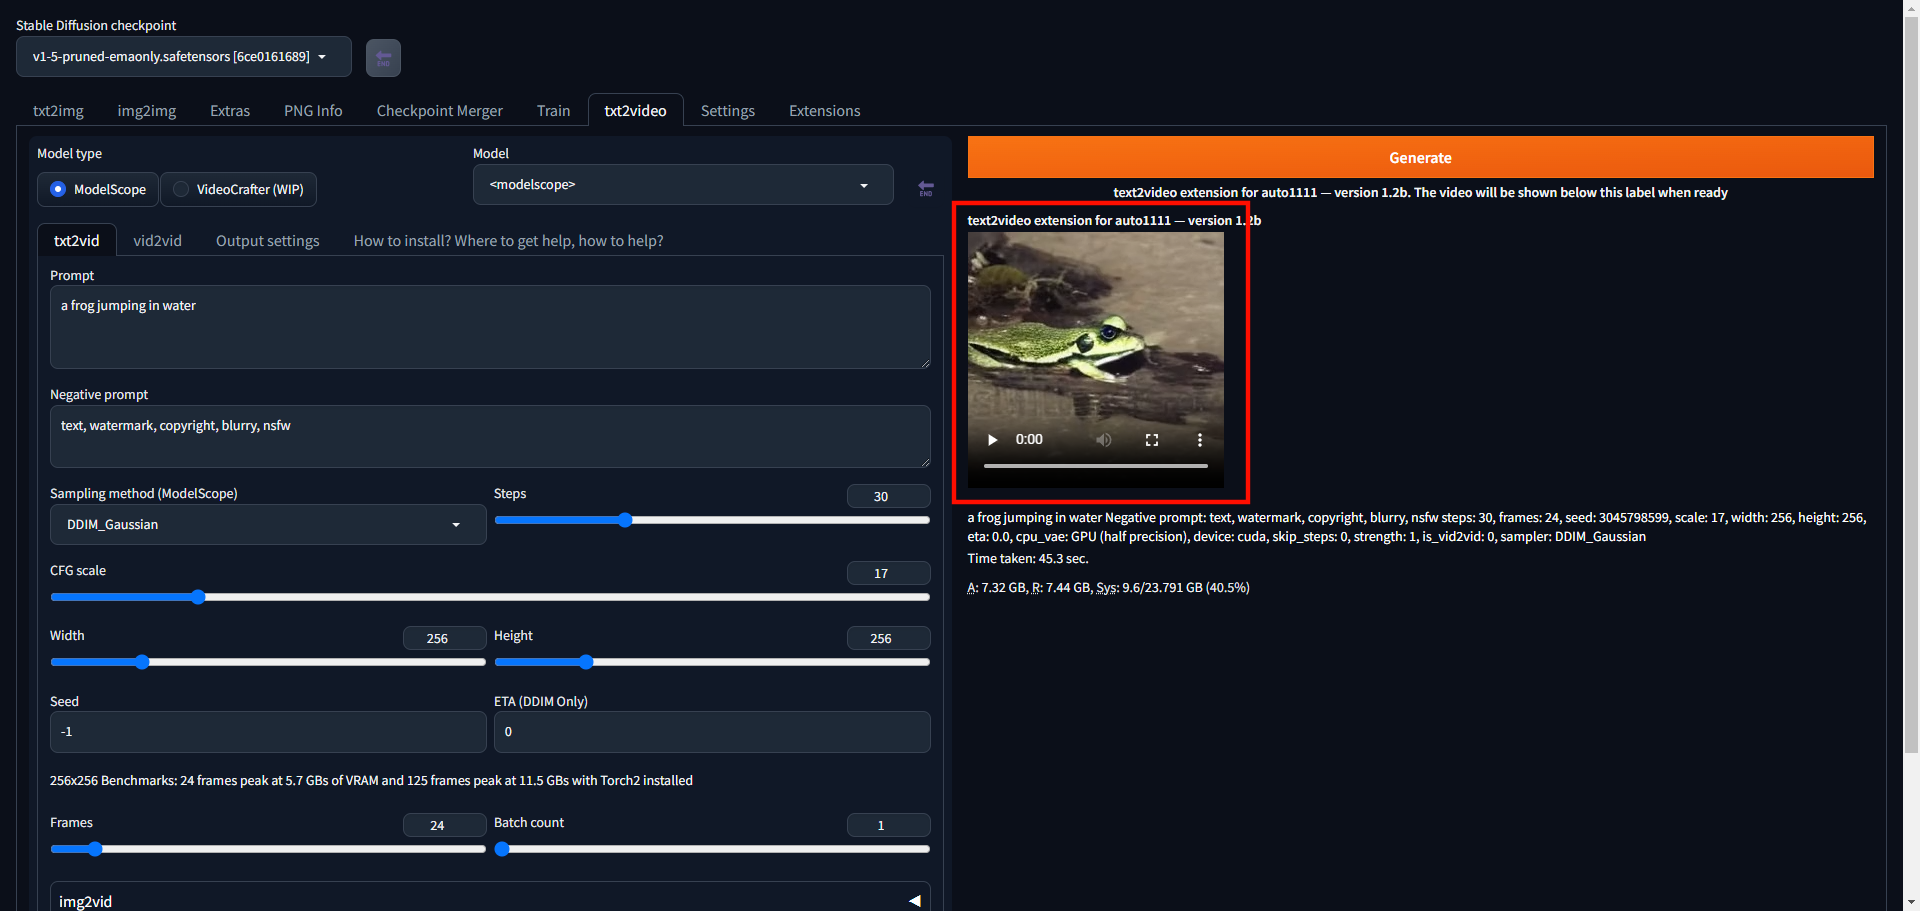
Click Generate and wait for at least
3minutes for the ModelScope generation process to complete.Preview the generated video and verify that it matches your needs. To modify the generated video, change your input text prompt and negative prompt to generate a new video using ModelScope to match your goals.
Generate Videos From Images using Inpainting and ModelScope
Scroll and expand the img2vid option below the txt2video customization section.
Click the Drop File Here field to browse and upload a base image from your computer to the WebUI.
Click the inpainting frames slider to set your target number of video frames to generate. For example,
24.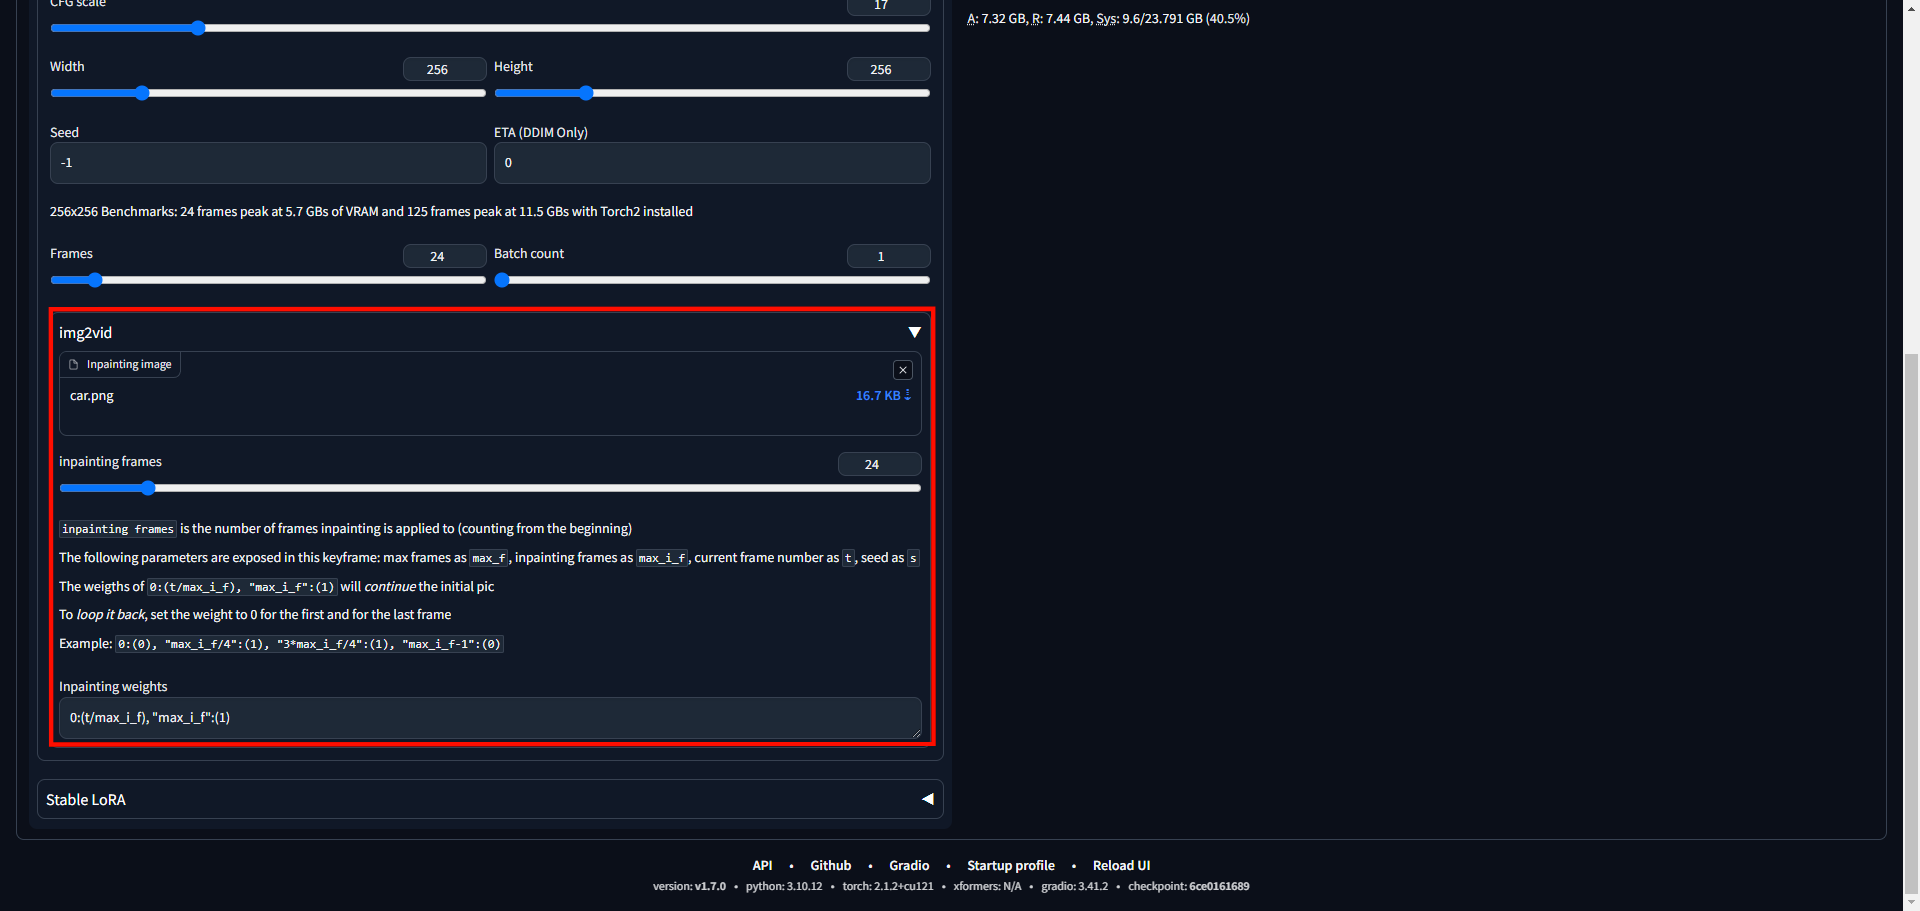
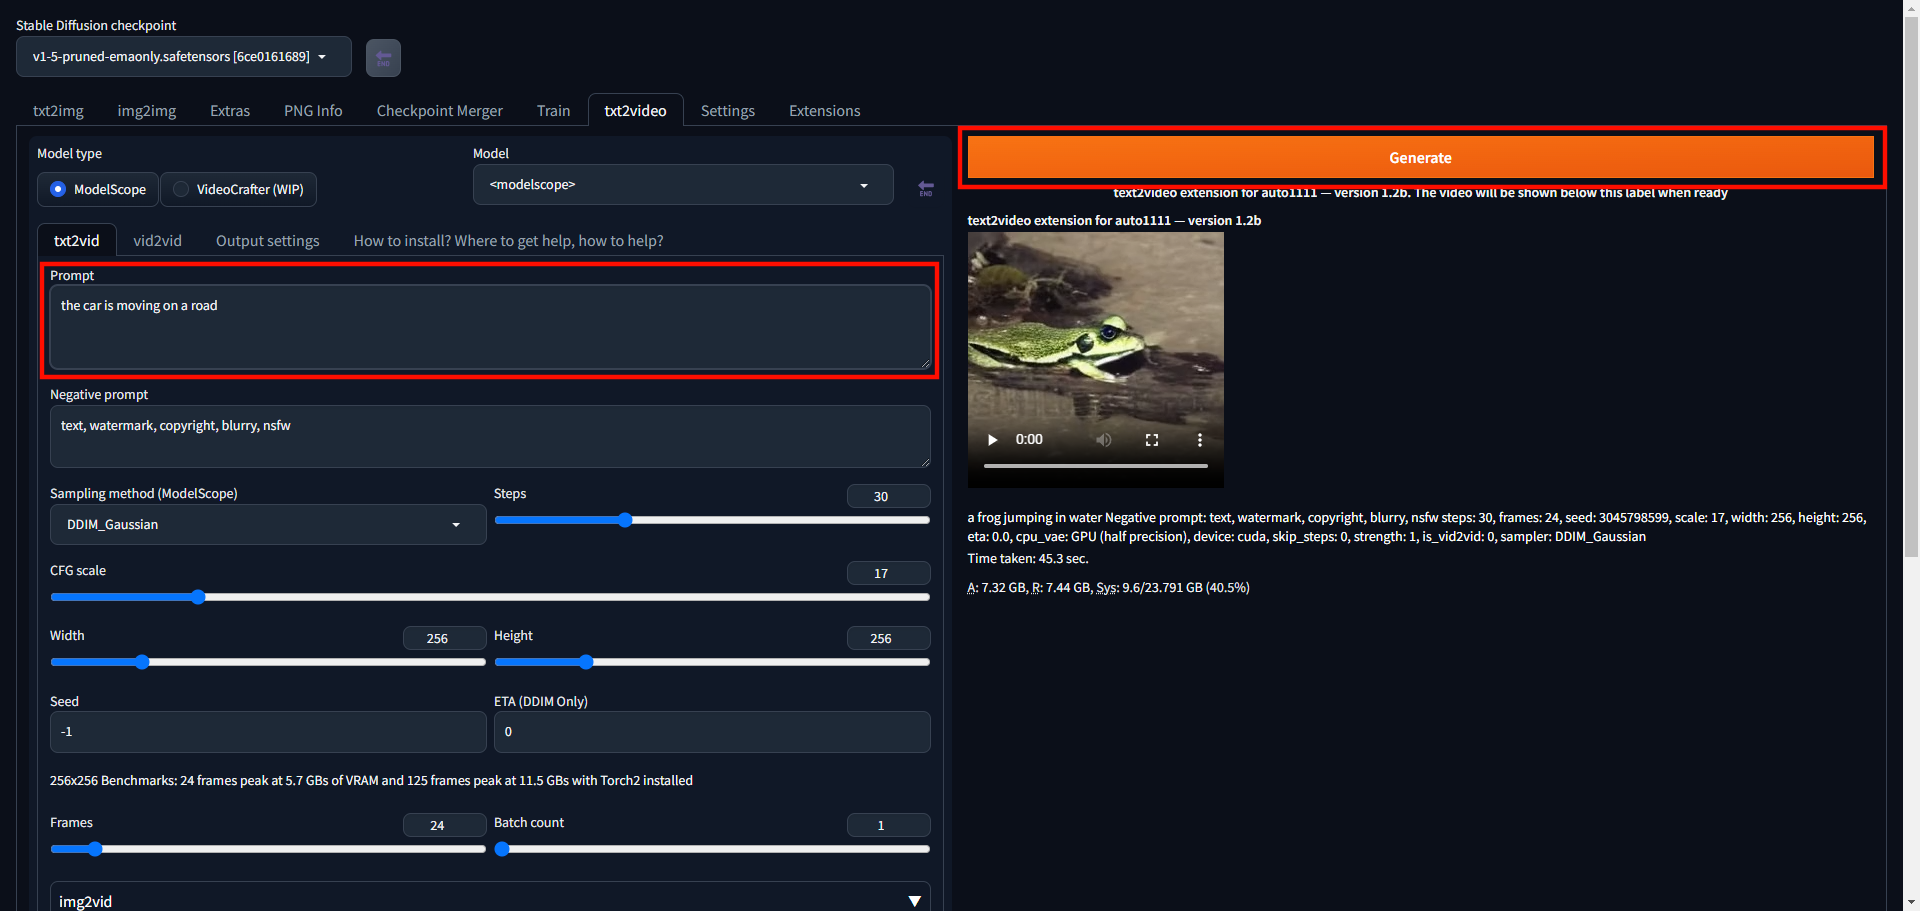
Enter a text prompt in the Prompt field to define your generated video based on your input image. For example, upload an image of a car and use a prompt such as
the car is moving on a road.Click Generate to create your video with ModelScope.
Wait for the video generation process to complete and preview the generated video or modify your input prompts.
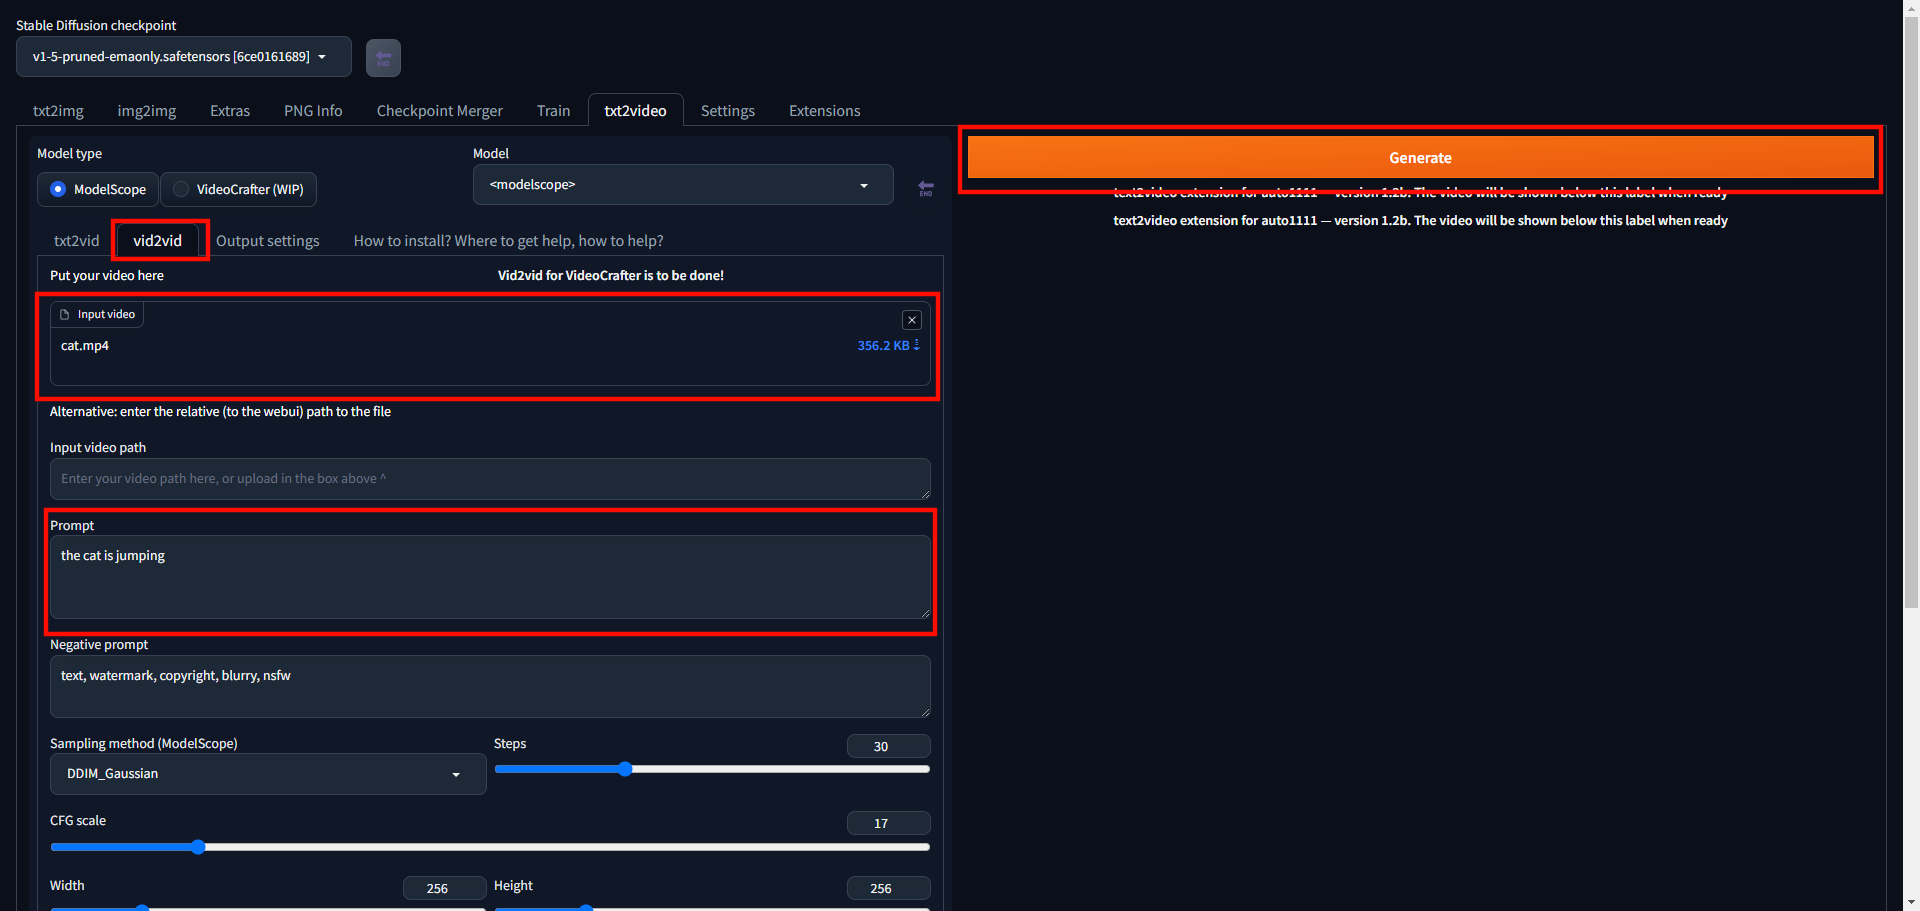
Generate Videos from Existing Videos using Vid2vid
Navigate to the vid2vid tab within the model options next to txt2vid.
Click the Drop File Here field to browse your local computer files and upload a base video file. When a video file is available in your server files, enter the path in the Input video path field instead.
Enter a text prompt in the Prompt field to define your generated video and verify any customization values such as the final video resolution.
Click Generate to start the video generation process using ModelScope.
Upscale Generated Videos
The resolution of generated videos matches your target width and height customization options during the ModelScope generation process. Upscaling the generated videos enhances the original resolution to improve the final video quality. Follow the steps below to upscale your generated videos using the WebUI interface.
Access your server SSH session and switch to your user home directory.
console$ cd
Create a new
upscaled-videosdirectory to store your upscaled video files.console$ mkdir upscaled-videos
Switch to your WebUI project directory. Replace
/home/user/stable-diffusion-webui/outputs/img2img-images/text2video/with your actual project directory path.console$ cd /home/user/stable-diffusion-webui/outputs/img2img-images/text2video/
List files in the directory to verify the generated naming structure.
console$ lsYour output should look like the one below.
20240310182107Based on the above output, WebUI writes generated videos to independent directories based on the generation time. For example,
20240310182107translates2024-03-10at18:21. Copy the directory name to verify the file contents to use when upscaling the generated video files.Switch to your target output video directory. For example,
20240310182107.console$ cd 20240310182107
Print the generated video file
vid.mp4absolute path to use when upscaling the video.console$ readlink -f vid.mp4
Output:
/home/user/stable-diffusion-webui/outputs/img2img-images/text2video/20240310182107/vid.mp4Access your WebUI interface in a new web browser session.
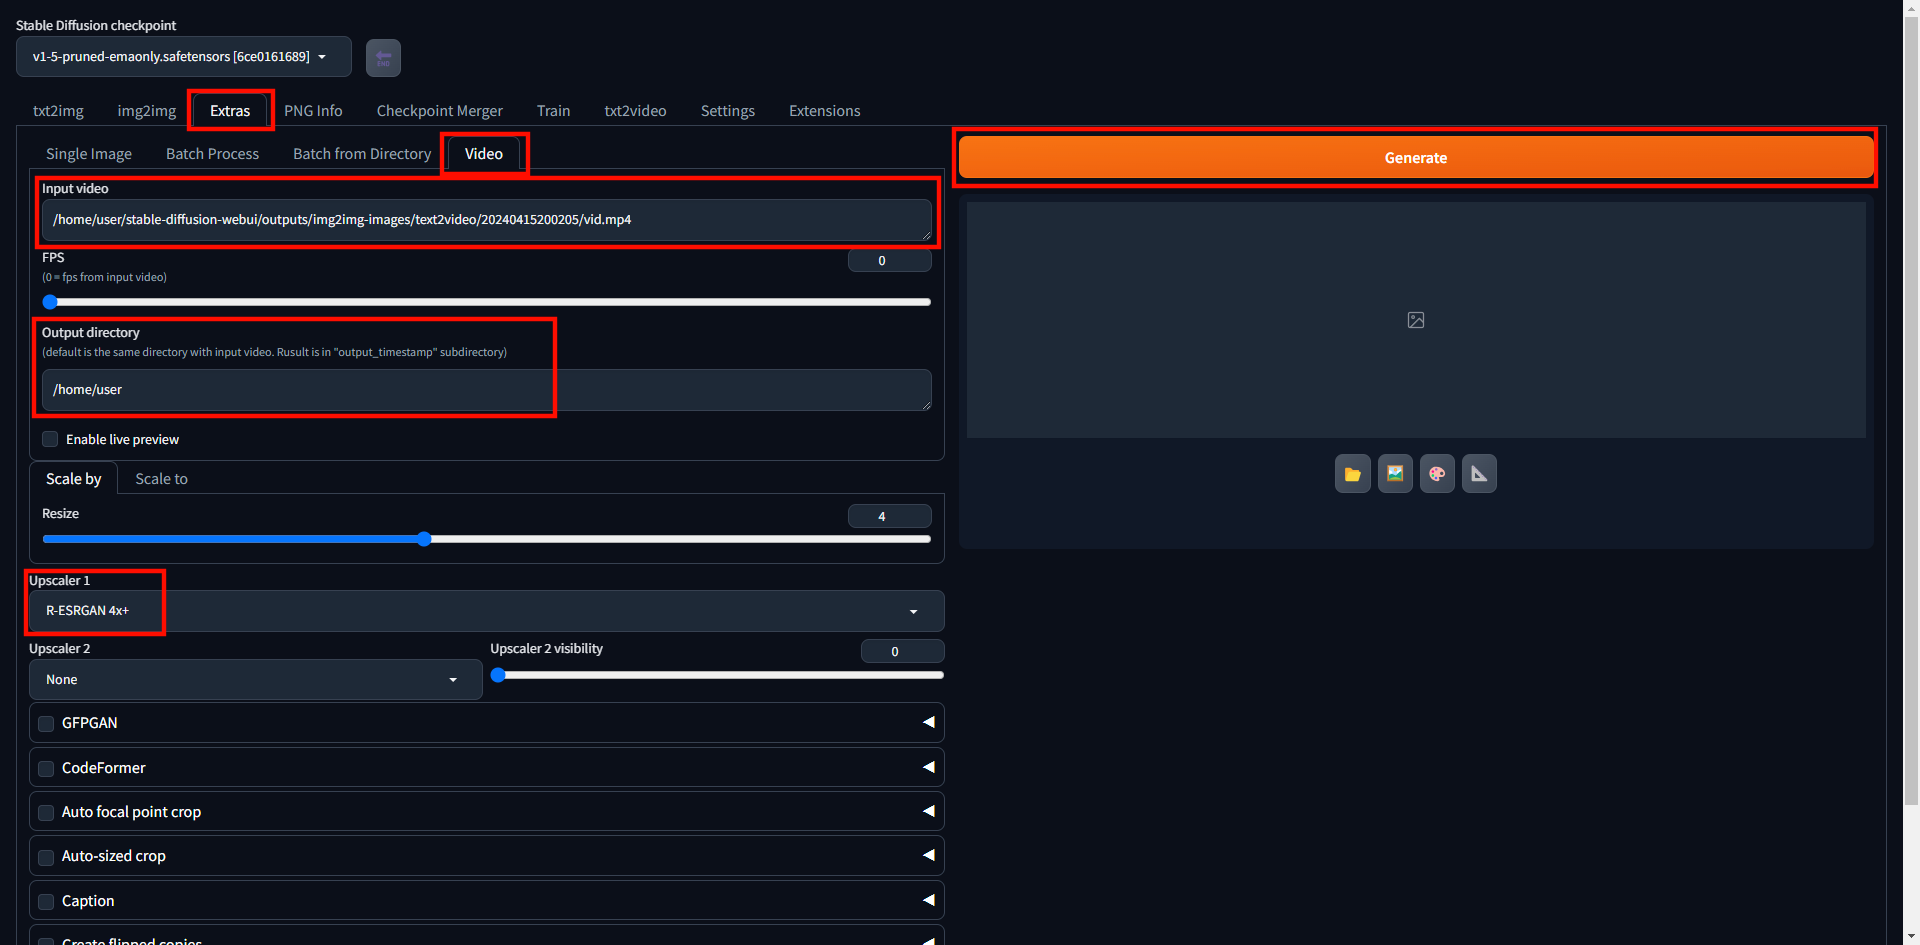
https://webui.exampleClick Extras on the main WebUI navigation menu.
Navigate to the Video tab next to Batch from Directory.
Paste your generated video absolute path in the Input video field.
Enter your upscaled videos directory path in the Output directory field. For example,
/home/user/upscaled-videos/.Click the Upscaler 1 dropdown and select a variant such as ESRGAN_4x from the list of model options.
Click Generate to start upscaling your target video.
Wait for at least
5 minutesfor the upscaling process to complete depending on the input file size. Then, switch to your terminal session to set up a new URL path to preview the upscaled video.Navigate to your output
upscaled-videosdirectory.console$ cd /home/user/upscaled-videos
List the directory files and verify that a new
out_directory is available.console$ lsYour output should look like the one below.
out_1710096504Switch to the new upscaled output directory to view the enhanced video files. For example,
out_1710096504.console$ cd out_1710096504
List files in the directory and verify that a new
.mp4video file is available.console$ lsOutput:
1443.png 2100.png 3002.png output_vid.mp4_1710096504.mp4Copy the upscaled video filename that includes a
.mp4extension to rename and store in your web server root files directory.Copy the upscaled video file to your web files directory
/var/www/htmlasupscaled_video.mp4. Replaceoutput_vid.mp4with your actual filename.console$ sudo cp output_vid.mp4 /var/www/html/upscaled_video.mp4
Open the WebUI Nginx configuration file.
console$ sudo nano /etc/nginx/sites-enabled/webui.conf
Add the following configuration within your
listen 443 sslserver block.nginxlocation /video_preview { alias /var/www/html; try_files $uri $uri/ =404; }
Save and close the file.
The above configuration forwards all
/video_previewpath requests to the/var/www/htmldirectory.Test the Nginx configuration for errors.
console$ sudo nginx -t
Output:
nginx: the configuration file /etc/nginx/nginx.conf syntax is ok
nginx: configuration file /etc/nginx/nginx.conf test is successful
Restart Nginx to apply the configuration changes.
console$ sudo systemctl restart nginx
Load your upscaled video in a new web browser window using your WebUI domain with the
/video_previewpath.https://example.com/video_preview/upscaled_video.mp4Verify that the upscaled video displays in your web browser session.
Troubleshooting
Depending on your production server setup, you may encounter errors while running WebUI or generating videos with Modelscope. Follow the troubleshooting steps below to fix any issues you may encounter while running the video generation pipeline.
- WebUI does not generate videos with ModelScope: Verify that the model files are available in the specified path.
- Unable to Access WebUI: View the application logs using the command
sudo tail -f /var/logs/sdwebui.logto verify the WebUI or ModelScope application errors. - HTTP Error 502: The Nginx reverse proxy is unable to connect to the WebUI application. Verify that WebUI is running using the
systemctl status sdbwebuicommand. - WebUI service startup failure: Verify that
WorkingDirectory,ExecStartandUserparameters are correctly set in yoursdwebui.servicefile. - ModelScope generates distorted videos: Increase the CFG scale and number of generation steps.
ModuleNotFoundError: No module named 'tqdm.auto': Runpip3 install --upgrade tqdmto update thetqdmpackage using the Pip.torch.cuda.OutOfMemoryError: CUDA out of memory.: The server doesn't have enough GPU memory resources to generate videos. Upgrade your server or clear the GPU memory to generate videos with ModelScope.
Conclusion
You have deployed ModelScope and generated videos using the WebUI web interface. The ModelScope txt2video model lets you generate videos from text prompts, existing images and videos using your Vultr Cloud GPU server resources. For more information and configuration options, visit the ModelScope Hugging Face page.
No comments yet.