Introduction
Open WebUI is a self-hosted, feature-rich, and user-friendly open-source web interface that lets you run large language models (LLMs) using Ollama and OpenAI-compatible APIs. You can extend Open WebUI with AI models and plugins to suit your needs.
This article explains how to install Open WebUI and run large language models (LLMs) using Ollama on a Vultr Cloud GPU instance. You will also configure Open WebUI with secure SSL certificates to expose the web interface using a custom domain.
Prerequisites
Before you begin:
Deploy a Vultr Cloud GPU instance with at least 8 GB RAM to run LLMs. Choose:
8 GBfor 7B models16 GBfor 13B models32 GBfor 33B models.
Set up a domain A recording pointing to the instance's public IP address. For example,
openwebui.example.com.Access the instance using SSH as a non-root sudo user.
Install Ollama
Ollama is a lightweight, extensible framework for running open-source LLMs such as Llama, Code Llama, Mistral, and Gemma. Ollama integrates with application frameworks using APIs to create, manage, and customize models. Open WebUI requires Ollama to run and manage LLMs. Follow the steps below to install Ollama and download a sample model to run using Open WebUI.
Download the Ollama installation script.
console$ wget https://ollama.ai/install.sh
Grant execute permissions to the script.
console$ sudo chmod +x install.sh
Run the script to install Ollama.
console$ sudo ./install.sh
Output:
>>> Installing ollama to /usr/local
>>> Downloading Linux amd64 bundle
############################################################################################################### 100.0%>>> Creating ollama user...
>>> Adding ollama user to render group...
>>> Adding ollama user to video group...
>>> Adding current user to ollama group...
>>> Creating ollama systemd service...
>>> Enabling and starting ollama service...
Created symlink /etc/systemd/system/default.target.wants/ollama.service → /etc/systemd/system/ollama.service.
>>> NVIDIA GPU installed.
Enable the Ollama system service to start at boot.
console$ sudo systemctl enable ollama
Start the Ollama service.
console$ sudo systemctl start ollama
View the Ollama service status and verify it's running.
console$ sudo systemctl status ollama
Output:
● ollama.service - Ollama Service
     Loaded: loaded (/etc/systemd/system/ollama.service; enabled; vendor preset: enabled)
     Active: active (running) since Sun 2024-11-17 11:51:45 UTC; 28s ago
   Main PID: 18515 (ollama)
      Tasks: 11 (limit: 9388)
     Memory: 70.2M
        CPU: 699ms
     CGroup: /system.slice/ollama.service
             └─18515 /usr/local/bin/ollama serve
Use Ollama to download a sample model such as
llama3:8b.console$ sudo ollama pull llama3:8b
Output:
pulling manifest
pulling 6a0746a1ec1a... 100% ▕██████████████████████████████████████████████████████▏ 4.7 GB
pulling 4fa551d4f938... 100% ▕██████████████████████████████████████████████████████▏  12 KB
pulling 8ab4849b038c... 100% ▕██████████████████████████████████████████████████████▏  254 B
pulling 577073ffcc6c... 100% ▕██████████████████████████████████████████████████████▏  110 B
pulling 3f8eb4da87fa... 100% ▕██████████████████████████████████████████████████████▏  485 B
verifying sha256 digest
writing manifest
success
Install Open WebUI
You can install Open WebUI using Python Pip or Docker. The Pip method requires the Python version 3.11 while Docker uses a prebuilt Open WebUI container image. Follow the steps below to install Open WebUI using both methods.
Option 1: Install Open WebUI Using Pip
Install Python 3.11 version.
console$ sudo apt install python3.11
Install Open WebUI.
console$ sudo python3.11 -m pip install open-webui
Upgrade
pillowandpyopensslmodules.console$ sudo python3.11 -m pip install -U Pillow pyopenssl
Run Open WebUI and verify it does not return errors.
console$ sudo open-webui serve
Output:
  / _ \ _ __   ___ _ __   \ \      / /__| |__ | | | |_ _|
 | | | | '_ \ / _ \ '_ \   \ \ /\ / / _ \ '_ \| | | || |
 | |_| | |_) |  __/ | | |   \ V  V /  __/ |_) | |_| || |
  \___/| .__/ \___|_| |_|    \_/\_/ \___|_.__/ \___/|___|
       |_|


v0.4.6 - building the best open-source AI user interface.

https://github.com/open-webui/open-webui

INFO:     Started server process [16779]
INFO:     Waiting for application startup.
INFO:     Application startup complete.
INFO:     Uvicorn running on http://0.0.0.0:8080 (Press CTRL+C to quit)
Press Ctrl + C to stop the application.
Create a System Service to Run Open WebUI
If you install Open WebUI using Pip, the application runs using the open-webui serve command. You should create a system service to manage the Open WebUI processes without running the open-webui serve command directly. Follow the steps below.
Create a new
/usr/lib/systemd/system/openwebui.servicesystem service file using a text editor likevim.console$ sudo vim /usr/lib/systemd/system/openwebui.service
Add the following service configurations to the
/usr/lib/systemd/system/openwebui.servicefile.ini[Unit] Description=Open WebUI Service After=network.target [Service] Type=simple ExecStart=open-webui serve ExecStop=/bin/kill -HUP $MAINPID [Install] WantedBy=multi-user.target
Save and close the file.
In the above system service configuration, starting the Open WebUI service automatically runs the
open-webui servecommand on your server.Reload systemd to apply the new service configuration.
console$ sudo systemctl daemon-reload
Enable the Open WebUI system service to start at boot.
console$ sudo systemctl enable openwebui.service
Start the Open WebUI service.
console$ sudo systemctl start openwebui
Test the Open WebUI service status and confirm it's running.
console$ sudo systemctl status openwebui
Output:
● openwebui.service - Open WebUI Service
     Loaded: loaded (/lib/systemd/system/openwebui.service; enabled; vendor preset: enabled)
     Active: active (running) since Wed 2024-12-04 20:20:29 UTC; 6s ago
   Main PID: 3007 (open-webui)
      Tasks: 9 (limit: 14212)
     Memory: 522.7M
        CPU: 6.456s
     CGroup: /system.slice/openwebui.service
             └─3007 /usr/bin/python3.11 /usr/local/bin/ open-webui serve
Option 2: Install Open WebUI Using Docker
Verify that Docker is running on your server.
console$ sudo docker ps
Output:
CONTAINER ID IMAGE COMMAND CREATED STATUS PORTS NAMESRun
sudo systemctl start dockerto start Docker in case you receive the following error.Cannot connect to the Docker daemon at unix:///var/run/docker.sock. Is the docker daemon running?Verify that a GPU device is available on your server.
console$ nvidia-smiPull the Open WebUI Docker image for Nvidia GPUs to your server.
console$ sudo docker pull ghcr.io/open-webui/open-webui:cuda
To use Open WebUI on a non-GPU server, download the main Docker image instead.
console$ sudo docker pull ghcr.io/open-webui/open-webui:main
Run Open WebUI and use all Nvidia GPU devices on the host server.
console$ sudo docker run -d -p 8080:8080 --gpus all --add-host=host.docker.internal:host-gateway -v open-webui:/app/backend/data --name open-webui --restart always ghcr.io/open-webui/open-webui:cuda
In the above command, Docker runs Open WebUI using the
open-webui:cudacontainer image you downloaded earlier with the following options:-p 8080:8080: Maps the host port8080to the Open WebUI container port8080for access on your server.--gpus all: Enables Open WebUI to access all GPUs available on your server.--add-host=host.docker.internal:host-gateway: Enables the Open WebUI container to communicate with services outside Docker that are installed on the server.-v open-webui:/app/backend/data: Creates a newopen-webuivolume and mounts it to/app/backend/datainside the Open WebUI container.--name open-webui-new: Sets the Open WebUI container name for visibility and management.--restart always: Enables the Open WebUI container to automatically restart in case the container stops unexpectedly.ghcr.io/open-webui/open-webui:cuda: Specifies the Open WebUI docker image to run.
Ensure that the Open WebUI Docker container is running.
console$ sudo docker ps
Output:
CONTAINER ID   IMAGE                                COMMAND           CREATED          STATUS                             PORTS                                       NAMES
d7957cd20569   ghcr.io/open-webui/open-webui:cuda   "bash start.sh"   12 seconds ago   Up 12 seconds (health: starting)   0.0.0.0:8080->8080/tcp, :::8080->8080/tcp   open-webui
Configure Nginx as a Reverse Proxy to Run Open WebUI
You can access the Open WebUI on the default port 8080 using your server's IP address or linked domain. Exposing the Open WebUI port in a production environment is insecure. You can use Nginx as a reverse proxy to handle secure connections to the Open WebUI's backend port using HTTP or HTTPS. In the following steps, install Nginx and create a new virtual host configuration to access Open WebUI on your server.
Install Nginx.
console$ sudo apt install nginx -y
Start the Nginx system service.
console$ sudo systemctl start nginx
If you receive an error, stop Apache or any other application using the HTTP port
80on your server to enable Nginx to run.Create a new
/etc/nginx/sites-available/openwebui.confvirtual host for Open WebUI.console$ sudo vim /etc/nginx/sites-available/openwebui.conf
Add the following Nginx configurations to the
/etc/nginx/sites-available/openwebui.conffile.nginxserver { listen 80; server_name openwebui.example.com; access_log /var/log/nginx/openwebui_access.log; error_log /var/log/nginx/openwebui_error.log; location / { proxy_pass http://127.0.0.1:8080; proxy_set_header Host $host; proxy_set_header X-Real-IP $remote_addr; proxy_set_header X-Forwarded-For $proxy_add_x_forwarded_for; proxy_set_header X-Forwarded-Proto $scheme; } }
Save the file.
Link the
openwebui.confconfiguration to thesites-enableddirectory to enable it.console$ sudo ln -s /etc/nginx/sites-available/openwebui.conf /etc/nginx/sites-enabled/openwebui.conf
Test Nginx for configuration errors.
console$ sudo nginx -t
Output:
nginx: the configuration file /etc/nginx/nginx.conf syntax is ok
nginx: configuration file /etc/nginx/nginx.conf test is successful
Restart Nginx to apply the Open WebUI virtual host configuration changes.
console$ sudo systemctl restart nginx
Allow HTTP connections through the firewall.
console$ sudo ufw allow http
Generate SSL Certificates to Secure Open WebUI
SSL certificates encrypt the connection between a client's web browser and your server. Use a trusted certificate authority (CA) like Let's Encrypt to generate SSL certificates and secure connections to the Open WebUI using your Nginx configuration. In the following steps, install the Certbot Let's Encrypt client and generate SSL certificates to access Open WebUI using your domain.
Install Certbot for Nginx.
console$ sudo apt install python3-certbot-nginx -y
Generate a new SSL certificate for your domain. Replace
openwebui.example.comwith your domain andadmin@example.comwith an active email address.console$ sudo certbot --nginx -d openwebui.example.com -m admin@example.com --agree-tos
Output:
Successfully received certificate.
Certificate is saved at: /etc/letsencrypt/live/openwebui.example.com/fullchain.pem
Key is saved at:         /etc/letsencrypt/live/openwebui.example.com/privkey.pem
This certificate expires on 2025-02-25.
These files will be updated when the certificate renews.
Certbot has set up a scheduled task to automatically renew this certificate in the background.

Deploying certificate
Successfully deployed certificate for openwebui.example.com to /etc/nginx/sites-enabled/openwebui.conf
Congratulations! You have successfully enabled HTTPS on https://openwebui.example.com
Restart Nginx to apply the SSL configuration changes.
console$ sudo systemctl restart nginx
Allow HTTPS connections through the firewall.
console$ sudo ufw allow https
Access Open WebUI
You can access Open WebUI using your domain based on the configuration steps you performed earlier. In the following steps, access Open WebUI and create a new administrator account to run LLMs on the server.
Access your Open WebUI's domain to access the web interface.
https://openwebui.example.comClick Get started to access Open WebUI.

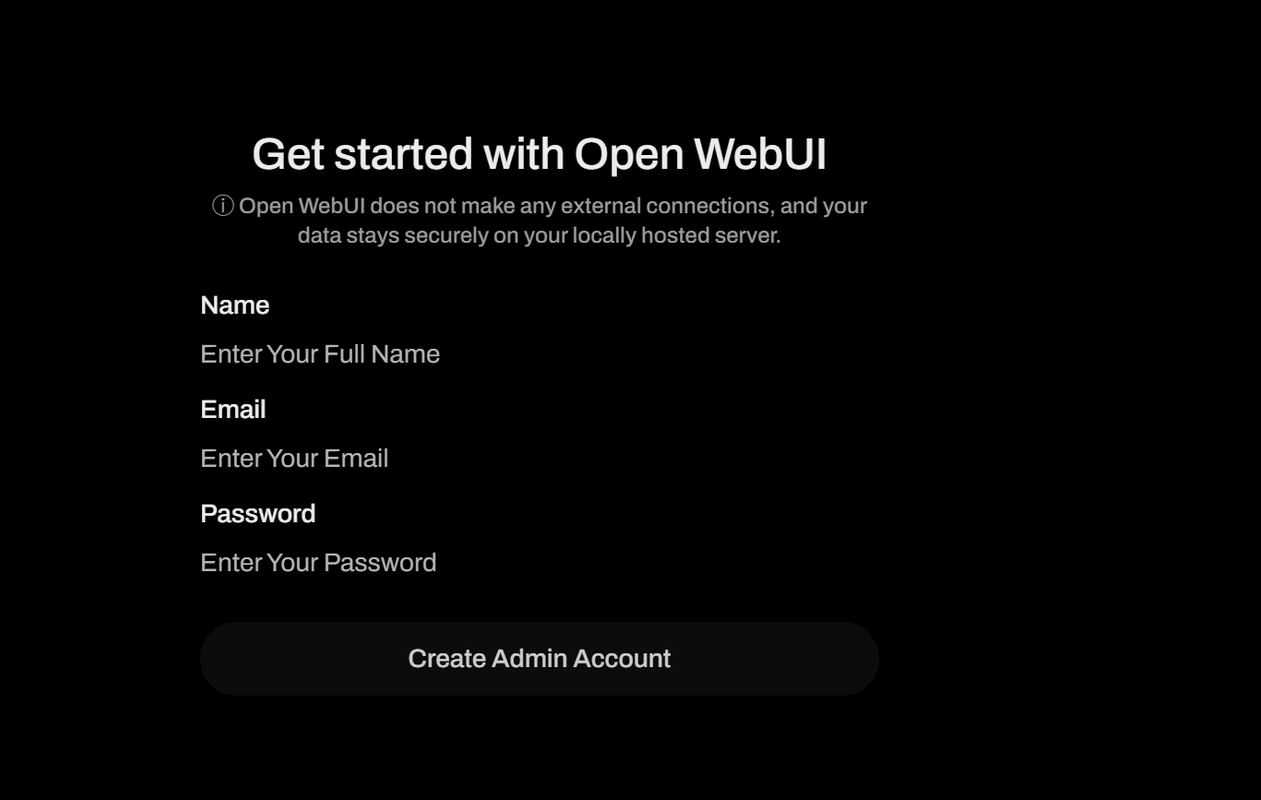
Enter a new administrator username, email address, and password in the Open WebUI fields.

Click Create Admin Account to create the first Open WebUI administrator account.
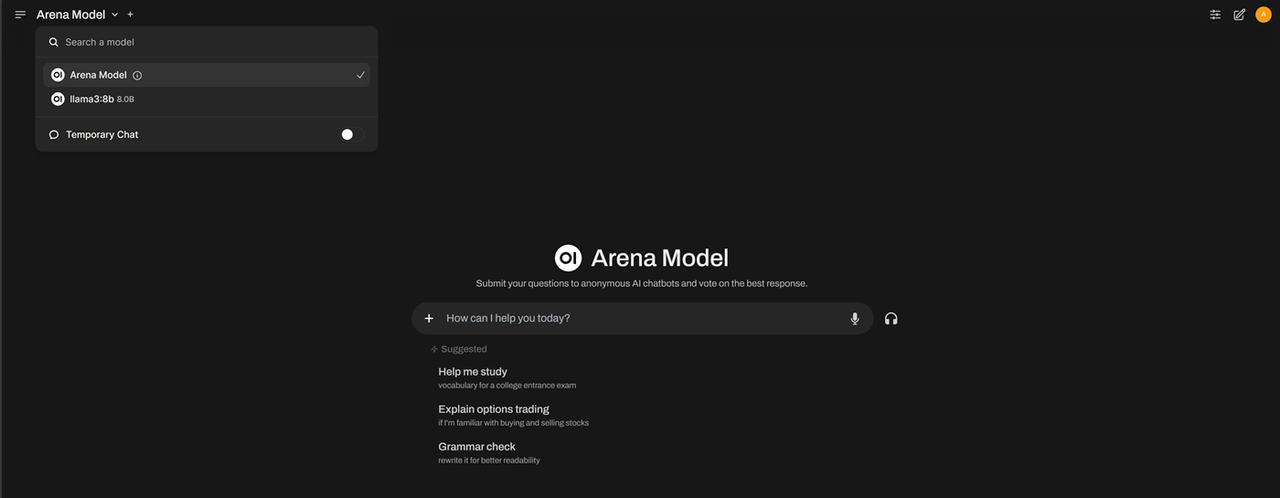
Confirm that the Open WebUI page displays in your browser, click the Arena Model drop-down in the top menu, and select the
Llama 8bmodel you installed earlier.
Enter a new prompt like
Hello today! Write me a simple poemto generate a result using the defaultLlama 8bmodel you installed earlier.
Install and Run LLMs in Open WebUI
Open WebUI ships with some default AI models. You can also install new models directly using Ollama on the server or by uploading the model files through the Open WebUI interface. In the following steps, install new models using Ollama and run them using Open WebUI.
Visit the Ollama library and find new models.
Download a new model. For example, the
mistral 7Bmodel.console$ sudo ollama pull mistral
Download another model, such as
llama3:70b.console$ sudo ollama pull llama3:70b
The
llama3:70bmodel is40GBand requires more RAM to run on the server.Restart Open WebUI to synchronize the new model changes.
console$ sudo docker restart open-webui
Or, restart the Open WebUI system service.
console$ sudo systemctl restart openwebui
Access Open WebUI in a new web browser.
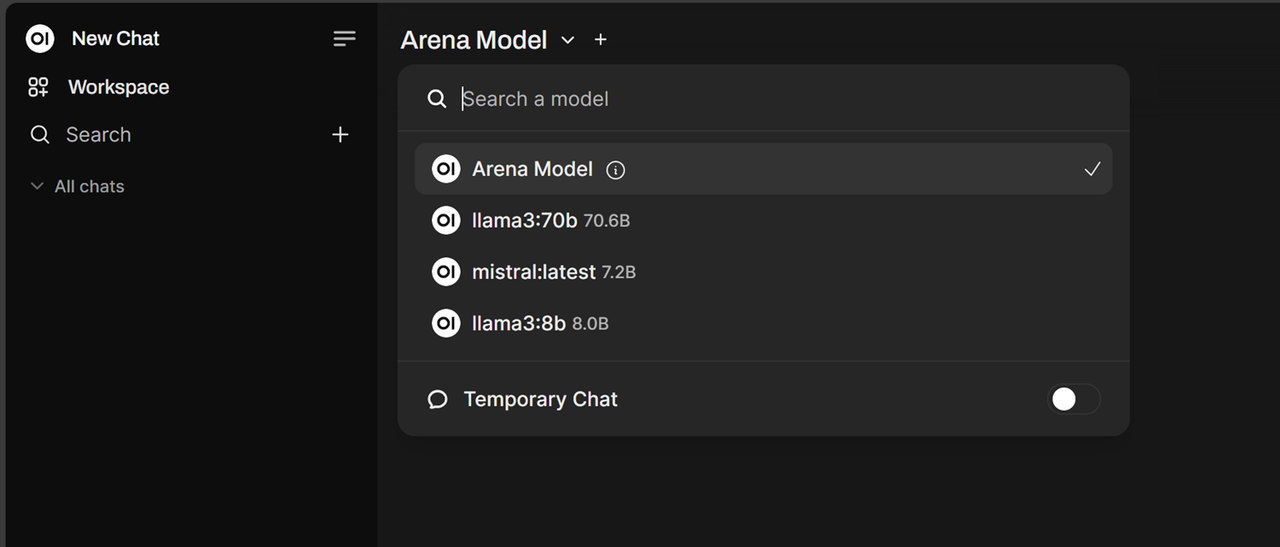
https://openwebui.example.comClick the models list on the top left drop-down list and verify the new models are available.

Select a model to use in Open WebUI. For example, select the Mistral model you installed.
Enter a new prompt in the input field, such as
What is Vultr?and verify that the model processes new results.
Conclusion
Open WebUI is a powerful web interface for running ML LLMs on a server. In this guide, you installed Open WebUI on a Vultr Cloud GPU instance and secured it with SSL certificates. You can customize the Open WebUI interface and create multiple users to log in or sign up to use LLMs directly on your server. For additional guidelines, please refer to the Open WebUI documentation.