
Introduction
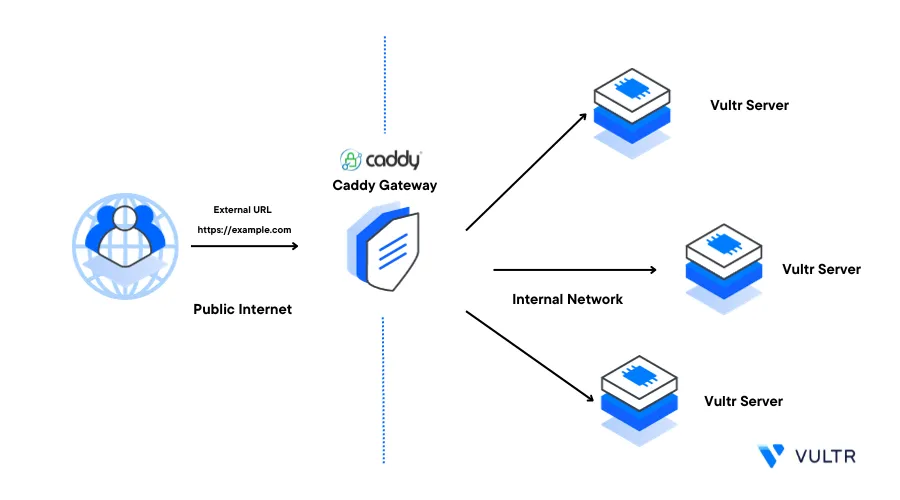
Caddy is an open-source web server that supports static and modern web applications using predefined configuration rules with automatic HTTPS enabled for all linked domain names. Written in GO, Caddy offers user-friendly configuration directives that enable you to either use it as a web server or reverse proxy with other applications such as Nginx and Apache on a server.
This article explains how you can get started with the Caddy Web Server on a Vultr Cloud Server. You are to host a sample HTML application, configure dynamic access to applications such as PHP, and verify automatic Lets Encrypt Certificates on your server.
Prerequisites
Before you start:
- Deploy a Linux Cloud Server on Vultr
- Configure a Domain name A record pointing to the server IP Address
- Access the server terminal using a secure protocol such as SSH
- Create a non-root sudo user and switch to the account
Install Caddy
Caddy is not available in the default Linux server repositories. To install the web server application, you can either enable the matching repository packages for your server distribution or install Caddy as a Docker container. Depending on your choice, install Caddy on your server as described in the optional methods below.
Install Caddy on Ubuntu or Debian Based Servers
Install the required system dependencies
$ sudo apt install apt-transport-https -yAdd the Caddy GPG Key to your system
$ curl -1sLf 'https://dl.cloudsmith.io/public/caddy/stable/gpg.key' | sudo gpg --dearmor -o /usr/share/keyrings/caddy-stable-archive-keyring.gpgAdd the Caddy repository to your APT Sources
$ curl -1sLf 'https://dl.cloudsmith.io/public/caddy/stable/debian.deb.txt' | sudo tee /etc/apt/sources.list.d/caddy-stable.listUpdate the server packages index
$ sudo apt updateInstall Caddy
$ sudo apt install caddy -yEnable Caddy to start at boot time
$ sudo systemctl enable caddyStart Caddy
$ sudo systemctl start caddyView the Caddy service status to verify that it’s running
$ sudo systemctl status caddyOutput:
  ● caddy.service - Caddy
  Loaded: loaded (/lib/systemd/system/caddy.service; enabled; preset: enabled)
  Active: active (running) since Mon 2023-10-09 01:26:05 UTC; 30s ago
     Docs: https://caddyserver.com/docs/
  Main PID: 47047 (caddy)
     Tasks: 8 (limit: 987)
  Memory: 8.3M
     CPU: 38ms
  CGroup: /system.slice/caddy.service
           └─47047 /usr/bin/caddy run --environ --config /etc/caddy/Caddyfile
Install Caddy on CentOS, Fedora, or RHEL based Servers
Install the RHEL Copr repository
$ dnf install 'dnf-command(copr)'Enable the Caddy Copr package
$ dnf copr enable @caddy/caddyUpdate the server
$ sudo dnf updateInstall Caddy
$ sudo dnf install caddyEnable Caddy to start at boot time
$ sudo systemctl enable caddyStart the Caddy web server
$ sudo systemctl start caddyVerify the Caddy system service status
$ sudo systemctl status caddy
Security
By default, the Caddy web server listens for connections on the HTTP port 80 and HTTPS port 443. Depending on your Linux server firewall structure, enable the HTTP and HTTPS through the firewall to allow Caddy to run on the server as described below.
Allow the HTTP port
80through the firewallUFW (Ubuntu/Debian systems)
$ sudo ufw allow 80/tcpFirewallD (CentOS/RHEL systems)
$ sudo firewall-cmd --zone=public --add-port=80/tcp --permanentAllow the HTTPS port
443$ sudo ufw allow 443/tcpOr
$ sudo firewall-cmd --zone=public --add-port=443/tcp --permanentReload the firewall table to save changes
$ sudo ufw reloadOr
$ sudo firewall-cmd --reload
Implement Basic Authentication Using Caddy
To protect applications using basic authentication by requesting a valid username and password, generate and set up your Caddy configuration with hashed values as described below.
Using the
caddy hash-passwordutility, generate a new hashed password$ caddy hash-passwordEnter your password, repeat the password, and copy the hashed output to use in your configuration file. When successful, your output should look like the one below:
$2a$14$9eY8yBp9nahGNkdABqwidedy3ySNWkA3CLmVFofJuNKXJxraHSUOuEdit your Caddy configuration file
$ sudo nano /etc/caddy/CaddyfileAdd a new
basicauth / { }section that includes your desired username and paste the hashed passwordbasicauth / { example_user $2a$14$9eY8yBp9nahGNkdABqwidedy3ySNWkA3CLmVFofJuNKXJxraHSUOu }Save and close the file.
In the above configuration, all user requests to the host root
/path get prompted to authenticate with a valid username and password hashed by your value. If a user enters the valid usernameexample_userand the password you set earlier, Caddy grants the user access to your web application.Your edited Caddy configuration file for the Server IP port
80should look like the one below::80 { root * /var/www/html/ file_server basicauth / { example_user HASHED PASSWORD } }Test the Caddy configuration for errors
$ caddy validateReload the Caddy configuration to save changes
$ sudo caddy reloadVisit your Server IP and verify that access to your hosted web application is restricted with a username and password
http://SERVER-IP
Configure the Caddy Web Server
To set up Caddy web server configurations, you can either modify the main configuration file /etc/caddy/Caddyfile or create a new configuration in any location. When using configurations in locations outside the /etc/caddy/ directory, you must specify the configuration file path to successfully include it in your web server runtime process.
Below is the Caddy configuration file structure format:
[host or port number] {

                [directive] [argument]

}

[host or port number] {

                [directive] [argument] {

                        [sub directive] [argument]

                }
}
Configure the Caddy web server with new configurations to serve web applications on your server as described in the sections below.
Set Up Virtual Hosts (Web Application configurations)
In this section, create a new virtual host configuration for the hostname example.com that points to the /var/www/html directory. Within the directory, set up a basic HTML application
Create the
/var/www/htmlweb files directory if it does not exist$ sudo mkdir /var/www/html/Create a new
index.htmlfile in the directory$ sudo touch /var/www/html/index.htmlEdit the file
$ sudo nano /var/www/html/index.htmlAdd the following HTML code to the file
 <html>
 <head>
     <title>Example Web Application on a Vultr Cloud Server</title>
 </head>
 <body>
     <h1>Hello World!</h1>
 </body>
 </html>
Save and close the file.
The above HTML file prints a
Hello World!heading 1 prompt when loaded in a web browser.Navigate to the main Caddy configurations directory
$ cd /etc/caddy/List available files and verify that the
Caddyfileis available$ lsOutput:
CaddyfileBack up the default Caddyfile configuration
$ mv Caddyfile Def.CaddyfileCreate a new Caddyfile configuration file
$ touch CaddyfileEdit the file
$ nano CaddyfileAdd the following contents to the file
 example.com {
     root * /var/www/html/
     file_server
     encode gzip
     log {
         output file /var/log/caddy/example.log
     }
 }
Save and close the file.
Below is what the above configuration does:
- Creates a new
example.comvirtual host entry that points to the/var/www/htmldirectory - The Caddy configuration serves any available files in the directory starting with
indexprefix files - To define a custom file to serve when the domain is accessed, include it in the
rootdirective value. For example/var/www/html/site.html encode gzip: Turns on Gzip compression to serve web files fasterlog { }: Defines the Caddy log file to add all virtual host entries
- Creates a new
Test the Caddy configuration for errors
$ caddy validateWhen successful, your output should look like the one below:
 2023/10/05 01:41:02.118 INFO    using adjacent Caddyfile
 2023/10/05 01:41:02.119 INFO    using provided configuration    {"config_file": "Caddyfile", "config_adapter": ""}
 2023/10/05 01:41:02.121 INFO    tls.cache.maintenance   started background certificate maintenance      {"cache": "0xc0003c8180"}
 2023/10/05 01:41:02.121 INFO    tls.cache.maintenance   stopped background certificate maintenance      {"cache": "0xc0003c8180"}
 Valid configuration
Reload Caddy to apply changes
$ caddy reloadUsing a web browser such as Safari, visit your domain name and verify that a
Hello world!heading displays on your web pagehttps://example.com
Enable Dynamic PHP Applications Using Caddy
PHP is a popular server side language used to build modern applications such as Content Management Systems like WordPress, Joomla, Ghost, among others. Configure Caddy to accept PHP requests as described in the steps below.
Install PHP and PHP-FPM if not installed on your server
$ sudo apt install php php-fpm -yOR
$ sudo dnf install php php-fpm -yVerify the installed PHP version
$ php -vOutput:
 PHP 8.1.12-1ubuntu4.3 (cli) (built: Aug 17 2023 17:37:48) (NTS)
 Copyright (c) The PHP Group
 Zend Engine v4.1.12, Copyright (c) Zend Technologies
     with Zend OPcache v8.1.12-1ubuntu4.3, Copyright (c), by Zend Technologies
Verify the PHP-FPM service status based on the installed version
$ sudo systemctl status php8.1-fpmOutput:
 ● php8.1-fpm.service - The PHP 8.1 FastCGI Process Manager
     Loaded: loaded (/lib/systemd/system/php8.1-fpm.service; enabled; preset: enabled)
     Active: active (running) since Mon 2023-10-09 01:48:18 UTC; 7min ago
       Docs: man:php-fpm8.1(8)
     Process: 56156 ExecStartPost=/usr/lib/php/php-fpm-socket-helper install /run/php/php-fpm.sock /etc/php/8.1/fpm/pool.d/www.conf 81>
   Main PID: 56153 (php-fpm8.1)
     Status: "Processes active: 0, idle: 2, Requests: 0, slow: 0, Traffic: 0req/sec"
       Tasks: 3 (limit: 987)
     Memory: 7.2M
Edit your Caddy configuration file
$ sudo nano /etc/caddy/CaddyfileModify your Virtual host configuration to include the
php fast-cgidirective with the PHP-FPM socket as an argumentexample.com { root * /var/www/html/ php_fastcgi unix//run/php/php8.1-fpm.sock encode gzip }Save and close the file.
Test the Caddy configuration for errors
$ caddy validateReload Caddy to save changes
$ caddy reloadCreate a new file
test.phpin your web files directory$ sudo nano /var/www/html/test.phpAdd the following PHP code to the file
 <?php

 echo "<h1> Hello World! </h1>"

 ?>
Save and close the file
The above PHP code prints a
Hello World!prompt when you access the configured domain name.In your web browser session, append
/test.phpto your domain URLhttps://example.com/test.phpVerify that a
Hello World!heading displays in your browser tab
Set Up Caddy as a Reverse Proxy
When running backend applications that have special custom ports such as 8080, use Caddy to act as a reverse proxy and forward incoming connections to the application. Caddy accepts incoming HTTP and HTTPS connection requests, then, forwards them to the configured application port. In this section, create a new virtual host configuration that sends a connection request to the Nginx Docker container.
Install Docker on your server if it’s not already installed
$ sudo apt install docker.ioDeploy a new application using the
Nginxdocker image that runs on the host port8080$ sudo docker run -d -p 8080:80 nginxVerify that the application is running
$ sudo docker psUsing Curl, verify that the application accepts connections on the host port
8080$ curl 127.0.0.1:8080Edit your Caddy configuration file
$ sudo nano /etc/caddy/CaddyfileAdd a new localhost HTTP virtual host configuration block with the
reverse_proxydirective:80 { reverse_proxy localhost:8080 }Save and close the file
The above
reverse_proxydirective redirects forwards all requests from the HTTP port80to the backend application port8080Test the Caddy configuration for errors
$ caddy validateReload Caddy to save changes
$ caddy reloadIn your web browser, open a new tab and visit your Server IP Address to verify that the backend application handles the request
http://SERVER-IP
By using Caddy as a reverse proxy, you can protect applications from most security attacks. In addition, for applications that don’t run directly using HTTPS, when configured with Caddy, all responses are served to the user over HTTPS, but requests are forwarded to the backend application over HTTP.
Set Up Custom Caddy Configuration Files
Caddyfile is the default Caddy configuration file naming scheme. However, you can use any naming scheme and in any location on your server depending on your needs. It’s not mandatory to store Caddy configurations in the /etc/caddy directory, and so, this allows you to keep custom configurations with different naming schemes and directories. Implement custom Caddy configuration files for a new virtual host domain caddy.example.com as described below.
- Create a new Subdomain A record pointing to your Server IP Address
Create a new virtual host files directory such as
/var/www/caddy.example.com/$ sudo mkdir /var/www/caddy.example.com/Create a new subdirectory
webappwithin the directory$ sudo mkdir /var/www/caddy.example.com/webapp/Create a new
index.htmlfile in thewebappdirectory$ sudo touch /var/www/caddy.example.com/webapp/index.htmlEdit the file
$ sudo nano /var/www/caddy.example.com/webapp/index.htmlAdd the following HTML code to the file
 <html>
 <head>
     <title>Example Web Application on a Vultr Cloud Server</title>
 </head>
 <body>
     <h1>Hello World!</h1>
 </body>
 </html>
Save and close the file
Create a new
configssubdirectory within the parent directory$ sudo mkdir /var/www/caddy.example.com/configs/Create a new
siteconfigurationfile in theconfigsdirectory$ sudo touch /var/www/caddy.example.com/configs/siteconfigurationEdit the
siteconfigurationfile$ sudo nano /var/www/caddy.example.com/configs/siteconfigurationAdd the following Caddy configurations to the file to define a new virtual host
 caddy.example.com {
     root * /var/www/html/
     file_server
 }
Save and close the file
The above configuration creates a new virtual host that points to the
/var/www/caddy.example.com/webapp directory and loads theindex.htmlfileTest the configuration file for errors
$ caddy validate -f /var/www/caddy.example.com/configs/siteconfigurationUsing Caddy, run the configuration file
$ sudo caddy run -config /var/www/caddy.example.com/configs/siteconfigurationReload Caddy to save changes
$ caddy reloadIn your web browser, open a new tab and visit your new subdomain to test the Caddy configuration process
https://caddy.example.comVerify that your web application displays correctly and the request is served over HTTPS
Caddy File Permissions
Depending on your directory configurations, the Caddy web server may fail to read web application files. To solve permission errors, verify that the following Caddy user or group has read permissions to the directory:
- User:
caddy - Group:
caddy
Implement the correct Caddy permissions on your virtual host web files directory as described below.
Long list the
/var/www/html/directory and verify the listed permissions$ ls -l /var/www/html/Output:
 total 12
 -rw-r--r-- 1 root root 10671 Oct  5 01:48 index.html
 -rw-r--r-- 1 root root 10671 Oct  5 01:48 test.php
Grant the Caddy group ownership permissions to the directory
$ sudo chown -R :caddy /var/www/htmlGrant the Caddy group users read and execute privileges to the directory
$ sudo chmod -R 755 /var/www/htmlLong list the directory to view the updated permissions
$ ls -l /var/www/html/Output:
 total 12
 -rwxr-xr-x 1 root caddy 10671 Oct  9 01:48 index.html
 -rwxr-xr-x 1 root caddy 10671 Oct  9 01:48 test.php
As listed in the above output, the Caddy group has read privileges to the file. This grants the web server read access to all directory files.
Test
View the Caddy web server status and verify that it’s running
$ sudo systemctl status caddyView your Caddyfile configuration and verify the configured virtual host directives
$ cat /etc/caddy/CaddyfileOutput:
 example.com {
     root * /var/www/html/
     file_server
 }
As listed in the above output, the domain
example.comloads files from your/var/www/htmlweb files directory.In your web browser session, visit your configured domain and verify that your web application loads correctly
https://example.com
Troubleshoot
Caddy requires the correct file and directory permissions to serve files on your server. However, you may also encounter Caddy configuration errors that may arise from port conflicts or file errors. In any case, fix the following common Caddy errors as described below.
If you encounter the following Caddy file formatting error:
 2023/10/15 04:01:31.709 INFO    using adjacent Caddyfile
 2023/10/15 04:01:31.711 WARN    Caddyfile input is not formatted; run 'caddy fmt --overwrite' to fix inconsistencies    {"adapter": "caddyfile", "file": "Caddyfile", "line": 1}
* Format the Caddy configuration and overwrite any misconfigured values that could result from excessive space in the directives
$ sudo caddy fmt --overwrite* Validate the Caddy configuration file
$ caddy validateIf Caddy is unable to serve your website files
Verify the file permissions on your web files directory. For example
/var/www/html/$ ls -l /var/www/htmlGrant the
Caddygroup ownership permissions to the directory$ sudo chown -R :caddy /var/www/htmlEnable group
readandexecuteprivileges on the directory$ sudo chmod -R 755 /var/www/htmlTest access to your website or Server IP to verify that Caddy correctly serves the website files
https://example.com
If the Caddy Service status returns the following error:
 Job for caddy.service failed because the control process exited with error code.
 See "systemctl status caddy.service" and "journalctl -xeu caddy.service" for details.
* Using a monitoring tool such as
lsof, view the application listening on the HTTP port80$ sudo lsof -i :80 Output: COMMAND PID USER FD TYPE DEVICE SIZE/OFF NODE NAME nginx 130258 nginx 7u IPv6 1120841 0t0 TCP *:http (LISTEN)* In the above output, the application
nginxis using the HTTP port80which is also required by Caddy. Stop the application$ sudo systemctl stop nginx* Restart Caddy to use the free HTTP port
80$ sudo systemctl restart caddy* Verify the Caddy service status
     $ sudo systemctl status caddy

 Output:

     ● caddy.service - Caddy
          Loaded: loaded (/lib/systemd/system/caddy.service; enabled; preset: enabled)
          Active: active (running) since Sun 2023-10-15 04:02:35 UTC; 43min ago
           Docs: https://caddyserver.com/docs/
        Main PID: 130258 (caddy)
Conclusion
You have installed and configured Caddy to serve both static and dynamic web applications on your server. By using Caddy, you don’t need to manually manage SSL certificates as Caddy automatically generates and renews your linked domain name certificates. In addition, you can add multiple virtual host entries in your Caddy configuration file to host different web applications. For more information and Caddy configuration options, visit the official documentation.
Next Steps
To install and run more web applications on your Vultr Cloud Server, visit the following resources:
No comments yet.