Introduction
UpdraftPlus, a popular backup system for WordPress, supports S3-Compatible remote storage. This guide explains how to configure UpdraftPlus for Vultr Object Storage.
1. Create Object Storage
If you don't have a Vultr Object Storage subscription, you'll need to create one.
- Select the Objects menu at the top of the Vultr customer portal.
- Navigate to the object storage subscription listing.
- Use the Add Object Storage form to create a new Object Storage subscription. You can choose a different location from your web server if you prefer.
- Select your subscription from the subscription listing.
- Click the Buckets tab.
- Click the Create Bucket button to add a new bucket.
For this guide, we created a bucket named updraftplus-example.
2. Install UpdraftPlus
If you don't have a WordPress site, deploy a new Vultr One-Click WordPress app, then install UpdraftPlus:
- On the left menu, click Plugins > Add New.
- Search for UpdraftPlus.
- Install UpdraftPlus WordPress Backup Plugin.
- Click Activate.
3. Configure Object Storage
On the left menu, click Settings > UpdraftPlus Backups.
Click the Settings tab.
In the Choose your remote storage section, click S3-Compatible (Generic).
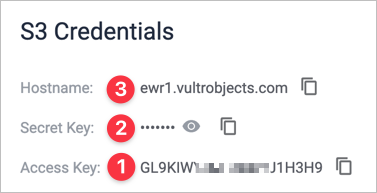
In another browser window, look up your Object Storage credentials:

Enter the information as shown in the UpdraftPlus S3 Configuration:

- Vultr: Access Key -> UpdraftPlus: S3 access key
- Vultr: Secret Key -> UpdraftPlus: S3 secret key
- Vultr: Hostname -> UpdraftPlus: S3 end-point
- Enter the Vultr Bucket Name from the bucket name tab in UpdraftPlus S3 Location
Click the Test S3 Settings button.

4. Configure Backups
Now that your storage location is configured, set up your backup schedule. For more details, see the UpdraftPlus instructions to back up WordPress and the UpdraftPlus FAQ.
No comments yet.