
How to Serve WordPress Assets using Vultr Object Storage
Introduction
WordPress site speed is a very important factor when making improvements to your general user experience and search engine discovery rankings. Among the critical factors that make up your general site speed, WordPress asset delivery takes a top spot with a guarantee on how fast users download images, logos, videos, and other files on the website.
By leveraging S3 compatible storage such as Vultr Object Storage, file bandwidth requirements are offloaded from your server and shifted to your buckets. With this functionality, WordPress database calls are quicker, and any local files are delivered to the user faster while lazy loading external assets from your object storage.
Advantages of using S3 Compatible Storage for WordPress Assets Delivery
- Improved site speed speeds and user experience.
- Improved Caching with S3 compatible plugins such as
W3 Total Cache,WP Super Cache, among others. - Faster file delivery, in case of downloads, files are downloaded directly from the Vultr Object Storage instead of your WordPress server.
- Distributed bandwidth, making it faster to scale your WordPress site in cases of high traffic, and improve server response times.
- Improved backup and recovery options in case of site crashes.
- Faster file uploads as files are transferred to Object Storage instead of the WordPress server that usually performs directory structuring operations.
- Direct file sharing. By default, WordPress serves assets with a
wp-content/XX/fileprefix. When using Object Storage, you can share direct links to a file with a clear file extension on the URL likehttps://xx.vultrobjects.com/wordpress-media/2023/07/media_card_1200x630.png.
This article explains how to serve WordPress Assets using Vultr Object Storage. You will upload media files using the WordPress library directly to the Object Storage Bucket without saving a copy of the files on the actual server to save space.
Prerequisites
Before you begin:
Deploy a Vultr Object Storage Instance.
Deploy a WordPress server using the Vultr Marketplace App.
If you have an existing WordPress website, skip the deployment, and only create a Vultr Object Instance to your account. Make sure you backup your site before following the steps in this article. The Vultr OneClick WordPress application deploys a Ubuntu server, with production-ready Nginx web server configurations. Complete the set up by configuring your domain name correctly to start using WordPress.
Set up your domain name A record to point to the WordPress server.
To avoid any downtime, prepare your WordPress Server configurations before setting up the domain name.
Using SSH, access the server as
root, and create a non-root sudo user.Switch to the non-root user account:
# su example-userMake a full backup of your WordPress site (WordPress core, theme files, and the database)
Set up Vultr Object Storage
Log in to the Vultr Console.
On the Products page, navigate to the Storage-Block/Object page.
Navigate to Object Storage, and click your object storage instance to manage it.
On the Instance management page, find the S3 Credentials section, copy the Hostname,Secret Key, and Access Key to a secure location on your computer.
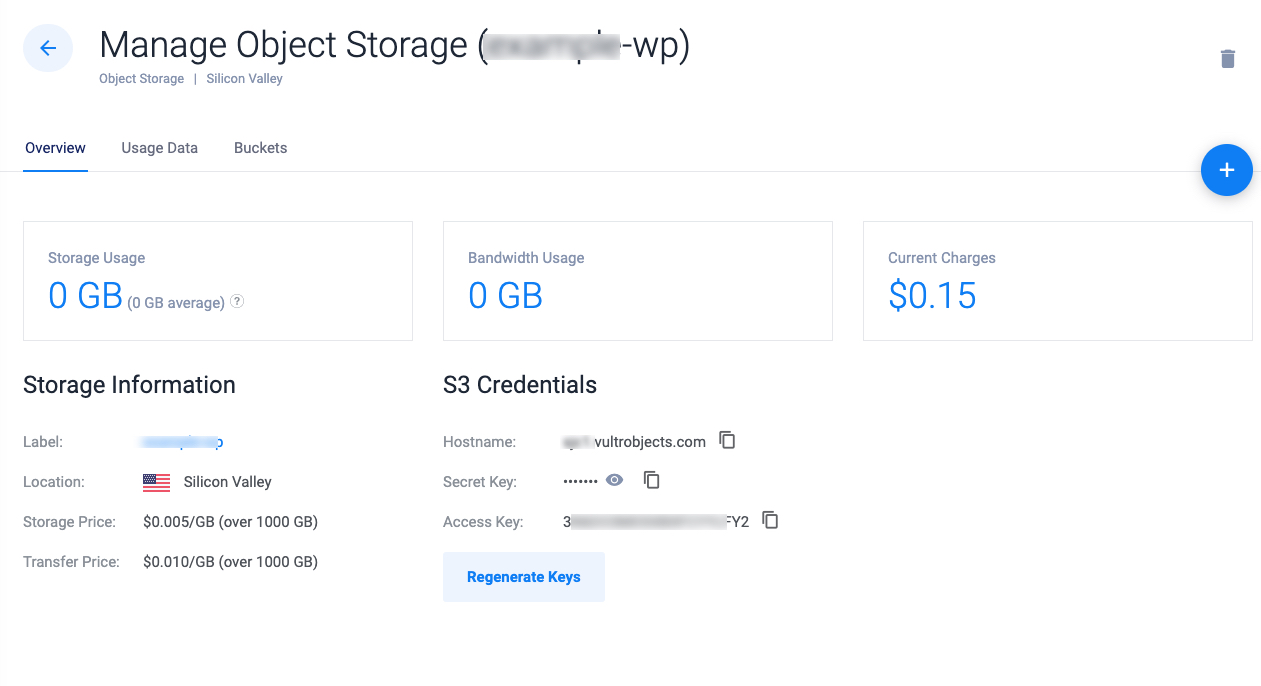
Navigate to Buckets, and click Create Bucket to set up a storage container for your files.
In the Create Bucket pop-up, enter a name for your bucket. For example wordpress-media”.

When created, click the new bucket to access the file manager, and verify that no file exists.
Configure WordPress to use Object Storage
To use Object Storage, WordPress requires a compatible plugin that handles the upload, and file transfer process. When integrated with Vultr Object Storage, WordPress uploads all new media files to the destination bucket, also old media files are offloaded from the server if you integrate premium plugin versions. In this section, use the Media Cloud plugin and configure WordPress to use your Vultr Object Storage bucket as described below.
In a web browser, such as Firefox, Log in to your WordPress administrator dashboard.
https://example.com/wp-adminLog in as an administrative user with full privileges to the website.
On the main navigation menu, navigate to Plugins, and click Add New.
Enter
Media Cloudin theSearch Pluginsfield, and press enter to start a new search.In the search results, find the
Media Cloudplugin, and click the Install Now button to add it to your WordPress site.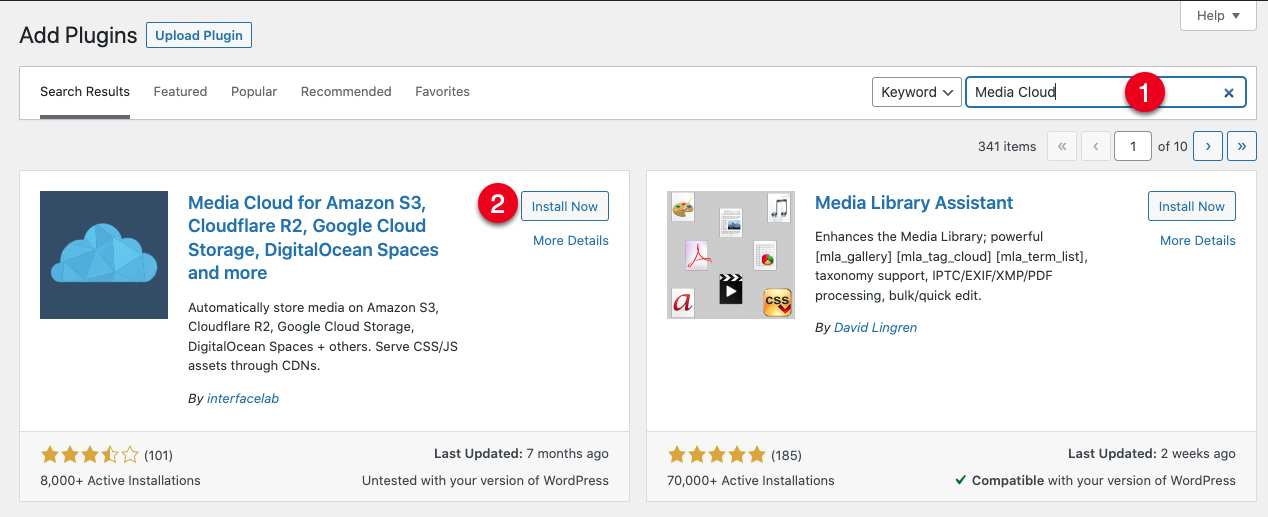
Click Activate to enable the plugin.
When activated, you are redirected to the Media Cloud setup page. Click Skip to disable product email notifications.
On the Welcome to Media Cloud splash screen, click Next to select your S3 storage provider.
Click S3 Compatible to open the setup page.
Click Next to navigate to the Cloud Storage Settings page.
Enter your Vultr Object Storage Access Key, and Secret Key in the respective fields.
Enter the Bucket name you created earlier, and keep the Region setting to
Automatic.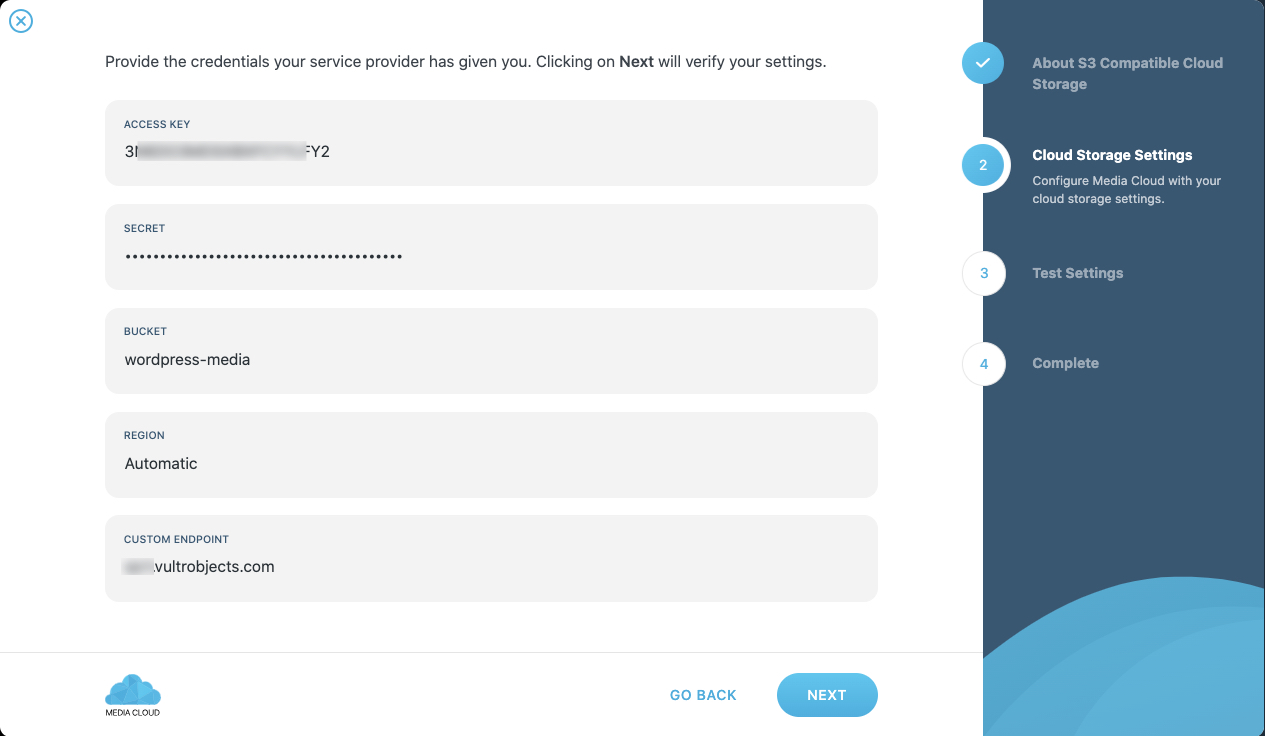
In the Public Endpoint field, fill in your Vultr Object Storage Hostname.
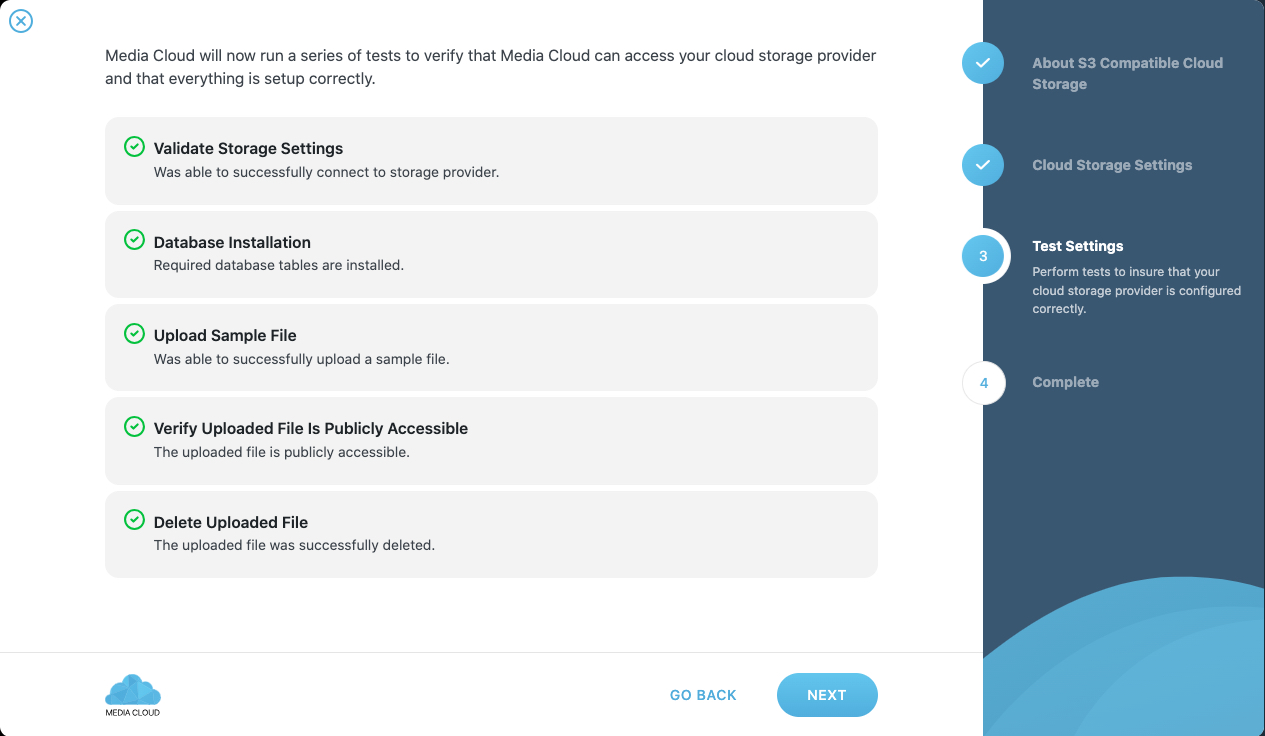
Click Next to verify your connection details and test that your WordPress site can write to your Vultr Object Storage bucket.
Click Start Tests, and verify that all results are successful.
Click Next to save changes and complete the setup process.
Click Finish & Exit Wizard to close the configuration wizard and redirect to the main plugin dashboard.
Within the Cloud Storage section, verify that the Enable Cloud Storage button is set to ON.
Click the Quick Jump options, and navigate to the Deleting Files section.
Toggle the Delete Uploaded Files button to ON. This enables the auto-deletion of all uploaded files from your WordPress server and stores them to your Vultr Object Storage bucket.
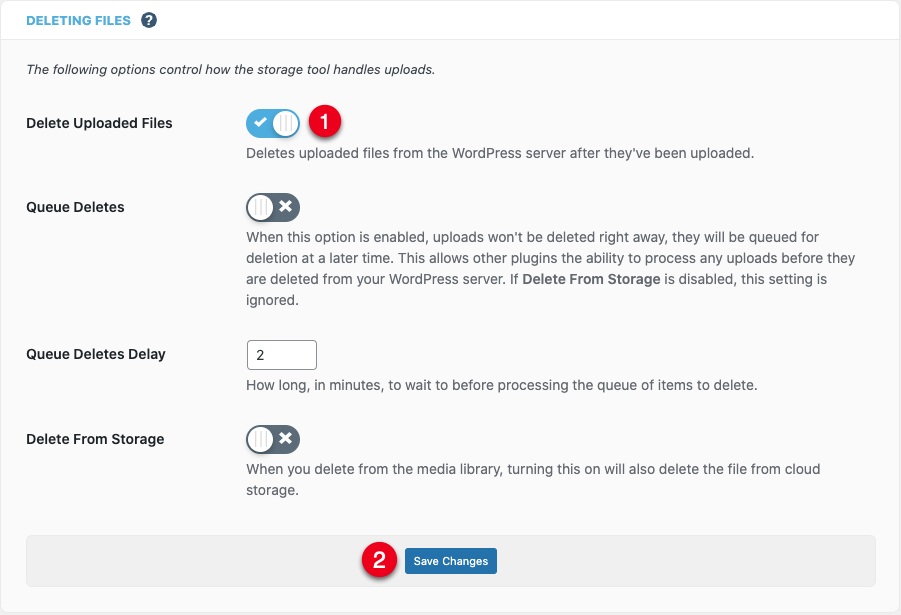
Keep the rest of the file deletion options turned OFF, and click Save Changes to apply your new settings.
Test and Serve WordPress Assets using Vultr Object Storage
To test that your WordPress Assets correctly transfer to your Vultr Object Storage bucket. Upload new media files to the library, and verify that the file storage path is external, and no files are stored on the server as described in this section.
On the main WordPress navigation menu, click Media to open the Media Library.
Click Add New to reveal the file uploads helper.
Click Select Files to browse files from your computer and upload them to your WordPress site.
Monitor your file upload progress, and verify that it completes successfully.
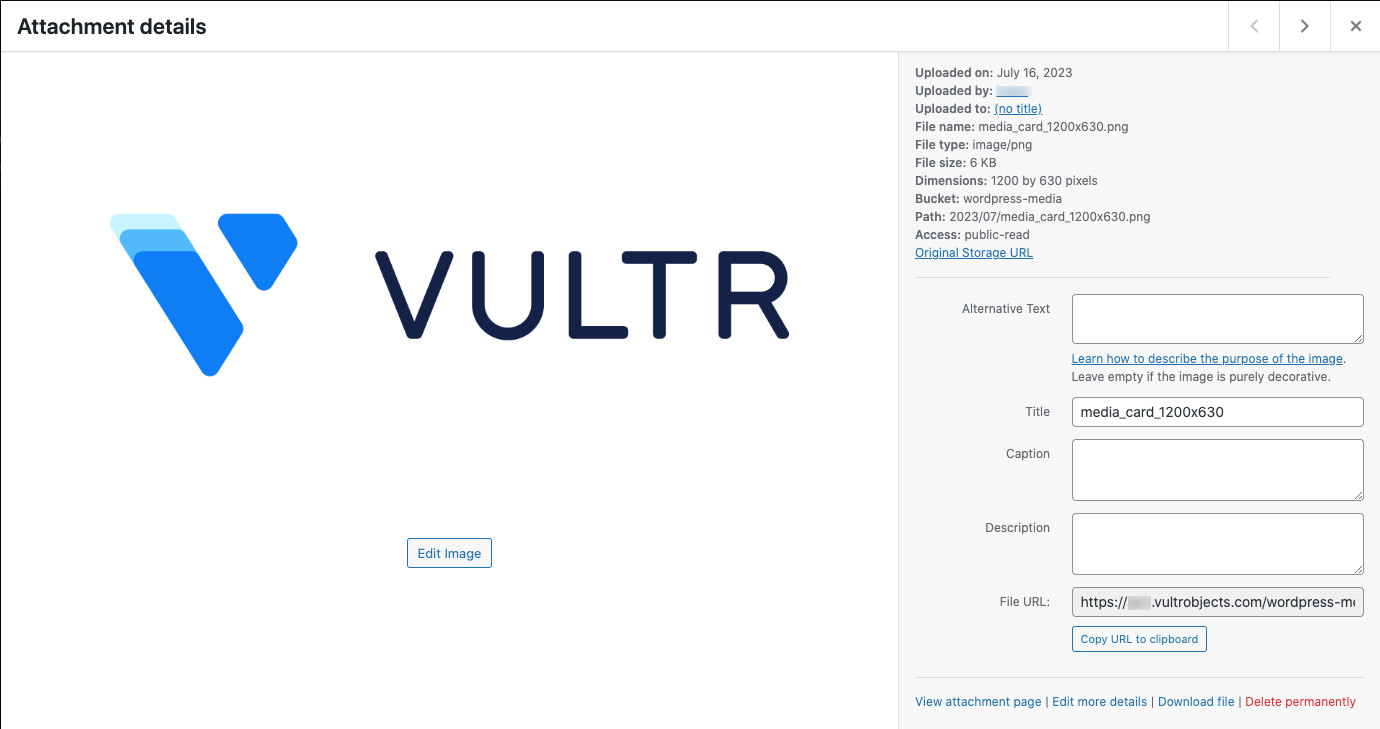
When your file is added to the WordPress media library, click to open the file attachment details, and verify the File URL is set to your Vultr Object Storage path, and the Bucket field correctly points to your target bucket.
Add the file to your WordPress pages or blog post, and verify that site visitors can access the files by previewing your pages.
Upload more files to your Object Storage bucket through the media library and start using them on your website.
To verify that all new WordPress files are added to your target bucket. Access your Vultr Object Storage dashboard, navigate to buckets, and check that new data is added to the
wordpress-mediabucket you created earlier.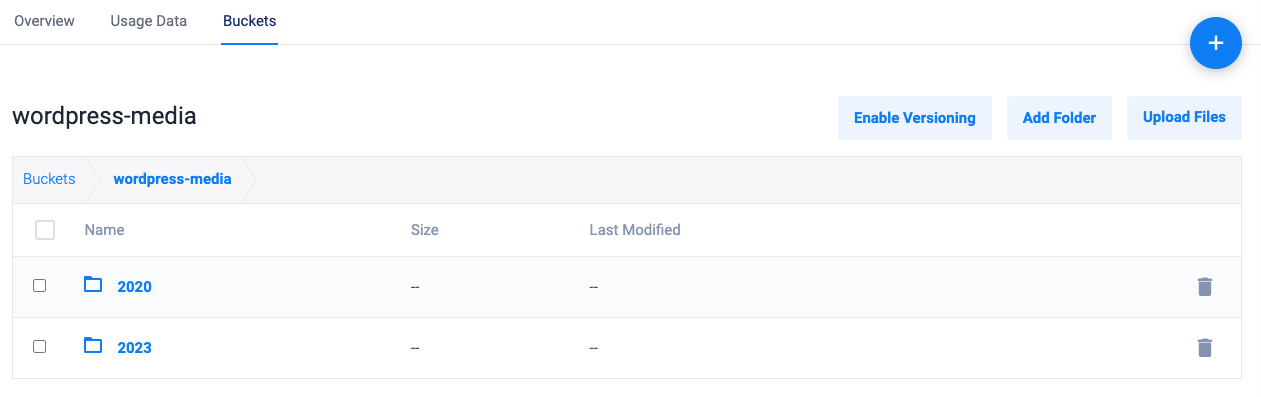
Continuously uploading files to your Object Storage bucket will free your WordPress server space and improve the general site speed.
Troubleshooting
When configuring WordPress to use Object Storage, you may encounter errors based on your server configurations. Below are fixes to the most common errors:
Error transferring images from WordPress to Object Storage.
Verify that you applied the correct Vultr Object Storage values in your Media Cloud settings. To update your Object Storage details, navigate to
Media Cloud > Cloud Storage > Provider Settings.Verify that the target Object Storage bucket exists. Your Object Storage could be running without an existing bucket, the Media Cloud plugin does not create any buckets apart from adding WordPress files to an existing file container.
Check your WordPress firewall rules (if any), and verify that the Media Cloud plugin has full access to the website. When using a plugin like
Wordfence, whitelist the plugin actions to enable all file transfers to your Object Storage bucket.Media Cloud error: There was a problem with your settings. Please double check entries for potential mistakes.”
Check your Vultr Object Storage values, and make sure the
access key,secret key, andhostnamedetails are the same as those displayed in your Vultr Object Storage instance dashboard.503 Service Unavailable:
Check your web server logs to know the source of the error. Usually, the
/var/log/directory stores most application error logs.Verify that your WordPress server has enough runtime resources. If you are storing images on both the Object Storage bucket, and the WordPress server, migrate all images to Object Storage to free space on your server.
Conclusion
You have configured WordPress to serve external assets using Vultr Object Storage. By serving assets from an external location, server resources are redirected to other services such as Database calls, and script handling which improves your general WordPress site response time.
Next Steps
Visit the following resources to further improve your WordPress site performance and maximize the CMS capabilities. You can enable more services such as caching, perform regular backups, and enhance site security to fine tune your production WordPress server depending on your needs.
- How to Migrate WordPress to Vultr.
- How to Back Up WordPress to Vultr Object Storage with UpdraftPlus.
- How to install WordPress on a Subdomain with Nginx.