
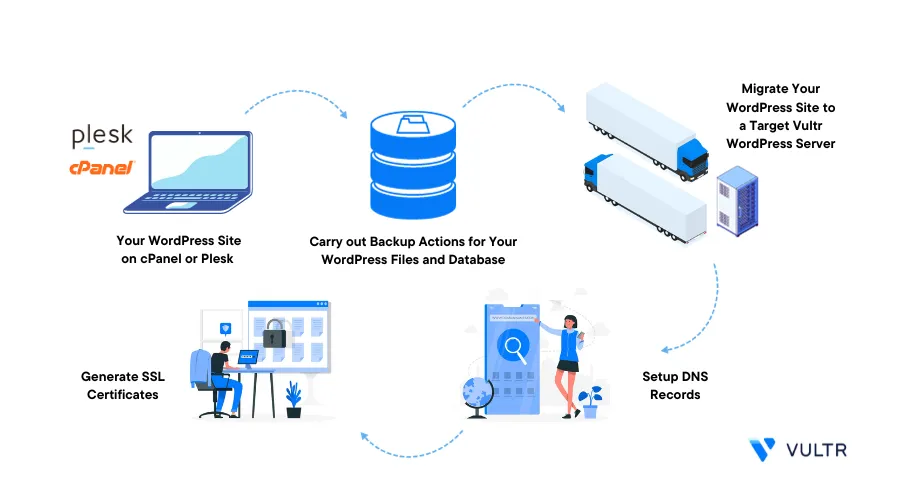
How to Migrate Your WordPress from cPanel or Plesk to Vultr
Introduction
WordPress migration is an important task that allows you to shift from one provider to another. Usually, when you experience site performance issues linked to underlying infrastructure performance, migrating your site to a new host can improve your general site reliability and ranking.
In a shared hosting environment, cPanel and Plesk are two of the most popular control panels that offer a graphical web interface that allows you to manage your server features and functions. Among the key advantages to consider when migrating from cPanel or Plesk to Vultr include the following:
- Improved site reliability and uptime
- Clear bandwidth usage statistics
- Improved Security with optional Vultr Firewall functionalities
- Full access to your backend server
This article explains how to migrate your WordPress site from cPanel or Plesk to Vultr using a Ubuntu production server. You are to apply the FTP or SFTP to handle file transfer, and mysqldump to restore your WordPress database on the server.
Prerequisites
Before you begin, make sure you:
Deploy a OneClick WordPress server on Vultr using the Vultr Marketplace application
Or, you can deploy a cPanel or Plesk server using a OneClick application from the Vultr Marketplace to keep your graphical management environment when switching providers.
Have access to the WordPress site domain DNS records
Use SSH to access the WordPress server
Create a standard user with sudo privileges. For example
webadminSwitch to the new user account
# su webadmin
Set Up Your Vultr Server
WordPress requires a set of PHP extensions to run correctly on your server. By default, the Vultr OneClick WordPress image run all necessary extensions, a database server, and Nginx as the web server. In this section, create the WordPress MySQL database, and test your web server configuration as described in the following steps.
Verify the installed PHP version
$ php -vOutput:
 PHP 8.1.21 (cli) (built: Jul 12 2023 23:03:54) (NTS)
 Copyright (c) The PHP Group
Make sure the PHP version is
7.4and above as required by WordPressTo prepare the WordPress database. Log in to the MySQL database server as the
rootuser$ sudo mysqlIf the above command fails to run, log in with the root user password
$ sudo mysql -u root -pTo view the default Vultr server database password, run the following command
$ sudo cat /root/.db_passwordCreate a new database
mysql> CREATE DATABASE wordpressdb;Create a new database user with a strong password.
mysql> CREATE USER 'adminuser'@'localhost' IDENTIFIED BY 'YOUR STRONG PASSWORD';Grant the user administrative privileges to the database
mysql> GRANT ALL PRIVILEGES ON wordpressdb.* TO adminuser@localhostRefresh MySQL privileges
mysql> FLUSH PRIVILEGESExit the MySQL console
mysql> EXITTo set up the web server, create a new web root directory to store WordPress files
$ sudo mkdir -p /var/www/example.comSwitch to the main Nginx configuration files directory
/etc/nginx$ cd /etc/nginx/> The Vultr OneClick application uses the LEMP (Linux, Nginx, MySQL, PHP) stack. When using LAMP, switch to the Apache directory instead
Deactivate the default WordPress configuration files
$ sudo rm /etc/nginx/sites-enabled/*Create a new WordPress configuration file in the
sites-availabledirectory$ sudo touch /etc/nginx/sites-available/example.comUsing a text editor such as
nano, edit the file$ sudo nano /etc/nginx/sites-available/example.comAdd the following configurations to the file. Replace
example.comwith your actual WordPress domain nameserver { listen 80; server_name example.com www.example.com; # WordPress web root directory root /var/www/example.com; index index.php index.html index.htm; location / { try_files $uri $uri/ /index.php?$args; } # PHP Configuration location ~ \.php$ { include fastcgi_params; fastcgi_pass unix:/var/run/php/php7.4-fpm.sock; # Update the PHP-FPM socket path fastcgi_param SCRIPT_FILENAME $document_root$fastcgi_script_name; fastcgi_param SCRIPT_NAME $fastcgi_script_name; } # Set Expiry Headers location ~* \.(js|css|png|jpg|jpeg|gif|ico)$ { expires max; log_not_found off; } # Disable XML-RPC location = /xmlrpc.php { deny all; } # Enable Gzip compression gzip on; gzip_comp_level 4; gzip_types text/plain text/css application/json application/x-javascript text/xml application/xml application/xml+rss text/javascript; }Save and close the file
Activate the configuration file
$ sudo ln -s /etc/nginx/sites-available/example.com /etc/nginx/sites-enabled/Test the Nginx configuration for errors
$ sudo nginx -tWhen the web server configuration is valid, your output should look like the one below:
 nginx: the configuration file /etc/nginx/nginx.conf syntax is ok
 nginx: configuration file /etc/nginx/nginx.conf test is successful
In case the test returns any errors. Fix the indicated error to avoid breaking your web server configuration
Restart Nginx to apply your WordPress host configuration changes
$ sudo systemctl restart nginx
Migrate WordPress from cPanel to Vultr
To migrate your WordPress site from cPanel to Vultr. Verify that your cPanel account supports FTP accounts, then back up your WordPress files and database to restore them on the target Vultr WordPress server as described in the steps below.
1. Backup WordPress Files
In the Files section, click to open File Manager
Find and view your WordPress web root directory. Usually
/public_htmloryour-domain.comdepending on your account setup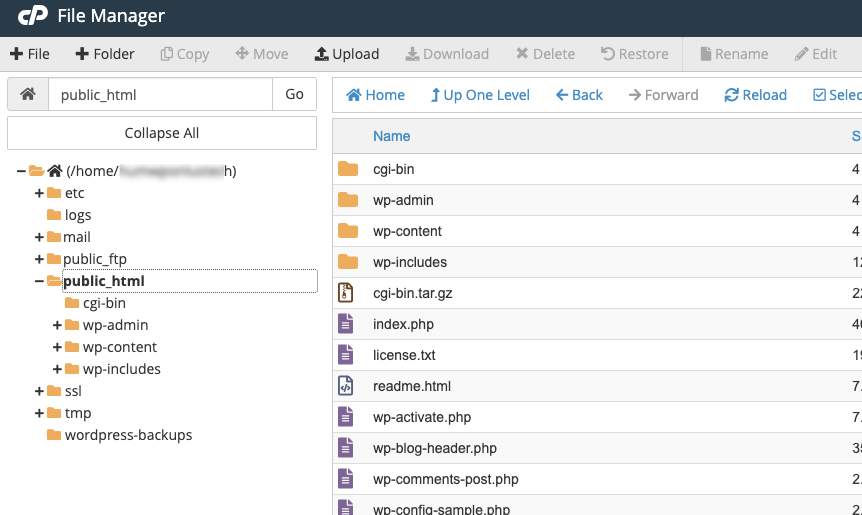
On the top bar, click Select All to start the WordPress backup process.
Click Compress to create a backup archive file.
In the Compress dialog, select your desired Compression Type. For the best results, select
GZiped Tar ArchiveVerify that all WordPress files are available on the Files to compress list
Enter a custom name to assign the backup file. For example,
backup.tar.gz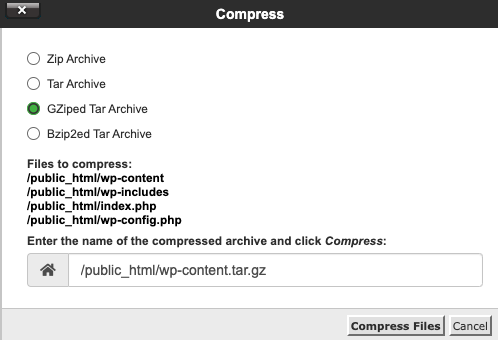
Wait for the backup process to complete, and close the Compression Results dialog
Verify that a new archive file is available in your target directory
2. Backup the WordPress Database
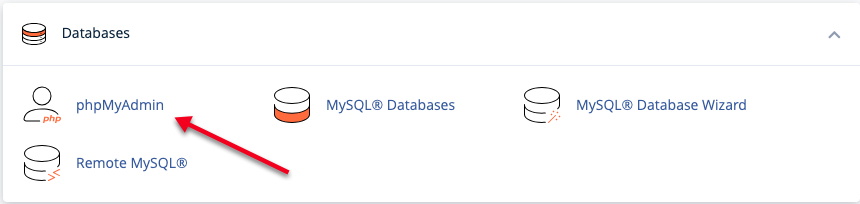
Navigate to the main cPanel dashboard
Find the Databases section, and click phpMyAdmin
Within the phpMyAdmin interface, find and click your target WordPress database on the left navigation menu
In cases where you have multiple WordPress websites, view your target site's
wp-config.phpfile and note the database nameClick Export on the main navigation bar
In the Export Method:, keep
Quick-display only the minimal optionsselected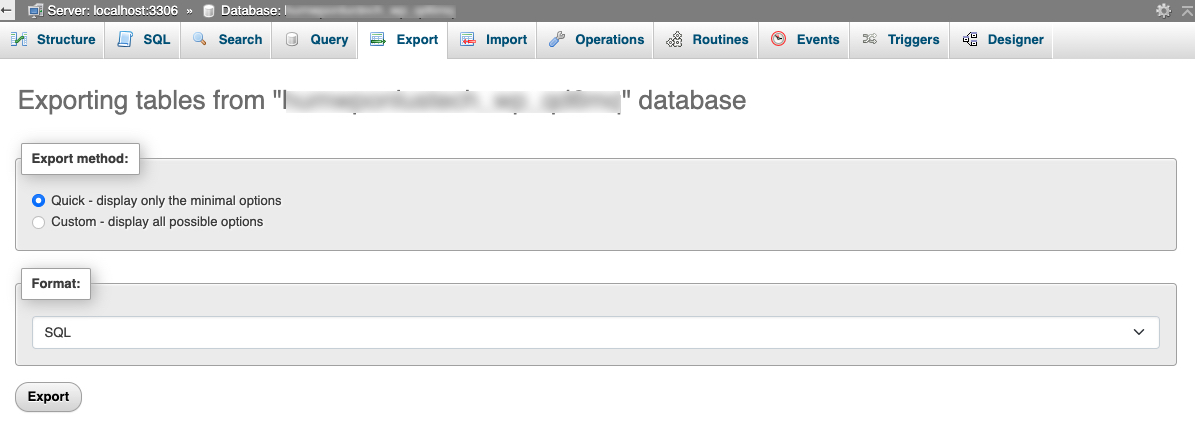
Keep
SQLas the Format:, and click Export to download the WordPress database backup to your computerWhen the download is complete, visit your downloads directory and verify that a new
.sqlfile is available on your computerTo access the database in your cPanel files, navigate to the File Manager
Switch to the WordPress files directory and upload the
database.sqlfile to the pathWhen the database upload is complete, prepare your account for transfer to the new WordPress server
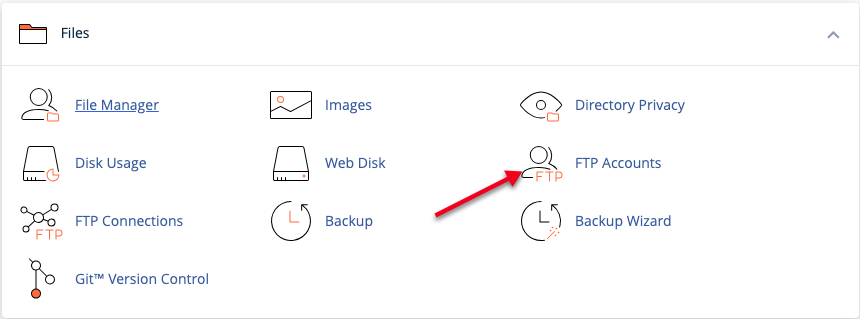
3. Prepare the cPanel File Transfer Accounts
Navigate to your main cPanel account dashboard
Find the Files section, and click FTP Accounts
Within the Add FTP Account form, enter your desired username in the Log In field. For example
wpbackupEnter a strong password in the appropriate fields
In the Directory field, replace the placeholder values with your WordPress web root directory
public_html/Keep the Quota set to unlimited
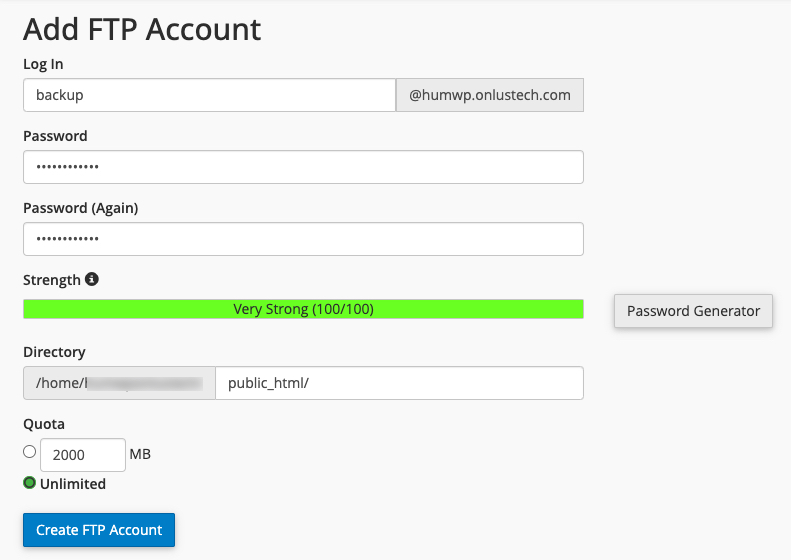
Click Create FTP Account to add the FTP Account to your server
Verify that the account gets created, and it’s listed in the FTP Accounts section
4. Transfer WordPress Backup Files from cPanel to your Vultr Server
Using SSH, access your Vultr WordPress server
$ ssh webadmin@SERVER-IPEstablish an FTP connection to your cPanel server. Replace
example.comwith your actual domain name$ ftp wpbackup@example.comList files in the directory.
> lsVerify that the
backup.tar.gzand yourdatabase.sqlfiles are available. If the user is only permitted to access/public_html, only WordPress files should display in the directory.Download the WordPress files archive file to your server
> get backup.tar.gzOutput:
 local: backup.tar.gz remote: backup.tar.gz
 200 EPRT command successful
 150 Opening BINARY mode data connection for backup.tar.gz (3236 bytes)
 100% |*********************************************************************************************************************************************|  3236        6.50 MiB/s    00:00 ETA
 226 Transfer complete
 3236 bytes received in 00:00 (16.41 KiB/s)
Download the database backup file
> get database.sqlMonitor the FTP
getprogress, and close the FTP connection when complete> exitList files and verify that all backup files are available in your working directory
$ lsExtract files from the WordPress
tar.gzarchive to your web root directory$ sudo tar -xzvf backup.tar.gz -C /var/www/example.com/When the extraction is complete, grant the web server ownership privileges to the directory
$ sudo chown -R www-data:www-data /var/www/example.comRestore the WordPress database to the MySQL database you created earlier
$ mysql -u adminuser -p wordpressdb < database.sqlWhen the restoration completes without errors, Log in to the MySQL database server
$ mysql -u adminuser -pSwitch to the WordPress database
mysql> USE wordpressdb;Show the database tables to verify that all WordPress tables are available
mysql> SHOW TABLES:Output:
 +----------------------------+
 | Tables_in_wordpressdb      |
 +----------------------------+
 | wp_actionscheduler_actions |
 | wp_actionscheduler_claims  |
 | wp_actionscheduler_groups  |
 | wp_actionscheduler_logs    |
 | wp_as3cf_items             |
 | wp_commentmeta             |
 | wp_comments                |
Exit the MySQL console
mysql> EXIT
You have migrated your WordPress site from cPanel to your Vultr WordPress server. Complete the migration process by setting up the correct DNS records and verify that you can access the WordPress site when DNS propagation is complete.
Migrate WordPress from Plesk to Vultr
To migrate your WordPress site from Plesk to your Vultr WordPress server. Log in to your Plesk account to access the control panel interface and carry out backup actions as described in the steps below.
1. Backup the WordPress Files
On the left navigation menu, click Files to open the File Manager
Within the File Manager interface, find and click
httpdocsor your WordPress files directory such asexample.com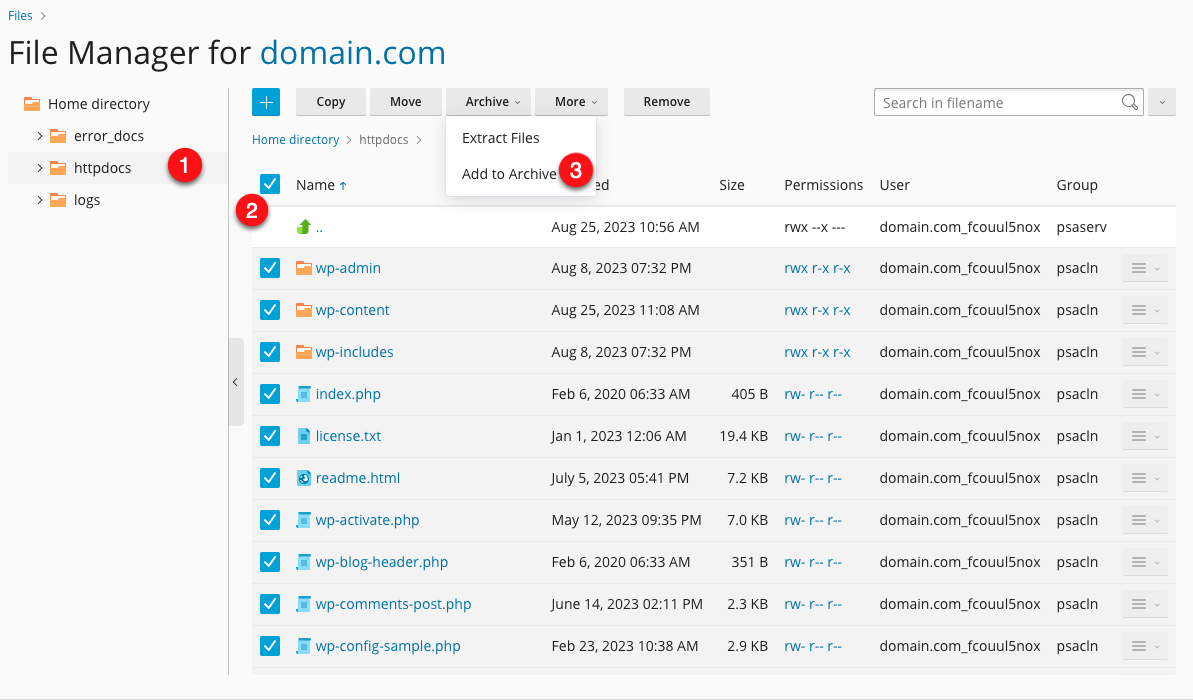
Check the Select All box next to Name to choose all WordPress files in the directory
On the top menu bar, click the Archive dropdown and select Add to Archive from the list of options
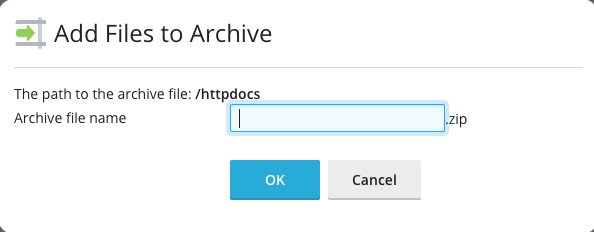
Enter your desired WordPress backup filename. For example
wpbackupClick OK and wait for the archiving process to complete
When complete, verify that a new
wpbackup.zipfile is available in yourhttpdocsdirectory
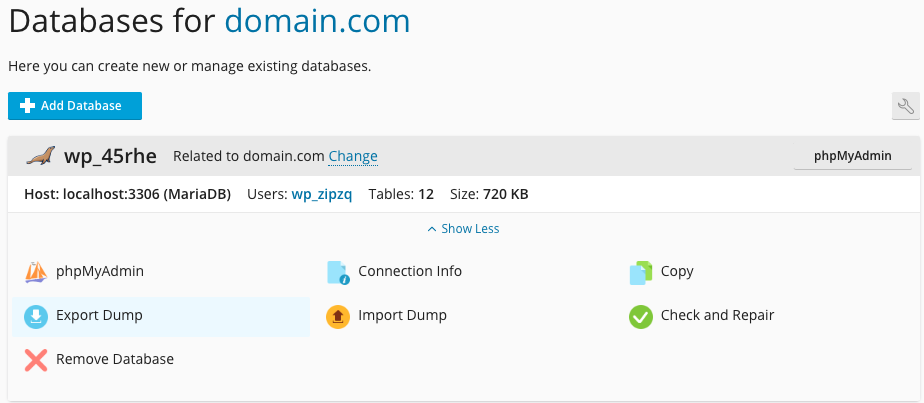
2. Backup the Full WordPress Database
Navigate to Databases on the main navigation bar
Find your target database, and click Export Dump
In the Export Dump dialog, select the
httpdocsdirectory, and enter your desired WordPress database backup filename. For examplewpdb.zip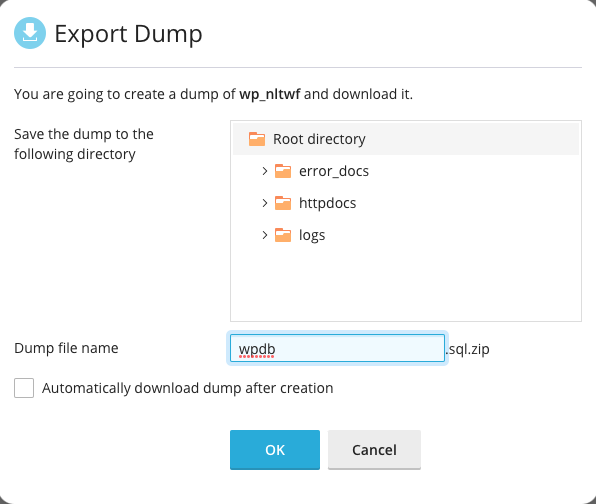
Click OK to back up your WordPress database
When complete, navigate to Files and verify that a new
.sql.zipfile is available in your target directoryhttpdocs
3. Prepare the Plesk File Transfer accounts
Navigate to Websites & Domains
Scroll and find your WordPress domain name
Within the domain section, click FTP to open the FTP Accounts page
Click Add an FTP Account, and enter your desired username in the
FTP account namefield. For examplewpbackup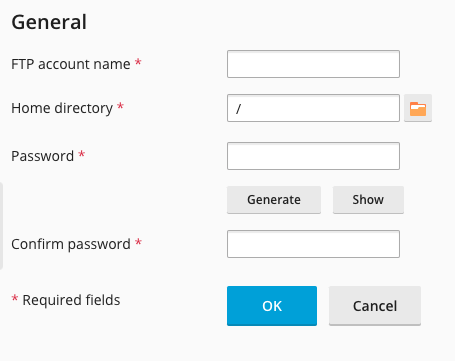
Click the Home directory and set it to
/Enter a strong password and confirm the password for your FTP account
Click OK to save changes
Verify that the new FTP account is available on the accounts page and ready to handle connections to your Vultr Server
4. Transfer WordPress files from Plesk to the Vultr WordPress server
Using SSH, access your Vultr WordPress server
$ ssh webadmin@SERVER-IPEstablish an FTP connection to your Plesk server
$ ftp wpbackup@example.comSwitch to the
httpdocsdirectory> cd httpdocsDownload the WordPress files archive file you generated earlier
> get wpbackup.zipDownload the WordPress database backup file
> get wpdb.zipVerify that the FTP download process completes without errors and exit the FTP console
> exitList files in your working directory
$ lsVerify that the WordPress files and database backup are available
Extract WordPress files from the backup archive to your web root directory
$ sudo unzip wpbackup.zip -d /var/www/example.com/When complete, grant the web server ownership permissions to the WordPress web root directory
$ sudo chown -R www-data:www-data /var/www/example.comExtract the WordPress database from the backup archive
$ unzip wpdb.zipRestore your WordPress database to the new database on your server
$ mysql -u adminuser -p wordpressdb < database.sqlWhen the restoration is complete, log in to the MySQL database server
$ mysql -u adminuser -pSwitch to the WordPress database
mysql> USE wordpressdb;View all database tables to verify that the correct WordPress structure is available
mysql> SHOW TABLES;Output:
 +----------------------------+
 | Tables_in_wordpressdb      |
 +----------------------------+
 | wp_actionscheduler_actions |
 | wp_actionscheduler_claims  |
 | wp_actionscheduler_groups  |
 | wp_actionscheduler_logs    |
 | wp_as3cf_items             |
 | wp_commentmeta             |
 | wp_comments                |
Exit the MySQL database console
mysql> EXIT
You have transferred your WordPress site files from Plesk to your Vultr Server, configure the necessary DNS records, and generate SSL certificates to redirect all user traffic and activate WordPress on the server
Configure DNS Records
Depending on your domain registrar, you do not need to change nameservers, unless hosted by the same cPanel or Plesk provider. Instead, you need to change the domain records to point to your Vultr Server which handles all client requests. In this section, configure your DNS records to point to the new WordPress server as described in the steps below.
Log in to your domain registrar such as
eNom,Namecheap,Cloudflare,GoDaddy, among othersIf your domain registrar doubles as your hosting provider, migrate your domain to another registrar such as
Cloudflareand change your nameservers to:ns1.vultr.com ns2.vultr.comTo effectively use the above Vultr nameservers, log in to the Vultr Console, and add the domain name to link to your Vultr account.
Find and click your domain name to open the DNS records
On the DNS records page, find and edit the domain A record

Change the IPV4 Address to your Vultr WordPress server's public IP Address
Wait for the DNS propagation to complete, when using Vultr DNS, changes should reflect in less than 3 hours.
If you have email accounts linked to your WordPress site, set up a mail server and change the domain MX records to point to the new server.
Generate SSL Certificates
To enable HTTPS access and redirect HTTP requests on your WordPress site, generate SSL certificates for your WordPress site domain. In this section, use the free Certbot Let’s Encrypt Client tool to request a new SSL certificate for your domain as described below.
Verify that Certbot is available on the server
$ sudo certbot --version
When unavailable, install Certbot using the Snap package manager
$ sudo snap install certbot --classicGenerate an SSL certificate for your WordPress domain name. Replace
example.com,admin@example.comwith your actual domain and active email address respectively$ sudo certbot --nginx -d example.com -m admin@example.comVerify that Certbot auto-renews your SSL certificate upon expiry
$ sudo certbot renew --dry-runWhen the command is successful, Certbot auto-renews your SSL certificate every after 90 days.
Test Your WordPress Site
Using a web browser such as Firefox, visit your WordPress site
https://example.comVerify that your site loads correctly without any errors
Log in to the WordPress administrator dashboard
https://example.com/wp-adminNavigate to Tools and select
Site Healthfrom the drop-down list.Click Info, and expand the Server drop down to view information about your WordPress server. Verify that the values change compared to your previous WordPress server details.
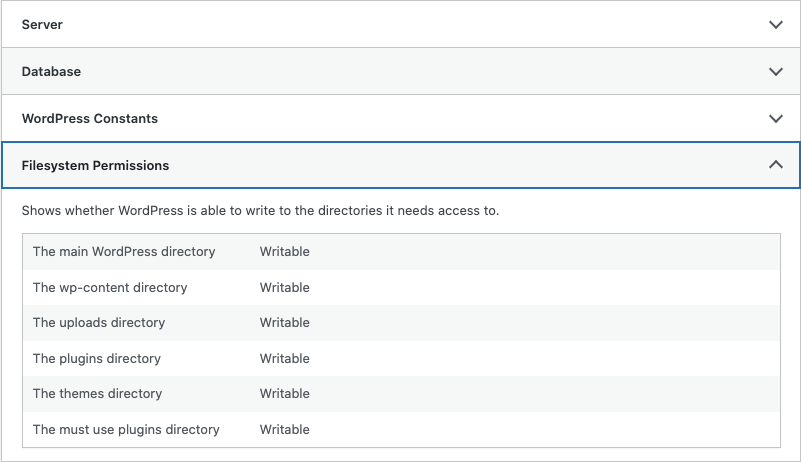
Click to expand File Permissions and verify that all directories are
writableExpand Database to view your MySQL database details. Verify that the new database and user you created earlier appear on the list
Your WordPress site is ready to use. You can safely add new posts, pages, or WooCommerce elements that load directly from your new WordPress server
Troubleshooting
The WordPress migration process should return no errors, nor should the site users detect any changes while using the site. But if in any way your WordPress site returns any error, fix it as defined in the steps below
503 Service Unavailable
View the web server logs to find the exact source of the error
$ sudo cat /var/log/nginx/error.logVerify that PHP-FPM is running correctly without any errors.
$ sudo systemctl status php-fpmVerify that the Nginx configuration returns no configuration errors
$ sudo nginx -tOutput:
 nginx: the configuration file /etc/nginx/nginx.conf syntax is ok
 nginx: configuration file /etc/nginx/nginx.conf test is successful
Verify that the Nginx web server is running correctly without any error
$ sudo systemctl status nginxOutput:
   ● nginx.service - A high-performance web server and a reverse proxy server
      Loaded: loaded (/lib/systemd/system/nginx.service; enabled; vendor preset: enabled)
      Active: active (running) since Thu 2023-07-27 13:46:34 UTC; 1 month 1 day ago
        Docs: man:nginx(8)
    Main PID: 101326 (nginx)
Error Establishing a Database Connection
Navigate to your WordPress webroot directory.
$ sudo cd /var/www/example.comView the contents of the
wp-config.phpfile and verify that they match your WordPress user and the database you created earlier$ cat wp-config.phpLog in to the MySQL database using the WordPress user in your
wp-config.phpfile$ mysql -u adminuser -pVerify that the user has access to the WordPress database
mysql> SHOW DATABASES:The WordPress database should display in your output:
Exit the MySQL console
mysql> EXITView the list of installed PHP extensions on your server, and verify that the
mysqliextension is available on the list$ php -mOutput:
 [PHP Modules]
 mbstring
 memcached
 msgpack
 mysqli
 mysqlnd
 openssl
 pcntl
Insecure Connection
Using Certbot, generate a new Let’s Encrypt SSL certificate. Replace
example.comwith your actual domain name.$ sudo certbot -d example.com -m adminuser@example.com --agree-tosVerify that the SSL certificate installs correctly to the server. If it fails, verify the DNS propagation is complete, and the ports
80, 443are open on the server firewall.View the UFW firewall table
$ sudo ufw statusAllow the HTTP and HTTPS ports if they’re missing
$ sudo ufw allow 80,443/tcpRestart the firewall to save changes
$ sudo ufw reloadTest auto-renewal to verify that the certificate renews upon expiry
$ sudo certbot renew --dry-run
404 Not Found
This error occurs when the web server does not have read privileges on your WordPress web root directory. Or, reset WordPress permalinks in the administrator dashboard to correct your post and page URLs. To grant the Nginx web server correct privileges to WordPress files, follow the steps below.
Switch to the Nginx
sites-availabledirectory.$ cd /etc/nginx/sites-available/View the WordPress virtual host configuration
$ cat example.comVerify that your WordPress host configuration file points to the correct webroot directory, and
index.phpis available on the index listroot /var/www/example.com; index index.php index.html;View the web root directory permissions
$ ls -l /var/www/example.comGrant the web server ownership permissions to the directory
$ sudo chown -R www-data:www-data /var/www/example.comRestart Nginx to apply changes
$ sudo systemctl restart nginxVisit your WordPress site and verify that it loads correctly without the error
https://example.comIf the error persists, view the Nginx
error.logto find the exact source of the error$ sudo cat /var/log/nginx/error.log
Conclusion
In this article, you migrated your WordPress site from cPanel or Plesk to a Vultr server. Depending on your source hosting environment, your website users may not notice the change while migrating your WordPress site. This means, your WordPress site must not experience any downtime. However, notable differences in the WordPress site speed, ranking, and reliability reflect when you make the change.
Next Steps
To improve your WordPress site performance and implement more solutions on the server, visit the following resources:
- How to Boost WordPress Performance with Vultr Managed Databases for Caching
- Manage your WordPress website with WP-CLI
- How to Install WordPress on a Subdomain with Nginx
- Troubleshooting WordPress Database Errors